很多时候,单纯用python脚本编译出来的代码,运行速度会比较慢,可以将部分功能改用C++实现,然后与python联合编译,速度会比较快。
这里使用pybind11库,将C++代码转换为python可以识别的代码。
pybind11 是一个轻量级的仅标头库,它在 Python 中公开C++类型,反之亦然,主要用于创建现有C++代码的 Python 绑定。它的目标和语法类似于David Abrahams的优秀Boost.Python库:通过使用编译时自省推断类型信息来最小化传统扩展模块中的样板代码。
将此库视为 Boost.Python 的小型自包含版本,剥离了与绑定生成无关的所有内容。没有注释,核心头文件只需要~4K行代码,并且依赖于Python(3.6+或PyPy)和C++标准库。由于一些新的 C++11 语言功能(特别是:元组、lambda 函数和可变参数模板),这种紧凑的实现成为可能。自创建以来,该库在许多方面都超越了Boost.Python,导致在许多常见情况下的绑定代码大大简化。
1. 获取pybind11
pybind11是 header-only的,因此不需要编译动态链接库,直接解压使用即可。
- 下载地址:pybind/pybind11 :https://github.com/pybind/pybind11
- 官方文档:Intro - pybind11 documentation :https://pybind11.readthedocs.io/en/stable/index.html
下载源码后的文件结构:
.
├── CMakeLists.txt
├── docs
├── include
├── LICENSE
├── MANIFEST.in
├── noxfile.py
├── pybind11
├── pyproject.toml
├── README.rst
├── SECURITY.md
├── setup.cfg
├── setup.py
├── tests
└── tools
可以将下载的文件直接放进工程代码子目录,也可以使用 git submodule 的方法添加子模块
git submodule add https://github.com/pybind/pybind11.git third_party/pybind11-2.11.0
cd third_party/pybind11-2.11.0/
git checkout tags/v2.11.0
2. 测试代码
randy_pybind11.cpp
#include <pybind11/pybind11.h> // pybind11 头文件和命名空间
#include <pybind11/numpy.h>
#include <omp.h>
#include <iostream>

#define STRINGIFY(x) #x
#define MACRO_STRINGIFY(x) STRINGIFY(x)

namespace py = pybind11;

int add(int i, int j)
{
    return i + j;
}

py::array_t<double> add_c(py::array_t<double> arr1, py::array_t<double> arr2) {
    py::buffer_info buf1 = arr1.request(), buf2 = arr2.request();
    if (buf1.shape != buf2.shape)
        throw std::runtime_error("Input shapes must match");
    /* No pointer is passed, so NumPy will allocate the buffer */
    auto result = py::array_t<double>(buf1);
    py::buffer_info buf3 = result.request();
    double* ptr1 = (double*)buf1.ptr,
        * ptr2 = (double*)buf2.ptr,
        * ptr3 = (double*)buf3.ptr;
#pragma omp parallel for
    for (ssize_t idx = 0; idx < buf1.size; idx++)
        ptr3[idx] = ptr1[idx] + ptr2[idx];
    return result;
}


PYBIND11_MODULE(randy_pybind11, m) {
  // 可选,说明这个模块是做什么的
  m.doc() = "Randy pybind11 example plugin";
  // def( "给python调用方法名", &实际操作的函数, "函数功能说明" ).
  // 其中函数功能说明为可选
  m.def("add", &add, "Adds two numbers");
  m.def("add_c", &add_c, "A function which adds two arrays with c type");
  m.def(
      "subtract", [](int i, int j "") { return i - j; }, R"pbdoc(
        Subtract two numbers

        Some other explanation about the subtract function.
    )pbdoc");

#ifdef VERSION_INFO
  m.attr("__version__") = MACRO_STRINGIFY(VERSION_INFO);
#else
  m.attr("__version__") = "dev";
#endif
}
PYBIND11_MODULE()宏函数将会创建函数,在Python代码import该函数时会被调用。宏函数的第一个参数为模块名称“randy_pybind11”,第二个参数“m”定义了一个py::module变量。
m.doc是python中要显示的模块信息,通过m.def绑定了2个函数“add”和"add_c",分别实现了整数相加和数组相加。
使用CMake进行编译,CMakeLists.txt如下:
cmake_minimum_required(VERSION 2.8.12)

project(randy)

add_definitions(-DVERSION_INFO)

add_subdirectory(./pybind11) // 需要将github上的pybind11源码放到与工程代码同一级目录下

# 此处模块名称randy_pybind11需要与cpp文件名称保持一致
pybind11_add_module(randy_pybind11 randy_pybind11.cpp)
编译:
mkdir build && cd build && cmake .. && make
编译完后,build目录下生成randy_pybind11.cpython-39-x86_64-linux-gnu.so库
2.1. 查看模块信息 help(randy_pybind11)
>>> import randy_pybind11
>>> help(randy_pybind11)
显示的模块信息如下:
Help on module randy_pybind11:

NAME
    randy_pybind11 - Randy pybind11 example plugin

FUNCTIONS
    add(...) method of builtins.PyCapsule instance
        add(arg0: int, arg1: int) -> int

        Adds two numbers

    add_c(...) method of builtins.PyCapsule instance
        add_c(arg0: numpy.ndarray[numpy.float64], arg1: numpy.ndarray[numpy.float64]) -> numpy.ndarray[numpy.float64]

        A function which adds two arrays with c type

    subtract(...) method of builtins.PyCapsule instance
        subtract(arg0: int, arg1: int) -> int


        Subtract two numbers

        Some other explanation about the subtract function.

VERSION
    1

FILE
    /home/qiancj/codes/test/pybind11-test/build/randy_pybind11.cpython-39-x86_64-linux-gnu.so
2.2. python 中引入编译好的so库
import sys
sys.path.append("./build")
import numpy as np
import randy_pybind11

def main():
    print("Version: ", randy_pybind11.__version__)
    assert randy_pybind11.__version__ == '1'

    dir(randy_pybind11)
    sum = randy_pybind11.add(2,13)
    print("sum: ", sum)
    sum_c = randy_pybind11.add_c(np.random.randint(60, size=(3, 4, 5)), np.ones((3, 4, 5)))
    print("sum_c: ", sum_c)
    diff = randy_pybind11.subtract(8, 4)
    print("subtract: ", diff)

if __name__ == "__main__":
    main()
运行python程序得:
Version:  1
sum:  15
sum_c:  [[[47. 38. 16. 55. 11.]
  [27. 56. 15. 56. 54.]
  [42. 46.  6. 21. 27.]
  [29. 41. 42. 13.  9.]]

 [[37. 12.  3. 56. 36.]
  [ 1. 51. 51. 31. 35.]
  [33. 22. 10. 44. 39.]
  [58. 27. 20. 14. 59.]]

 [[ 3. 46. 14. 13. 39.]
  [44. 27. 60. 51. 12.]
  [34.  8. 29. 40. 60.]
  [11.  5. 13. 38. 25.]]]

subtract:  4

Process finished with exit code 0
3. 默认参数
现在假设要绑定的函数具有默认参数,例如:
int add(int i = 1, int j = 2) {
    return i + j;
}
pybind11 不能自动提取这些默认参数,因为它们并不是函数类型信息的一部分。可以使用 arg 扩展模块使用默认值:
m.def("add", &add, "A function which adds two numbers",
      py::arg("i") = 1, py::arg("j") = 2);
4. 导出变量
要公开C++中的值,相当于使用1个静态变量,可以使用 attr 函数将其注册到模块中,如下所示。
内置类型和常规对象在指定为属性时会自动转换,并且可以使用函数 py::cast 显式转换。
PYBIND11_MODULE(sesame, m) {
    m.attr("the_answer") = 213
    py::object randy = py::cast("Randy");
    m.attr("hello") = randy;
}
Python中调用:
import sesame
sesame.the_answer
213
sesame.randy
'Randy'
5. 绑定Numpy数组
需要引入头文件<pybind11/numpy.h>,通过pybind11::array_t<T>类可以接收numpy.ndarray数组。
数组本质上是一块一维的连续内存区域,通过pybind11中的request()函数可以把数组解析成py::buffer_info结构体,buffer_info类型可以公开一个缓冲区视图,它提供对内部数据的快速直接访问。
struct buffer_info {
    void *ptr = nullptr;          // 指向基础存储的指针
    ssize_t itemsize = 0;         // 单个项目的大小(以字节为单位)
    ssize_t size = 0;             // 条目总数
    std::string format;           // 对于同类缓冲区,应将其设置为 format_descriptor<T>::format()
    ssize_t ndim = 0;             // 尺寸数,即维度
    std::vector<ssize_t> shape;   // 张量的形状(每个维度 1 个条目)
    std::vector<ssize_t> strides; // 相邻条目之间的字节数(对于每个维度)
    bool readonly = false;        // 标志,以指示是否可以将基础存储写入
}
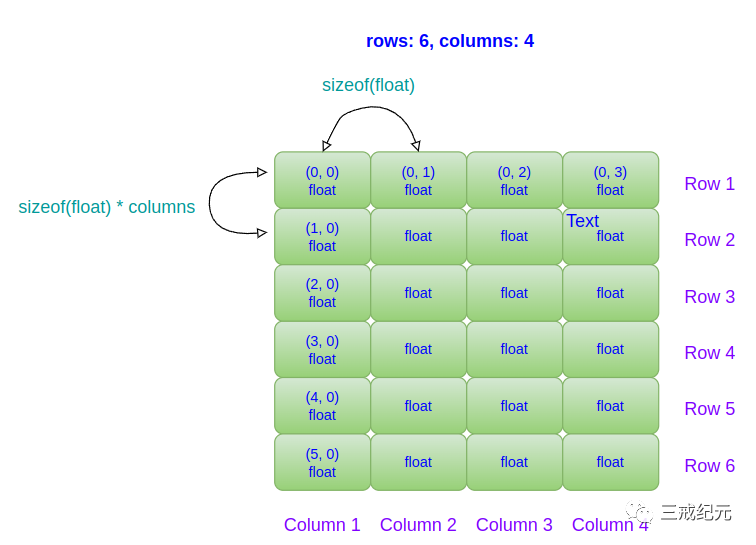
需要特别注意strides这个元素代表的是每个维度相邻元素的字节间隔,numpy和C++的数组默认都是行优先存储的
对于处于同一列相邻行的元素来说,它们在内存上相差了“sizeof(float) * columns”大小,对于同一行相邻列的两个元素,它们在内存上相差了“sizeof(float)”的大小
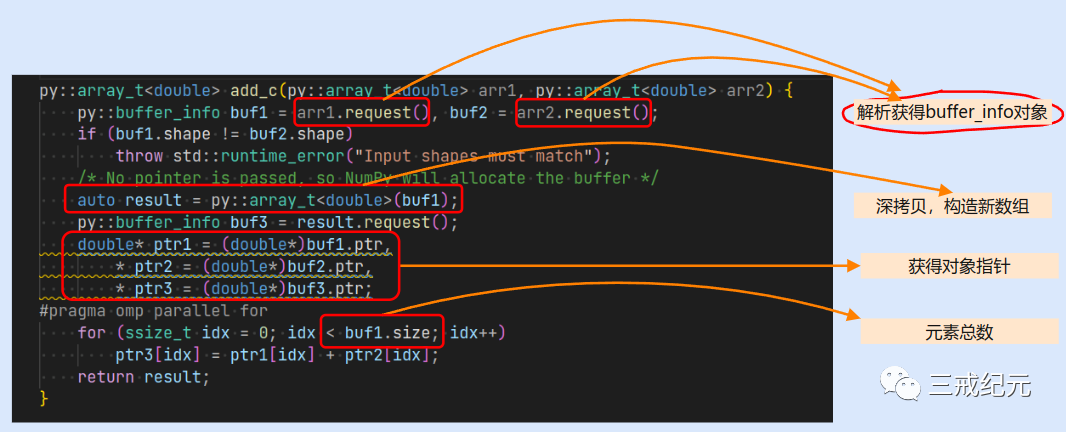
add_c重新实现数组相加,arr.request()解析获得buffer_info对象,通过py::array_t<double>(buffer_info)传入整个buffer_info可以实现深拷贝(开辟新的内存空间)重新构造一个完全相同的数组对象,也可以传入一个buffer_info.shape构造形状相同的新数组。
但是py::array_t的类函数通常比较有限(仅有访问元素\dims\shape\flag\dtype等基础功能),对标numpy中丰富的线性代数操作难以满足
获取缓冲对象元素的指针buffer.ptr就可以操作元素完成运算,buffer.size是元素的总数,不管数组是多少维度的,其底层表示均是一维数组,可以用一个循环直接遍历所有元素,实现数组元素相加。
5.1. 直接使用Numpy和Python功能
通过py::moudle::attr()就可以实现直接使用Numpy的函数功能,py::moudle::attr()可以链接到当前激活的python环境,直接调用python中相应类型的函数,需要 #include <pybind11/embed.h>。py::module::import()可以将python标准库或当前python环境中定义的对象到C++环境下共同使用,这真正意义上的“混合编程”。
#include <pybind11/pybind11.h>
#include <pybind11/numpy.h>
#include <pybind11/embed.h>
#include <omp.h>
#include <iostream>

namespace py = pybind11;
using namespace py::literals;
py::object np = py::module::import("numpy");


void showarray(py::array_t<double> arr1)
{
    auto local = py::dict();
    py::object amax = arr1.attr("max")();
    py::object shape = arr1.attr("shape");
    py::array_t<double> a1 = np.attr("ones")(std::make_tuple(3, 4, 5),"dtype"_a="double");
    py::print(a1);
    local["arr1"] = arr1;
    auto a2 = py::eval("(arr1==5)",local);
    py::tuple a3 = np.attr("where")(a2);
    int index = a3[0].cast<py::array_t<int>>().at(0);
    py::print(a2);
    py::print(index);
    py::print(shape);
}
py::object np = py::module::import("numpy") 等价于python中的 import numpy as np,使用格式为
(py::object变量).attr("python中的函数名")(参数)
代码中的等价行为:
py::object amax = arr1.attr("max")();
py::object shape = arr1.attr("shape");
py::array_t<double> a1 = np.attr("ones")(std::make_tuple(3, 4, 5),"dtype"_a="double");

等价于python中的

arr1.max()
arr1.shape
a1 = np.ones((3,4,5),dtype=double)
_a是py::literals中的迭代器别名,用来输入python中的Keyword参数,如"dtype _a = double"。
数组的切片和列表索引特性、布尔数组等python特性无法通过py::moudle::attr()和C++方法给出(attr()中只能输入函数名,非函数特性则不行)
pybind11 提供eval,exec和eval_file函数来直接运行 Python 表达式和语句,如下所示
#include <pybind11/eval.h>

auto local = py::dict();
local["arr1"] = arr1;
auto a2 = py::eval("(arr1==5)",local);

// Evaluate a sequence of statements
py::exec(
    "print('Hello')\n"
    "print('arr1');",
    local);

// Evaluate the statements in an separate Python file on disk
py::eval_file("script.py", local);
local = py::dict() 用来接收和转换python\C++中对应的一组参数,
py::dict()["python变量名"] = C++变量
py::dict()传入 eval, exec, eval_file时可以接收Python 表达式产生的所有变量,保存变量名为key值,通过下面的语句可以用C++变量接收之。
C++变量 = py::dict()["python变量名"]
6. Eigen数组接口
pybind11也实现了对Eigen一维和二维数组的直接转换支持,需要包含头文件<pybind11/eigen.h>。
6.1. Example
函数参数和返回值都可以直接使用Eigen::Matrix<T>和Eigen::Array<T>的类型,pybind11会自动转换。
using namespace Eigen;
MatrixXd add_matrix(MatrixXd matA, MatrixXd matB)
{
    return matA + matB;
}

namespace py = pybind11;
PYBIND11_MODULE(add_matrix_moudle, m)
{
    m.doc() = "Matrix add";
    m.def("matrix_add", &add_matrix);
}
为了保证内存安全,当普通的Eigen::Matrix对象作为参数和返回值时,pybind11接受 numpy.ndarray 的输入值,将其值复制到临时数组变量,然后用临时变量调用C++函数。即默认情况下是多进行了一次数组内存拷贝的,对于计算量很小的矩阵四则运算等操作,这会显著增加函数运行的总时间!
**使用 Eigen::Ref<MatrixType> 和 Eigen::Map<MatrixType>**,会简单地引用返回的数据,但是须确保这些数据不能在返回前被销毁。
特别注意,由于 **numpy 和 Eigen 对数据的默认存储顺序不同(Numpy行优先,Eigen列优先)**,需要在创建Eigen::Matrix对象使用Eigen::Rowmajor参数指定为行优先数组,否则转换时有可能会发生内存泄漏导致函数崩溃。
如果自定义函数中没有使用Eigen::Ref 和 Eigen::Map接收和返回参数,为了避免数组被复制,可以在绑定函数中使用pybind11的返回值策略 py::return_value_policy::reference_internal 来返回引用值
PYBIND11_MODULE(add_mat_moudle, m)
{
    m.doc() = "Matrix add";
    m.def("mat_add_ref", &add_mat, py::return_value_policy::reference_internal);
}
稀疏矩阵类型 scipy.sparse.csr_matrix/scipy.sparse.csc_matrix 不支持按引用传递,它们总是被复制按值传递的。
7. Class
和普通的函数绑定相比,绑定class的时候由m.def转变为了pybind11::class_<class>.def,还需要显式的指定class的构造函数的参数类型。
7.1. 最简单的c++类
class Student {
    public:
        Student(const std::string &name) : name_(name) { }
        void setName(const std::string &name) { name_ = name; }
        const std::string &getName() const { return name_; }
    private:
        std::string name_;
};


PYBIND11_MODULE(school, m) {
    pybind11::class_<Student>(m, "Student")
        .def(pybind11::init<const std::string &>())
        .def("setName", &Student::setName)
        .def("getName", &Student::getName);
}
class_为 C++ 类或结构样式的数据结构创建绑定。init() 是一个方便的函数,它将构造函数参数的类型作为模板参数并包装相应的构造函数。
'Student::name_' 是一个私有的内部变量,只能通过 setter 和 getter 访问。
通过def_property的定义,我们就可以像访问python的property风格那样访问name_,其实就是通过成员函数访问类的私有变量。
python中的对象还可以增加动态属性,就是一个class中本没有这个成员,但是直接赋值后也就产生了,这就是动态属性。
使用pybind11::dynamic_attr()可以实现类似功能,代码如下所示:
PYBIND11_MODULE(school, m) {
    pybind11::class_<Student>(m, "Student",pybind11::dynamic_attr())
        .def(pybind11::init<const std::string &>())
        .def("setName", &Student::setName)
        .def("getName", &Student::getName)
        .def_property("name_", &Student::getName, &Student::setName);
}
运行如下:
>>> import school
>>> q = school.Student("Randy")
>>> q.age = 7
>>> q.age
7
>>> q.money
Traceback (most recent call last):
  File "<stdin>", line 1, in <module>
AttributeError: 'school.Student' object has no attribute 'money'
>>> q.__dict__
{'age': 7}
请注意,具有动态属性的类的运行时开销很小。不仅因为添加了__dict__,还因为必须激活更昂贵的垃圾收集跟踪以解析可能的循环引用。默认情况下,pybind11 类比原生 Python 类更有效。启用动态属性只会使它们相提并论。
7.1.1. 绑定lambda表达式
我们可以绑定 Lambda 函数将人类可读的摘要返回到名为 __repr__ 的特殊方法槽。
pybind11 支持无状态和有状态 lambda 闭包。无状态闭包是那些将一对空括号 [] 作为捕获对象的闭包。
py::class_<Pet>(m, "Student")
    .def(py::init<const std::string &>())
    .def("setName", &Pet::setName)
    .def("getName", &Pet::getName)
    .def("__repr__",
        [](const Student &a "") {
            return "<school.Student named '" + a.name_ + "'>";
        }
    );
打印摘要:
print(p)
<school.Student named 'Kim'>
7.1.2. 实例和静态字段
可以使用 class_::def_readwrite()方法直接公开 name_ 字段。类似的 class_::def_readonly()方法也存在于常量字段。
py::class_<Pet>(m, "Pet")
    .def(py::init<const std::string &>())
    .def_readwrite("name", &Pet::name)
    // ... remainder ...
实际调用:
>>> p = school.Student("Molly")
>>> p.name
'Molly'
>>> p.name = "Charly"
>>> p.name
'Charly'
因为Student::name_为私有成员变量,方法class_::def_property(),class_::def_property_readonly() 用于只读数据,可用于在Python中提供一个类似字段的接口,该接口将透明地调用setter和getter函数:
py::class_<Pet>(m, "Pet")
    .def(py::init<const std::string &>())
    .def_property("name", &Pet::getName, &Pet::setName)
    // ... remainder ...
7.2. 继承和自动下行转换
现在假设该示例由两个具有继承关系的数据结构组成:
struct Pet {
    Pet(const std::string &name) : name(name) { }
    std::string name;
};

struct Dog : Pet {
    Dog(const std::string &name) : Pet(name) { }
    std::string bark() const { return "woof!"; } // Dog 特有函数
};
有两种不同的方法来指示与pybind11的层次结构关系:
-
将C++基类指定为“
class_”的额外模板参数:
py::class_<Pet>(m, "Pet")
   .def(py::init<const std::string &>())
   .def_readwrite("name", &Pet::name);

// Method 1: template parameter:
py::class_<Dog, Pet /* <- specify C++ parent type */>(m, "Dog")
    .def(py::init<const std::string &>())
    .def("bark", &Dog::bark);
或者,我们也可以为之前绑定的Pet class_ 对象赋一个名称,并在绑定Dog类时引用它:
py::class_<Pet> pet(m, "Pet");
pet.def(py::init<const std::string &>())
   .def_readwrite("name", &Pet::name);

// Method 2: pass parent class_ object:
py::class_<Dog>(m, "Dog", pet /* <- specify Python parent type */)
    .def(py::init<const std::string &>())
    .def("bark", &Dog::bark);
在功能方面,这两种方法是等效的。之后,实例将公开两种类型的字段和方法:
>>> p = example.Dog("Molly")
>>> p.name
'Molly'
>>> p.bark()
'woof!'
上面定义的C++类是具有继承关系的常规非多态类型。这反映在 Python 中:
// Return a base pointer to a derived instance
m.def("pet_store", []( "") { return std::unique_ptr<Pet>(new Dog("Molly")); });
>>> p = example.pet_store()
>>> type(p)  # `Dog` instance behind `Pet` pointer
Pet          # no pointer downcasting for regular non-polymorphic types
>>> p.bark()
AttributeError: 'Pet' object has no attribute 'bark'
该函数返回了一个Dog实例,但由于它是基指针后面的非多态类型,因此 Python 只能看到“宠物”。在C++中,仅当一个类型至少有一个虚函数并且 pybind11 将自动识别这一点时,它才被认为是多态的:
struct PolymorphicPet {
    virtual ~PolymorphicPet() = default;
};

struct PolymorphicDog : PolymorphicPet {
    std::string bark() const { return "woof!"; }
};

// Same binding code
py::class_<PolymorphicPet>(m, "PolymorphicPet");
py::class_<PolymorphicDog, PolymorphicPet>(m, "PolymorphicDog")
    .def(py::init<>())
    .def("bark", &PolymorphicDog::bark);

// Again, return a base pointer to a derived instance
m.def("pet_store2", []( "") { return std::unique_ptr<PolymorphicPet>(new PolymorphicDog); });
>>> p = example.pet_store2()
>>> type(p)
PolymorphicDog  # automatically downcast
>>> p.bark()
'woof!'
给定指向多态基的指针,pybind11 自动向下转换到实际派生类型。
请注意,这超出了C++中的通常情况:我们不仅可以访问基的虚函数,还可以获得具体的派生类型,包括基类型甚至可能不知道的函数和属性。
8. 虚函数
假设一个C++类或接口有一个虚函数,我们希望从 Python 中覆盖它(我们将专注于类 Animal; Dog 作为如何使用传统C++代码做到这一点的具体示例给出)。
class Animal {
public:
    virtual ~Animal() { }
    virtual std::string go(int n_times) = 0;
};

class Dog : public Animal {
public:
    std::string go(int n_times) override {
        std::string result;
        for (int i=0; i<n_times; ++i)
            result += "woof! ";
        return result;
    }
};
还有一个普通函数,该函数在任意的Animal实例上调用函数 go()。
std::string call_go(Animal *animal) {
    return animal->go(3);
}
通常,这些类的绑定代码如下所示:
PYBIND11_MODULE(example, m) {
    py::class_<Animal>(m, "Animal")
        .def("go", &Animal::go);

    py::class_<Dog, Animal>(m, "Dog")
        .def(py::init<>());

    m.def("call_go", &call_go);
}
但是,这些绑定是不可能扩展的:Animal是不可构造的。
从 Python 中定义一种新型的Animal是可能的,但需要一个定义如下的帮助程序类:
class PyAnimal : public Animal {
public:
    /* Inherit the constructors */
    using Animal::Animal;

    /* Trampoline (need one for each virtual function) */
    std::string go(int n_times) override {
        PYBIND11_OVERRIDE_PURE(
            std::string, /* Return type */
            Animal,      /* Parent class */
            go,          /* Name of function in C++ (must match Python name) */
            n_times      /* Argument(s) */
        );
    }
};
宏PYBIND11_OVERRIDE_PURE应该用于纯虚函数,PYBIND11_OVERRIDE应该用于具有默认实现的函数。还有两个交替宏PYBIND11_OVERRIDE_PURE_NAME和PYBIND11_OVERRIDE_NAME,它们在 Parent 类和函数槽的名称之间采用字符串值名称参数,该参数定义了 Python 中函数的名称。当函数的C++和Python版本具有不同的名称时,这是必需的,例如operator() 与__call__。
绑定代码还需要一些小的调整(突出显示):
PYBIND11_MODULE(example, m) {
    py::class_<Animal, PyAnimal /* <--- trampoline*/>(m, "Animal")
        .def(py::init<>())
        .def("go", &Animal::go);

    py::class_<Dog, Animal>(m, "Dog")
        .def(py::init<>());

    m.def("call_go", &call_go);
}
重要的是,pybind11 通过将其指定为 class_的额外模板参数来识别蹦床辅助类。(这也可以与其他模板参数,如自定义持有者类型结合使用;模板类型的顺序无关紧要)。在此之后,我们能够像往常一样定义一个构造函数。
绑定应该针对实际类进行,而不是针对蹦床帮助程序类。
py::class_<Animal, PyAnimal /* <--- trampoline*/>(m, "Animal");
    .def(py::init<>())
    .def("go", &PyAnimal::go); /* <--- THIS IS WRONG, use &Animal::go */
但是请注意,上述内容足以允许 python 类扩展 Animal,但不能扩展 Dog:需要为继承类提供适当的覆盖支持所需的必要步骤。
下面的 Python 会话展示了如何覆盖 Animal::go 并通过虚拟方法调用调用它。
>>> from example import *
>>> d = Dog()
>>> call_go(d)
'woof! woof! woof! '
>>> class Cat(Animal):
...     def go(self, n_times):
...         return "meow! " * n_times
...
>>> c = Cat()
>>> call_go(c)
'meow! meow! meow! '
如果要在派生的 Python 类中定义自定义构造函数,则必须确保使用__init__显式调用绑定C++构造函数,无论它是否是默认构造函数。否则,实例C++部分的内存将保持未初始化状态,这通常会使C++实例处于无效状态,并在随后使用C++实例时导致未定义的行为。
下面是一个示例:
class Dachshund(Dog):
    def __init__(self, name):
        Dog.__init__(self)  # Without this, a TypeError is raised.
        self.name = name

    def bark(self):
        return "yap!"
请注意,应该调用直接的__init__构造函数,并且不应使用 super()。对于简单的线性继承情况, super()可能会起作用,但是一旦你开始混合Python和C++多重继承,由于Python的MRO和C++机制之间的差异,事情就会分崩离析。
8.1. 结合虚函数和继承
将虚拟方法与继承相结合时,需要确保为要允许从派生的 python 类进行覆盖的每个方法提供覆盖。例如,假设我们扩展上面的 Animal/Dog 示例,如下所示:
class Animal {
public:
    virtual std::string go(int n_times) = 0;
    virtual std::string name() { return "unknown"; }
};
class Dog : public Animal {
public:
    std::string go(int n_times) override {
        std::string result;
        for (int i=0; i<n_times; ++i)
            result += bark() + " ";
        return result;
    }
    virtual std::string bark() { return "woof!"; }
};
Animal 的蹦床类必须,如上一节所述,覆盖go() 和name(),但为了允许 python 代码正确地从Dog继承,我们还需要一个Dog的蹦床类来覆盖添加的bark() 方法 和 从 Animal 继承的 go() 和name()方法(即使Dog没有直接覆盖name()方法):
class PyAnimal : public Animal {
public:
    using Animal::Animal; // Inherit constructors
    std::string go(int n_times) override { PYBIND11_OVERRIDE_PURE(std::string, Animal, go, n_times); }
    std::string name() override { PYBIND11_OVERRIDE(std::string, Animal, name, ); }
};
class PyDog : public Dog {
public:
    using Dog::Dog; // Inherit constructors
    std::string go(int n_times) override { PYBIND11_OVERRIDE(std::string, Dog, go, n_times); }
    std::string name() override { PYBIND11_OVERRIDE(std::string, Dog, name, ); }
    std::string bark() override { PYBIND11_OVERRIDE(std::string, Dog, bark, ); }
};
请注意PYBIND11_OVERRIDE调用中的尾随逗号,以 name()和bark()。这些是可移植地为不接受任何参数的函数实现蹦床所必需的。对于采用非零个参数的函数,必须省略尾随逗号。
从具有虚拟方法的 pybind11 注册类派生的注册类需要类似的蹦床类,即使它没有显式声明或覆盖任何虚拟方法本身:
class Husky : public Dog {};
class PyHusky : public Husky {
public:
    using Husky::Husky; // Inherit constructors
    std::string go(int n_times) override { PYBIND11_OVERRIDE_PURE(std::string, Husky, go, n_times); }
    std::string name() override { PYBIND11_OVERRIDE(std::string, Husky, name, ); }
    std::string bark() override { PYBIND11_OVERRIDE(std::string, Husky, bark, ); }
};
但是,有一种技术可用于避免这种重复(这对于具有多个虚拟方法的基类特别有用)。该技术涉及使用模板蹦床类,如下所示:
template <class AnimalBase = Animal> class PyAnimal : public AnimalBase {
public:
    using AnimalBase::AnimalBase; // Inherit constructors
    std::string go(int n_times) override { PYBIND11_OVERRIDE_PURE(std::string, AnimalBase, go, n_times); }
    std::string name() override { PYBIND11_OVERRIDE(std::string, AnimalBase, name, ); }
};
template <class DogBase = Dog> class PyDog : public PyAnimal<DogBase> {
public:
    using PyAnimal<DogBase>::PyAnimal; // Inherit constructors
    // Override PyAnimal's pure virtual go() with a non-pure one:
    std::string go(int n_times) override { PYBIND11_OVERRIDE(std::string, DogBase, go, n_times); }
    std::string bark() override { PYBIND11_OVERRIDE(std::string, DogBase, bark, ); }
};
此技术的优点是只需要为每个虚拟方法声明一个蹦床方法和纯虚拟方法重写。
但是,它确实要求编译器至少生成同样多的方法(如果同时公开纯虚方法和被覆盖的纯虚方法,则可能更多)。
然后使用以下方法向 pybind11 注册这些类:
py::class_<Animal, PyAnimal<>> animal(m, "Animal");
py::class_<Dog, Animal, PyDog<>> dog(m, "Dog");
py::class_<Husky, Dog, PyDog<Husky>> husky(m, "Husky");
// ... add animal, dog, husky definitions
请注意,Husky 根本不需要专用的蹦床模板类,因为它既没有声明任何新的虚拟方法,也没有提供任何纯虚拟方法实现。
使用重复虚拟或模板化的蹦床方法,现在可以创建一个继承自 Dog的python类:
class ShiMin(Dog):
    def bark(self):
        return "yip!"