1. 长按事件
1.1 知识点
(1)掌握长按事件的操作形式;
(2)可以设置手机的桌面背景;
1.2 具体内容
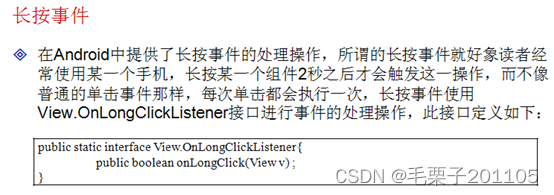
范例:长按一张图片之后,此图片设置为手机桌面背景。
<LinearLayout xmlns:android="http://schemas.android.com/apk/res/android"
    xmlns:tools="http://schemas.android.com/tools"
    android:layout_width="match_parent"
    android:layout_height="match_parent"
    android:paddingBottom="@dimen/activity_vertical_margin"
    android:paddingLeft="@dimen/activity_horizontal_margin"
    android:paddingRight="@dimen/activity_horizontal_margin"
    android:paddingTop="@dimen/activity_vertical_margin"
    tools:context=".LongClickActivity" >

    <TextView
        android:layout_width="wrap_content"
        android:layout_height="wrap_content"
        android:text="长按图片设置桌面背景" />

    <ImageView
        android:id="@+id/img"
        android:layout_width="wrap_content"
        android:layout_height="wrap_content"
        android:src="@drawable/head11"
        />

</LinearLayout>
package com.example.longclickproject;

import java.io.IOException;

import android.app.Activity;
import android.os.Bundle;
import android.view.View;
import android.view.View.OnLongClickListener;
import android.widget.ImageView;

public class LongClickActivity extends Activity {
    ImageView img =null;
	@Override
	protected void onCreate(Bundle savedInstanceState) {
		super.onCreate(savedInstanceState);
		setContentView(R.layout.activity_long_click);
		img = (ImageView) super.findViewById(R.id.img);
		img.setOnLongClickListener(new OnLongClickListener() {

			@Override
			public boolean onLongClick(View v) {
				try {
					LongClickActivity.this.clearWallpaper();
					LongClickActivity.this.setWallpaper(LongClickActivity.this.img.getResources()
							.openRawResource(R.drawable.head11));
				} catch (IOException e) {
					// TODO Auto-generated catch block
					e.printStackTrace();
				}//清除桌面背景
				return false;
			}
		});

	}


}
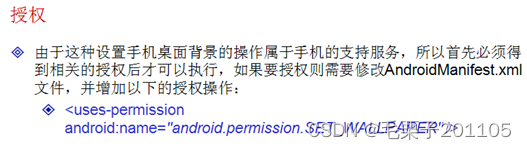
以上程序在长按之后,直接报错了,这因为设置桌面背景这是属于手机系统相关的操作,没有设置相应的权限的话,是不能进行这样的操作的,所有我们需要主配文件当中进行设置。
<?xml version="1.0" encoding="utf-8"?>
<manifest xmlns:android="http://schemas.android.com/apk/res/android"
    package="com.example.longclickproject"
    android:versionCode="1"
    android:versionName="1.0" >

    <uses-sdk
        android:minSdkVersion="10"
        android:targetSdkVersion="10" />

    <uses-permission
         android:name="android.permission.SET_WALLPAPER"
        />

    <application
        android:allowBackup="true"
        android:icon="@drawable/ic_launcher"
        android:label="@string/app_name"
        android:theme="@style/AppTheme" >
        <activity
            android:name="com.example.longclickproject.LongClickActivity"
            android:label="@string/app_name" >
            <intent-filter>
                <action android:name="android.intent.action.MAIN" />

                <category android:name="android.intent.category.LAUNCHER" />
            </intent-filter>
        </activity>
    </application>

</manifest>
再次运行之后,我们发现程序可以正常地完成相应的工作了。
1.3 小结
(1)长按事件只有在触发2秒之后才会有所反应;
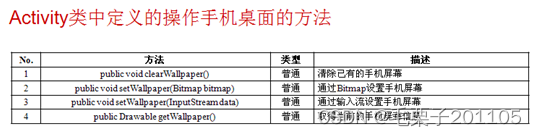
(2)桌面操作方法:
清除桌面:public void clearWallpaper()
设置桌面:public void setWallpaper(InputStream data)
2. 键盘事件
2.1 知识点
(1)掌握键盘事件的使用;
(2)可以使用键盘事件进行EMAIL验证;
2.2 具体内容

范例:进行Email验证
<LinearLayout xmlns:android="http://schemas.android.com/apk/res/android"
    xmlns:tools="http://schemas.android.com/tools"
    android:layout_width="match_parent"
    android:layout_height="match_parent"
    android:paddingBottom="@dimen/activity_vertical_margin"
    android:paddingLeft="@dimen/activity_horizontal_margin"
    android:paddingRight="@dimen/activity_horizontal_margin"
    android:paddingTop="@dimen/activity_vertical_margin"
    android:orientation="vertical"
    tools:context=".OnKeyListenerActivity" >

    <EditText
        android:id="@+id/edt"
        android:layout_width="match_parent"
        android:layout_height="wrap_content"

        />

    <TextView
        android:id="@+id/tv"
        android:layout_width="match_parent"
        android:layout_height="wrap_content"
       />

</LinearLayout>
package com.example.onkeylistenerproject;

import android.app.Activity;
import android.os.Bundle;
import android.view.KeyEvent;
import android.view.View;
import android.view.View.OnKeyListener;
import android.widget.EditText;
import android.widget.TextView;

public class OnKeyListenerActivity extends Activity {
    EditText edt = null;
    TextView tv =null;
	@Override
	protected void onCreate(Bundle savedInstanceState) {
		super.onCreate(savedInstanceState);
		setContentView(R.layout.activity_on_key_listener);
		edt = (EditText) super.findViewById(R.id.edt);
		tv = (TextView) super.findViewById(R.id.tv);
		edt.setOnKeyListener(new OnKeyListener() {

			@Override
			public boolean onKey(View v, int keyCode, KeyEvent event) {
				// TODO Auto-generated method stub
				String email = edt.getText().toString();
				if(event.getAction()==KeyEvent.ACTION_UP){//键盘松开
					if(email.matches("\\w+@\\w+(.com|.cn|.org|.edu)")){//进行正则的验证
						tv.setText("输入的为正确的邮箱格式");
					}else{
						tv.setText("输入的邮箱格式有问题");
					}

				}
				return false;
			}
		});
	}


}
2.3 小结
(1)在输入组件中可以使用正则进行数据的输入验证;
(2)键盘事件是用户在输入数据时所触发的操作。
3. 触摸事件
3.1 知识点
(1)了解触摸事件的基本操作形式;
(2)可以使用触摸事件进行基本的绘图操作。
3.2 具体内容
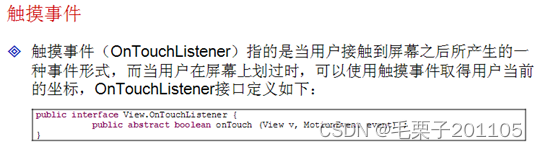
OnTouchListener本身当然也是Android当中所提供的一个监听接口,对于实际的Android开发而已其实用处不多,一般适用于游戏的开发。
范例:取得触摸点的坐标。
<LinearLayout xmlns:android="http://schemas.android.com/apk/res/android"
    xmlns:tools="http://schemas.android.com/tools"
    android:layout_width="match_parent"
    android:layout_height="match_parent"
    android:paddingBottom="@dimen/activity_vertical_margin"
    android:paddingLeft="@dimen/activity_horizontal_margin"
    android:paddingRight="@dimen/activity_horizontal_margin"
    android:paddingTop="@dimen/activity_vertical_margin"
    android:orientation="vertical"
    tools:context=".OnTocuhListenerActivity" >


    <TextView
        android:id="@+id/tv"
        android:layout_width="match_parent"
        android:layout_height="match_parent"
       />

</LinearLayout>
package com.example.ontouchlistenerproject;

import android.app.Activity;
import android.os.Bundle;
import android.view.Menu;
import android.view.MotionEvent;
import android.view.View;
import android.view.View.OnTouchListener;
import android.widget.TextView;

public class OnTocuhListenerActivity extends Activity {
    TextView tv = null;
	@Override
	protected void onCreate(Bundle savedInstanceState) {
		super.onCreate(savedInstanceState);
		setContentView(R.layout.activity_on_tocuh_listener);
		tv = (TextView) super.findViewById(R.id.tv);
		tv.setOnTouchListener(new OnTouchListener() {

			@Override
			public boolean onTouch(View v, MotionEvent event) {
				float x = event.getX();
				float y = event.getY();
				tv.setText("X轴:"+x+",Y轴:"+y);
				return false;
			}
		});
	}

	@Override
	public boolean onCreateOptionsMenu(Menu menu) {
		// Inflate the menu; this adds items to the action bar if it is present.
		getMenuInflater().inflate(R.menu.on_tocuh_listener, menu);
		return true;
	}

}
如果想要让OnTouch事件多一些实际的效果,比如说通过触摸进行屏幕划线,就可以通过一些绘图的操作来完成,那么想要完成绘图操作,就需要自定义一个新的组件。既然是一个组件类,就必须继承View这个类。
模糊
package com.example.myView;

import java.util.ArrayList;
import java.util.Iterator;
import java.util.List;

import android.content.Context;
import android.graphics.Canvas;
import android.graphics.Color;
import android.graphics.Paint;
import android.graphics.Point;
import android.util.AttributeSet;
import android.view.MotionEvent;
import android.view.View;

public class MyView extends View {
    private List<Point> allPoint = new ArrayList<Point>();
	public MyView(Context context, AttributeSet attrs) {
		super(context, attrs);
		//在实例化这个组件的同时就进行触摸事件的监听
		super.setOnTouchListener(new OnTouchListenerImpl());
	}

	protected void onDraw(Canvas canvas){
		Paint p = new Paint();//画线依靠此类,相当于画笔类
		p.setColor(Color.RED);//设置画笔颜色
		if(MyView.this.allPoint.size()>0){//如果存在坐标点的话,就可以开始绘制图形
			Iterator<Point> it = MyView.this.allPoint.iterator();
			Point frist = null;
			Point last = null;
			while(it.hasNext()){
				if(null==frist){
					frist = it.next();
				}else{
					if(last!=null){//当一段线段接收之后,下端开始的点将会是本段中结束的点
						frist = last;
					}
					last = it.next();
					canvas.drawLine(frist.x, frist.y, last.x, last.y, p);
				}
			}
		}
	}
	class OnTouchListenerImpl implements OnTouchListener{

		@Override
		public boolean onTouch(View v, MotionEvent event) {

			Point p = new Point((int)event.getX(),(int)event.getY());
			if(event.getAction()==MotionEvent.ACTION_DOWN){//如果是触摸下去,就开始保存坐标
				MyView.this.allPoint.add(p);
			}else if(event.getAction()==MotionEvent.ACTION_UP){//如果手指松开,进行画线
				MyView.this.allPoint.add(p);
				MyView.this.postInvalidate();//重新绘制图形
			}else if(event.getAction()==MotionEvent.ACTION_MOVE){//手指一动
				MyView.this.allPoint.add(p);
				MyView.this.postInvalidate();//重新绘制图形
			}

			return true;
		}

	}
}
<?xml version="1.0" encoding="utf-8"?>
<LinearLayout xmlns:android="http://schemas.android.com/apk/res/android"
    android:layout_width="match_parent"
    android:layout_height="match_parent"
    android:orientation="vertical" >

    <com.example.myView.MyView
        android:id="@+id/mv"
        android:layout_width="match_parent"
        android:layout_height="match_parent"
        />


</LinearLayout>
package com.example.ontouchlistenerproject;

import android.app.Activity;
import android.os.Bundle;
import android.view.Menu;
import android.view.MotionEvent;
import android.view.View;
import android.view.View.OnTouchListener;
import android.widget.TextView;

public class OnTocuhListenerActivity extends Activity {
    TextView tv = null;
	@Override
	protected void onCreate(Bundle savedInstanceState) {
		super.onCreate(savedInstanceState);
		setContentView(R.layout.myview_layout);

	}

	@Override
	public boolean onCreateOptionsMenu(Menu menu) {
		// Inflate the menu; this adds items to the action bar if it is present.
		getMenuInflater().inflate(R.menu.on_tocuh_listener, menu);
		return true;
	}

}
3.3 小结
(1)触摸事件是在用户接触到屏幕之后所产生的事件;
(2)如果用户要想使用触摸事件进行图形的绘制,则需要编写自定义的绘图组件。