目录
创作前情
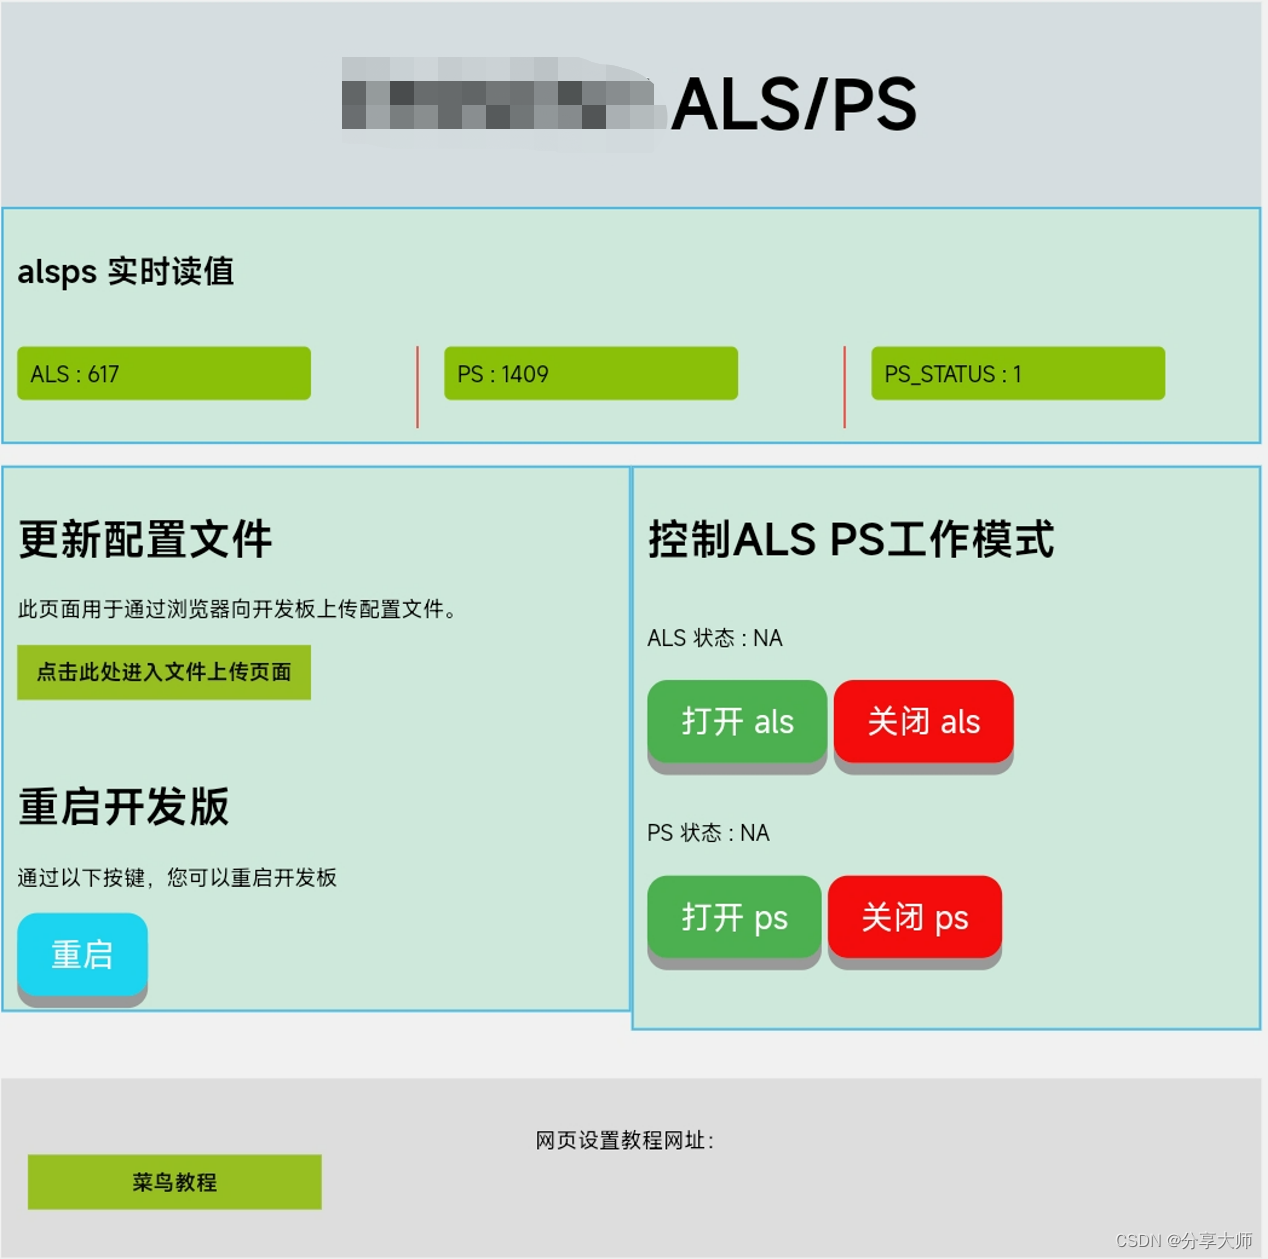
目前所在公司主要业务是手机上光距感这颗器件,由于公司没有MTK/QCOM开发版,只能自己想办法模拟平台驱动,来熟悉芯片特性以及查找客户使用驱动的bug,由于esp8266比较便宜而且使用arduino编程也比较方便,开发版通过i2c与sensor通信,这篇主要介绍模拟更新配置文件,存于ESP闪存中,SPIFFS系统,开机时读取获得。
参考网站:太极极客,菜鸟教程
项目规划
通过连接WiFi,使用电脑通过浏览器更新配置文件,傻瓜式操作,因配置文件只有在启动时才会读取参数,所以在配置文件更新后,需重启下esp8266,后来发现可以将ic读值传输到网页端,所以目前把都加到网页。
实现过程
不啰嗦,直接上代码,开发版部分,标注的也是比较清楚的,都是复制粘贴所得,希望路过的大神勿踩,
//*********************************网页上传********************************************
// #include <ESP8266WiFi.h>
#include <ESP8266WiFiMulti.h>
#include <ESP8266WebServer.h>
#include <FS.h>
#define AP_PATH 0
ESP8266WiFiMulti wifiMulti; // 建立ESP8266WiFiMulti对象,对象名称是 'wifiMulti'

ESP8266WebServer esp8266_server(80); // 建立网络服务器对象,该对象用于响应HTTP请求。监听端口(80)
// String file_name1 = "/config.json"; //被读取的文件位置和名称
File fsUploadFile; // 建立文件对象用于闪存文件上传
void sf_setup()
{

#if AP_PATH
    wifiMulti.addAP("Xiaomi", "0000000000");                     // 将需要连接的一系列WiFi ID和密码输入这里
    wifiMulti.addAP("ssid_from_AP_2", "your_password_for_AP_2"); // ESP8266-NodeMCU再启动后会扫描当前网络
    wifiMulti.addAP("ssid_from_AP_3", "your_password_for_AP_3"); // 环境查找是否有这里列出的WiFi ID。如果有
    Serial.println("Connecting ...");                            // 则尝试使用此处存储的密码进行连接。

    int i = 0;
    while (wifiMulti.run() != WL_CONNECTED)
    { // 尝试进行wifi连接。
        delay(1000);
        Serial.print(i++);
        Serial.print('.');
    }

#else
    WiFi.mode(WIFI_AP);
    IPAddress softLocal(192, 168, 1, 1); // 1 设置内网WIFI IP地址
    IPAddress softGateway(192, 168, 1, 1);
    IPAddress softSubnet(255, 255, 255, 0);
    WiFi.softAPConfig(softLocal, softGateway, softSubnet);

    String apName = ("EMI_ALSPS_" + (String)ESP.getChipId()); // 2 设置WIFI名称
    const char *softAPName = apName.c_str();

    WiFi.softAP(softAPName, "12345678"); // 3创建wifi  名称 +密码 adminadmin

    IPAddress myIP = WiFi.softAPIP(); // 4输出创建的WIFI IP地址
    Serial.println("");
    Serial.print("AP直链模式 网关IP: ");
    Serial.println(myIP);

    Serial.print("AP SSID: "); // 5输出WIFI 名称
    Serial.println(apName);
    Serial.print("AP 密码: ");  // 5输出WIFI 名称
    Serial.println("12345678"); // 5输出WIFI 名称
#endif
    // WiFi连接成功后将通过串口监视器输出连接成功信息
    Serial.println('\n');
    Serial.print("Connected to ");
    Serial.println(WiFi.SSID()); // 通过串口监视器输出连接的WiFi名称
    Serial.print("IP address:\t");
    Serial.println(WiFi.localIP()); // 通过串口监视器输出ESP8266-NodeMCU的IP

    if (SPIFFS.begin())
    { // 启动闪存文件系统
        Serial.println("SPIFFS Started.");
    }
    else
    {
        Serial.println("SPIFFS Failed to Start.");
    }

    esp8266_server.on("/upload.html",                    // 如果客户端通过upload页面
                      HTTP_POST,                         // 向服务器发送文件(请求方法POST)
                      respondOK,                         // 则回复状态码 200 给客户端
                      handleFileUpload);                 // 并且运行处理文件上传函数
    esp8266_server.on("/LED-Control", handleLEDControl); // 告知系统如何处理/LED-Control请求
    esp8266_server.onNotFound(handleUserRequest);
    esp8266_server.on("/setLED", handleLED);
    esp8266_server.on("/setALS", handleSETALS);
    esp8266_server.on("/setPS", handleSETPS);

    esp8266_server.on("/readALS", handleALS);
    esp8266_server.on("/readPS", handlePS);
    esp8266_server.on("/readPSSTATUS", handlePSSTATUS);

    esp8266_server.begin(); // 启动网站服务
    Serial.println("HTTP server started");
}
void sf_loop()
{
    esp8266_server.handleClient();
}
void handleLED()
{
    String ledState = "OFF";

    String LED_State = esp8266_server.arg("LEDstate"); // 参考xhttp.open("GET", "setLED?LEDstate="+led, true);

    Serial.println(LED_State);

    if (LED_State == "1")
    {
        digitalWrite(LED_BUILTIN, LOW); // LED 点亮
        ledState = "ON";                // 反馈参数
    }
    else
    {
        digitalWrite(LED_BUILTIN, HIGH); // LED 熄灭
        ledState = "OFF";                // 反馈参数
    }

    esp8266_server.send(200, "text/plain", ledState); // 发送网页
}
void handleSETALS()
{
    String alsState = "OFF";
    String ALS_State = esp8266_server.arg("ALSstate"); // 参考xhttp.open("GET", "setLED?LEDstate="+led, true);
    Serial.println(ALS_State);

    if (ALS_State == "1")
    {
        digitalWrite(LED_BUILTIN, LOW); // LED 点亮
        alsState = "ON";                // 反馈参数
        als_enable_flag = true;

        mn_sensor_pwr_off();
        mn_sensor_set_als_power_on();
        mn_sensor_pwr_on();
    }
    else
    {
        digitalWrite(LED_BUILTIN, HIGH); // LED 熄灭
        alsState = "OFF";                // 反馈参数
        als_enable_flag = false;
        mn_sensor_pwr_off();
        mn_sensor_set_als_power_off();
        mn_sensor_detect_pwr();
    }
    esp8266_server.send(200, "text/plain", alsState); // 发送网页
}
void handleSETPS()
{
    String psState = "OFF";
    String PS_State = esp8266_server.arg("PSstate"); // 参考xhttp.open("GET", "setLED?LEDstate="+led, true);
    Serial.println(PS_State);

    if (PS_State == "1")
    {
        digitalWrite(LED_BUILTIN, LOW); // LED 点亮
        psState = "ON";                 // 反馈参数
        ps_enable_flag = true;
        mn_sensor_pwr_off();
        mn_sensor_set_ps_power_on();
        mn_sensor_pwr_on();
    }
    else
    {
        digitalWrite(LED_BUILTIN, HIGH); // LED 熄灭
        psState = "OFF";                 // 反馈参数
        ps_enable_flag = false;
        mn_sensor_pwr_off();
        mn_sensor_set_ps_power_off();
        mn_sensor_detect_pwr();
    }
    esp8266_server.send(200, "text/plain", psState); // 发送网页
}
void handleALS()
{
    String alsValue = String(alsread);

    esp8266_server.send(200, "text/plain", alsValue); //发送模拟输入引脚到客户端ajax请求
}
void handlePS()
{
    String psValue = String(psread);

    esp8266_server.send(200, "text/plain", psValue); //发送模拟输入引脚到客户端ajax请求
}
void handlePSSTATUS()
{
    String psValue = String(psreadstatus);

    esp8266_server.send(200, "text/plain", psValue); //发送模拟输入引脚到客户端ajax请求
}
// 处理/LED-Control请求
void handleLEDControl()
{
    //   bool ledStatus = digitalRead(LED_BUILTIN);     // 此变量用于储存LED状态
    //   ledStatus == HIGH ? digitalWrite(LED_BUILTIN, LOW) : digitalWrite(LED_BUILTIN, HIGH);  // 点亮或者熄灭LED
    ESP.restart();
    esp8266_server.sendHeader("Location", "/index.html");
    esp8266_server.send(303);
}
// 处理上传文件函数
void handleFileUpload()
{

    HTTPUpload &upload = esp8266_server.upload();

    if (upload.status == UPLOAD_FILE_START)
    { // 如果上传状态为UPLOAD_FILE_START

        String filename = upload.filename; // 建立字符串变量用于存放上传文件名
        if (!filename.startsWith("/"))
            filename = "/" + filename;            // 为上传文件名前加上"/"
        Serial.println("File Name: " + filename); // 通过串口监视器输出上传文件的名称

        fsUploadFile = SPIFFS.open(filename, "w"); // 在SPIFFS中建立文件用于写入用户上传的文件数据
    }
    else if (upload.status == UPLOAD_FILE_WRITE)
    { // 如果上传状态为UPLOAD_FILE_WRITE

        if (fsUploadFile)
            fsUploadFile.write(upload.buf, upload.currentSize); // 向SPIFFS文件写入浏览器发来的文件数据
    }
    else if (upload.status == UPLOAD_FILE_END)
    { // 如果上传状态为UPLOAD_FILE_END
        if (fsUploadFile)
        {                                                           // 如果文件成功建立
            fsUploadFile.close();                                   // 将文件关闭
            Serial.println(" Size: " + upload.totalSize);           // 通过串口监视器输出文件大小
            esp8266_server.sendHeader("Location", "/success.html"); // 将浏览器跳转到/success.html(成功上传页面)
            esp8266_server.send(303);                               // 发送相应代码303(重定向到新页面)
        }
        else
        {                                                                        // 如果文件未能成功建立
            Serial.println("File upload failed");                                // 通过串口监视器输出报错信息
            esp8266_server.send(500, "text/plain", "500: couldn't create file"); // 向浏览器发送相应代码500(服务器错误)
        }
    }
}

// 回复状态码 200 给客户端
void respondOK()
{
    esp8266_server.send(200);
}

// 处理用户浏览器的HTTP访问
void handleUserRequest()
{

    // 获取用户请求网址信息
    String webAddress = esp8266_server.uri();

    // 通过handleFileRead函数处处理用户访问
    bool fileReadOK = handleFileRead(webAddress);

    // 如果在SPIFFS无法找到用户访问的资源,则回复404 (Not Found)
    if (!fileReadOK)
    {
        esp8266_server.send(404, "text/plain", "404 Not Found");
    }
}

bool handleFileRead(String path)
{ // 处理浏览器HTTP访问

    if (path.endsWith("/"))
    {                         // 如果访问地址以"/"为结尾
        path = "/index.html"; // 则将访问地址修改为/index.html便于SPIFFS访问
    }

    String contentType = getContentType(path); // 获取文件类型

    if (SPIFFS.exists(path))
    {                                                 // 如果访问的文件可以在SPIFFS中找到
        File file = SPIFFS.open(path, "r");           // 则尝试打开该文件
        esp8266_server.streamFile(file, contentType); // 并且将该文件返回给浏览器
        file.close();                                 // 并且关闭文件
        return true;                                  // 返回true
    }
    return false; // 如果文件未找到,则返回false
}

// 获取文件类型
String getContentType(String filename)
{
    if (filename.endsWith(".htm"))
        return "text/html";
    else if (filename.endsWith(".html"))
        return "text/html";
    else if (filename.endsWith(".css"))
        return "text/css";
    else if (filename.endsWith(".js"))
        return "application/javascript";
    else if (filename.endsWith(".png"))
        return "image/png";
    else if (filename.endsWith(".gif"))
        return "image/gif";
    else if (filename.endsWith(".jpg"))
        return "image/jpeg";
    else if (filename.endsWith(".ico"))
        return "image/x-icon";
    else if (filename.endsWith(".xml"))
        return "text/xml";
    else if (filename.endsWith(".pdf"))
        return "application/x-pdf";
    else if (filename.endsWith(".zip"))
        return "application/x-zip";
    else if (filename.endsWith(".gz"))
        return "application/x-gzip";
    return "text/plain";
}

//*********************************网页上传*******************************************
网页端:
<!DOCTYPE html>
<html lang="zh-CN">

<!-- <head>
  <meta charset="UTF-8">
  <link rel="stylesheet" type="text/css" href="main.css">
  <title>ALSPS-更新配置文件</title>
</head> -->

<head>
    <meta charset="UTF-8">
    <script src="\jquery.min.js"></script>
    <script src="\d3-gauge.js"></script>
    <link rel="stylesheet" type="text/css" href="main.css">
    <title>ALSPS-更新配置文件</title>
</head>

<body>
    <center>
        <!-- <a href="http://www.taichi-maker.com" target="_blank"><img src="/img/taichi-maker.jpg" alt="太极创客"></a>
         <h1>ESP8266 SPIFFS 文件上传</h1>
        <p>此页面用于通过浏览器向ESP8266开发板的SPIFFS上传文件。</p>
        <p></p>
        <p> <a href="/upload.html">点击此处进入文件上传页面</a> </p> -->
        <p></p>
    </center>
    <div class="header">
        <h1>EMINENT ALS/PS</h1>
    </div>
</body>

<body>
    <div class="row">
        <div class="column1">
            <div class="container1">
                <div class="card">
                    <div id="demo">
                        <h2>alsps 实时读值</h2>
                        <br>
                        <div class="newspaper">
                            <div>
                                <div id="rcorners1">
                                    ALS : <span id="ALSCH1Value">0</span><br>
                                </div>
                            </div>
                            <br>
                            <div>
                                <div id="rcorners1">
                                    PS : <span id="PSCH1Value">0</span><br>
                                </div>
                            </div>
                            <br>
                            <div>
                                <div id="rcorners1">
                                    PS_STATUS : <span id="PSSTATUSValue">0</span><br>
                                </div>
                            </div>
                            <br>
                        </div>
                    </div>
                </div>
            </div>
        </div>
    </div>
</body>

<body>

    <div class="row">
        <div class="column">
            <div class="container1">
                <div class="card">
                    <div id="demo">
                        <h1>更新配置文件</h1>
                        <p>此页面用于通过浏览器向开发板上传配置文件。</p>
                        <p></p>
                        <p> <a href="/upload.html">点击此处进入文件上传页面</a> </p>
                        <br>
                        <h1>重启开发版</h1>
                        <p>通过以下按键,您可以重启开发板</p>
                        <form action="LED-Control">
                            <button class="button2" type="submit" formaction="LED-Control">重启</button>
                        </form>
                    </div>
                </div>
            </div>
        </div>
        <div class="column">
            <!--第四列-->
            <div class="container1">
                <div class="card">
                    <h1>控制ALS PS工作模式</h1>
                    <!-- <br>
                    <div>
                        LED引脚状态 : <span id="LEDState">NA</span><br>
                    </div>
                    <div id="demo">
                        <button type="button" onclick="sendData(1)">点亮 LED</button>
                        <button type="button" onclick="sendData(0)">关闭 LED</button><br>
                    </div> -->
                    <br>
                    <div>
                        ALS 状态 : <span id="ALSstate">NA</span><br>
                    </div>
                    <br>
                    <div id="demo">
                        <button class="button" type="button" onclick="sendALSData(1)">打开 als</button>
                        <button class="button1" type="button" onclick="sendALSData(0)">关闭 als</button><br>
                    </div>
                    <br>
                    <br>
                    <div>
                        PS 状态 : <span id="PSstate">NA</span><br>
                    </div>

                    <br>
                    <div id="demo">
                        <button class="button" type="button" onclick="sendPSData(1)">打开 ps</button>
                        <button class="button1" type="button" onclick="sendPSData(0)">关闭 ps</button><br>
                    </div>
                    <br>
                    <br>
                    <script>
                        function sendData(led) {
                            var xhttp = new XMLHttpRequest();
                            xhttp.onreadystatechange = function () {
                                if (this.readyState == 4 && this.status == 200) {
                                    document.getElementById("LEDState").innerHTML =
                                        this.responseText;
                                }
                            };
                            xhttp.open("GET", "setLED?LEDstate=" + led, true);
                            xhttp.send();
                        }
                        function sendALSData(als) {
                            var xhttp = new XMLHttpRequest();
                            xhttp.onreadystatechange = function () {
                                if (this.readyState == 4 && this.status == 200) {
                                    document.getElementById("ALSstate").innerHTML =
                                        this.responseText;
                                }
                            };
                            xhttp.open("GET", "setALS?ALSstate=" + als, true);
                            xhttp.send();
                        }
                        function sendPSData(ps) {
                            var xhttp = new XMLHttpRequest();
                            xhttp.onreadystatechange = function () {
                                if (this.readyState == 4 && this.status == 200) {
                                    document.getElementById("PSstate").innerHTML =
                                        this.responseText;
                                }
                            };
                            xhttp.open("GET", "setPS?PSstate=" + ps, true);
                            xhttp.send();
                        }

                    </script>
                </div>
            </div>
        </div>
    </div>
    <script>
        setInterval(function () {
            alsgetData();
            psgetData();
            psstatusgetData();
        }, 500); //2000mSeconds update rate
        function alsgetData() {
            var xhttp = new XMLHttpRequest();
            xhttp.onreadystatechange = function () {
                if (this.readyState == 4 && this.status == 200) {
                    document.getElementById("ALSCH1Value").innerHTML =
                        this.responseText;
                }
            };
            xhttp.open("GET", "readALS", true);
            xhttp.send();
        }
        function psgetData() {
            var xhttp = new XMLHttpRequest();
            xhttp.onreadystatechange = function () {
                if (this.readyState == 4 && this.status == 200) {
                    document.getElementById("PSCH1Value").innerHTML =
                        this.responseText;
                }
            };
            xhttp.open("GET", "readPS", true);
            xhttp.send();
        }
        function psstatusgetData() {
            var xhttp = new XMLHttpRequest();
            xhttp.onreadystatechange = function () {
                if (this.readyState == 4 && this.status == 200) {
                    document.getElementById("PSSTATUSValue").innerHTML =
                        this.responseText;
                }
            };
            xhttp.open("GET", "readPSSTATUS", true);
            xhttp.send();
        }
    </script>
    <div class="footer">
        <!-- <h1>可视化显示</h1>
        <p>使用指针表的形式显示ESP8266开发板的模拟输入引脚读数数值。</p> -->
        <p>网页设置教程网址: <a href="https://www.runoob.com/css/css-font.html">菜鸟教程</a>
    </div>
</body>


</html>
upload.html以及success.html
<!DOCTYPE html>
<html lang="zh-CN">

<head>
  <meta charset="UTF-8">
  <link rel="stylesheet" type="text/css" href="main.css">
  <title>ALSPS-配置更新</title>
</head>

<body>
	<center>
	<!-- <a href="http://www.taichi-maker.com" target="_blank"><img src="/img/taichi-maker.jpg" alt="太极创客"></a> -->
    <h1>ESP8266 SPIFFS 文件上传</h1>
    <p>点击按钮选择需要上传的文件</p>
    <form method="POST" enctype="multipart/form-data">
        <input type="file" name="data">
        <input class="button" type="submit" value="上传">
    </form>
	</center>
</body>

</html>


<!DOCTYPE html>
<html lang="zh-CN">

<head>
  <meta charset="UTF-8">
  <link rel="stylesheet" type="text/css" href="main.css">
  <title>ALSPS-配置更新</title>
</head>

<body>
	<!-- <a href="http://www.taichi-maker.com" target="_blank"><img src="/img/taichi-maker.jpg" alt="太极创客"></a> -->
    <h1>ESP8266 SPIFFS 文件上传成功</h1>
    <p><a href="/">返回首页</a></p>
</body>

</html>
main.css
body {
    /*
    font-family: sans-serif;
    color: #444;
    */
    font-family: Arial;
    padding: 10px;
    background: #f1f1f1;
}

.header {
    background-color: hsla(194, 20%, 69%, 0.349);
    text-align: center;
    padding: 10px;
}

.header h1 {
    font-size: 50px;
}

/* 导航条 */
.topnav {
    overflow: hidden;
    background-color: #333;
}

/* 导航链接 */
.topnav a {
    float: left;
    display: block;
    color: #f2f2f2;
    text-align: center;
    padding: 14px 16px;
    text-decoration: none;
}

/* 链接 - 修改颜色 */
.topnav a:hover {
    background-color: #ddd;
    color: black;
}

/* 创建三个相等的列 */
.column {
    float: left;
    width: 50%;
}

.column1 {
    float: left;
    width: 100%;
}

/* 右侧栏 */
.rightcolumn {
    float: left;
    width: 25%;
    background-color: #f1f1f1;
    padding-left: 20px;
}

/* 图像部分 */
.fakeimg {
    background-color: #aaa;
    width: 100%;
    padding: 20px;
}

/* 文章卡片效果 */
.card {
    background-color: white;
    padding: 20px;
    margin-top: 20px;
}

/* 列后清除浮动 */
.row:after {
    content: "";
    display: table;
    clear: both;
}

.button {
    display: inline-block;
    padding: 15px 25px;
    font-size: 24px;
    cursor: pointer;
    text-align: center;
    text-decoration: none;
    outline: none;
    color: #fff;
    background-color: #4CAF50;
    border: none;
    border-radius: 15px;
    box-shadow: 0 9px #999;
  }

  .button:hover {background-color: #3e8e41}

  .button:active {
    background-color: #3e8e41;
    box-shadow: 0 5px #666;
    transform: translateY(4px);
  }
  .button1 {
    display: inline-block;
    padding: 15px 25px;
    font-size: 24px;
    cursor: pointer;
    text-align: center;
    text-decoration: none;
    outline: none;
    color: #fff;
    background-color: #f40909fd;
    border: none;
    border-radius: 15px;
    box-shadow: 0 9px #999;
  }

  .button1:hover {background-color: #f40909fd}

  .button1:active {
    background-color: #f40909fd;
    box-shadow: 0 5px #666;
    transform: translateY(4px);
  }
  .button2 {
    display: inline-block;
    padding: 15px 25px;
    font-size: 24px;
    cursor: pointer;
    text-align: center;
    text-decoration: none;
    outline: none;
    color: #fff;
    background-color: rgb(29, 212, 240);
    border: none;
    border-radius: 15px;
    box-shadow: 0 9px #999;
  }

  .button2:hover {background-color: rgb(29, 212, 240)}

  .button2:active {
    background-color: rgb(29, 212, 240);
    box-shadow: 0 5px #666;
    transform: translateY(4px);
  }
/*

column-count 属性指定了需要分割的列数。
以下实例将 <div> 元素中的文本分为 3 列:

column-gap 属性指定了列与列间的间隙。
以下实例指定了列与列间的间隙为 40 像素:
https://www.runoob.com/css3/css3-multiple-columns.html
属性	描述
column-count	指定元素应该被分割的列数。
column-fill	指定如何填充列
column-gap	指定列与列之间的间隙
column-rule	所有 column-rule-* 属性的简写
column-rule-color	指定两列间边框的颜色
column-rule-style	指定两列间边框的样式
column-rule-width	指定两列间边框的厚度
column-span	指定元素要跨越多少列
column-width	指定列的宽度
columns	column-width 与 column-count 的简写属性。
*/
  .newspaper
  {
      column-count:3;
      column-gap:40px;
      column-rule-style:outset;
      column-rule-color:#ff0000;

      /* Firefox */
      -moz-column-count:3;
      -moz-column-gap:40px;
      -moz-column-rule-style:outset;
      -moz-column-rule-color:#ff0000;

      /* Safari and Chrome */
      -webkit-column-count:3;
      -webkit-column-gap:40px;
      -webkit-column-rule-style:outset;
      -webkit-column-rule-color:#ff0000;
  }
  /* 圆角边框 */
  #rcorners1 {
    border-radius: 5px;
    background: #8AC007;
    padding: 10px;
    width: 200px;
    height: 20px;
}

#rcorners2 {
    border-radius: 25px;
    border: 2px solid #8AC007;
    padding: 20px;
    width: 200px;
    height: 150px;
}

  /* 链接 */
a:link,a:visited
{
	display:block;
	font-weight:bold;
	color:hsl(0, 0%, 5%);
	background-color:#98bf21;
	width:200px;
	text-align:center;
	padding:10px;
	text-decoration:none;
}
a:hover,a:active
{
	background-color:#7A991A;
}
/* 响应式布局 - 屏幕尺寸小于 800px 时,两列布局改为上下布局 */
@media screen and (max-width: 800px) {

    .leftcolumn,
    .rightcolumn {
        width: 100%;
        padding: 0;
    }
}

/* 响应式布局 -屏幕尺寸小于 400px 时,导航等布局改为上下布局 */
@media screen and (max-width: 400px) {
    .topnav a {
        float: none;
        width: 100%;
    }
}

/* 响应式布局 - 小于 600 px 时改为上下布局 */
@media screen and (max-width: 600px) {
    .column {
        width: 100%;
    }
}

/* 底部样式 */
.footer {
    /*
    background-color: #f1f1f1;
    padding: 10px;
    text-align: center;
*/
    padding: 20px;
    text-align: center;
    background: #ddd;
    margin-top: 20px;
}

.container {
    column-width: 350px;
    column-gap: 200px;
}

.container1 {
    column-width: 100%;
    column-gap: 200px;
}

.card {
    break-inside: avoid;
    page-break-inside: avoid;
    background-color: rgb(207, 232, 220);
    border: 2px solid rgb(79, 185, 227);
    padding: 10px;
    margin: 0 0 1em 0;
}

.card1 {
    break-inside: avoid;
    page-break-inside: avoid;
    background-color: rgb(207, 232, 220);
    border: 2px solid rgb(79, 185, 227);
    padding: 10px;
    margin: 0 0 1em 0;
    text-align: center;
}

.right {
    position: absolute;
    right: 2px;
    width: 600px;
    border: 3px solid #73AD21;
    padding: 10px;
    background-color: #b0e0e6;
}

.left {
    position: absolute;
    left: 2px;
    width: 600px;
    border: 3px solid #73AD21;
    padding: 10px;
    background-color: #b0e0e6;
}

ul li select,
select option {
    direction: ltr;
}

.d3-gauge {
    float: left;
}

/* Simple */
.d3-gauge.simple .outer-circle {
    fill: #ccc;
    stroke: #000;
    stroke-width: 0.5px;
}

.d3-gauge.simple .inner-circle {
    fill: #fff;
    stroke: #E0E0E0;
    stroke-width: 2px;
}

.d3-gauge.simple .label {
    fill: #333;
    font-size: 16px;
}

.d3-gauge.simple .labelc {
    fill: #333;
    font-size: 12px;
}

.d3-gauge.simple .major-tick {
    stroke: #333;
    stroke-width: 2px;
}

.d3-gauge.simple .minor-tick {
    stroke: #666;
    stroke-width: 1px;
}

.d3-gauge.simple .major-tick-label {
    fill: darkblue;
    stroke-width: 2px;
    font-size: 15px;
}

.d3-gauge.simple .needle {
    fill: #dc3912;
    stroke: #c63310;
    fill-opacity: 0.7;
}

.d3-gauge.simple .needle-container {
    fill: #4684EE;
    stroke: #666;
    fill-opacity: 1;
}

.d3-gauge.simple .current-value {
    fill: #000;
    stroke-width: 0px;
}

.d3-gauge.simple .green-zone {
    fill: #FF9900
}

.d3-gauge.simple .yellow-zone {
    fill: #FF9900
}

.d3-gauge.simple .red-zone {
    fill: #DC3912
}

/* GrayScale */

.d3-gauge.grayscale .outer-circle {
    fill: #00A8A9;
    stroke: #000;
    stroke-width: 0.5px;
}

.d3-gauge.grayscale .inner-circle {
    fill: #111;
    stroke: #E0E0E0;
    stroke-width: 2px;
}

.d3-gauge.grayscale .label {
    fill: #ff9102;
    font-size: 24px;
}

.d3-gauge.grayscale .labelc {
    fill: #fff;
    font-size: 12px;
}

.d3-gauge.grayscale .major-tick {
    stroke: #888;
    stroke-width: 2px;
}

.d3-gauge.grayscale .minor-tick {
    stroke: #777;
    stroke-width: 1px;
}

.d3-gauge.grayscale .major-tick-label {
    fill: #ddd;
    stroke-width: 2px;
    font-size: 15px;
}

.d3-gauge.grayscale .needle {
    fill: #ff9102;
    stroke: #555;
    fill-opacity: 0.7;
}

.d3-gauge.grayscale .needle-container {
    fill: #444;
    stroke: #666;
    fill-opacity: 1;
}

.d3-gauge.grayscale .current-value {
    fill: #fff;
    stroke-width: 0px;
}

.d3-gauge.grayscale .green-zone {
    fill: #ddd;
}

.d3-gauge.grayscale .yellow-zone {
    fill: #888
}

.d3-gauge.grayscale .red-zone {
    fill: #666
}
后续优化
目前发现esp8266AP会消失,也不清楚是哪里的问题,