上两篇博客 [yolov8 检测瑞芯微 RKNN 的 C++部署] 和[yolov8pose 瑞芯微 RKNN 的C++ 部署] 写了yolov8检测的C++部署和yolov8pose的C++部署。不把yolov8seg的C++部署写一下凑齐,工作都提不起干劲,奈何总有那么多的执拗,说干就干。这一篇写一下基于rknn板子对yolov8seg进行C++部署,开源并提供完整的代码、模型、使用流程,供网友自行进行测试验证。
特别说明:如有侵权告知删除,谢谢。
【完整代码】代码和模型
1、rknn模型准备
onnx转rknn模型这一步就不再赘述,请参考上一篇 ”yolov8seg 瑞芯微RKNN芯片、地平线Horizon芯片、TensorRT部署“ 。上一篇提供了完整的模型和仿真代码,如果仅仅是想验证模型,可以直接拿提供的rknn模型进行后续的步骤,本篇也是基于上一篇转好的rknn模型进行的,在rk3588芯片部署测试。
2、C++代码准备
本篇中的 C++ 代码基于瑞芯微官方提供的 rknpu2_1.3.0 进行的。官方提供的开源示例参考 ,提取码:rknn .
3、C++ 代码说明
模型和图片读取部分参考rknn官方提供的示例,主要说明后处理部分。定义了一个yolov8seg后处理类,将模型输出进行解码处理,解码结果装在一个vector中,装的格式按照 classId,score,xmin,ymin,xmax,ymax, classId,score,xmin,ymin,xmax,ymax … 进行,每六个数据为一个检测框,对 vector 进行遍历得到检测框;对分割结果装在一个cv::mat 中用于可视化。
    // 后处理部分
    std::vector<float> out_scales;
    std::vector<int32_t> out_zps;
    for (int i = 0; i < io_num.n_output; ++i)
    {


        out_scales.push_back(output_attrs[i].scale);
        out_zps.push_back(output_attrs[i].zp);
    }

    int8_t *pblob[10];
    for (int i = 0; i < io_num.n_output; ++i)
    {


        pblob[i] = (int8_t *)outputs[i].buf;
    }

    // 将检测结果按照classId、score、xmin1、ymin1、xmax1、ymax1 的格式存放在vector<float>中
    GetResultRectYolov8 PostProcess;
    std::vector<float> DetectiontRects;

    cv::Mat SegMask;
    SegMask = cv::Mat::zeros(160, 160, CV_8UC3);
    PostProcess.GetConvDetectionResult(pblob, out_zps, out_scales, DetectiontRects, SegMask);

    cv::Mat SegMaskResize;
    cv::resize(SegMask, SegMaskResize, cv::Size(640, 640), 0, 0, cv::INTER_LINEAR);

    gettimeofday(&stop_time1, NULL);
    printf("postprocess run use %f ms\n", (__get_us(stop_time1) - __get_us(stop_time)) / 1000);

    int KeyPoinstNum = 17;
    float pose_score = 0;
    int pose_x = 0, pose_y = 0;

    for (int i = 0; i < DetectiontRects.size(); i += 6)
    {


        int classId = int(DetectiontRects[i + 0]);
        float conf = DetectiontRects[i + 1];
        int xmin = int(DetectiontRects[i + 2] * float(img_width) + 0.5);
        int ymin = int(DetectiontRects[i + 3] * float(img_height) + 0.5);
        int xmax = int(DetectiontRects[i + 4] * float(img_width) + 0.5);
        int ymax = int(DetectiontRects[i + 5] * float(img_height) + 0.5);

        char text1[256];
        sprintf(text1, "%d:%.2f", classId, conf);
        rectangle(src_image, cv::Point(xmin, ymin), cv::Point(xmax, ymax), cv::Scalar(255, 0, 0), 2);
        putText(src_image, text1, cv::Point(xmin, ymin + 15), cv::FONT_HERSHEY_SIMPLEX, 0.7, cv::Scalar(0, 0, 255), 2);
    }

    cv::Mat SrcAddMask;
    cv::addWeighted(src_image, 0.55, SegMaskResize, 0.45, 0, SrcAddMask);

    cv::imwrite(save_image_path, SrcAddMask);
后处理核心部分代码如下,其中后处理代码不一定是最优的,如果有更优的写法欢迎交流。完整代码请参本实例对应的github仓库,代码和模型 。
int GetResultRectYolov8::GetConvDetectionResult(int8_t **pBlob, std::vector<int> &qnt_zp, std::vector<float> &qnt_scale, std::vector<float> &DetectiontRects, cv::Mat &SegMask)
{


    int ret = 0;
    if (meshgrid.empty())
    {


        ret = GenerateMeshgrid();
    }

    int gridIndex = -2;
    float xmin = 0, ymin = 0, xmax = 0, ymax = 0;
    float cls_val = 0;
    float cls_max = 0;
    int cls_index = 0;

    int quant_zp_cls = 0, quant_zp_reg = 0, quant_zp_msk, quant_zp_seg = 0;
    float quant_scale_cls = 0, quant_scale_reg = 0, quant_scale_msk = 0, quant_scale_seg = 0;

    DetectRect temp;
    std::vector<DetectRect> detectRects;

    for (int index = 0; index < headNum; index++)
    {


        int8_t *reg = (int8_t *)pBlob[index * 2 + 0];
        int8_t *cls = (int8_t *)pBlob[index * 2 + 1];
        int8_t *msk = (int8_t *)pBlob[index + headNum * 2];

        quant_zp_reg = qnt_zp[index * 2 + 0];
        quant_zp_cls = qnt_zp[index * 2 + 1];
        quant_zp_msk = qnt_zp[index + headNum * 2];

        quant_scale_reg = qnt_scale[index * 2 + 0];
        quant_scale_cls = qnt_scale[index * 2 + 1];
        quant_scale_msk = qnt_scale[index + headNum * 2];

        for (int h = 0; h < mapSize[index][0]; h++)
        {


            for (int w = 0; w < mapSize[index][1]; w++)
            {


                gridIndex += 2;

                for (int cl = 0; cl < class_num; cl++)
                {


                    cls_val = sigmoid(DeQnt2F32(cls[cl * mapSize[index][0] * mapSize[index][1] + h * mapSize[index][1] + w], quant_zp_cls, quant_scale_cls));

                    if(0 == cl)
                    {


                        cls_max = cls_val;
                        cls_index = cl;
                    }
                    else
                    {


                        if(cls_val > cls_max)
                        {


                            cls_max = cls_val;
                            cls_index = cl;
                        }
                    }
                }

                if (cls_val > objectThresh)
                {


                    xmin = (meshgrid[gridIndex + 0] - DeQnt2F32(reg[0 * mapSize[index][0] * mapSize[index][1] + h * mapSize[index][1] + w], quant_zp_reg, quant_scale_reg)) * strides[index];
                    ymin = (meshgrid[gridIndex + 1] - DeQnt2F32(reg[1 * mapSize[index][0] * mapSize[index][1] + h * mapSize[index][1] + w], quant_zp_reg, quant_scale_reg)) * strides[index];
                    xmax = (meshgrid[gridIndex + 0] + DeQnt2F32(reg[2 * mapSize[index][0] * mapSize[index][1] + h * mapSize[index][1] + w], quant_zp_reg, quant_scale_reg)) * strides[index];
                    ymax = (meshgrid[gridIndex + 1] + DeQnt2F32(reg[3 * mapSize[index][0] * mapSize[index][1] + h * mapSize[index][1] + w], quant_zp_reg, quant_scale_reg)) * strides[index];

                    xmin = xmin > 0 ? xmin : 0;
                    ymin = ymin > 0 ? ymin : 0;
                    xmax = xmax < input_w ? xmax : input_w;
                    ymax = ymax < input_h ? ymax : input_h;

                    if (xmin >= 0 && ymin >= 0 && xmax <= input_w && ymax <= input_h)
                    {


                        temp.xmin = xmin / input_w;
                        temp.ymin = ymin / input_h;
                        temp.xmax = xmax / input_w;
                        temp.ymax = ymax / input_h;
                        temp.classId = cls_index;
                        temp.score = cls_val;

                        for(int ms = 0; ms < maskNum; ms ++)
                        {


                            temp.mask[ms] = DeQnt2F32(msk[ms * mapSize[index][0] * mapSize[index][1] + h * mapSize[index][1] + w], quant_zp_msk, quant_scale_msk);

                        }
                        detectRects.push_back(temp);
                    }
                }
            }
        }
    }

    std::sort(detectRects.begin(), detectRects.end(), [](DetectRect &Rect1, DetectRect &Rect2) -> bool
              {

     return (Rect1.score > Rect2.score); });

    for (int i = 0; i < detectRects.size(); ++i)
    {


        float xmin1 = detectRects[i].xmin;
        float ymin1 = detectRects[i].ymin;
        float xmax1 = detectRects[i].xmax;
        float ymax1 = detectRects[i].ymax;
        int classId = detectRects[i].classId;
        float score = detectRects[i].score;

        if (classId != -1)
        {


            // 将检测结果按照classId、score、xmin1、ymin1、xmax1、ymax1的格式存放在vector<float>中
            DetectiontRects.push_back(float(classId));
            DetectiontRects.push_back(float(score));
            DetectiontRects.push_back(float(xmin1));
            DetectiontRects.push_back(float(ymin1));
            DetectiontRects.push_back(float(xmax1));
            DetectiontRects.push_back(float(ymax1));

            for (int j = i + 1; j < detectRects.size(); ++j)
            {


                float xmin2 = detectRects[j].xmin;
                float ymin2 = detectRects[j].ymin;
                float xmax2 = detectRects[j].xmax;
                float ymax2 = detectRects[j].ymax;
                float iou = IOU(xmin1, ymin1, xmax1, ymax1, xmin2, ymin2, xmax2, ymax2);
                if (iou > nmsThresh)
                {


                    detectRects[j].classId = -1;
                }
            }
        }
    }

    int8_t *seg = (int8_t *)pBlob[9];
    quant_zp_seg = qnt_zp[9];
    quant_scale_seg = qnt_scale[9];

    int left = 0, top = 0, right = 0, bottom = 0;
    float SegSum = 0;

    for(int i = 0; i < detectRects.size(); ++ i)
    {


        if(-1 != detectRects[i].classId)
        {


            left = int(detectRects[i].xmin * mask_seg_w + 0.5);
            top = int(detectRects[i].ymin * mask_seg_h + 0.5);
            right = int(detectRects[i].xmax * mask_seg_w + 0.5);
            bottom = int(detectRects[i].ymax * mask_seg_h + 0.5);

            for(int h = top; h < bottom; ++ h)
            {


                for(int w = left; w < right; ++ w)
                {


                    SegSum = 0;
                    for(int s = 0; s < maskNum; ++ s)
                    {


                        SegSum += detectRects[i].mask[s] * DeQnt2F32(seg[s * mask_seg_w * mask_seg_h + h * mask_seg_w + w], quant_zp_seg, quant_scale_seg);
                    }

                    if(1 / (1 + exp(-SegSum)) > 0.5)
                    {


                        SegMask.at<cv::Vec3b>(h, w) = ColorLists[detectRects[i].classId / 10];
                    }
                }
            }
        }
    }

    return ret;
}
4、编译运行
1)编译
cd examples/rknn_yolov8seg_demo_open

bash build-linux_RK3588.sh
2)运行
cd install/rknn_yolov8seg_demo_Linux

./rknn_yolov8seg_demo
注意:修改模型、测试图像、保存图像的路径,所在文件为 src 下main.cc文件。
5、板端推理效果
onnx 效果
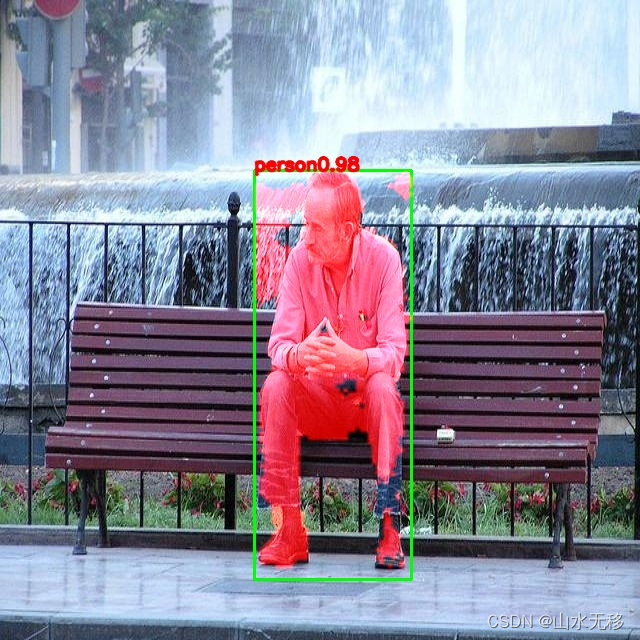
冒号“:”前的数子是类别,后面的浮点数是目标得分。(类别:得分)
板端推理效果
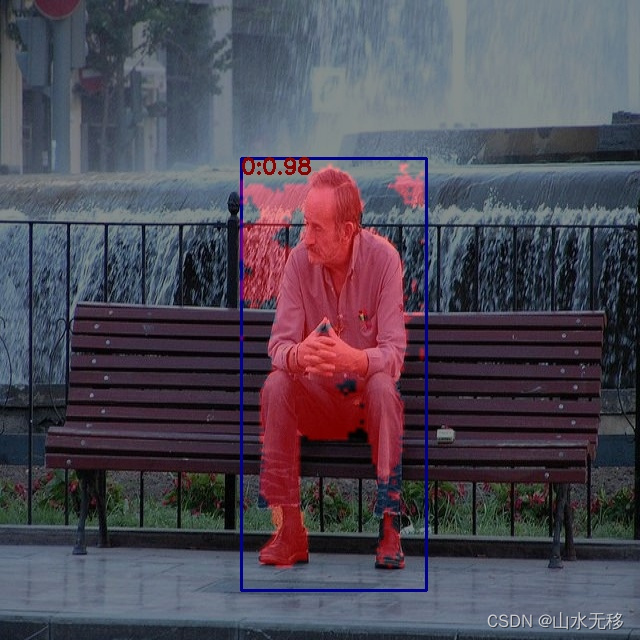
说明:推理测试预处理没有考虑等比率缩放,激活函数 SiLU 用 Relu 进行了替换。由于使用的数据不多,效果并不是很好,仅供测试流程用。
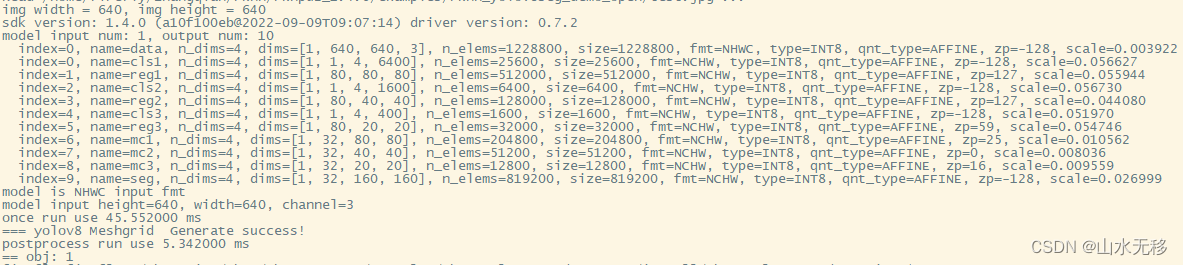
6、模型和后处理时耗
模型和后处理时耗贴出来,供大家参考,使用芯片rk3588,输入的分辨率640x640。