大家都知道在Android中通过AIDL可以跨进程调用Service中的数据,网上也有很多实例,但是大部分实例都是关于基本数据类型的远程调用,很少讲到复杂数据的调用,今天我用一个例子来演示一下怎样用AIDL Service 传递复杂数据。
我们分2步开始:
第一步:部署我们的服务端,也就是Service端:
1:在Service端我先自定义2个类型:Person和Pet。因为我们需要跨进程传递Person对象和Pet对象,所以Person类和Pet类都必须实现Parcelable接口,并要求在实现类中定义一个名为CREATER,类型为Parcelable.creator的静态Field。
代码如下:
package com.example.remoteservice;

import android.os.Parcel;
import android.os.Parcelable;

public class Person implements Parcelable {
    int id;
    String name;
    String pass;

    public Person() {

    }

    public Person(int id, String name, String pass) {
        this.id = id;
        this.name = name;
        this.pass = pass;
    }

    @Override
    public boolean equals(Object o) {
        if (this == o) {
            return true;
        }
        if (o == null) {
            return false;
        }

        if (getClass() != o.getClass()) {
            return false;
        }
        Person other = (Person) o;

        if (name == null) {
            if (other.name != null) {
                return false;
            }
        } else if (!name.equals(other.name)) {
            return false;
        }

        if (pass == null) {
            if (other.pass != null) {
                return false;
            }
        } else if (!pass.equals(other.pass)) {
            return false;
        }

        return true;
    }

    @Override
    public int hashCode() {
        final int prime = 31;
        int result = 1;
        result = prime * result + (name == null ? 0 : name.hashCode());
        result = prime * result + (pass == null ? 0 : pass.hashCode());
        return result;
    }

    @Override
    public int describeContents() {

        return 0;
    }

    @Override
    public void writeToParcel(Parcel arg0, int arg1) {
        arg0.writeInt(id);
        arg0.writeString(name);
        arg0.writeString(pass);
    }

    public static final Parcelable.Creator<Person> CREATOR = new Creator<Person>() {

        @Override
        public Person createFromParcel(Parcel source) {

            return new Person(source.readInt(), source.readString(), source.readString());
        }

        @Override
        public Person[] newArray(int size) {

            return new Person[size];
        }
    };

    public int getId() {
        return id;
    }

    public void setId(int id) {
        this.id = id;
    }

    public String getName() {
        return name;
    }

    public void setName(String name) {
        this.name = name;
    }

    public String getPass() {
        return pass;
    }

    public void setPass(String pass) {
        this.pass = pass;
    }

}
因为我们会对Person进行比较,所以在Person类中我重写了
public int hashCode() 和 public boolean equals(Object o)方法
package com.example.remoteservice;

import android.os.Parcel;
import android.os.Parcelable;

public class Pet implements Parcelable {
    String name;
    float weight;

    public Pet(String name, float weight) {
        this.name = name;
        this.weight = weight;
    }

    public String getName() {
        return name;
    }

    public void setName(String name) {
        this.name = name;
    }

    public float getWeight() {
        return weight;
    }

    public void setWeight(float weight) {
        this.weight = weight;
    }

    @Override
    public int describeContents() {

        return 1;
    }

    @Override
    public void writeToParcel(Parcel dest, int flags) {
        dest.writeString(name);
        dest.writeFloat(weight);

    }

    public static final Parcelable.Creator<Pet> CREATOR = new Creator<Pet>() {

        @Override
        public Pet createFromParcel(Parcel source) {

            return new Pet(source.readString(), source.readFloat());
        }

        @Override
        public Pet[] newArray(int size) {

            return new Pet[size];
        }
    };

    @Override
    public String toString() {

        return "name:" + this.name + ";weight:" + this.weight;
    }

}
2:创建完自定义类型之后还需要用AIDL来定义它们,Person.aidl和Pet.aidl的代码如下:
Person.aidl
package com.example.remoteservice;
parcelable Person;
Pet.aidl
package com.example.remoteservice;
parcelable Pet;
3:完成1,2之后就可以使用AIDL定义通信接口了,在这里我定义一个IPet.aidl的接口,代码如下:
package com.example.remoteservice; //必须导入包
import com.example.remoteservice.Person; //指定自定义类的位置
import com.example.remoteservice.Pet;

interface IPet
{
List<Pet> getPets(in Person owner);//这里的in表示Person对象是输入的参数
}
4:服务端的最后一步就是实现Service了,当然不要忘了注册Service,代码如下:
package com.example.remoteservice;

import com.example.remoteservice.IPet.Stub;

import java.util.ArrayList;
import java.util.HashMap;
import java.util.List;
import java.util.Map;

import android.app.Service;
import android.content.Intent;
import android.os.IBinder;
import android.os.RemoteException;
import android.util.Log;

public class RemoteService extends Service {

    private PetBinder petBinder;

    private static Map<Person, List<Pet>> pets = new HashMap<Person, List<Pet>>();
    static {
        ArrayList<Pet> list1 = new ArrayList<Pet>();
        list1.add(new Pet("candy", 2.2f));
        list1.add(new Pet("sandy", 4.2f));
        pets.put(new Person(1, "sun", "sun"), list1);

        ArrayList<Pet> list2 = new ArrayList<Pet>();
        list2.add(new Pet("moon", 5.2f));
        list2.add(new Pet("hony", 6.2f));
        pets.put(new Person(1, "csx", "csx"), list2);

    }

    public class PetBinder extends Stub {// 继承IPet接口中的Stub类,Stub类继承了Binder类,所有PetBinder也间接的继承了Binder类

        @Override
        public List<Pet> getPets(Person owner) throws RemoteException {

            return pets.get(owner);
        }

    }

    @Override
    public IBinder onBind(Intent intent) {

        Log.i("csx", "onBind");
        return petBinder;
    }

    @Override
    public void onCreate() {

        super.onCreate();
        Log.i("csx", "onCreate");
        petBinder = new PetBinder();// 实例化Binder

    }

    @Override
    public boolean onUnbind(Intent intent) {

        Log.i("csx", "onUnbind");
        return super.onUnbind(intent);
    }

    @Override
    public void onDestroy() {

        super.onDestroy();
        Log.i("csx", "onDestroy");
    }

}
这是我Service端的部署情况(其中MainActivity可以不用去实现,因为我们只提供服务,没有窗口显示):

第二步:部署客户端:
1.在客户端新建一个包,命名需要和服务端放置aidl文件的包名相同(我这里是com.example.remoteservice),然后把服务端的Person.java,Pet.java,Person.aidl,Pet.aidl,IPet.aidl复制到这个包下面

2.在activity中绑定远程服务进行数据交换,layout布局和activity代码如下:
<RelativeLayout xmlns:android="http://schemas.android.com/apk/res/android"
    xmlns:tools="http://schemas.android.com/tools"
    android:layout_width="match_parent"
    android:layout_height="match_parent"
    android:paddingBottom="@dimen/activity_vertical_margin"
    android:paddingLeft="@dimen/activity_horizontal_margin"
    android:paddingRight="@dimen/activity_horizontal_margin"
    android:paddingTop="@dimen/activity_vertical_margin"
    tools:context="com.example.remoteclient.RemoteClient" >

    <LinearLayout
        android:layout_width="match_parent"
        android:layout_height="match_parent"
        android:orientation="vertical" >

        <LinearLayout
            android:layout_width="match_parent"
            android:layout_height="wrap_content"
            android:orientation="horizontal" >

            <EditText
                android:id="@+id/editText_person"
                android:layout_width="wrap_content"
                android:layout_height="wrap_content"
                android:layout_gravity="bottom"
                android:ems="10" >
            </EditText>

            <Button
                android:id="@+id/button_ok"
                android:layout_width="wrap_content"
                android:layout_height="wrap_content"
                android:layout_gravity="bottom"
                android:text="确定" />
        </LinearLayout>

        <ListView
            android:id="@+id/listView_pet"
            android:layout_width="match_parent"
            android:layout_height="wrap_content" >
        </ListView>
    </LinearLayout>

</RelativeLayout>
package com.example.remoteclient;
import android.app.Service;
import android.content.ComponentName;
import android.content.Intent;
import android.content.ServiceConnection;
import android.os.Bundle;
import android.os.IBinder;
import android.os.RemoteException;
import android.support.v7.app.ActionBarActivity;
import android.util.Log;
import android.view.View;
import android.view.View.OnClickListener;
import android.widget.ArrayAdapter;
import android.widget.Button;
import android.widget.EditText;
import android.widget.ListView;
import com.example.remoteservice.IPet;
import com.example.remoteservice.Person;
import com.example.remoteservice.Pet;
import java.util.List;
public class RemoteClient extends ActionBarActivity {
public static final String REMOTE_SERVICE_ACTION = "com.example.remoteservice.RemoteService.ACTION";
EditText editText;
Button button;
ListView listView;
IPet petService;// 声明IPet接口
List<Pet> pets;
ServiceConnection conn = new ServiceConnection() {
@Override
public void onServiceDisconnected(ComponentName name) {
Log.i("csx", "onServiceDisconnected");
conn = null;
}
@Override
public void onServiceConnected(ComponentName name, IBinder service) {
Log.i("csx", "onServiceConnected");
petService = IPet.Stub.asInterface(service);// 通过远程服务的Binder实现接口
}
};
@Override
protected void onCreate(Bundle savedInstanceState) {
super.onCreate(savedInstanceState);
setContentView(R.layout.remote_client_layout);
editText = (EditText) findViewById(R.id.editText_person);
button = (Button) findViewById(R.id.button_ok);
listView = (ListView) findViewById(R.id.listView_pet);
Intent service = new Intent();
service.setAction(REMOTE_SERVICE_ACTION);
bindService(service, conn, Service.BIND_AUTO_CREATE);// 绑定远程服务
button.setOnClickListener(new OnClickListener() {
@Override
public void onClick(View v) {
String personName = editText.getText().toString();
if (personName == null || personName.equals("")) {
return;
}
try {
pets = petService.getPets(new Person(1, personName, personName));// 调用远程service的getPets方法
updataListView();
} catch (RemoteException e) {
e.printStackTrace();
} catch (NullPointerException e) {
e.printStackTrace();
}
}
});
}
public void updataListView() {
listView.setAdapter(null);
if (pets == null || pets.isEmpty()) {
return;
}
ArrayAdapter<Pet> adapter = new ArrayAdapter<Pet>(RemoteClient.this,
android.R.layout.simple_list_item_1, pets);
listView.setAdapter(adapter);
}
@Override
protected void onDestroy() {
unbindService(conn);// 解除绑定
super.onDestroy();
}
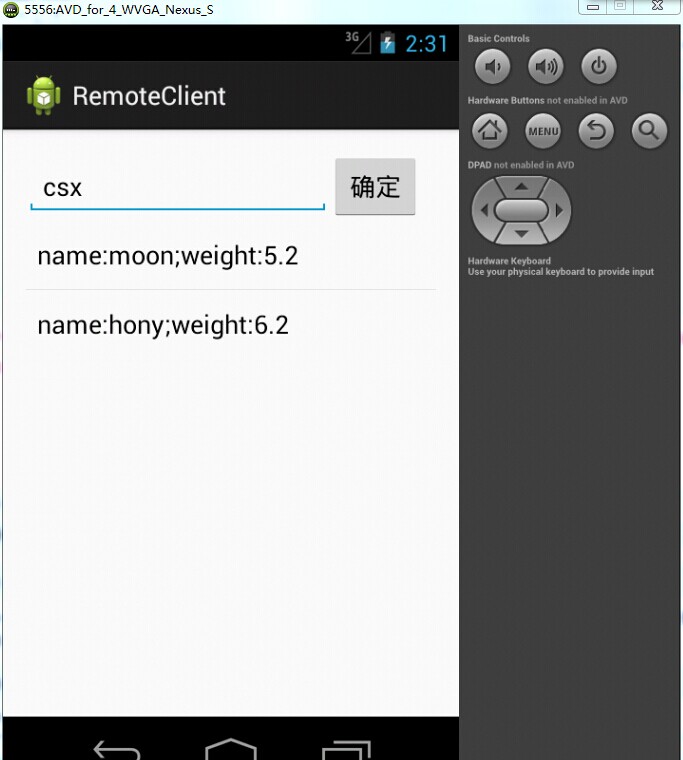
}到此为止所有的工作都完成了,下面我们看一下效果:我在编辑框中输入“csx”,点击确定,就会显示出服务端RemoteService中pets的相应数据。