Uniapp零基础开发学习笔记(9) -媒体组件音视频摄像头等的练习使用
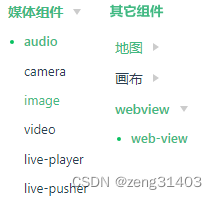
基础组件部分,最后就只剩余媒体组件以及地图,和画布Canvas,以及浏览器组件web-view。
此次先看看媒体组件,重点学习前面几个。
链接如下:
https://uniapp.dcloud.net.cn/component/audio.html#
1.媒体组件的用法
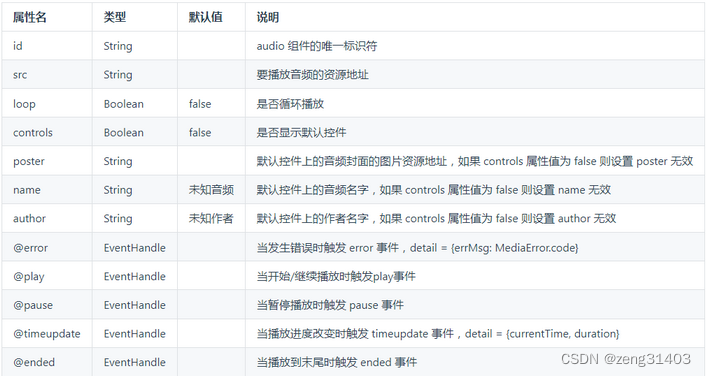
1. audio音频组件

这是演示案例的效果。
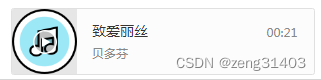
示例源代码,其中src播放地址,poster封面图片地址,以及name音频名称,author作者,播放动作action这个貌似不在所列属性之内。如果定义loop=‘true’则循环播放。
<!-- 音频播放 -->
<view class="uni-padding-wrap uni-common-mt">
	<view class="page-section page-section-gap" style="text-align: center;">
		<audio style="text-align: left" :src="current.src" :poster="current.poster" :name="current.name"
		:author="current.author" :action="audioAction" controls></audio>
	</view>
</view>
<!-- 音频播放结束 -->
JS代码如下,补充了变量定义。
export default {


	data() {


		return {


			current: {


				poster: 'https://bjetxgzv.cdn.bspapp.com/VKCEYUGU-uni-app-doc/7fbf26a0-4f4a-11eb-b680-7980c8a877b8.png',
				name: '致爱丽丝',
				author: '贝多芬',
				src: 'https://bjetxgzv.cdn.bspapp.com/VKCEYUGU-hello-uniapp/2cc220e0-c27a-11ea-9dfb-6da8e309e0d8.mp3',
			},
			audioAction: {


				method: 'pause'
			}
		}
	}
}
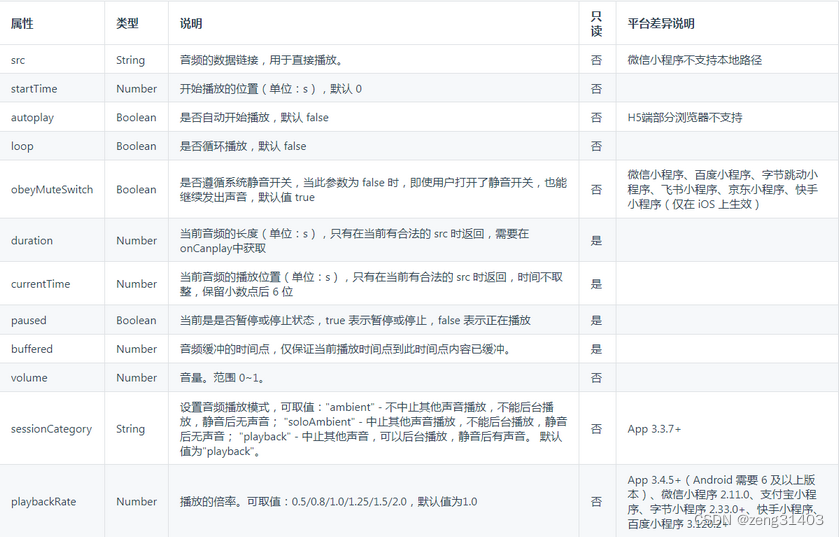
微信小程序以及其它很多小程序已经不支持audio组件了,试试用API来写一下,见uni.createInnerAudioContext
加入一个按钮播放音乐,定义click触发播放音乐函数playAudio
<button type="primary" @click="playAudio">播放音乐</button>
函数定义:
playAudio() {


	const innerAudioContext = uni.createInnerAudioContext();
	innerAudioContext.autoplay = true;
	innerAudioContext.src = this.current.src;
	innerAudioContext.obeyMuteSwitch=true;//根据系统音量开关切换
	innerAudioContext.volume=0.8;//音量
	innerAudioContext.onPlay(() => {


		console.info('开始播放');//开始播放
			});
	innerAudioContext.onError((res) => {


	  	console.log(res.errMsg);
	  	console.log(res.errCode);
	});
	innerAudioContext.onEnded(() => {


		console.info('结束播放');//结束播放
			});
	}
2. camera摄像头组件
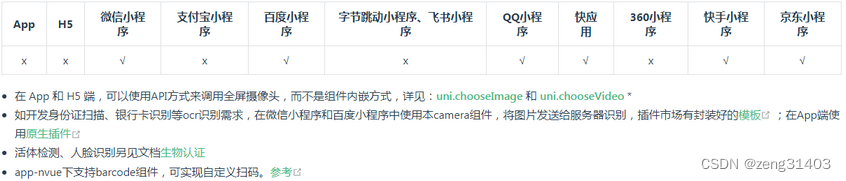
APP和H5都不支持该组件,反而微信小程序支持,因为没有下载微信小程序开发,示例代码看看但运行不了。
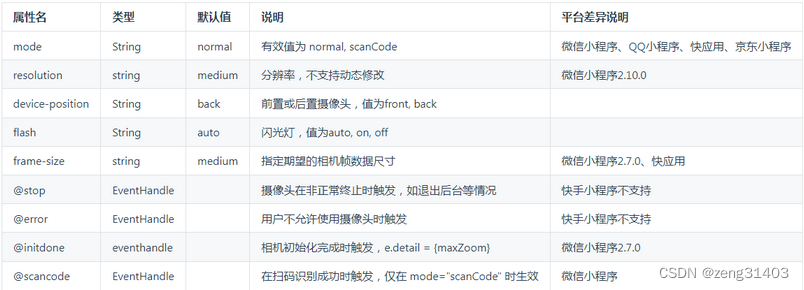
几个重要属性:
mode有效值为 normal, scanCode即拍照和扫码
resolution分辨率,类型为string,默认medium,不清楚还有其它哪些值
device-position前后摄像头front/back
flash闪光灯auto,on,off
示例代码:
<view>
     <camera device-position="back" flash="off" @error="error" style="width: 100%; height: 300px;"></camera>
     <button type="primary" @click="takePhoto">拍照</button>
     <view>预览</view>
     <image mode="widthFix" :src="src"></image>
 </view>
JS:
export default {


    data() {


        return {


            src:"" //临时存放照片的地址
        }
    },
    methods: {


         takePhoto() {


            const ctx = uni.createCameraContext();
            ctx.takePhoto({


                quality: 'high',
                success: (res) => {


                    this.src = res.tempImagePath
                }
            });
        },
        error(e) {


            console.log(e.detail);
        }
    }
}
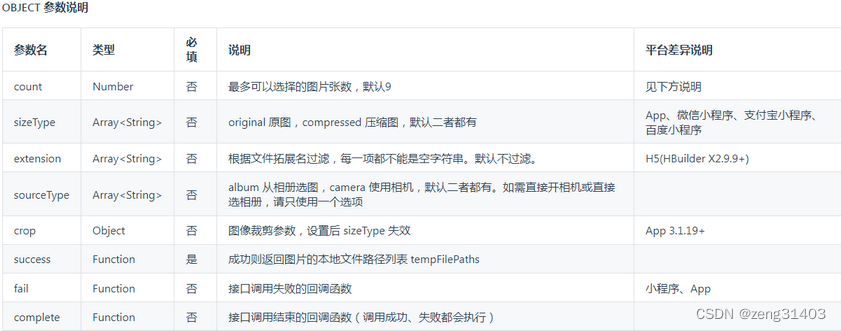
用API实现:uni.chooseImage(OBJECT)从本地相册选择图片或使用相机拍照
data() {


			return {

    }
		},
GetImg(){


		uni.chooseImage({


		count: 6, //默认9
		sizeType: ['original', 'compressed'], //可以指定是原图还是压缩图,默认二者都有
		sourceType: ['album'],//从相册选择album,相机camera,默认二者都有
		success: function (res) {


		console.log(JSON.stringify(res.tempFilePaths));
				}
		});
	}
3. image图片组件
image图片使用非常频繁。
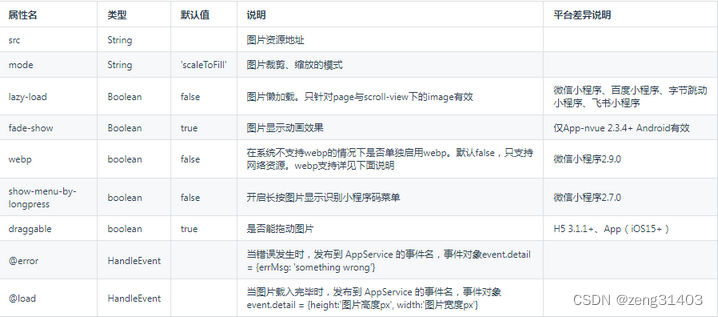
重要属性有:
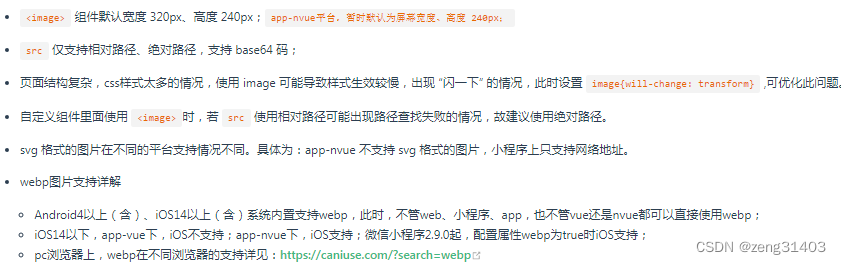
src:图片地址,静态资源和网络地址都可以
mode:对于放图片的容器尺寸,有裁剪,缩放等模式
lazy-load:图片懒加载。只针对page与scroll-view下的image有效,为了改善页面效果,先把页面框架显示出来图片位置先占位再显示。
还有是否可拖动draggable
事件方面有@load 加载完毕之后触发,@error出错之后触发
示例代码效果:
页面代码:
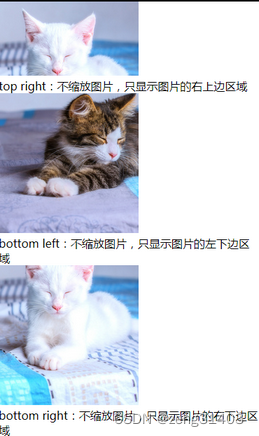
image属性中定义主要有宽/高/背景色,填充模式mode,下面展示所有模式的效果。
<view class="page">
	<view class="image-list">
		<view class="image-item" v-for="(item,index) in array" :key="index">
			<view class="image-content">
				<image style="width: 200px; height: 200px; background-color: #eeeeee;" :mode="item.mode" :src="src"
					@error="imageError"></image>
			</view>
			<view class="image-title">{

   {item.text}}</view>
		</view>
	</view>
</view>
JS:
src: 'https://bjetxgzv.cdn.bspapp.com/VKCEYUGU-uni-app-doc/6acec660-4f31-11eb-a16f-5b3e54966275.jpg',
array: [{


            mode: 'scaleToFill',
              text: 'scaleToFill:不保持纵横比缩放图片,使图片完全适应'
          }, {


              mode: 'aspectFit',
              text: 'aspectFit:保持纵横比缩放图片,使图片的长边能完全显示出来'
          }, {


              mode: 'aspectFill',
              text: 'aspectFill:保持纵横比缩放图片,只保证图片的短边能完全显示出来'
          }, {


              mode: 'top',
              text: 'top:不缩放图片,只显示图片的顶部区域'
          }, {


              mode: 'bottom',
              text: 'bottom:不缩放图片,只显示图片的底部区域'
          }, {


              mode: 'center',
              text: 'center:不缩放图片,只显示图片的中间区域'
          }, {


              mode: 'left',
              text: 'left:不缩放图片,只显示图片的左边区域'
          }, {


              mode: 'right',
              text: 'right:不缩放图片,只显示图片的右边边区域'
          }, {


              mode: 'top left',
              text: 'top left:不缩放图片,只显示图片的左上边区域'
          }, {


              mode: 'top right',
              text: 'top right:不缩放图片,只显示图片的右上边区域'
          }, {


              mode: 'bottom left',
              text: 'bottom left:不缩放图片,只显示图片的左下边区域'
          }, {


              mode: 'bottom right',
              text: 'bottom right:不缩放图片,只显示图片的右下边区域'
          }]
4. video视频组件
曾经用过一次,但播放不成功,这次看看问题在哪里。
这次终于成功了,原因是必须运行到chrome里,内置浏览器不可以。
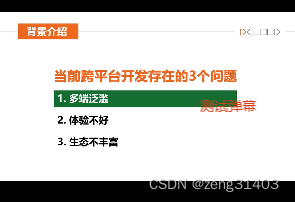
示例代码:
input v-model="danmuValue"双向绑定了待发送的弹幕的值
弹幕还可以定义颜色,这里定义了一个随机颜色的函数getRandomColor();
<!-- 视频播放 -->
<view class="uni-padding-wrap uni-common-mt">
	<view>
		<video id="myVideo" src="https://img.cdn.aliyun.dcloud.net.cn/guide/uniapp/%E7%AC%AC1%E8%AE%B2%EF%BC%88uni-	app%E4%BA%A7%E5%93%81%E4%BB%8B%E7%BB%8D%EF%BC%89-%20DCloud%E5%AE%98%E6%96%B9%E8%A7%86%E9%A2%91%E6%95%99%E7%A8%[email protected]"
			@error="videoErrorCallback" :danmu-list="danmuList"
			show-loading='true'
			enable-danmu danmu-btn controls ></video>
	</view>
	<!-- 定义条件编译,除了支付宝小程序别的都可以 -->
	<!-- #ifndef MP-ALIPAY -->
	<view class="uni-list uni-common-mt">
		<view class="uni-list-cell">
			<view>
				<view class="uni-label">弹幕内容</view>
			</view>
			<view class="uni-list-cell-db">
				<input v-model="danmuValue" class="uni-input" type="text" placeholder="在此处输入弹幕内容" />
			</view>
		</view>
	</view>
	<view class="uni-btn-v">
		<button @click="sendDanmu" class="page-body-button">发送弹幕</button>
	</view>
	<!-- #endif -->
</view>
<!-- 视频频播放结束 -->
JS:
export default {


    data() {


        return {


            src: '',
            danmuList: [{


                    text: '第 1s 出现的弹幕',
                    color: '#ff0000',
                    time: 1
                },
                {


                    text: '第 3s 出现的弹幕',
                    color: '#ff00ff',
                    time: 3
                }
            ],
            danmuValue: ''
        }
    },
    onReady: function(res) {


        // #ifndef MP-ALIPAY
        this.videoContext = uni.createVideoContext('myVideo')
        // #endif
    },
    methods: {


        sendDanmu: function() {


            this.videoContext.sendDanmu({


                text: this.danmuValue,
                color: this.getRandomColor()
            });
            this.danmuValue = '';
        },
        videoErrorCallback: function(e) {


            uni.showModal({


                content: e.target.errMsg,
                showCancel: false
            })
        },
        getRandomColor: function() {


            const rgb = []
            for (let i = 0; i < 3; ++i) {


                let color = Math.floor(Math.random() * 256).toString(16)
                color = color.length == 1 ? '0' + color : color
                rgb.push(color)
            }
            return '#' + rgb.join('')
        }
    }
}
5. live-player视频组件
实时音视频播放,也称直播拉流。这个不太用得着。看看示例代码就行了。
App的实时音视频播放,不是使用 live-player,而是直接使用 video 组件。
关键属性:
mode:live(直播),RTC(实时通话,该模式时延更低)
sound-mode:声音输出方式;可选值speaker扬声器、ear听筒
object-fit :contain-图像长边填满屏幕,短边区域会被填充;fillCrop-图像铺满屏幕,超出显示区域的部分将被截掉
<!-- 直播拉流 -->
<live-player
  src="https://domain/pull_stream"
  autoplay
  @statechange="statechange"
  @error="error"
  style="width: 300px; height: 225px;"
/>
<!-- 直播拉流结束 -->
JS
export default {


    methods:{


        statechange(e){


            console.log('live-player code:', e.detail.code)
        },
        error(e){


            console.error('live-player error:', e.detail.errMsg)
        }
    }
}
无法测试,因此了解一下就行。
6. live-pusher实时音视频录制,也称直播推流
主要的一些属性:
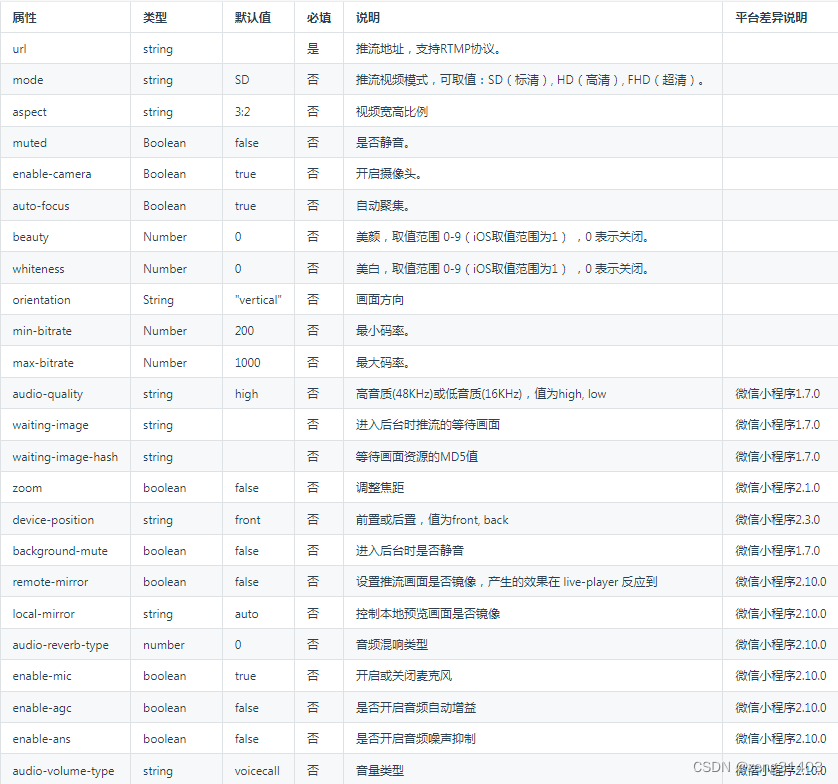
示例代码
 <view>
      <live-pusher id='livePusher' ref="livePusher" class="livePusher" url=""
       mode="SD" :muted="true" :enable-camera="true" :auto-focus="true" :beauty="1" whiteness="2"
       aspect="9:16" @statechange="statechange" @netstatus="netstatus" @error = "error"
       ></live-pusher>
       <button class="btn" @click="start">开始推流</button>
       <button class="btn" @click="pause">暂停推流</button>
       <button class="btn" @click="resume">resume</button>
       <button class="btn" @click="stop">停止推流</button>
       <button class="btn" @click="snapshot">快照</button>
       <button class="btn" @click="startPreview">开启摄像头预览</button>
       <button class="btn" @click="stopPreview">关闭摄像头预览</button>
       <button class="btn" @click="switchCamera">切换摄像头</button>
    </view>
JS
<script>
    export default {


        data() {


			return {

    }
        },
        onReady() {


            // 注意:需要在onReady中 或 onLoad 延时
            this.context = uni.createLivePusherContext("livePusher", this);
        },
        methods: {


            statechange(e) {


                console.log("statechange:" + JSON.stringify(e));
            },
            netstatus(e) {


                console.log("netstatus:" + JSON.stringify(e));
            },
            error(e) {


                console.log("error:" + JSON.stringify(e));
            },
            start: function() {


                this.context.start({


                    success: (a) => {


                        console.log("livePusher.start:" + JSON.stringify(a));
                    }
                });
            },
            close: function() {


                this.context.close({


                    success: (a) => {


                        console.log("livePusher.close:" + JSON.stringify(a));
                    }
                });
            },
            snapshot: function() {


                this.context.snapshot({


                    success: (e) => {


                        console.log(JSON.stringify(e));
                    }
                });
            },
            resume: function() {


                this.context.resume({


                    success: (a) => {


                        console.log("livePusher.resume:" + JSON.stringify(a));
                    }
                });
            },
            pause: function() {


                this.context.pause({


                    success: (a) => {


                        console.log("livePusher.pause:" + JSON.stringify(a));
                    }
                });
            },
            stop: function() {


                this.context.stop({


                    success: (a) => {


                        console.log(JSON.stringify(a));
                    }
                });
            },
            switchCamera: function() {


                this.context.switchCamera({


                    success: (a) => {


                        console.log("livePusher.switchCamera:" + JSON.stringify(a));
                    }
                });
            },
            startPreview: function() {


                this.context.startPreview({


                    success: (a) => {


                        console.log("livePusher.startPreview:" + JSON.stringify(a));
                    }
                });
            },
            stopPreview: function() {


                this.context.stopPreview({


                    success: (a) => {


                        console.log("livePusher.stopPreview:" + JSON.stringify(a));
                    }
                });
            }
        }
    }
</script>
H5上不支持预览,因此也只是了解。