一.使用Vant组件库-小程序版本
1.安装
步骤一 通过 npm 安装
# 通过 npm 安装
npm i @vant/weapp -S --production

# 通过 yarn 安装
yarn add @vant/weapp --production
步骤二 修改 app.json
将 app.json 中的 "style": "v2" 去除,小程序的新版基础组件强行加上了许多样式,难以覆盖,不关闭将造成部分组件样式混乱。
步骤三 修改 project.config.json
开发者工具创建的项目,miniprogramRoot 默认为 miniprogram,package.json 在其外部,npm 构建无法正常工作。
需要手动在 project.config.json 内添加如下配置,使开发者工具可以正确索引到 npm 依赖的位置。
{
  ...
  "setting": {
    ...
    "packNpmManually": true,
    "packNpmRelationList": [
      {
        "packageJsonPath": "./package.json",
        "miniprogramNpmDistDir": "./miniprogram/"
      }
    ]
  }
}
注意: 由于目前新版开发者工具创建的小程序目录文件结构问题,npm构建的文件目录为miniprogram_npm,并且开发工具会默认在当前目录下创建miniprogram_npm的文件名,所以新版本的miniprogramNpmDistDir配置为'./'即可
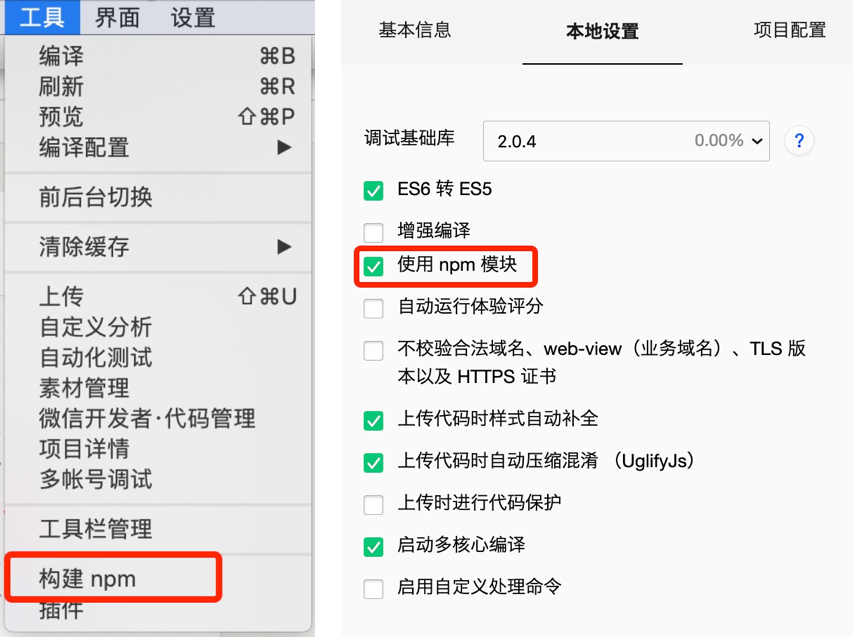
步骤四 构建 npm 包
打开微信开发者工具,点击 工具 -> 构建 npm,并勾选 使用 npm 模块 选项,构建完成后,即可引入组件。
2.引用组件
以 Button 组件为例,只需要在app.json或index.json中配置 Button 对应的路径即可。
// 通过 npm 安装
// app.json
"usingComponents": {
  "van-button": "@vant/weapp/button/index"
}
3.使用组件
引入组件后,可以在 wxml 中直接使用组件
<van-button type="primary">按钮</van-button>二.使用Uploader 组件
1.引入
在app.json或index.json中引入组件。
"usingComponents": {
  "van-uploader": "@vant/weapp/uploader/index"
}
2.基础用法
文件上传完毕后会触发after-read回调函数,获取到对应的文件的临时地址,然后再使用wx.uploadFile将图片上传到远程服务器上。
<van-uploader file-list="{

   { fileList }}" bind:after-read="afterRead" />
Page({
data: {
fileList: [],
},
afterRead(event) {
const { file } = event.detail;
// 当设置 mutiple 为 true 时, file 为数组格式,否则为对象格式
wx.uploadFile({
url: 'https://example.weixin.qq.com/upload', // 仅为示例,非真实的接口地址
filePath: file.url,
name: 'file',
formData: { user: 'test' },
success(res) {
// 上传完成需要更新 fileList
const { fileList = [] } = this.data;
fileList.push({ ...file, url: res.data });
this.setData({ fileList });
},
fail(err){
wx.showToast({
title: '上传失败,请重试',
icon:"none"
})
}
});
},
});multiple属性
| multiple | 是否开启图片多选,部分安卓机型不支持 | boolean | false |
当设置 mutiple 为 true 时, file 为数组格式,否则为对象格式。设置 mutiple 为 true 时,选择完图片,以递归的方式通过wx.uploadFile上传图片。
 afterRead(event) {
    const { file } = event.detail;
    // 当设置 mutiple 为 true 时, file 为数组格式,否则为对象格式
    let that =this
    file.forEach(item => {
	  wx.uploadFile({
      url: `https://example.weixin.qq.com/upload`, // 仅为示例,非真实的接口地址
      filePath: item.url,
      name: 'file',
      success(res) {
       // 上传完成需要更新 fileList
        const { fileList = [] } = this.data;
        fileList.push({ ...file, url: res.data });
        this.setData({ fileList });
      },
      fail(err){
        console.log("文件上传ERR",err)
        console.log(err)
        wx.showToast({
          title: '上传失败,请重试',
          icon:"none"
        })
      }
    });
	 })
  },
这样就能实现小程序批量上传照片了
三.wx.uploadFile
1.功能描述
将本地资源上传到服务器。客户端发起一个 HTTPS POST 请求,其中 content-type 为 multipart/form-data。
wx.chooseImage({
  success (res) {
    const tempFilePaths = res.tempFilePaths
    wx.uploadFile({
      url: 'https://example.weixin.qq.com/upload', //仅为示例,非真实的接口地址
      filePath: tempFilePaths[0],
      name: 'file',
      formData: {
        'user': 'test'
      },
      success (res){
        const data = res.data
        //do something
      }
    })
  }
})
2.参数
| 属性 | 类型 | 默认值 | 必填 | 说明 | 最低版本 |
|---|---|---|---|---|---|
| url | string | 是 | 开发者服务器地址 | ||
| filePath | string | 是 | 要上传文件资源的路径 (本地路径) | ||
| name | string | 是 | 文件对应的 key,开发者在服务端可以通过这个 key 获取文件的二进制内容 | ||
| header | Object | 否 | HTTP 请求 Header,Header 中不能设置 Referer | ||
| formData | Object | 否 | HTTP 请求中其他额外的 form data | ||
| timeout | number | 否 | 超时时间,单位为毫秒 | 2.10.0 | |
| success | function | 否 | 接口调用成功的回调函数 | ||
| fail | function | 否 | 接口调用失败的回调函数 | ||
| complete | function | 否 | 接口调用结束的回调函数(调用成功、失败都会执行) |
四.wx.chooseImage
1.功能描述
从本地相册选择图片或使用相机拍照。
wx.chooseImage({
  count: 1,
  sizeType: ['original', 'compressed'],
  sourceType: ['album', 'camera'],
  success (res) {
    // tempFilePath可以作为img标签的src属性显示图片
    const tempFilePaths = res.tempFilePaths
  }
})
2.参数
| 属性 | 类型 | 默认值 | 必填 | 说明 | ||||||
| count | number | 9 | 否 | 最多可以选择的图片张数 | ||||||
| sizeType | Array.<string> | ['original', 'compressed'] | 否 | 所选的图片的尺寸 | ||||||
|
||||||||||
| sourceType | Array.<string> | ['album', 'camera'] | 否 | 选择图片的来源 | ||||||
|
||||||||||
| success | function | 否 | 接口调用成功的回调函数 | |||||||
| fail | function | 否 | 接口调用失败的回调函数 | |||||||
| complete | function | 否 | 接口调用结束的回调函数(调用成功、失败都会执行) | |||||||