概要
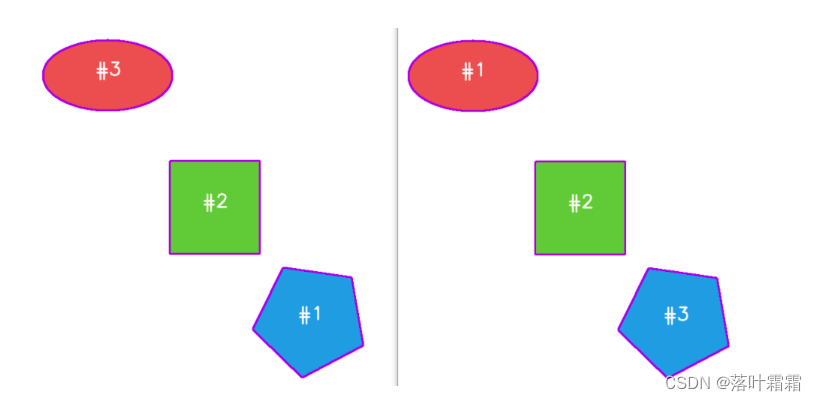
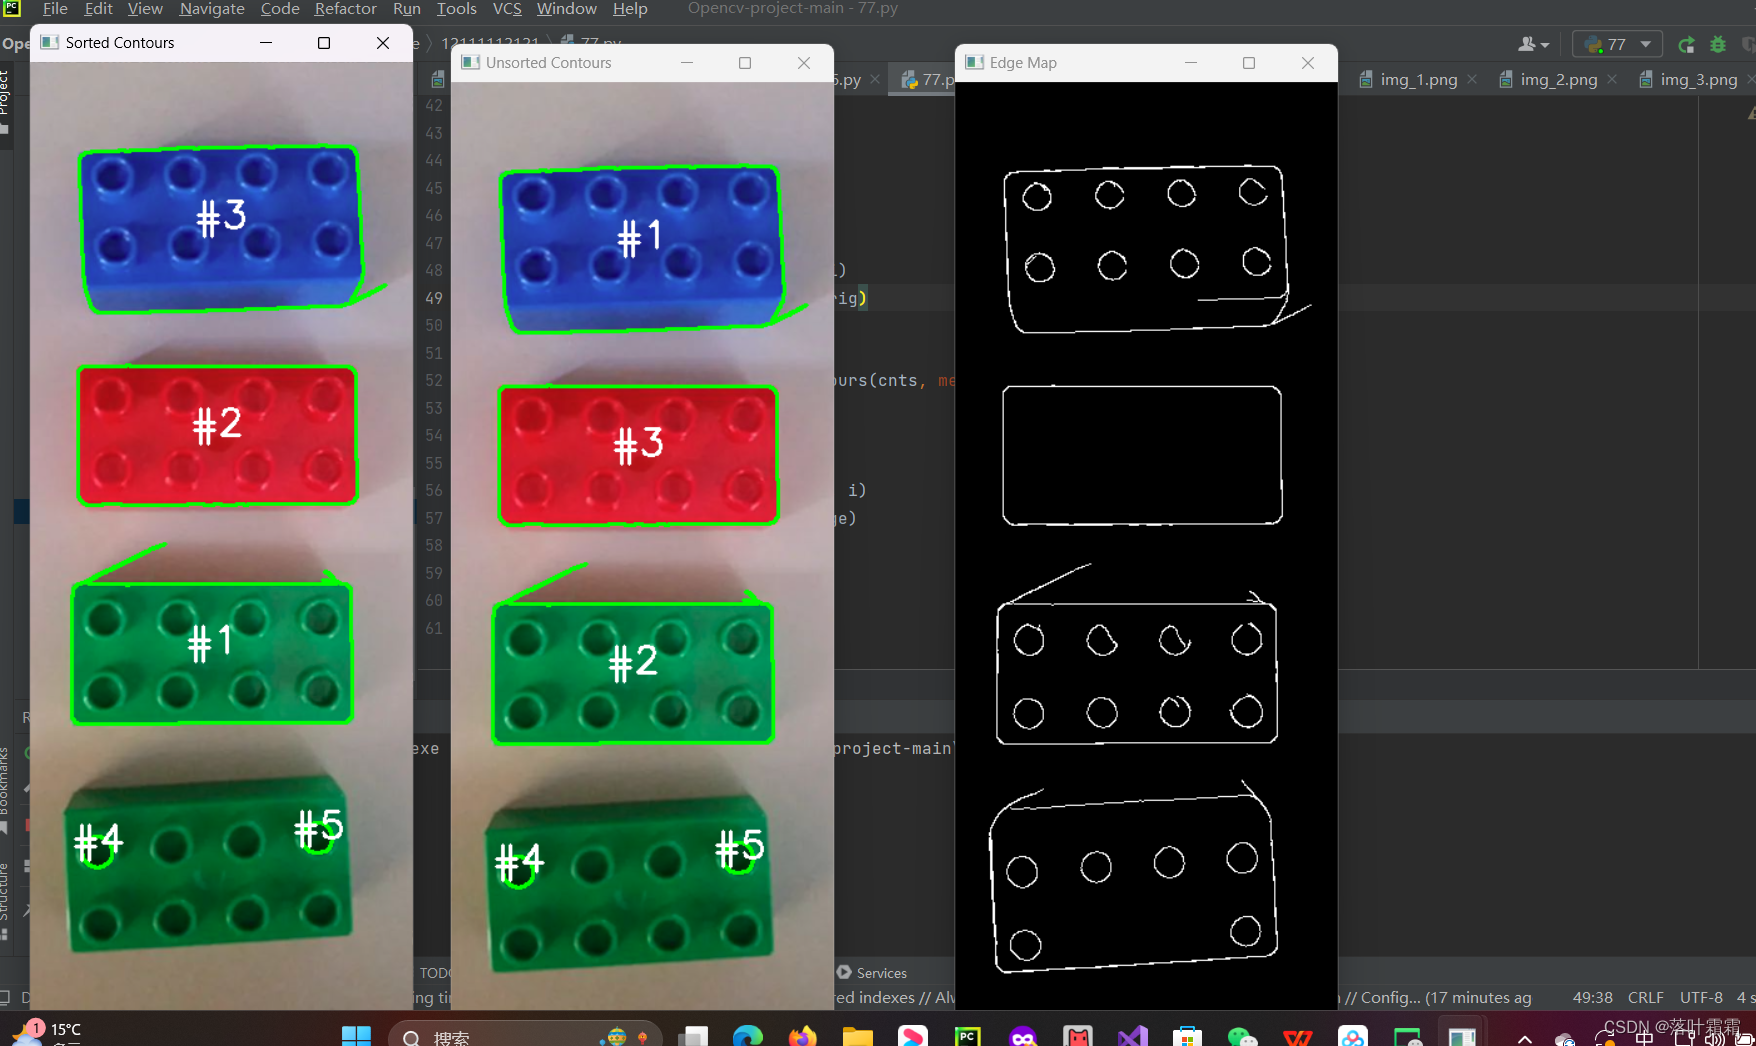
在图像处理中,经常需要进行与物体轮廓相关的操作,比如计算目标轮廓的周长、面积等。为了获取目标轮廓的信息,通常使用OpenCV的findContours函数。然而,一旦获得轮廓信息后,可能会发现轮廓的顺序是无序的,如下图左侧所示:
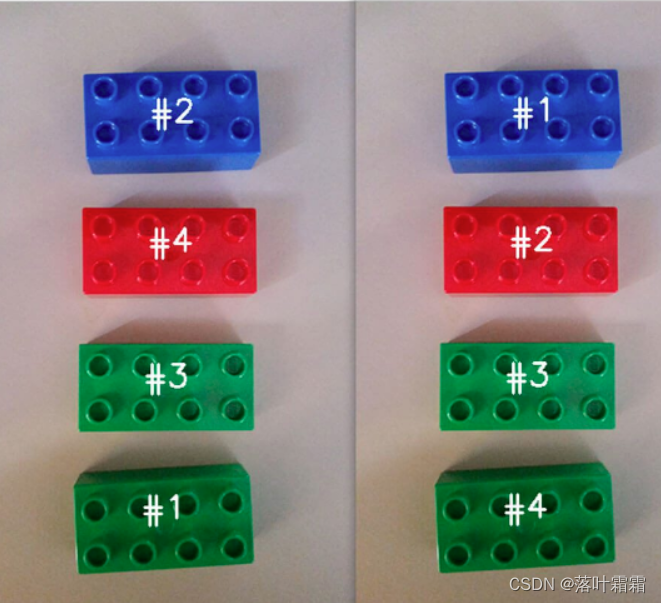
在这个图中,每个轮廓都被找到,但它们的顺序是混乱的,这使得难以对每个目标进行准确的测量和分析。为了解决这个问题,我们需要对轮廓进行排序,以便更方便地进行后续处理。
读取图像
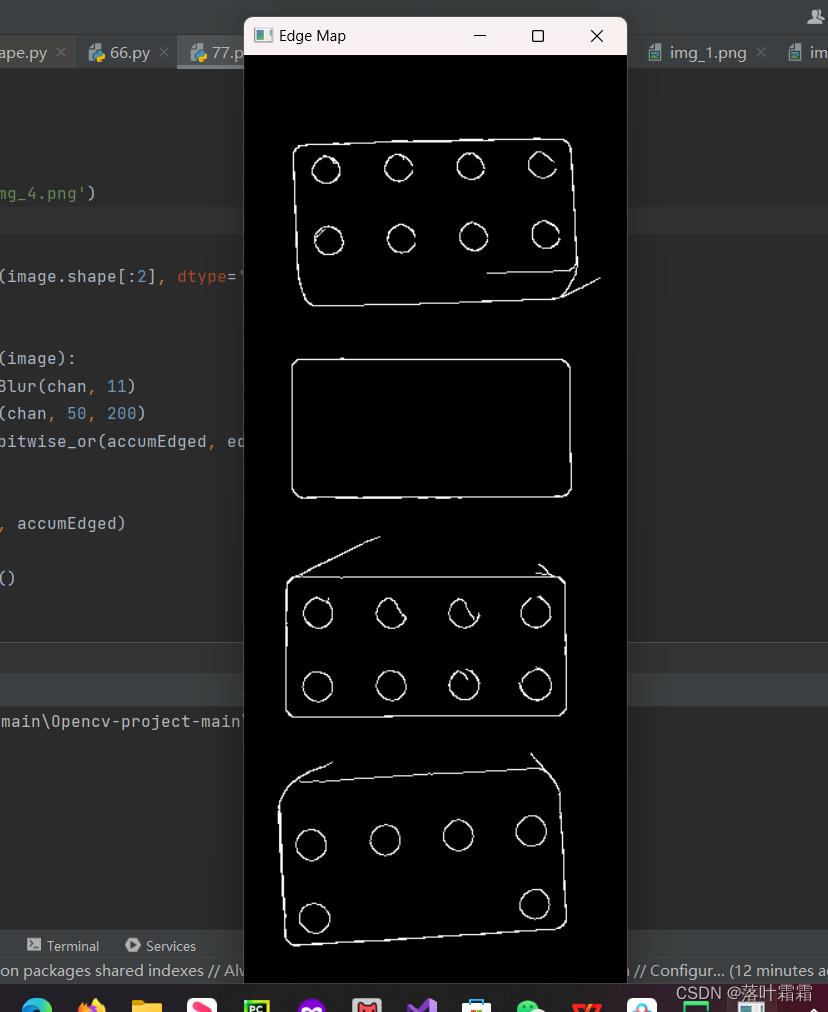
开始读取图像并生成其边缘检测图。
import cv2
import numpy as np

# 读取图像
image = cv2.imread('img_4.png')

# 初始化累积边缘图
accumEdged = np.zeros(image.shape[:2], dtype='uint8')

# 对每个通道进行边缘检测
for chan in cv2.split(image):
    chan = cv2.medianBlur(chan, 11)
    edged = cv2.Canny(chan, 50, 200)
    accumEdged = cv2.bitwise_or(accumEdged, edged)

# 显示边缘检测图
cv2.imshow('Edge Map', accumEdged)
cv2.waitKey(0)
cv2.destroyAllWindows()
获取轮廓
opencv-python中查找图像轮廓的API为:findContours函数,该函数接收二值图像作为输入,可输出物体外轮廓、内外轮廓等等。
import cv2
import numpy as np
# 读取图像
image = cv2.imread('img_4.png')
# 初始化累积边缘图
accumEdged = np.zeros(image.shape[:2], dtype='uint8')
# 对每个通道进行边缘检测
for chan in cv2.split(image):
chan = cv2.medianBlur(chan, 11)
edged = cv2.Canny(chan, 50, 200)
accumEdged = cv2.bitwise_or(accumEdged, edged)
# 显示边缘检测图
cv2.imshow('Edge Map', accumEdged)
# 寻找图像轮廓
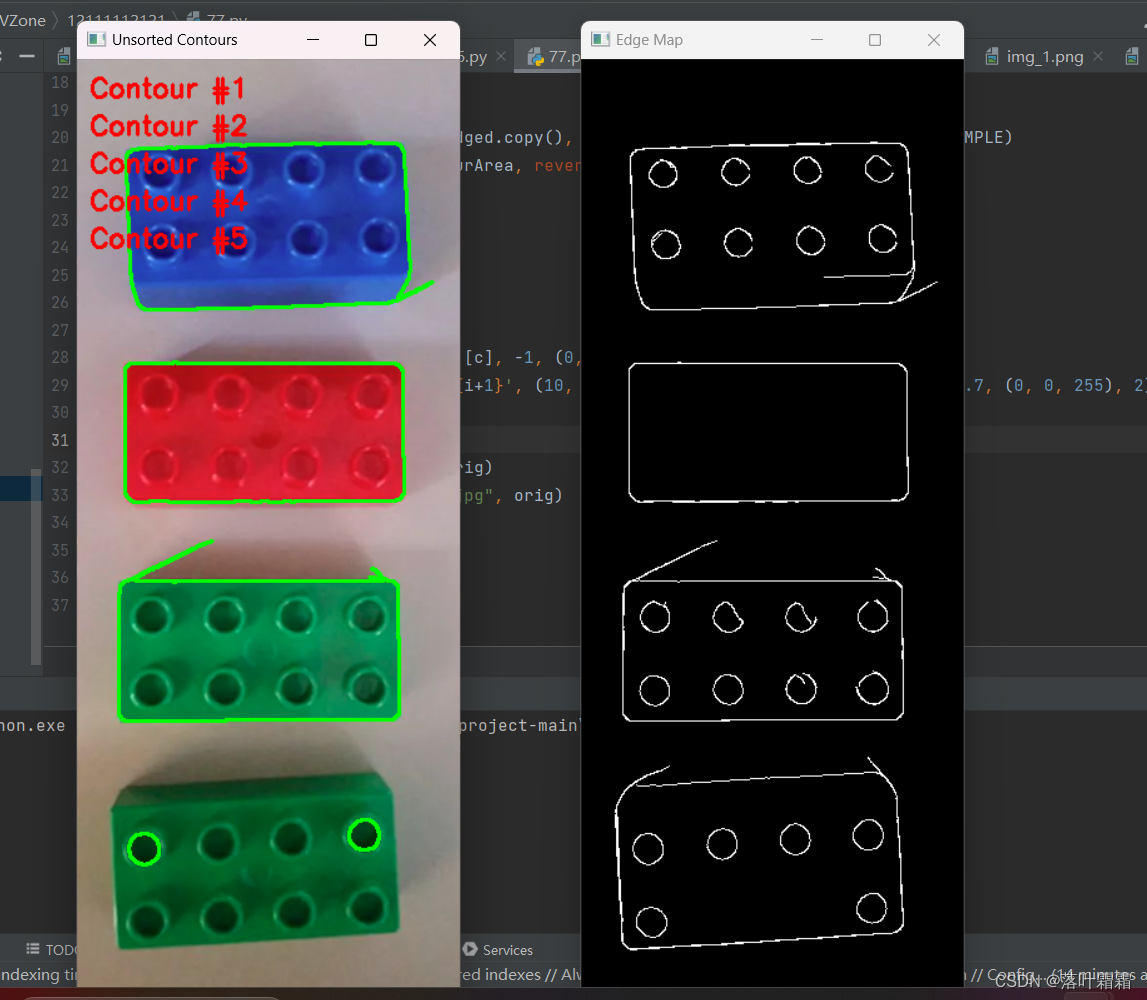
cnts, _ = cv2.findContours(accumEdged.copy(), cv2.RETR_EXTERNAL, cv2.CHAIN_APPROX_SIMPLE)
cnts = sorted(cnts, key=cv2.contourArea, reverse=True)[:5]
# 复制原始图像
orig = image.copy()
# 对未排序的轮廓进行可视化
for (i, c) in enumerate(cnts):
orig = cv2.drawContours(orig, [c], -1, (0, 255, 0), 2)
cv2.putText(orig, f'Contour #{i+1}', (10, 30*(i+1)), cv2.FONT_HERSHEY_SIMPLEX, 0.7, (0, 0, 255), 2)
# 显示未排序的轮廓可视化结果
cv2.imshow('Unsorted Contours', orig)
cv2.imwrite("./Unsorted_Contours.jpg", orig)
cv2.waitKey(0)
cv2.destroyAllWindows()
在OpenCV的不同版本中,cv2.findContours 函数的返回值形式有所不同。在OpenCV 2.X版本中,函数返回两个值,而在OpenCV 3以上版本中,返回三个值。为了适配这两种版本,可以实现一个名为 grab_contours 的函数,根据不同的版本选择正确的轮廓返回位置。以下是该函数的代码:
def grab_contours(cnts):
    # 如果 cv2.findContours 返回的轮廓元组长度为 '2',则表示使用的是 OpenCV v2.4、v4-beta 或 v4-official
    if len(cnts) == 2:
        cnts = cnts[0]
    # 如果轮廓元组长度为 '3',则表示使用的是 OpenCV v3、v4-pre 或 v4-alpha
    elif len(cnts) == 3:
        cnts = cnts[1]

    return cnts
这个函数简单地检查返回的轮廓元组的长度,根据长度选择正确的轮廓返回位置。通过使用这个函数,可以确保代码在不同版本的OpenCV中都能正确地工作。
轮廓排序
通过上述步骤,得到了图像中的所有物体的轮廓,接下来定义函数sort_contours函数来实现对轮廓进行排序操作,该函数接受method参数来实现按照不同的次序对轮廓进行排序,比如从左往右,或者从右往左.
import cv2
import numpy as np

def sort_contours(cnts, method='left-to-right'):
    reverse = False
    i = 0
    if method == 'right-to-left' or method == 'bottom-to-top':
        reverse = True
    if method == 'bottom-to-top' or method == 'top-to-bottom':
        i = 1

    boundingBoxes = [cv2.boundingRect(c) for c in cnts]
    (cnts, boundingBoxes) = zip(*sorted(zip(cnts, boundingBoxes), key=lambda b: b[1][i], reverse=reverse))
    return (cnts, boundingBoxes)

def draw_contour(image, c, i):
    M = cv2.moments(c)
    cX = int(M["m10"] / M["m00"])
    cY = int(M["m01"] / M["m00"])
    cv2.drawContours(image, [c], -1, (0, 255, 0), 2)
    cv2.putText(image, f'#{i+1}', (cX - 20, cY), cv2.FONT_HERSHEY_SIMPLEX, 1, (255, 255, 255), 2)
    return image

# 读取图像
image = cv2.imread('img_4.png')

# 初始化累积边缘图
accumEdged = np.zeros(image.shape[:2], dtype='uint8')

# 对每个通道进行边缘检测
for chan in cv2.split(image):
    chan = cv2.medianBlur(chan, 11)
    edged = cv2.Canny(chan, 50, 200)
    accumEdged = cv2.bitwise_or(accumEdged, edged)

# 显示边缘检测图
cv2.imshow('Edge Map', accumEdged)

# 寻找图像轮廓
cnts, _ = cv2.findContours(accumEdged.copy(), cv2.RETR_EXTERNAL, cv2.CHAIN_APPROX_SIMPLE)
cnts = sorted(cnts, key=cv2.contourArea, reverse=True)[:5]

# 复制原始图像
orig = image.copy()

# 对未排序的轮廓进行可视化
for (i, c) in enumerate(cnts):
    orig = draw_contour(orig, c, i)
cv2.imshow('Unsorted Contours', orig)

# 轮廓排序
(cnts, boundingboxes) = sort_contours(cnts, method='left-to-right')

# 对排序后的轮廓进行可视化
for (i, c) in enumerate(cnts):
    image = draw_contour(image, c, i)
cv2.imshow('Sorted Contours', image)

cv2.waitKey(0)
cv2.destroyAllWindows()
下面是对其中的函数 sort_contours 的解释:
def sort_contours(cnts, method='left-to-right'):
    # 初始化反转标志和排序索引
    reverse = False
    i = 0
    # 处理反向排序
    if method == 'right-to-left' or method == 'bottom-to-top':
        reverse = True
    # 如果按照 y 而不是 x 对外接框进行排序
    if method == 'bottom-to-top' or method == 'top-to-bottom':
        i = 1

    # 获取轮廓的外接矩形框
    boundingBoxes = [cv2.boundingRect(c) for c in cnts]
    # 使用 lambda 函数按照指定的坐标轴对外接框进行排序
    (cnts, boundingBoxes) = zip(*sorted(zip(cnts, boundingBoxes), key=lambda b: b[1][i], reverse=reverse))
    return (cnts, boundingBoxes)
函数接受轮廓列表 cnts 和排序方法 method 作为参数。首先初始化了反转标志和排序索引,根据指定的排序方法设置这些标志。然后,使用列表推导式和 cv2.boundingRect 函数获取每个轮廓的外接矩形框。最后,通过使用 sorted 函数和 zip 函数,根据外接框的 x 或 y 坐标进行排序。
在排序的结果中,cnts 存储了按照指定方法排序后的轮廓,而 boundingBoxes 存储了相应的外接矩形框。这两个结果作为元组返回给调用函数。
在主调用部分,代码如下:
# 使用 sort_contours 函数对轮廓进行排序
(cnts, boundingboxes) = sort_contours(cnts, method=args['method'])
# 遍历排序后的轮廓并绘制
for (i, c) in enumerate(cnts):
    image = draw_contour(image, c, i)
# 显示排序后的结果
cv2.imshow('Sorted', image)
cv2.waitKey(0)
在这里,调用了 sort_contours 函数,并将返回的排序后的轮廓存储在 cnts 中。然后,通过遍历这些排序后的轮廓,并调用 draw_contour 函数绘制,最后使用 cv2.imshow 显示排序后的结果。
小结
边缘检测:
    通过中值模糊和Canny边缘检测对图像进行处理,生成累积边缘图。

轮廓查找:
    使用 cv2.findContours 函数找到累积边缘图中的轮廓,并按面积降序排序。

未排序轮廓可视化:
    将未排序的轮廓绘制在原始图像上,并标注轮廓编号。

轮廓排序函数 sort_contours:
    实现根据指定方法对轮廓进行排序,可选择从左到右、从右到左、从上到下或从下到上排序。

轮廓排序和可视化:
    使用排序函数对轮廓进行排序,然后将排序后的轮廓绘制在原始图像上,同时标注轮廓编号。