1、SpringSession简介
SpringSession是基于Spring框架的Session管理解决方案。它基于标准的Servlet容器API,提供了Session的分布式管理解决方案,支持把Session存储在多种场景下,比如内存、MongoDB、Redis等,并且能够快速集成到Spring应用程序中。使用SpringSession实现Session管理,可以有效解决Session共享的问题,提升系统的可伸缩性和可靠性。同时,SpringSession还提供了一些扩展,如Spring Session Data Redis、Spring Session JDBC等,可用于与不同的数据源进行集成。
这边博客主要记录了如何在SpringBoot项目中整合SpringSession,并基于Redis实现对Session的管理和事件监听,具体过程如下:
2、整合SpringSession的步骤
2.1、引用SpringSession相关依赖
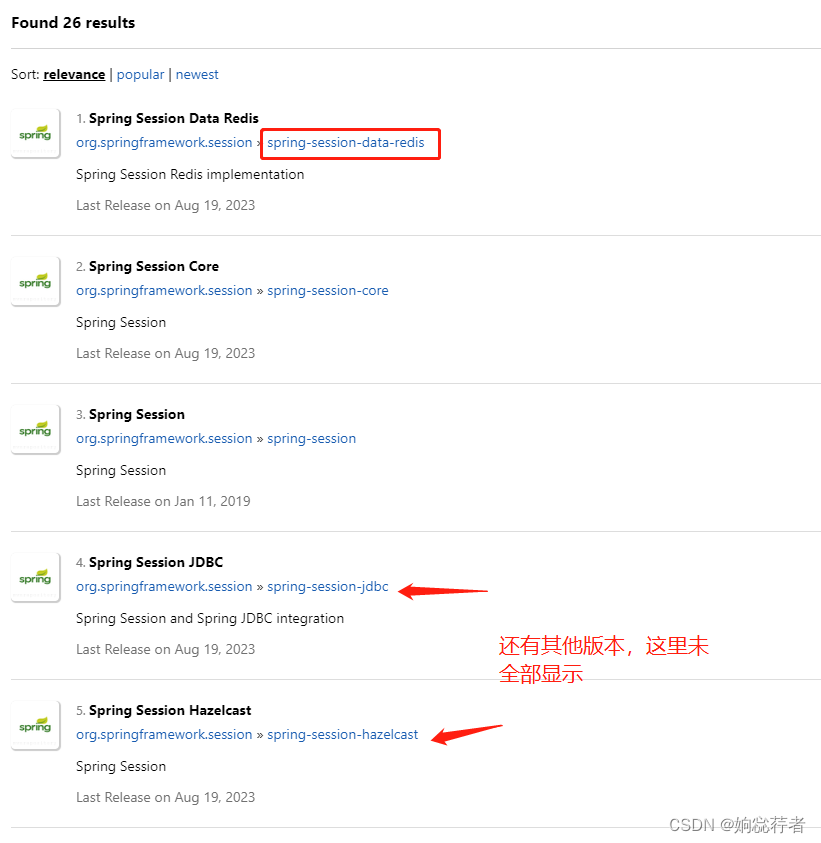
这里引入了spring-session和Redis的相关依赖,项目其他依赖根据自己的项目按需引入即可。其中spring-session依赖有很多版本(根据Session存储场景区分),这里我们引入spring-session-data-redis即可。
 <dependency>
   <groupId>org.springframework.session</groupId>
    <artifactId>spring-session-data-redis</artifactId>
</dependency>
<dependency>
    <groupId>org.springframework.boot</groupId>
    <artifactId>spring-boot-starter-data-redis</artifactId>
</dependency>
2.2、通过Java Config进行配置
这里通过Java实现SpringSession的配置。
- EnableRedisHttpSession注解,开启SpringSession的配置,默认加载SpringSession需要的配置内容。其中maxInactiveIntervalInSeconds用来设置Session的过期时间,默认是1800s(30分钟),这里为了方便测试改成了2分钟。
- 引入LettuceConnectionFactory 工厂类,用于配置和管理与Redis服务器连接的,它是Spring Data Redis的一部分。
- HttpSessionIdResolver 类主要实现SessionId的解析,SpringSession默认的使用的是CookieHttpSessionIdResolver,即基于Cookie解析SessionId,因为项目使用了前后端分离,所以这里改成了http请求头的解析方式,同时修改了请求头的key为“X-Token”,默认值为“X-Auth-Token”。
@Configuration
@EnableRedisHttpSession(maxInactiveIntervalInSeconds=60 * 2)
public class QriverSpringSessionConfig {


    @Bean
    public LettuceConnectionFactory connectionFactory(){


        return new LettuceConnectionFactory();
    }

    @Bean
    public HttpSessionIdResolver sessionIdResolver() {


        return new HeaderHttpSessionIdResolver("X-Token");
    }

}
如果之前项目中没有引入Redis,这里还需要增加Redis的相关链接信息,如下所示:
spring:
  redis:
    host: 127.0.0.1
    port: 6379
    ssl: false
    database: 0
    password: 123456
2.3、前端获取token并作为鉴权标识
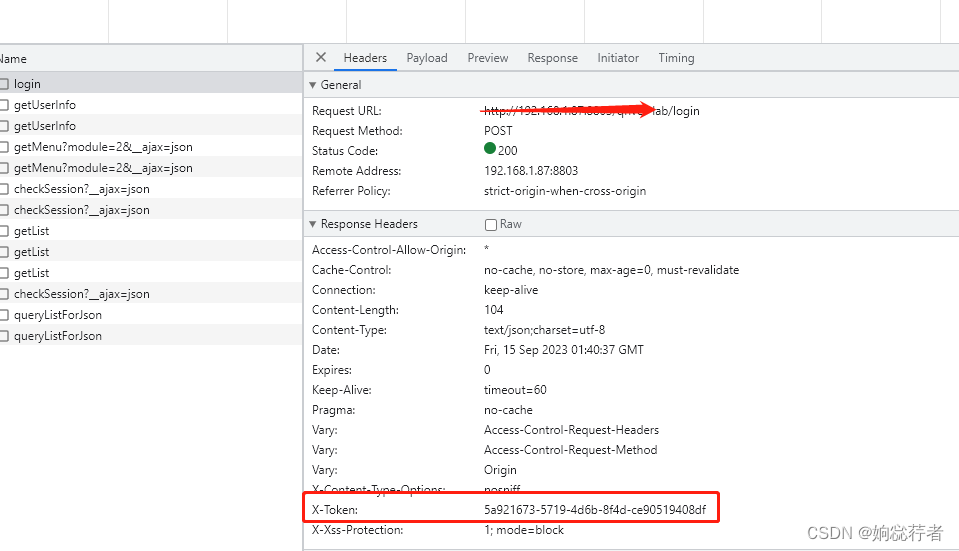
前端在登录系统成功时,可以通过返回的response 的Headers中解析到Token值,一般会在前端封装的http请求中进行全局处理,如下下图所示:
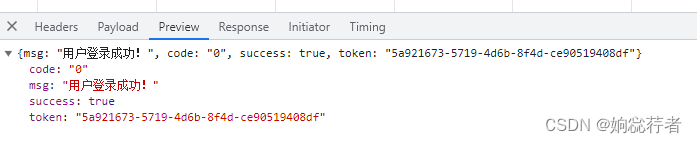
同时,也可以直接由后端作为响应结果进行返回,如果使用这种方式,需要后端配合进行token的返回,因为项目里使用了SpringSecurity框架,所以我这里直接在重写的AuthenticationSuccessHandler的onAuthenticationSuccess()方法中实现了,代码如下:
@Override
    public void onAuthenticationSuccess(HttpServletRequest request, HttpServletResponse response, Authentication authentication) throws IOException, ServletException {


     boolean isAjax = this.isAjaxRequest(request);
      if(isAjax){

    //ajax请求,返回json数据

          Map<String, Object> map = new HashMap<>();
          map.put("code", "0");
          map.put("msg", "用户登录成功!");
          map.put("success", true);
          //map.put("user",authentication);
          String token = request.getSession().getId();
          map.put("token",token);
          String json = JSON.toJSONString(map);

          response.setContentType("text/json;charset=utf-8");
          response.getWriter().write(json);
      }else{

    //按照原来的处理过程继续处理
          response.sendRedirect("./index/toIndex");
      }
  }
因为后端使用了HeaderHttpSessionIdResolver作为解析token(SessionId)的方法,所以前端访问后端资源(接口)时,需要把Token放到请求头中,后台解析Token并校验鉴权。
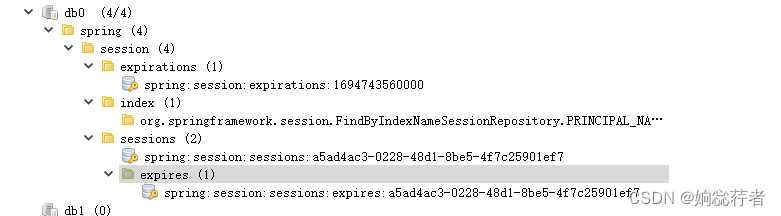
至此,当我们在请求需要鉴权后才能访问的资源时,就会在Header上携带Token,同时每次响应头中也会带有该Token值。也就算了完成了SpringSession的整合工作了。因为我们使用了SpringBoot来整合SpringSession,很多工作都被SpringBoot自动配置完成了,所以整个过程就会非常简单和方便了。而在Redis中,Session数据的存储方式如下所示,这里不再展开,后续学习过程中再逐步记录。
3、Session生命周期事件监听
上述过程,完成了SpringSession的整合,如果我们想监听Session的创建和销毁事件,我们可以通过监听SessionCreatedEvent和SessionDeletedEvent完成,具体实现如下:
3.1、通过@EventListener注解实现
@Component
public class QriverSessionEventListener {


    @EventListener
    public void handleSessionCreatedEvent(SessionCreatedEvent event) {


        // 可以执行创建事件的操作
        System.out.println("QriverSessionEventListener handleSessionCreatedEvent,Time:" + Calendar.getInstance().getTime());
    }

    @EventListener
    public void handleSessionDeletedEvent(SessionDeletedEvent event) {


        // 可以执行销毁事件的操作
        System.out.println("QriverSessionEventListener handleSessionDeletedEvent,Time:" + Calendar.getInstance().getTime());

    }
}
3.2、通过实现HttpSessionListener接口实现
@Component
public class QriverSessionListener implements HttpSessionListener {


    @Override
    public void sessionCreated(HttpSessionEvent event) {


        // 当新的Session创建时,增加在线用户计数
        // 你可以在这里添加你的逻辑代码
        System.out.println("QriverSessionListener sessionCreated,Time:" + Calendar.getInstance().getTime());
    }

    @Override
    public void sessionDestroyed(HttpSessionEvent event) {


        // 当Session销毁时,减少在线用户计数
        // 你可以在这里添加你的逻辑代码
        System.out.println("QriverSessionListener sessionCreated,sessionDestroyed:" + Calendar.getInstance().getTime());

    }

}