文章目录
- 一、前言
- 二、QML中的粒子系统
- 三、粒子系统-ParticleSystem
- 四、粒子发射器-Emitter
- 五、粒子画笔-ParticlePainter
- 六、使用案例
- 七、粒子方向
- 八、粒子控制
- 九、粒子组-ParticleGroup
一、前言
粒子系统用于模拟一些特定的模糊效果,例如:爆炸、烟花、雪花、水流等。使用传统的渲染技术实现粒子效果比较困难,但是使用QML粒子系统能十分方便的实现各种粒子效果,使你的界面更加炫酷、动感。
本文福利,莬费领取Qt开发学习资料包、技术视频,内容包括(Qt实战项目视频教程+代码,C++语言基础,C++设计模式,Qt编程入门,QT信号与槽机制,QT界面开发-图像绘制,QT网络,QT数据库编程,QT项目实战,QSS,OpenCV,Quick模块,面试题等等)↓↓↓↓↓↓见下面↓↓文章底部点击莬费领取↓↓
二、QML中的粒子系统
QML粒子系统的核心是ParticleSystem,用于控制共享时间线。一个场景可以有多个粒子系统,每一个都有自己独立的时间线。
粒子由粒子发射器(Emitter)元素发射,使用粒子画笔(ParticlePainter)进行可视化显示,它可以是一张图片、一个QML项或者一个着色器程序。Emitter还使用向量空间定义了粒子方向,粒子一旦发射,就脱离了Emitter的控制。
粒子模块提供了粒子控制器(Affector),它可以控制已发射粒子的参数。
系统中的粒子可以通过粒子组(ParticleGroup)共享时间变换,默认情况下,粒子都属于空组。
粒子系统主要类如下:
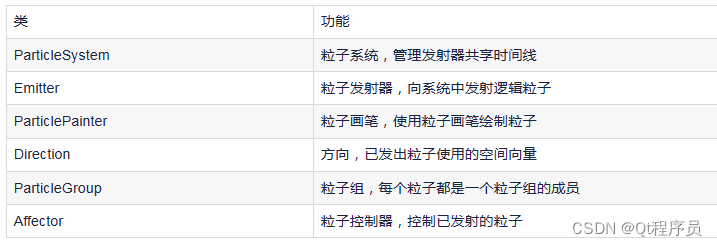
三、粒子系统-ParticleSystem
ParticleSystem用于控制共享时间线,它将ParticleSystem、Emitter、Affector等元素联合起来实现粒子效果,也就是说其它类型想要交互的话就必须在同一个ParticleSystem中。
想要使用粒子系统,第一步就是要创建一个粒子系统:
import QtQuick.Particles 2.0
ParticleSystem {
id: particleSystem;
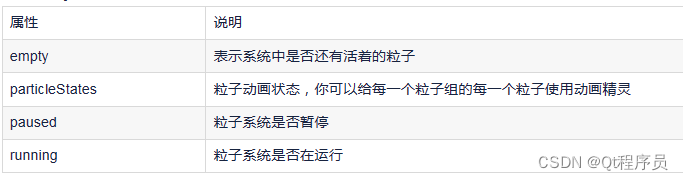
}ParticleSystem包含以下属性:
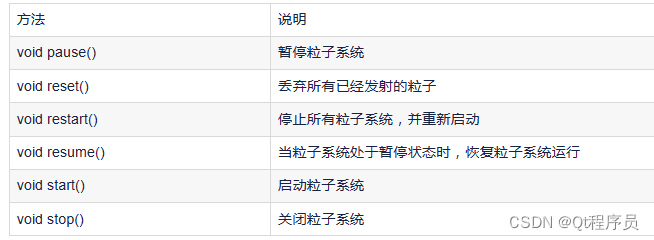
ParticleSystem提供以下方法:
四、粒子发射器-Emitter
Emitter向粒子系统中发射逻辑粒子,这些粒子斗殴自己的轨迹和生命周期,但它们时不可见的,想要可见的话就得用到ParticlePainter。
Emitter定义了粒子的发射区域以及相关发射参数并使用system属性将自己与一个粒子系统关联起来。
想要使用粒子系统,第二步就是要创建一个粒子发射器:
import QtQuick.Particles 2.0
ParticleSystem {
id: particleSystem;
}
Emitter {
id: emitter;
system: particleSystem;
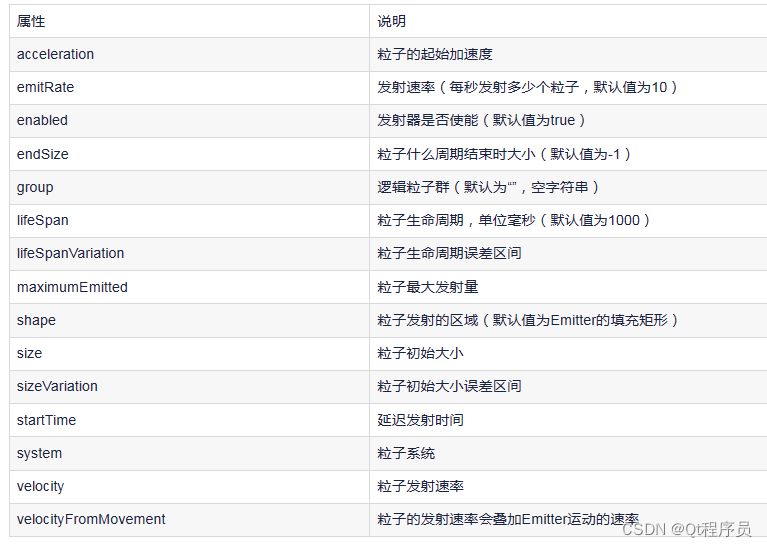
}Emitter包含以下属性:
Emitter提供以下方法:

QML还提供一个叫TrailEmitter的发射器,该发射器的特点是起始位置是基于其它粒子的,它会跟随一个粒子移动。例如你需要创建一个跟随一团火焰的烟,你可能就需要用到这个发射器。
五、粒子画笔-ParticlePainter
使用Emitter发射的只是逻辑粒子,我们还需要使用粒子画笔ParticlePainter对粒子进行可视化渲染。ParticlePainter是个基本类型,本身并不渲染任何东西,我们需要使用ParticlePainter的子类进行渲染。ParticlePainter的子类包括:ItemParticle、ImageParticle、CustomParticle;
1、ItemParticle
ItemParticle使用QML的Item来渲染粒子,我们可以给ItemParticle的delegate(代理)属性设置一个Item,这样每个粒子都会使用该Item进行渲染。同样,我们也需要使用ItemParticle的system属性将ParticleSystem与ItemParticle关联起来。
import QtQuick.Particles 2.0

ParticleSystem {
  id: particleSystem;
}

Emitter {
  id: emitter;
  system: particleSystem;
}

ItemParticle {
  system: particleSystem;
  delegate: Rectangle{};
}
ItemParticle包含以下属性:

ItemParticle提供以下方法: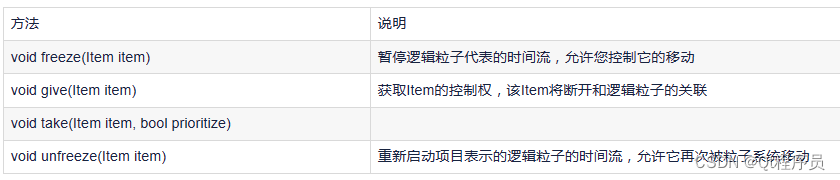
2、Ima
geParticle
ImageParticle使用图像来渲染逻辑粒子,图像能够上色、旋转、变形或者添加精灵动画。
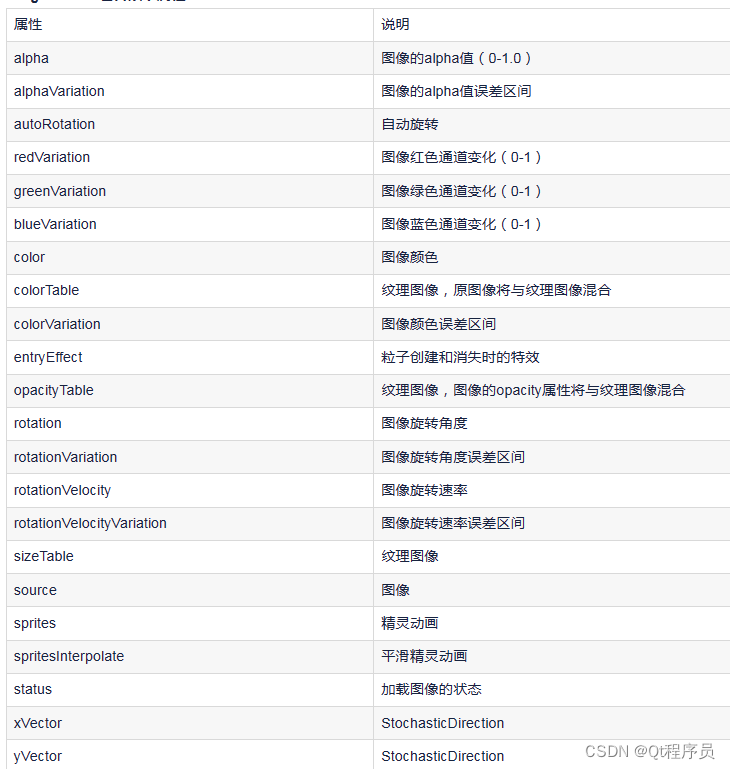
ImageParticle包含以下属性:
3、CustomParticle
除了ItemParticle和ImageParticle,还有基于着色器的粒子CustomParticle,CustomParticle使用OpenGL着色器语言GLSL定义。
CustomParticle包含以下属性:

六、使用案例
1、用ItemParticle渲染粒子

import QtQuick 2.12
import QtQuick.Window 2.12

import QtQuick.Particles 2.0

Window {
    id: root;
    width: 400;
    height: 400;
    visible: true;

    Rectangle {
        id: rootItem;
        width: 400;
        height: 400;
        color: "#1f1f1f";

        Rectangle {
            id: emitter_area;
            anchors.centerIn: parent;
            width: 200;
            height: 200;
            border.color: "green";
        }

        ParticleSystem {
            id: particleSystem;
        }

        Emitter {
            id: emitter;
            anchors.centerIn: parent;
            width: 200;
            height: 200;
            system: particleSystem;
            emitRate: 100;
            lifeSpan: 1000;
            lifeSpanVariation: 500;
            size: 16;
            endSize: 32;
        }

        ItemParticle {
            system: particleSystem;
            delegate: Rectangle {
                id: particleRect;
                width: 10;
                height: 10;
                color: "red";
                radius: 10;
            }
        }
    }

}矩形元素emitter_area和粒子发射器Emitter完全重合,可以看到粒子也只在这个区域内产生,说明粒子只会在粒子发射器限定的范围内产生;
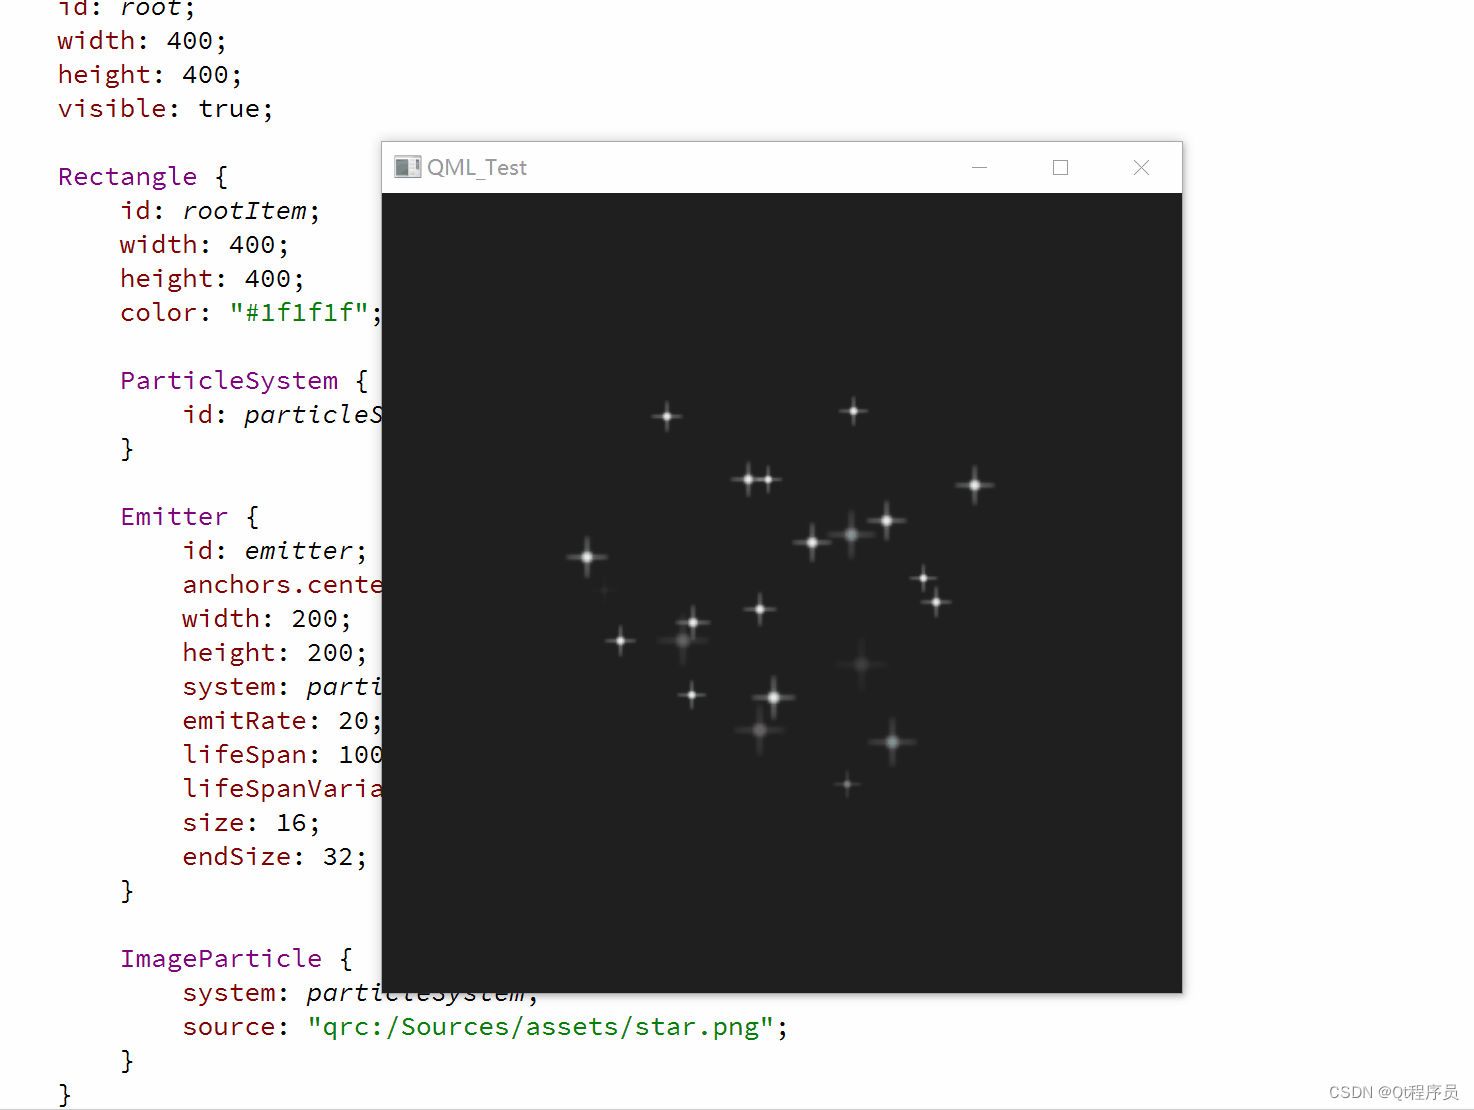
2、用ImageParticle渲染粒子
import QtQuick 2.12
import QtQuick.Window 2.12
import QtQuick.Particles 2.0
Window {
id: root;
width: 400;
height: 400;
visible: true;
Rectangle {
id: rootItem;
width: 400;
height: 400;
color: "#1f1f1f";
ParticleSystem {
id: particleSystem;
}
Emitter {
id: emitter;
anchors.centerIn: parent;
width: 200;
height: 200;
system: particleSystem;
emitRate: 20;
lifeSpan: 1000;
lifeSpanVariation: 500;
size: 16;
endSize: 32;
}
ImageParticle {
system: particleSystem;
source: "qrc:/Sources/assets/star.png";
}
}
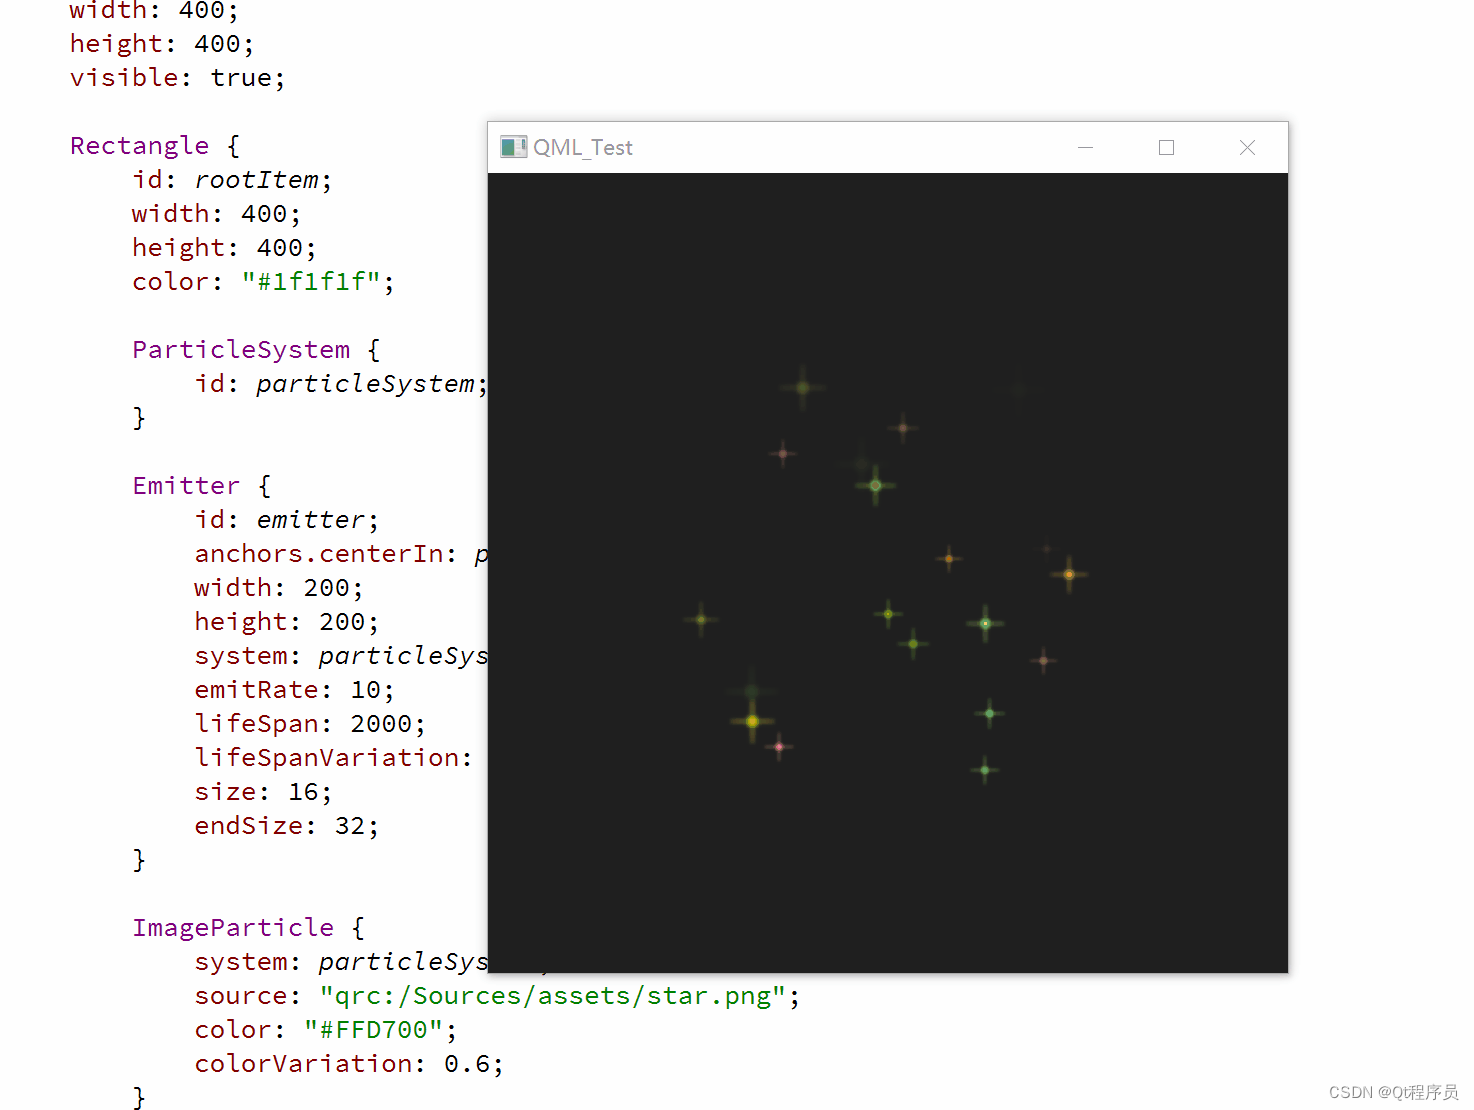
}3、用ImageParticle渲染粒子,并设置粒子颜色
import QtQuick 2.12
import QtQuick.Window 2.12
import QtQuick.Particles 2.0
Window {
id: root;
width: 400;
height: 400;
visible: true;
Rectangle {
id: rootItem;
width: 400;
height: 400;
color: "#1f1f1f";
ParticleSystem {
id: particleSystem;
}
Emitter {
id: emitter;
anchors.centerIn: parent;
width: 200;
height: 200;
system: particleSystem;
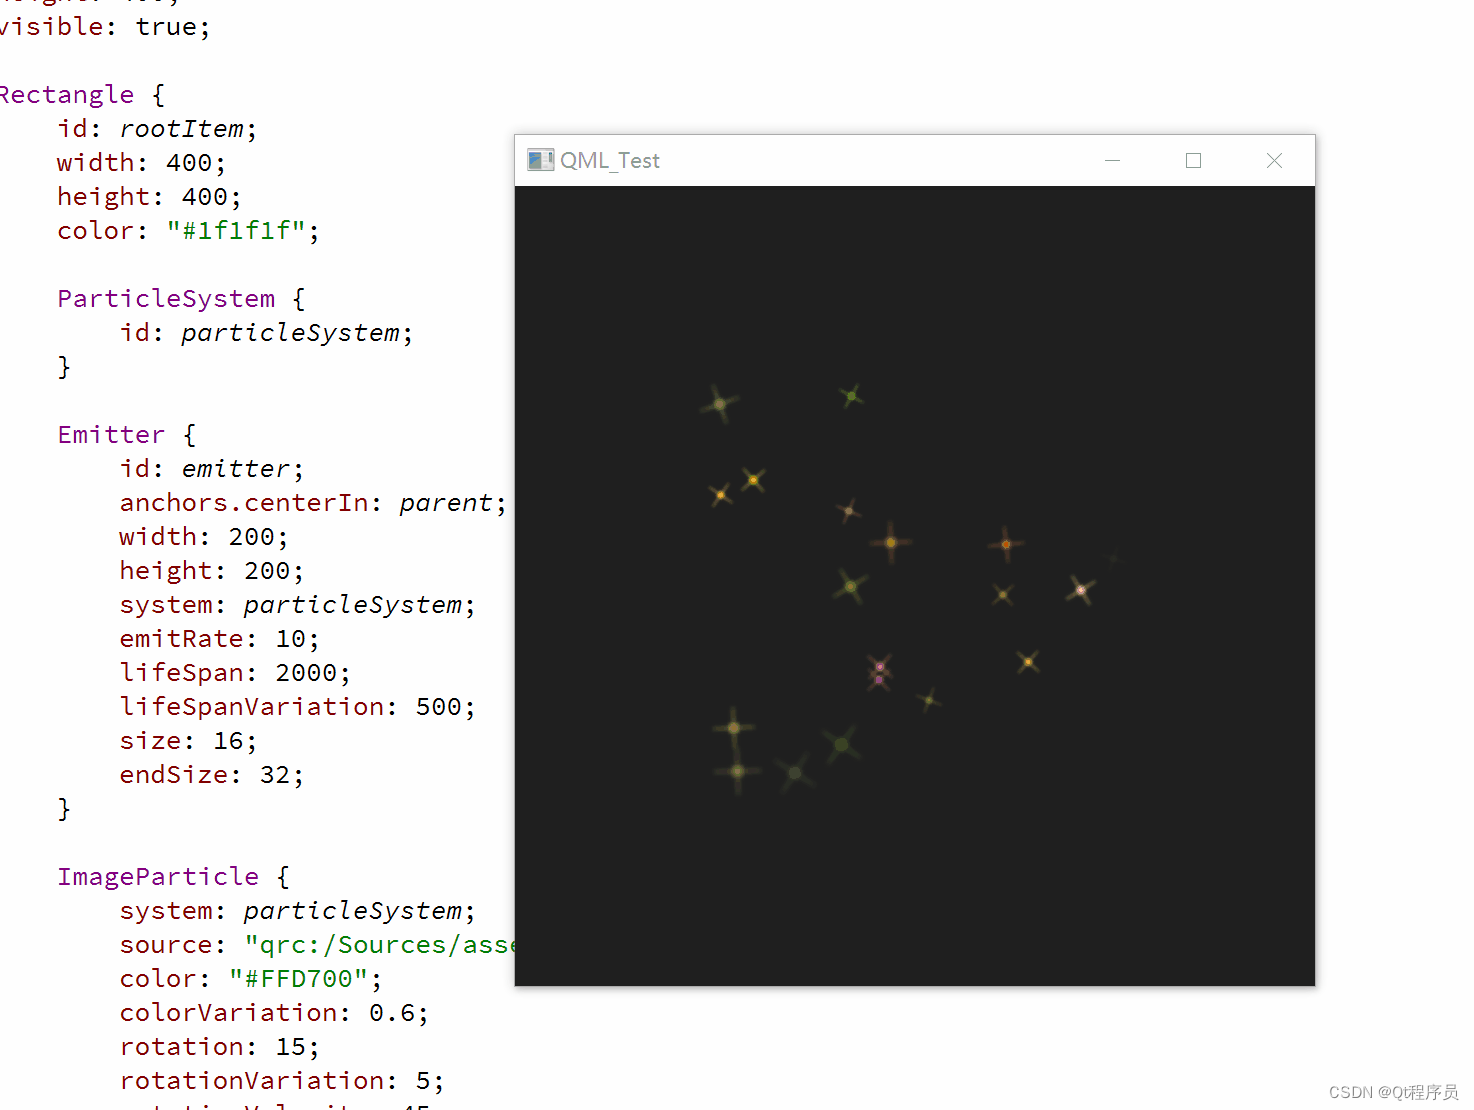
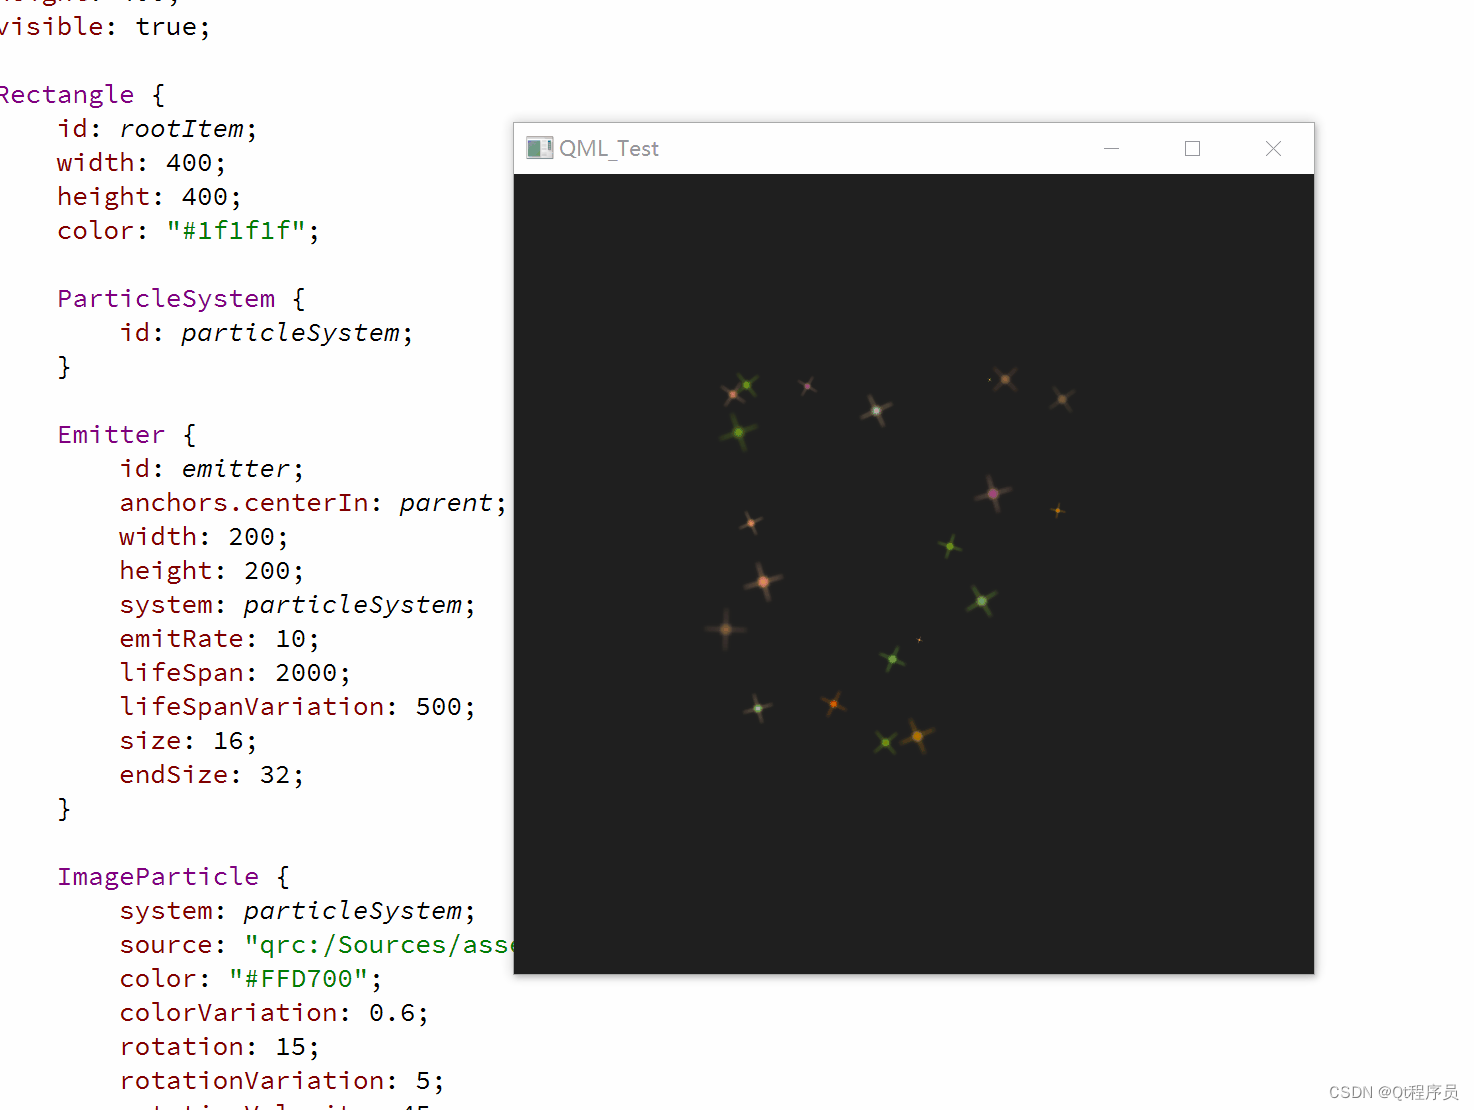
emitRate: 10;
lifeSpan: 2000;
lifeSpanVariation: 500;
size: 16;
endSize: 32;
}
ImageParticle {
system: particleSystem;
source: "qrc:/Sources/assets/star.png";
color: "#FFD700";
colorVariation: 0.6;
}
}
}给粒子画笔ImageParticle设置了color为金色,颜色误差设置为0.6(颜色误差设置越靠近0误差越小,基本都是金色;颜色误差设置越靠近1误差越大,颜色越随机);
4、用ImageParticle渲染粒子,并设置粒子旋转
import QtQuick 2.12
import QtQuick.Window 2.12

import QtQuick.Particles 2.0

Window {
    id: root;
    width: 400;
    height: 400;
    visible: true;

    Rectangle {
        id: rootItem;
        width: 400;
        height: 400;
        color: "#1f1f1f";

        ParticleSystem {
            id: particleSystem;
        }

        Emitter {
            id: emitter;
            anchors.centerIn: parent;
            width: 200;
            height: 200;
            system: particleSystem;
            emitRate: 10;
            lifeSpan: 2000;
            lifeSpanVariation: 500;
            size: 16;
            endSize: 32;
        }

        ImageParticle {
            system: particleSystem;
            source: "qrc:/Sources/assets/star.png";
            color: "#FFD700";
            colorVariation: 0.6;
            rotation: 15;
            rotationVariation: 5;
            rotationVelocity: 45;
            rotationVelocityVariation: 15;
        }
    }

}
将每个粒子顺时针旋转15°,另外有一个5°的误差范围;
将这些粒子继续以每秒45°的速度旋转,也会有一个15°的误差范围;
5、用ImageParticle渲染粒子,并设置粒子效果
import QtQuick 2.12
import QtQuick.Window 2.12

import QtQuick.Particles 2.0

Window {
    id: root;
    width: 400;
    height: 400;
    visible: true;

    Rectangle {
        id: rootItem;
        width: 400;
        height: 400;
        color: "#1f1f1f";

        ParticleSystem {
            id: particleSystem;
        }

        Emitter {
            id: emitter;
            anchors.centerIn: parent;
            width: 200;
            height: 200;
            system: particleSystem;
            emitRate: 10;
            lifeSpan: 2000;
            lifeSpanVariation: 500;
            size: 16;
            endSize: 32;
        }

        ImageParticle {
            system: particleSystem;
            source: "qrc:/Sources/assets/star.png";
            color: "#FFD700";
            colorVariation: 0.6;
            rotation: 15;
            rotationVariation: 5;
            rotationVelocity: 45;
            rotationVelocityVariation: 15;
            entryEffect: ImageParticle.Scale;
        }
    }

}
我们可以修改粒子进入场景的效果,当粒子生命周期开始时,就会应用这个效果;
使用entryEffect: ImageParticle.Scale添加了一个缩放效果;
七、粒子方向
我们还可以设置粒子轨迹的方向,轨迹取决于一个指定的向量空间,该向量定义了粒子的速度和加速度,以及一个随机的方向。
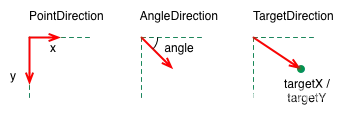
QML提供了三种不同的向量空间,用于定义粒子的速度和加速度:
点方向(PointDirection):使用x和y值定义的方向;
角度方向(AngleDirection):使用角度定义方向;
目标方向(TargetDirection):使用一个目标点坐标定义方向;
7.1、PointDirection
PointDirection使用x、y值导出向量空间。例如,你想让粒子轨迹沿着45°角方向,那么就要将x、y值设置成相同的值。
例如:我们希望粒子轨迹从左向右,形成一个15°的角,为了设置粒子轨迹,我们首先需要赋值PointDirection赋值给Emitter的velocity属性;
velocity: PointDirection{};
import QtQuick 2.12
import QtQuick.Window 2.12

import QtQuick.Particles 2.0

Window {
    id: root;
    width: 400;
    height: 400;
    visible: true;

    Rectangle {
        id: rootItem;
        width: 400;
        height: 400;
        color: "#1f1f1f";

        ParticleSystem {
            id: particleSystem;
        }

        Emitter {
            id: emitter;
            anchors.left: parent.left;
            anchors.verticalCenter: parent.verticalCenter;
            width: 1;
            height: 1;
            system: particleSystem;
            emitRate: 10;
            lifeSpan: 6400;
            lifeSpanVariation: 400;
            size: 32;
            velocity: PointDirection {
                x: 100;
                y: 0;
                xVariation: 0;
                yVariation: 100/6;
            }
        }

        ImageParticle {
            system: particleSystem;
            source: "qrc:/Sources/assets/star.png";
            color: "#FFD700";
            colorVariation: 0.6;
            rotation: 15;
            rotationVariation: 5;
            rotationVelocity: 45;
            rotationVelocityVariation: 15;
            entryEffect: ImageParticle.Scale;
        }
    }

}
设定方向,坐标(100,0),xVariation和yVariation为误差精度;
7.2、AngleDirection
要使用AngleDirection,我们需要将其赋值给Emitter的velocity属性:
我们希望粒子水平向右发射,因此,angle: 0;
粒子速度由magnitude属性决定,magnitude属性单位是像素/秒。如果我们的场景宽度是640px,那么将magnitude属性设置为100的话,这就意味着,粒子平均要消耗6.4秒才能从场景一端移动到另一端。为了让粒子速度更有趣,我们还要设置magnitudeVariation属性,这会为该速度设置一个可变的范围区间;
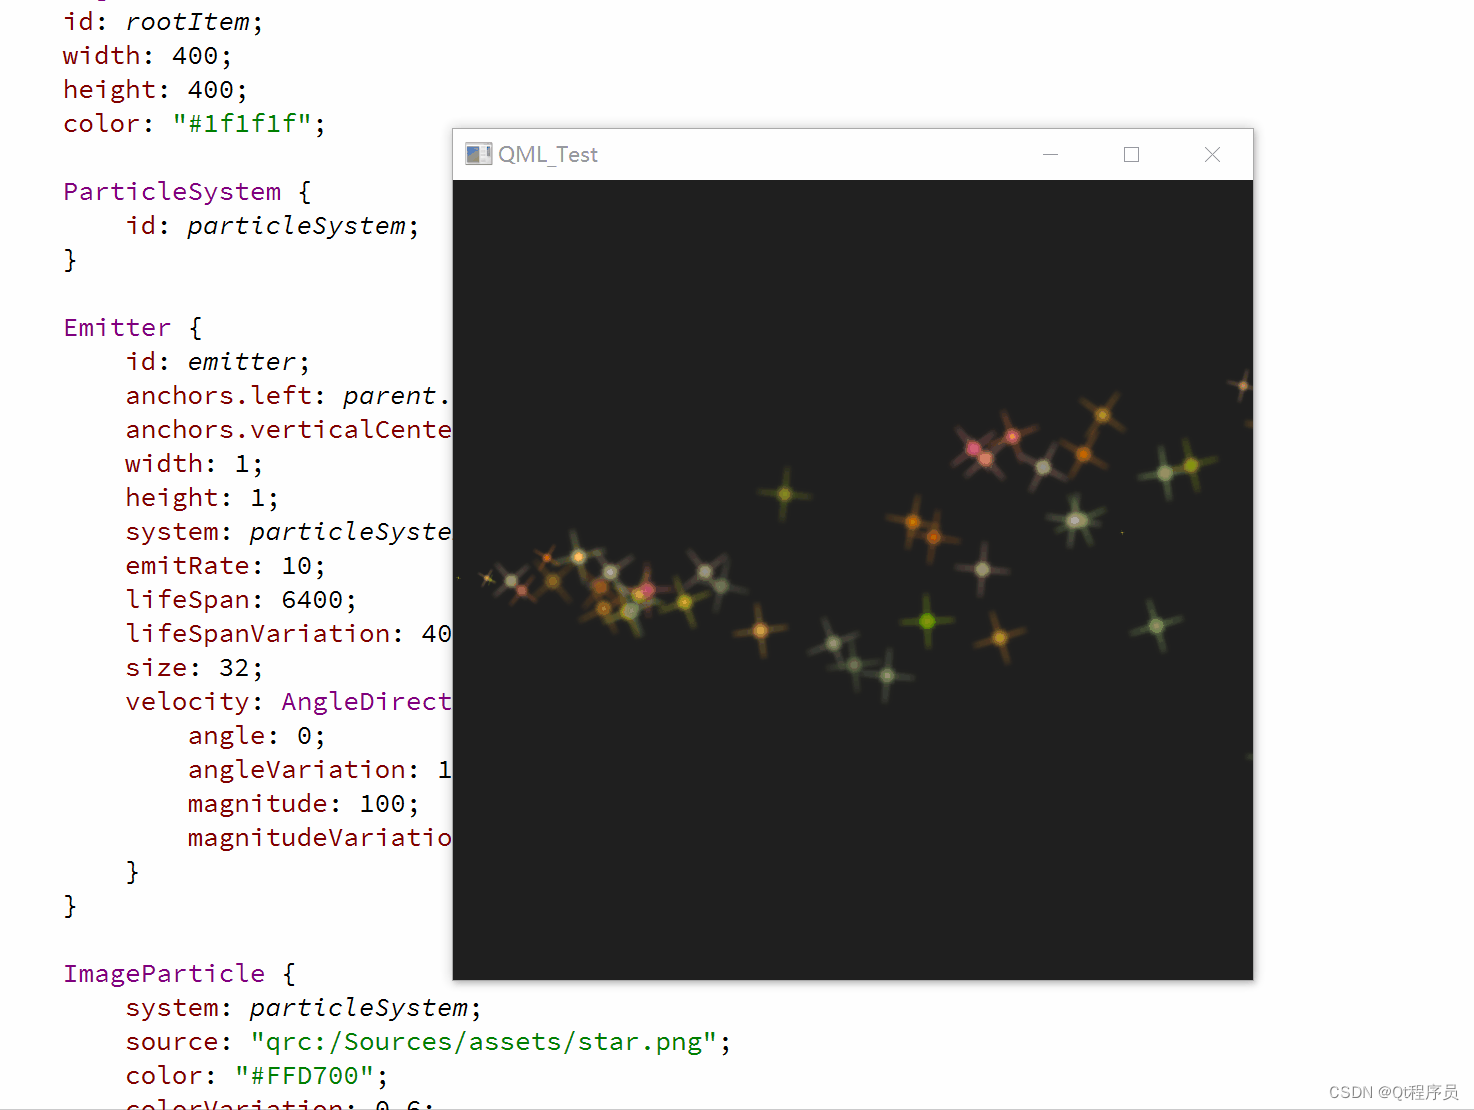
velocity: AngleDirection{};import QtQuick 2.12
import QtQuick.Window 2.12
import QtQuick.Particles 2.0
Window {
id: root;
width: 400;
height: 400;
visible: true;
Rectangle {
id: rootItem;
width: 400;
height: 400;
color: "#1f1f1f";
ParticleSystem {
id: particleSystem;
}
Emitter {
id: emitter;
anchors.left: parent.left;
anchors.verticalCenter: parent.verticalCenter;
width: 1;
height: 1;
system: particleSystem;
emitRate: 10;
lifeSpan: 6400;
lifeSpanVariation: 400;
size: 32;
velocity: AngleDirection {
angle: 0;
angleVariation: 15;
magnitude: 100;
magnitudeVariation: 50;
}
}
ImageParticle {
system: particleSystem;
source: "qrc:/Sources/assets/star.png";
color: "#FFD700";
colorVariation: 0.6;
rotation: 15;
rotationVariation: 5;
rotationVelocity: 45;
rotationVelocityVariation: 15;
entryEffect: ImageParticle.Scale;
}
}
}接下来看加速度,加速度为每一个粒子添加一个加速度向量,该向量会随着时间流逝而改变速度。
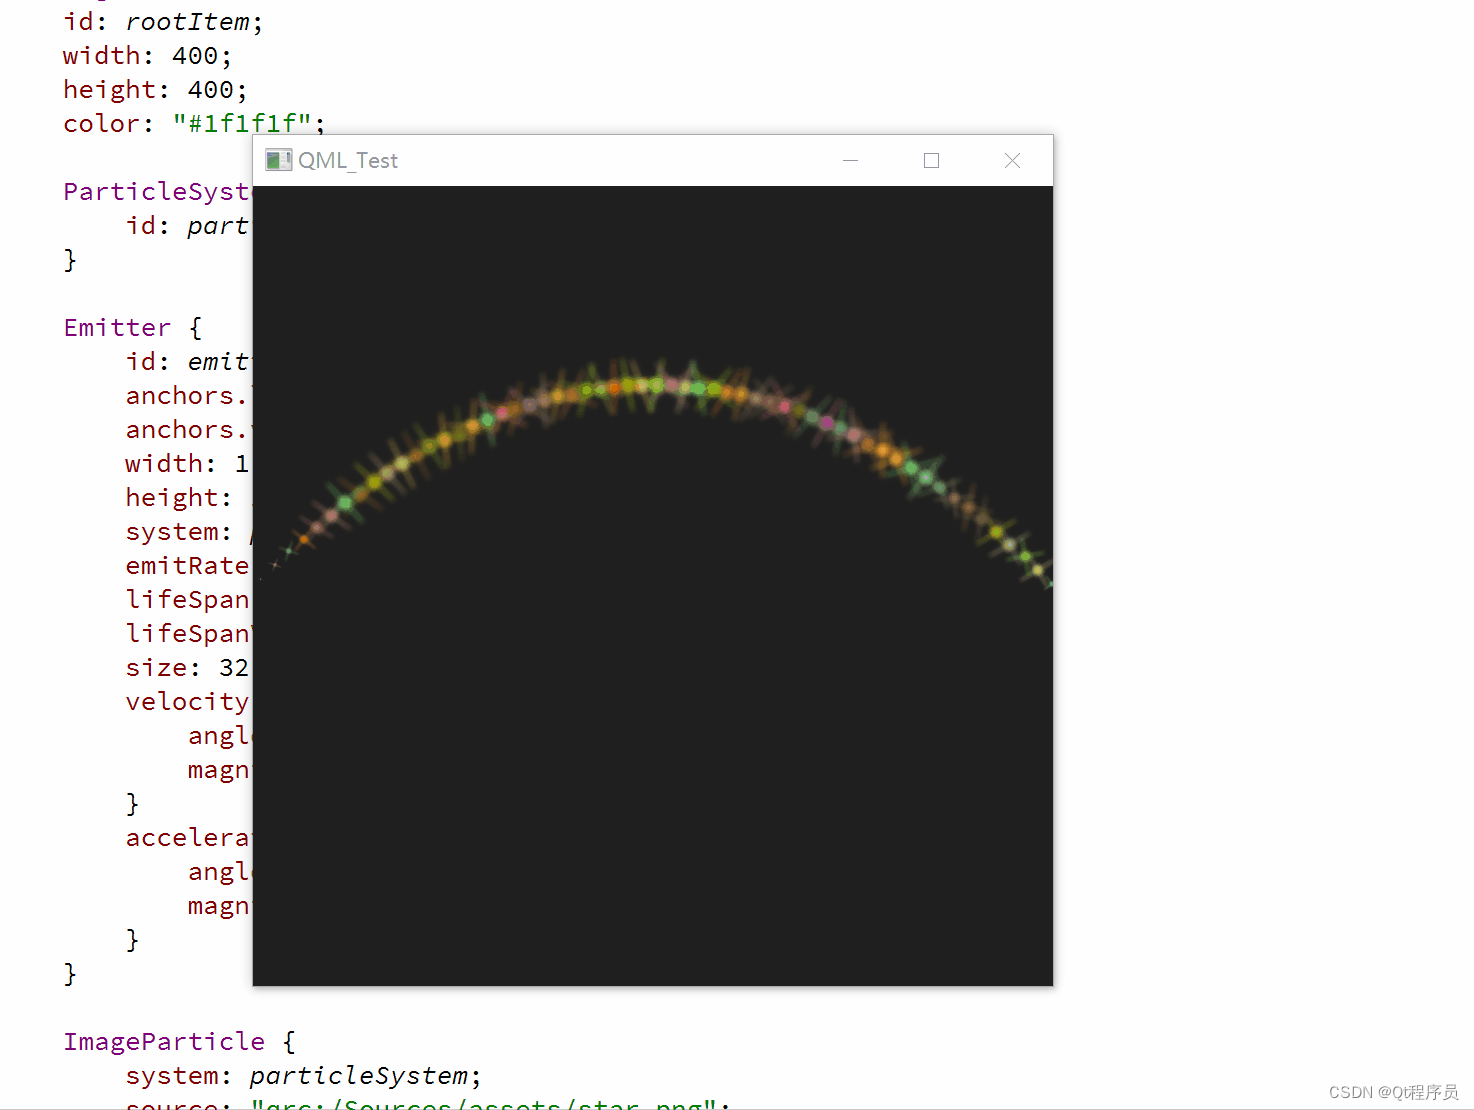
例如,我们创建一个类似星轨的轨迹,为了达到这一目的,我们将方向修改为-45°,并且移除速度变量区间:
velocity: AngleDirection {
  angle: -45;
  magnitude: 100;
}
加速度方向为90°向下,数值为25:
acceleration: AngleDirection {
  angle: 90;
  magnitude: 25
}
import QtQuick 2.12
import QtQuick.Window 2.12

import QtQuick.Particles 2.0

Window {
    id: root;
    width: 400;
    height: 400;
    visible: true;

    Rectangle {
        id: rootItem;
        width: 400;
        height: 400;
        color: "#1f1f1f";

        ParticleSystem {
            id: particleSystem;
        }

        Emitter {
            id: emitter;
            anchors.left: parent.left;
            anchors.verticalCenter: parent.verticalCenter;
            width: 1;
            height: 1;
            system: particleSystem;
            emitRate: 10;
            lifeSpan: 6400;
            lifeSpanVariation: 400;
            size: 32;
            velocity: AngleDirection {
                angle: -45;
                magnitude: 100;
            }
            acceleration: AngleDirection {
                angle: 90;
                magnitude: 25;
            }
        }

        ImageParticle {
            system: particleSystem;
            source: "qrc:/Sources/assets/star.png";
            color: "#FFD700";
            colorVariation: 0.6;
            rotation: 15;
            rotationVariation: 5;
            rotationVelocity: 45;
            rotationVelocityVariation: 15;
            entryEffect: ImageParticle.Scale;
        }
    }

}
7.3、TargetDirection
TargetDirection使用某个项目指定一个目标点,targetItem指定目标位置关联Item,Item的中心会成为目标点
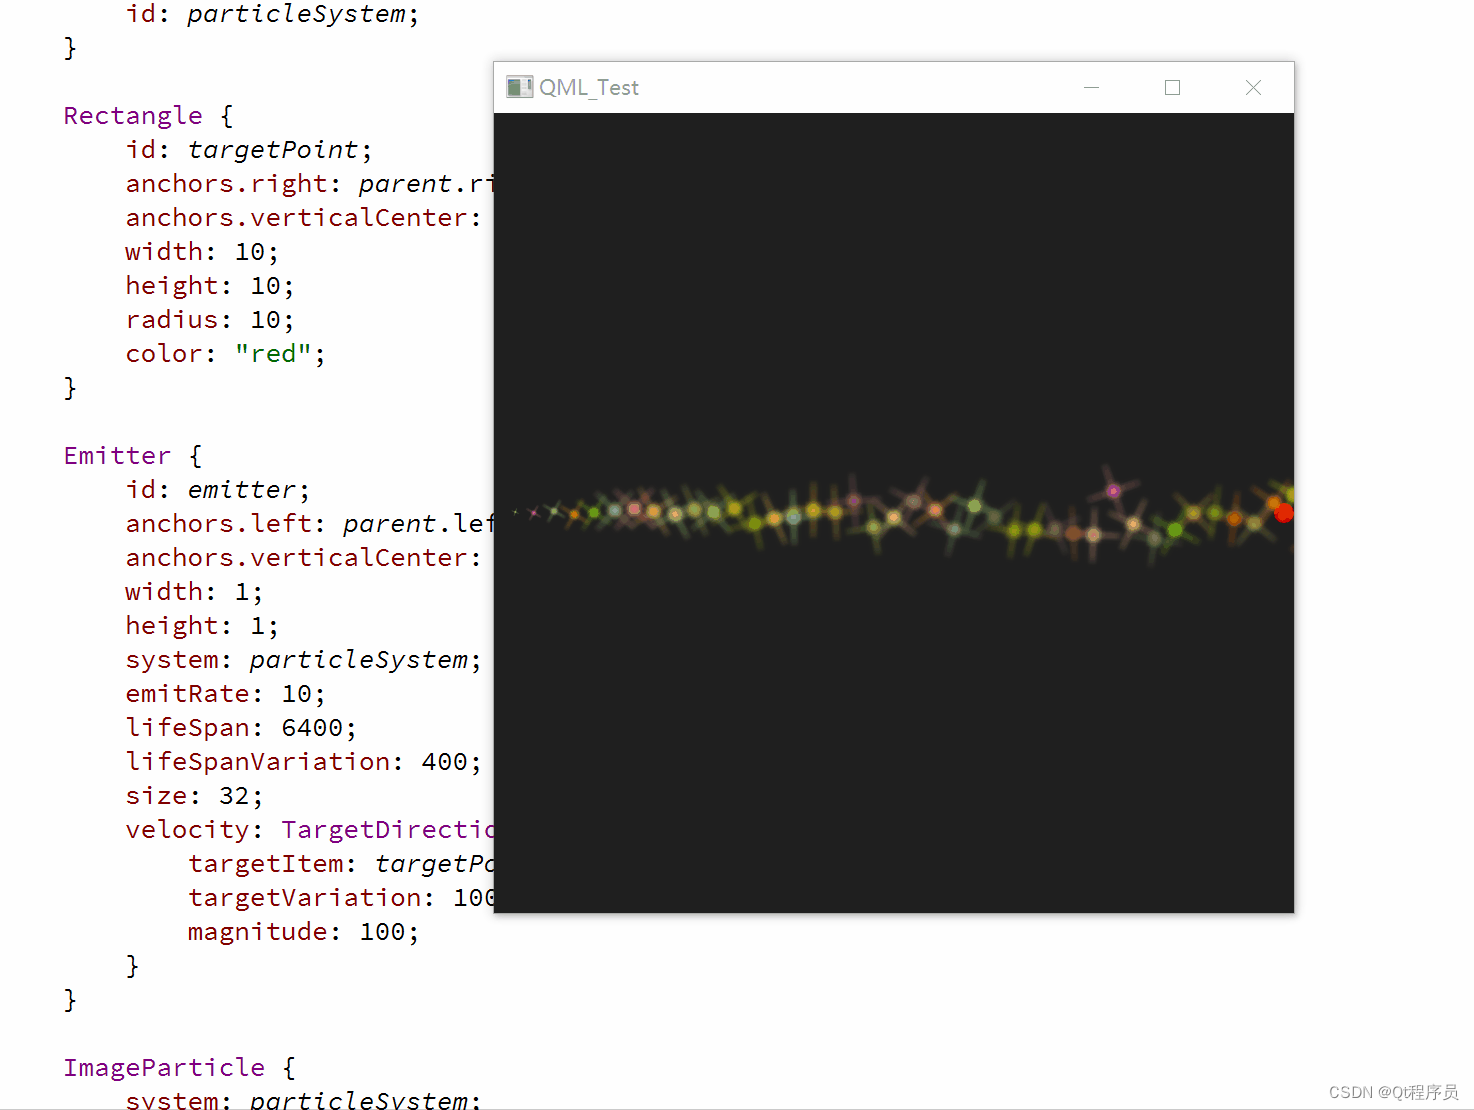
首先我们在界面右侧中心设置一个目标点:
Rectangle {
  id: targetPoint;
  anchors.right: parent.right;
  anchors.verticalCenter: parent.verticalCenter;
  width: 10;
  height: 10;
  radius: 10;
  color: "red";
}我们将TargetDirection的targetItem属性设置为targetPoint,targetVariation的值为100/6,这大约会形成一个15°的角;
Emitter {
    id: emitter;
    anchors.left: parent.left;
    anchors.verticalCenter: parent.verticalCenter;
    width: 1;
    height: 1;
    system: particleSystem;
    emitRate: 10;
    lifeSpan: 6400;
    lifeSpanVariation: 400;
    size: 32;
    velocity: TargetDirection {
        targetItem: targetPoint;
        targetVariation: 100/6;
        magnitude: 100;
    }
}
import QtQuick 2.12
import QtQuick.Window 2.12

import QtQuick.Particles 2.0

Window {
    id: root;
    width: 400;
    height: 400;
    visible: true;

    Rectangle {
        id: rootItem;
        width: 400;
        height: 400;
        color: "#1f1f1f";

        ParticleSystem {
            id: particleSystem;
        }

        Rectangle {
            id: targetPoint;
            anchors.right: parent.right;
            anchors.verticalCenter: parent.verticalCenter;
            width: 10;
            height: 10;
            radius: 10;
            color: "red";
        }

        Emitter {
            id: emitter;
            anchors.left: parent.left;
            anchors.verticalCenter: parent.verticalCenter;
            width: 1;
            height: 1;
            system: particleSystem;
            emitRate: 10;
            lifeSpan: 6400;
            lifeSpanVariation: 400;
            size: 32;
            velocity: TargetDirection {
                targetItem: targetPoint;
                targetVariation: 100/6;
                magnitude: 100;
            }
        }

        ImageParticle {
            system: particleSystem;
            source: "qrc:/Sources/assets/star.png";
            color: "#FFD700";
            colorVariation: 0.6;
            rotation: 15;
            rotationVariation: 5;
            rotationVelocity: 45;
            rotationVelocityVariation: 15;
            entryEffect: ImageParticle.Scale;
        }
    }

}
八、粒子控制
粒子由发射器发射,一旦粒子发射出来,发射器的任务也就完成了,不会再对粒子有任何影响。如果我们需要控制已发射的粒子,需要使用粒子控制器(Affector);
QML提供如下控制器:

8.1、Age
Age可以改变粒子生命周期,lifeLeft属性指定粒子还能存活多少时间。
import QtQuick 2.12
import QtQuick.Window 2.12
import QtQuick.Particles 2.0
Window {
id: root;
width: 400;
height: 400;
visible: true;
Rectangle {
id: rootItem;
width: 400;
height: 400;
color: "#1f1f1f";
ParticleSystem {
id: particleSystem;
}
Rectangle {
id: targetPoint;
anchors.right: parent.right;
anchors.verticalCenter: parent.verticalCenter;
width: 10;
height: 10;
radius: 10;
color: "red";
}
Emitter {
id: emitter;
anchors.left: parent.left;
anchors.verticalCenter: parent.verticalCenter;
width: 1;
height: 1;
system: particleSystem;
emitRate: 10;
lifeSpan: 5000;
lifeSpanVariation: 400;
size: 32;
velocity: TargetDirection {
targetItem: targetPoint;
targetVariation: 100/6;
magnitude: 100;
}
}
ImageParticle {
system: particleSystem;
source: "qrc:/Sources/assets/star.png";
color: "#FFD700";
colorVariation: 0.6;
rotation: 15;
rotationVariation: 5;
rotationVelocity: 45;
rotationVelocityVariation: 15;
entryEffect: ImageParticle.Scale;
}
Age {
anchors.centerIn: parent;
width: 140;
height: 120;
system: particleSystem;
advancePosition: true;
lifeLeft: 2500;
once: true;
Rectangle {
anchors.fill: parent;
color: "transparent";
border.color: "green";
border.width: 2;
}
}
}
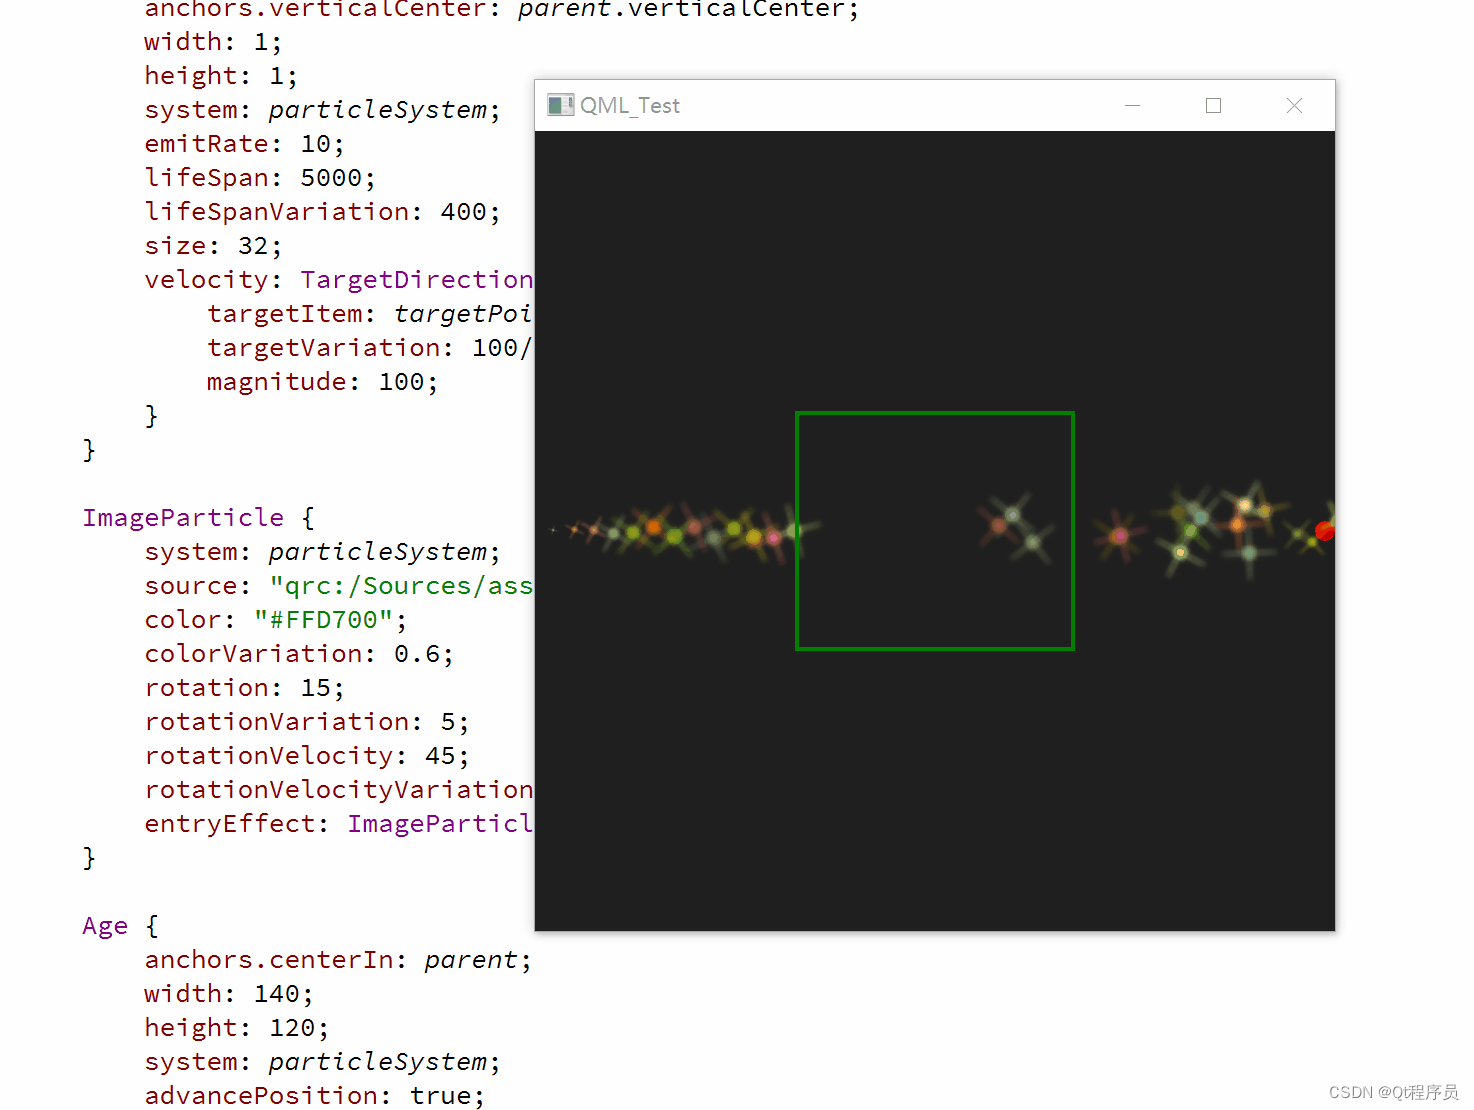
}添加的居中绿色矩形区域为Age控制器的区域范围;
发射器设置的粒子生命周期为5000,Age控制器的生命周期为2500,也就是说,当粒子进入Age控制器区域后,生命周期就剩下2500了;
advancePosition设置为true,粒子就会从其预期的位置从新出现(参考剩余生命周期、粒子速度和到目标点的距离来推算预期的位置);
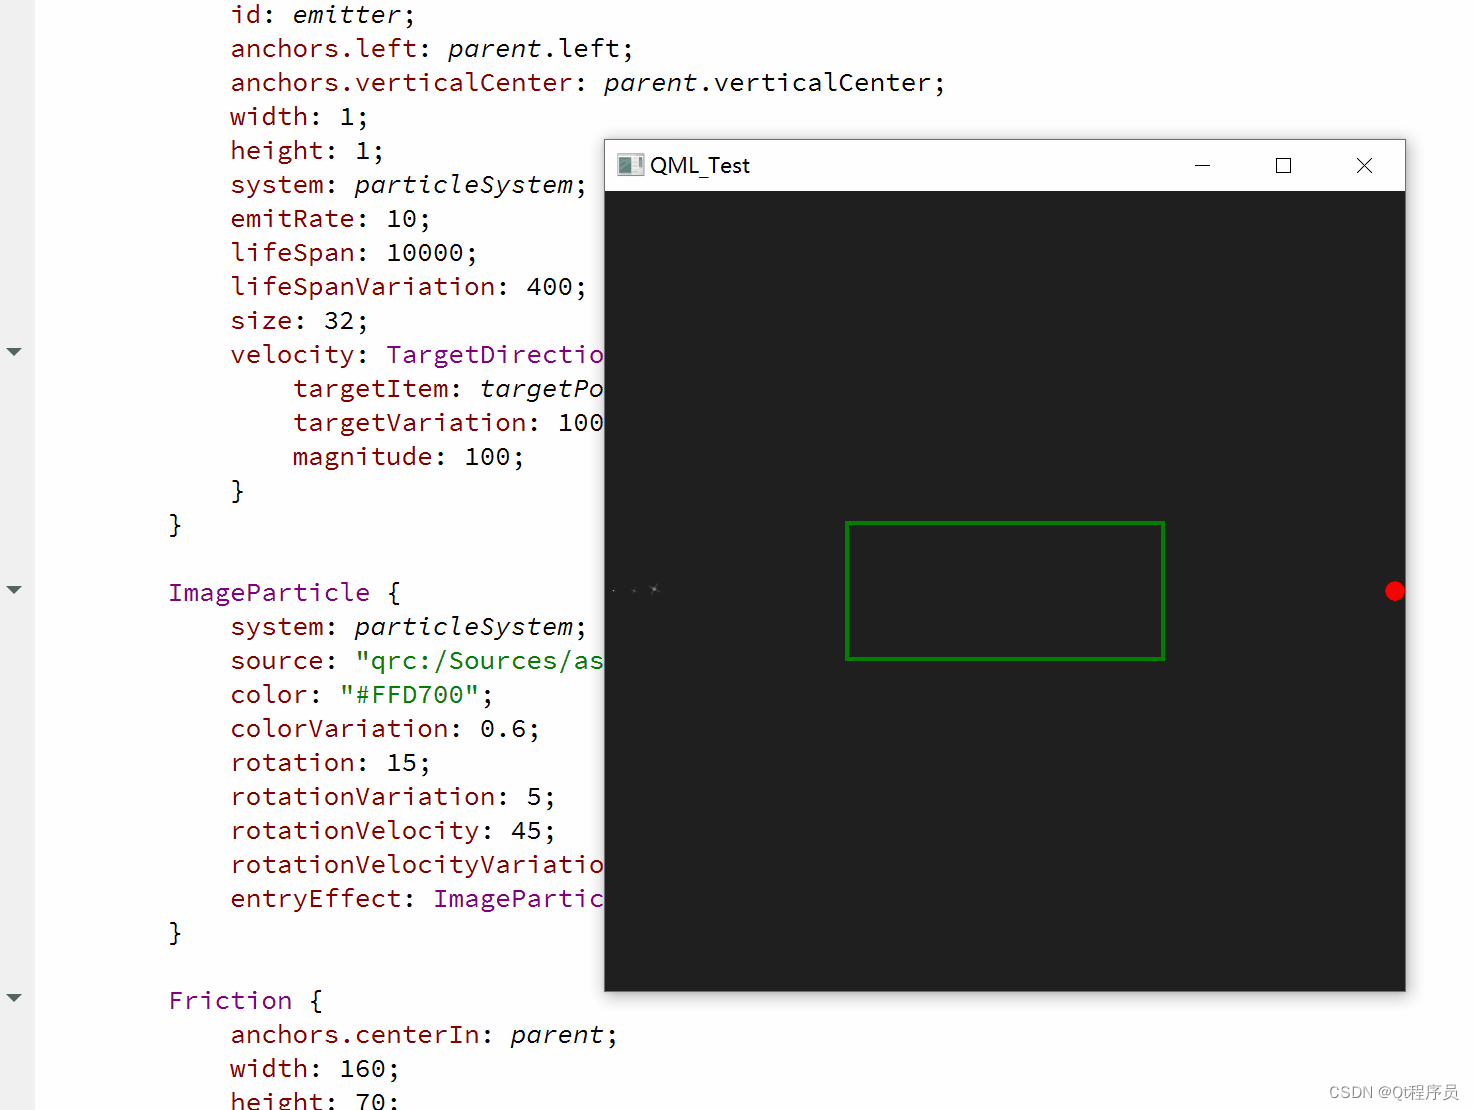
8.2、Attractor
Attractor将粒子吸引到pointX和pointY指定的点,strength属性指定吸引的强度;
强度为1.0
强度为100.0

import QtQuick 2.12
import QtQuick.Window 2.12
import QtQuick.Particles 2.0
Window {
id: root;
width: 400;
height: 400;
visible: true;
Rectangle {
id: rootItem;
width: 400;
height: 400;
color: "#1f1f1f";
ParticleSystem {
id: particleSystem;
}
Rectangle {
id: targetPoint;
anchors.right: parent.right;
anchors.verticalCenter: parent.verticalCenter;
width: 10;
height: 10;
radius: 10;
color: "red";
}
Emitter {
id: emitter;
anchors.left: parent.left;
anchors.verticalCenter: parent.verticalCenter;
width: 1;
height: 1;
system: particleSystem;
emitRate: 10;
lifeSpan: 10000;
lifeSpanVariation: 400;
size: 32;
velocity: TargetDirection {
targetItem: targetPoint;
targetVariation: 100/6;
magnitude: 100;
}
}
ImageParticle {
system: particleSystem;
source: "qrc:/Sources/assets/star.png";
color: "#FFD700";
colorVariation: 0.6;
rotation: 15;
rotationVariation: 5;
rotationVelocity: 45;
rotationVelocityVariation: 15;
entryEffect: ImageParticle.Scale;
}
Attractor {
anchors.centerIn: parent;
width: 160;
height: 70;
system: particleSystem;
pointX: 0;
pointY: 0;
strength: 100.0
Rectangle {
anchors.fill: parent;
color: "transparent";
border.color: "green";
border.width: 2;
}
}
}
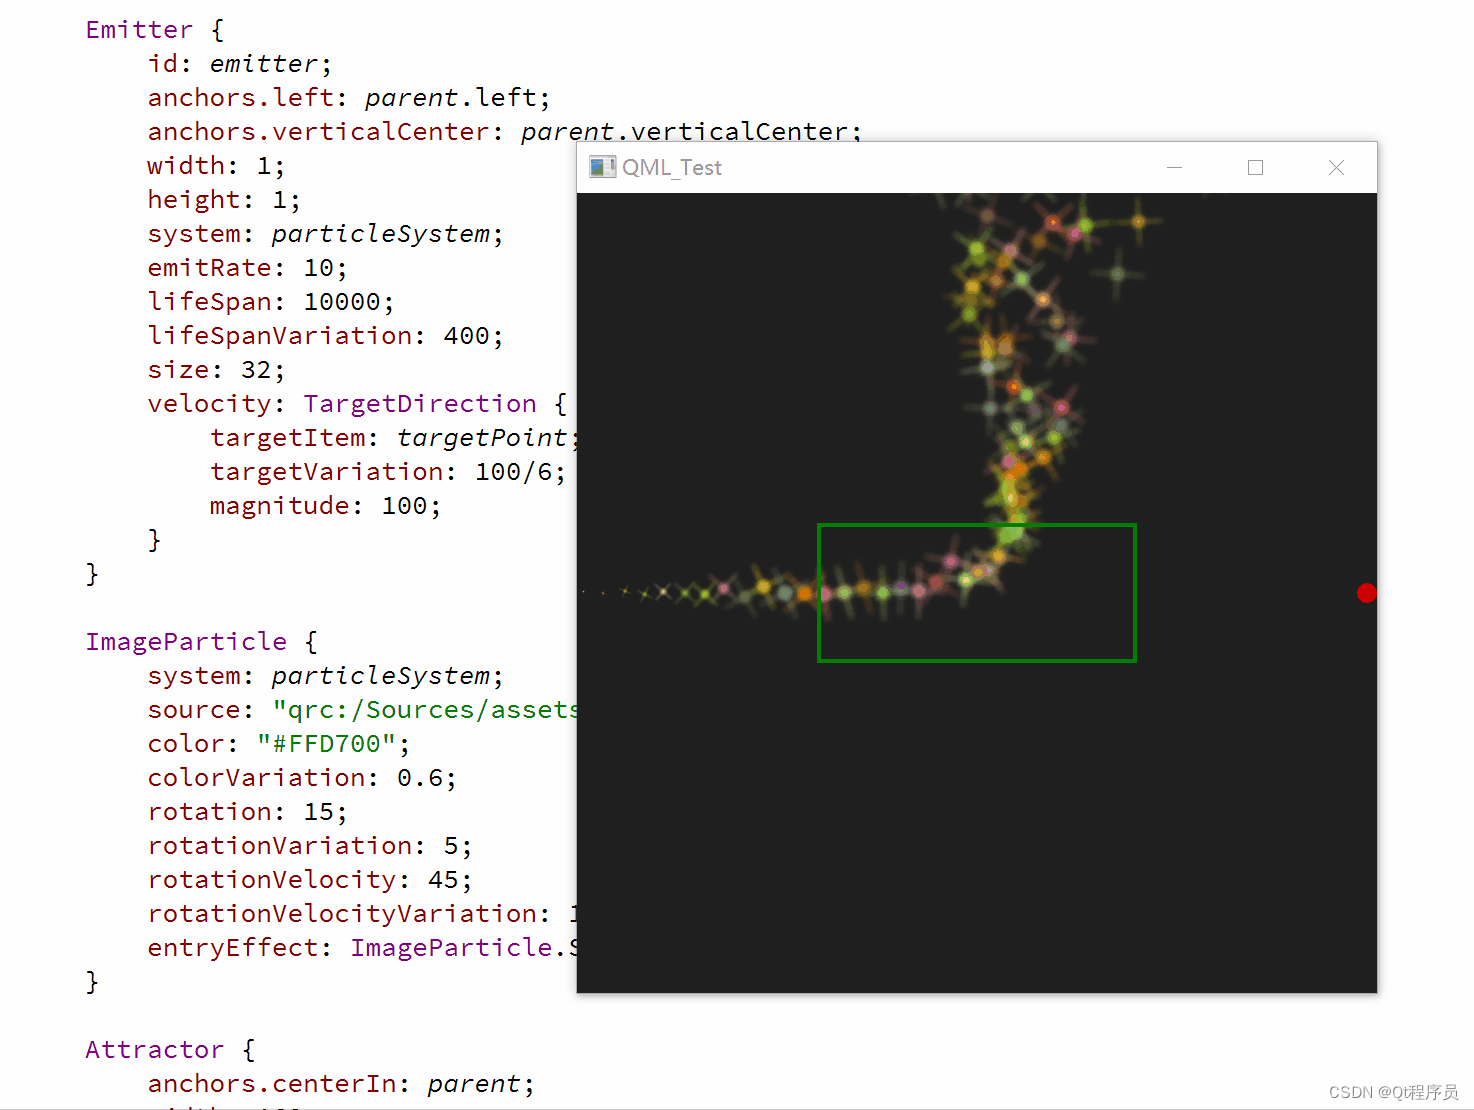
}我们的控制器位于界面中间,当粒子进入控制器范围时,控制器会影响粒子向(0,0)点方向移动;
8.3、Friction
Friction会按一定比例降低粒子速度
import QtQuick 2.12
import QtQuick.Window 2.12

import QtQuick.Particles 2.0

Window {
    id: root;
    width: 400;
    height: 400;
    visible: true;

    Rectangle {
        id: rootItem;
        width: 400;
        height: 400;
        color: "#1f1f1f";

        ParticleSystem {
            id: particleSystem;
        }

        Rectangle {
            id: targetPoint;
            anchors.right: parent.right;
            anchors.verticalCenter: parent.verticalCenter;
            width: 10;
            height: 10;
            radius: 10;
            color: "red";
        }

        Emitter {
            id: emitter;
            anchors.left: parent.left;
            anchors.verticalCenter: parent.verticalCenter;
            width: 1;
            height: 1;
            system: particleSystem;
            emitRate: 10;
            lifeSpan: 10000;
            lifeSpanVariation: 400;
            size: 32;
            velocity: TargetDirection {
                targetItem: targetPoint;
                targetVariation: 100/6;
                magnitude: 100;
            }
        }

        ImageParticle {
            system: particleSystem;
            source: "qrc:/Sources/assets/star.png";
            color: "#FFD700";
            colorVariation: 0.6;
            rotation: 15;
            rotationVariation: 5;
            rotationVelocity: 45;
            rotationVelocityVariation: 15;
            entryEffect: ImageParticle.Scale;
        }

        Friction {
            anchors.centerIn: parent;
            width: 160;
            height: 70;
            system: particleSystem;
            factor: 0.8;
            threshold: 25;

            Rectangle {
                anchors.fill: parent;
                color: "transparent";
                border.color: "green";
                border.width: 2;
            }
        }
    }

}
粒子进入控制器范围后,会以factor系数为0.8的比例降低粒子速度,直到降低到threshold: 25px/s;
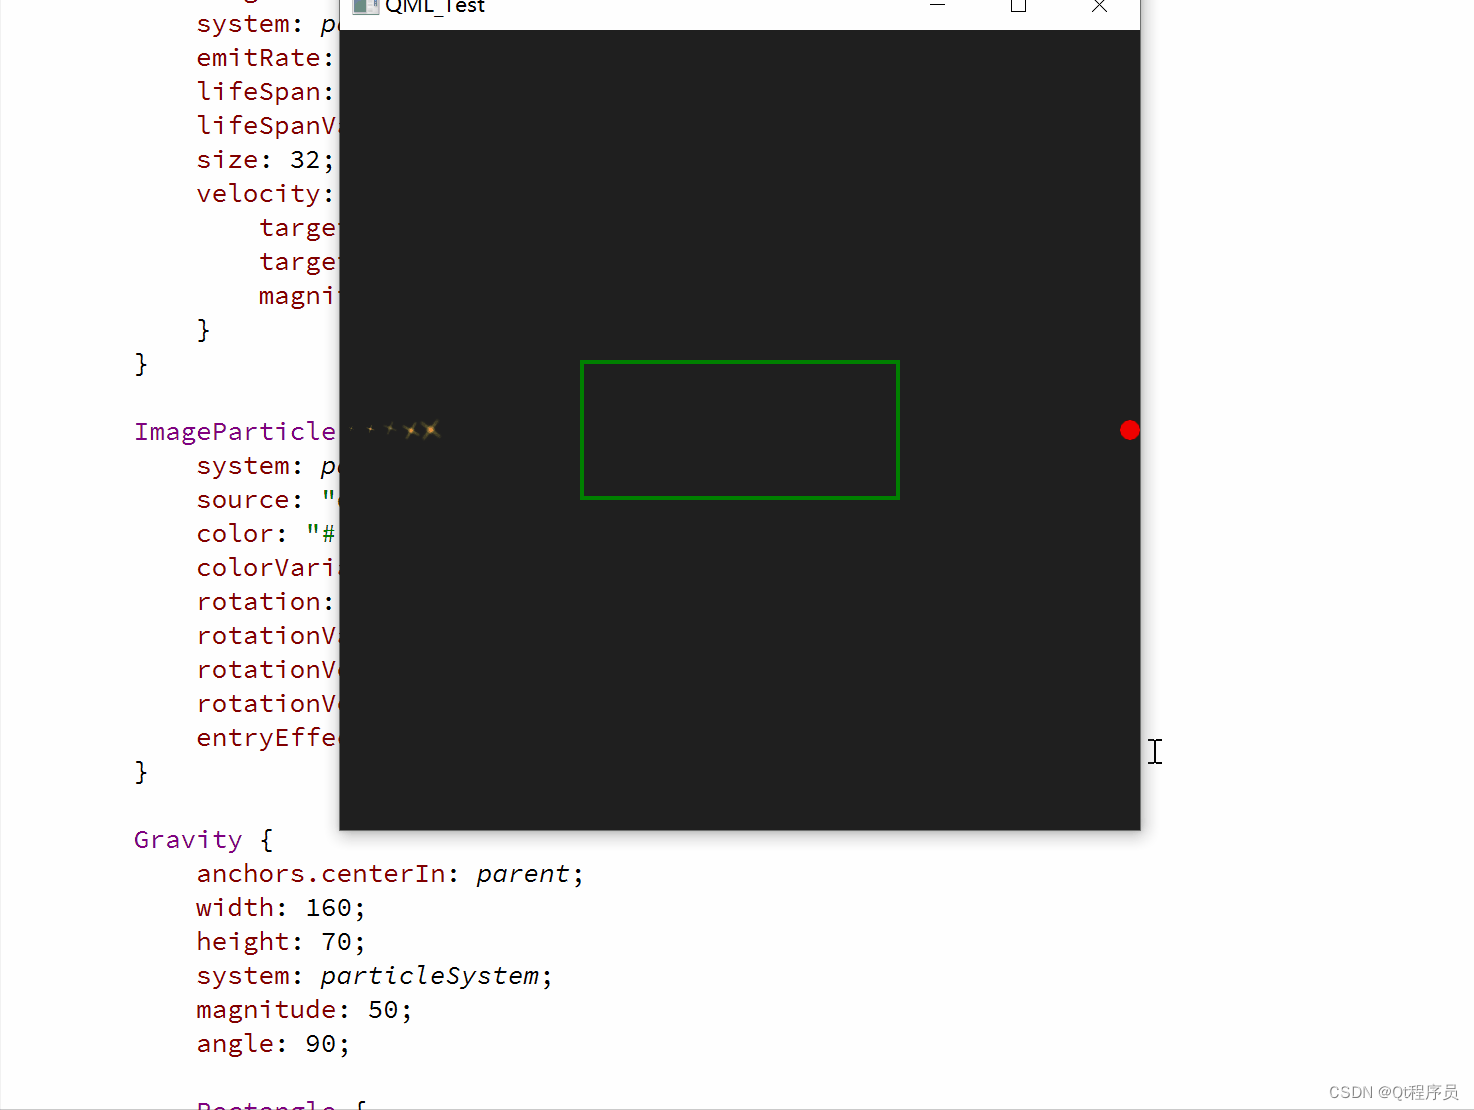
8.4、Gravity
Gravity位粒子添加一个加速度;
import QtQuick 2.12
import QtQuick.Window 2.12

import QtQuick.Particles 2.0

Window {
    id: root;
    width: 400;
    height: 400;
    visible: true;

    Rectangle {
        id: rootItem;
        width: 400;
        height: 400;
        color: "#1f1f1f";

        ParticleSystem {
            id: particleSystem;
        }

        Rectangle {
            id: targetPoint;
            anchors.right: parent.right;
            anchors.verticalCenter: parent.verticalCenter;
            width: 10;
            height: 10;
            radius: 10;
            color: "red";
        }

        Emitter {
            id: emitter;
            anchors.left: parent.left;
            anchors.verticalCenter: parent.verticalCenter;
            width: 1;
            height: 1;
            system: particleSystem;
            emitRate: 10;
            lifeSpan: 10000;
            lifeSpanVariation: 400;
            size: 32;
            velocity: TargetDirection {
                targetItem: targetPoint;
                targetVariation: 100/6;
                magnitude: 100;
            }
        }

        ImageParticle {
            system: particleSystem;
            source: "qrc:/Sources/assets/star.png";
            color: "#FFD700";
            colorVariation: 0.6;
            rotation: 15;
            rotationVariation: 5;
            rotationVelocity: 45;
            rotationVelocityVariation: 15;
            entryEffect: ImageParticle.Scale;
        }

        Gravity {
            anchors.centerIn: parent;
            width: 160;
            height: 70;
            system: particleSystem;
            magnitude: 50;
            angle: 90;

            Rectangle {
                anchors.fill: parent;
                color: "transparent";
                border.color: "green";
                border.width: 2;
            }
        }
    }

}
进入控制器范围的粒子都会被添加一个大小为50,方向为向下90°的加速度;
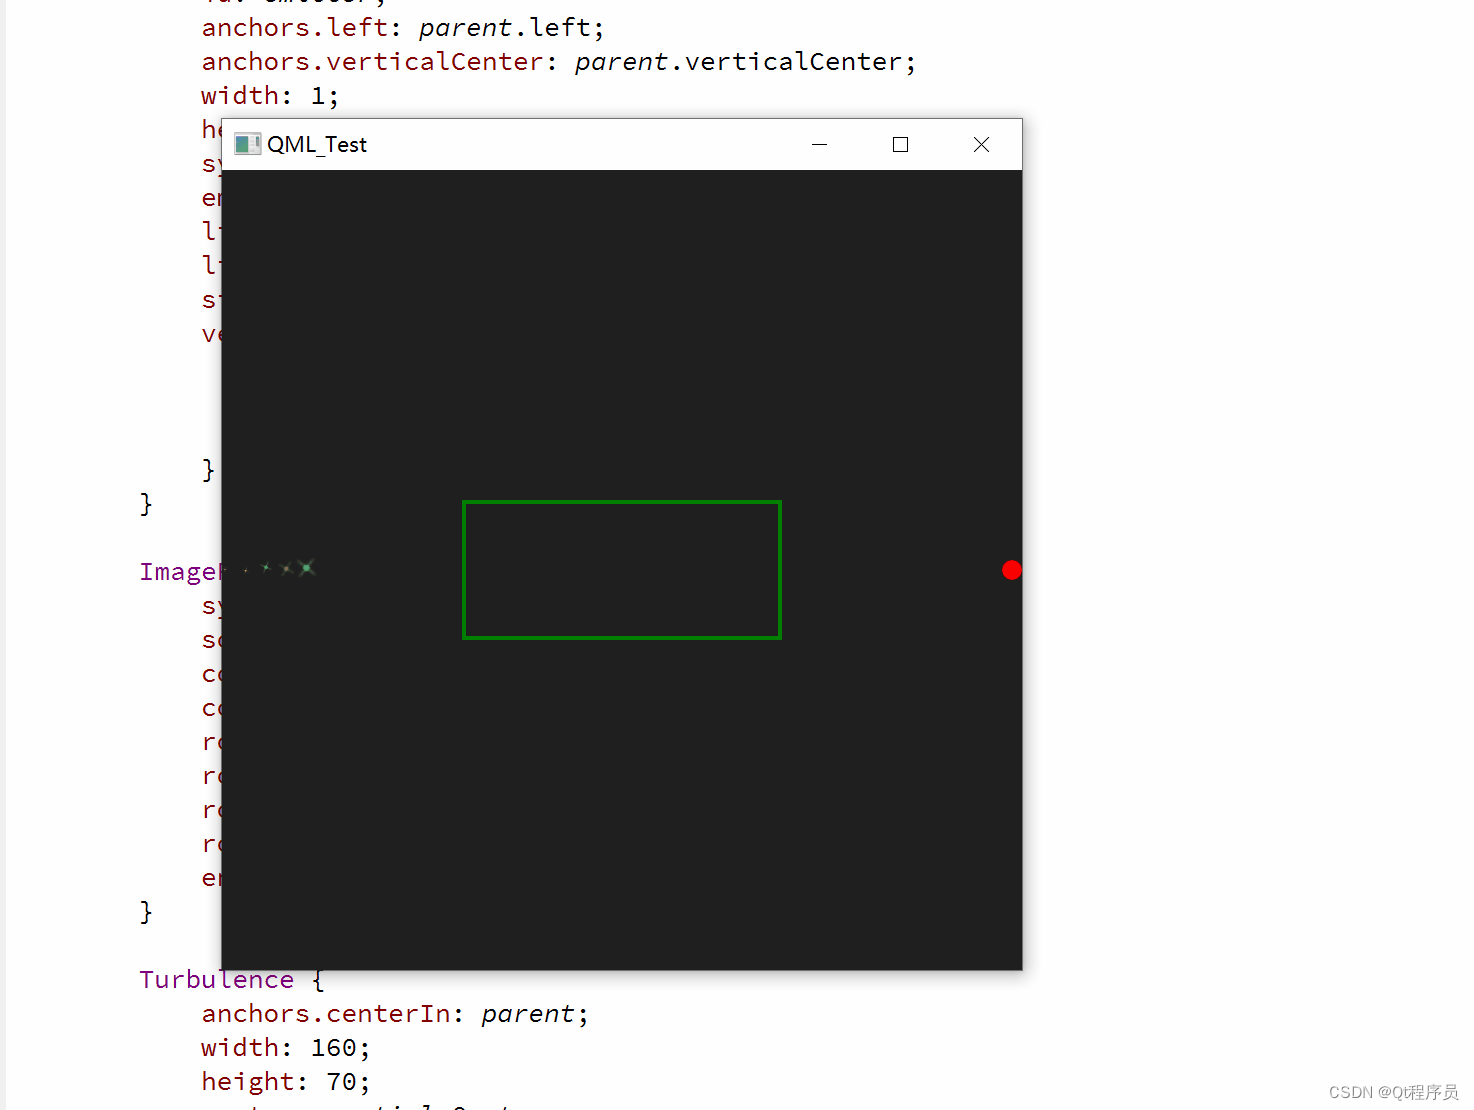
8.5、Turbulence
Turbulence为粒子添加一个力向量,每个粒子获得的力向量都是随机的,这是由一个噪音图像决定的,使用noiseSource可以自定义噪音图像,strength定义了力向量强度;
import QtQuick 2.12
import QtQuick.Window 2.12

import QtQuick.Particles 2.0

Window {
    id: root;
    width: 400;
    height: 400;
    visible: true;

    Rectangle {
        id: rootItem;
        width: 400;
        height: 400;
        color: "#1f1f1f";

        ParticleSystem {
            id: particleSystem;
        }

        Rectangle {
            id: targetPoint;
            anchors.right: parent.right;
            anchors.verticalCenter: parent.verticalCenter;
            width: 10;
            height: 10;
            radius: 10;
            color: "red";
        }

        Emitter {
            id: emitter;
            anchors.left: parent.left;
            anchors.verticalCenter: parent.verticalCenter;
            width: 1;
            height: 1;
            system: particleSystem;
            emitRate: 10;
            lifeSpan: 10000;
            lifeSpanVariation: 400;
            size: 32;
            velocity: TargetDirection {
                targetItem: targetPoint;
                targetVariation: 100/6;
                magnitude: 100;
            }
        }

        ImageParticle {
            system: particleSystem;
            source: "qrc:/Sources/assets/star.png";
            color: "#FFD700";
            colorVariation: 0.6;
            rotation: 15;
            rotationVariation: 5;
            rotationVelocity: 45;
            rotationVelocityVariation: 15;
            entryEffect: ImageParticle.Scale;
        }

        Turbulence {
            anchors.centerIn: parent;
            width: 160;
            height: 70;
            system: particleSystem;
            strength: 100;

            Rectangle {
                anchors.fill: parent;
                color: "transparent";
                border.color: "green";
                border.width: 2;
            }
        }
    }

}
粒子一旦进入控制器范围,就会发疯一样乱窜,而不是安装从左到右的方向保持一个大致轨迹;
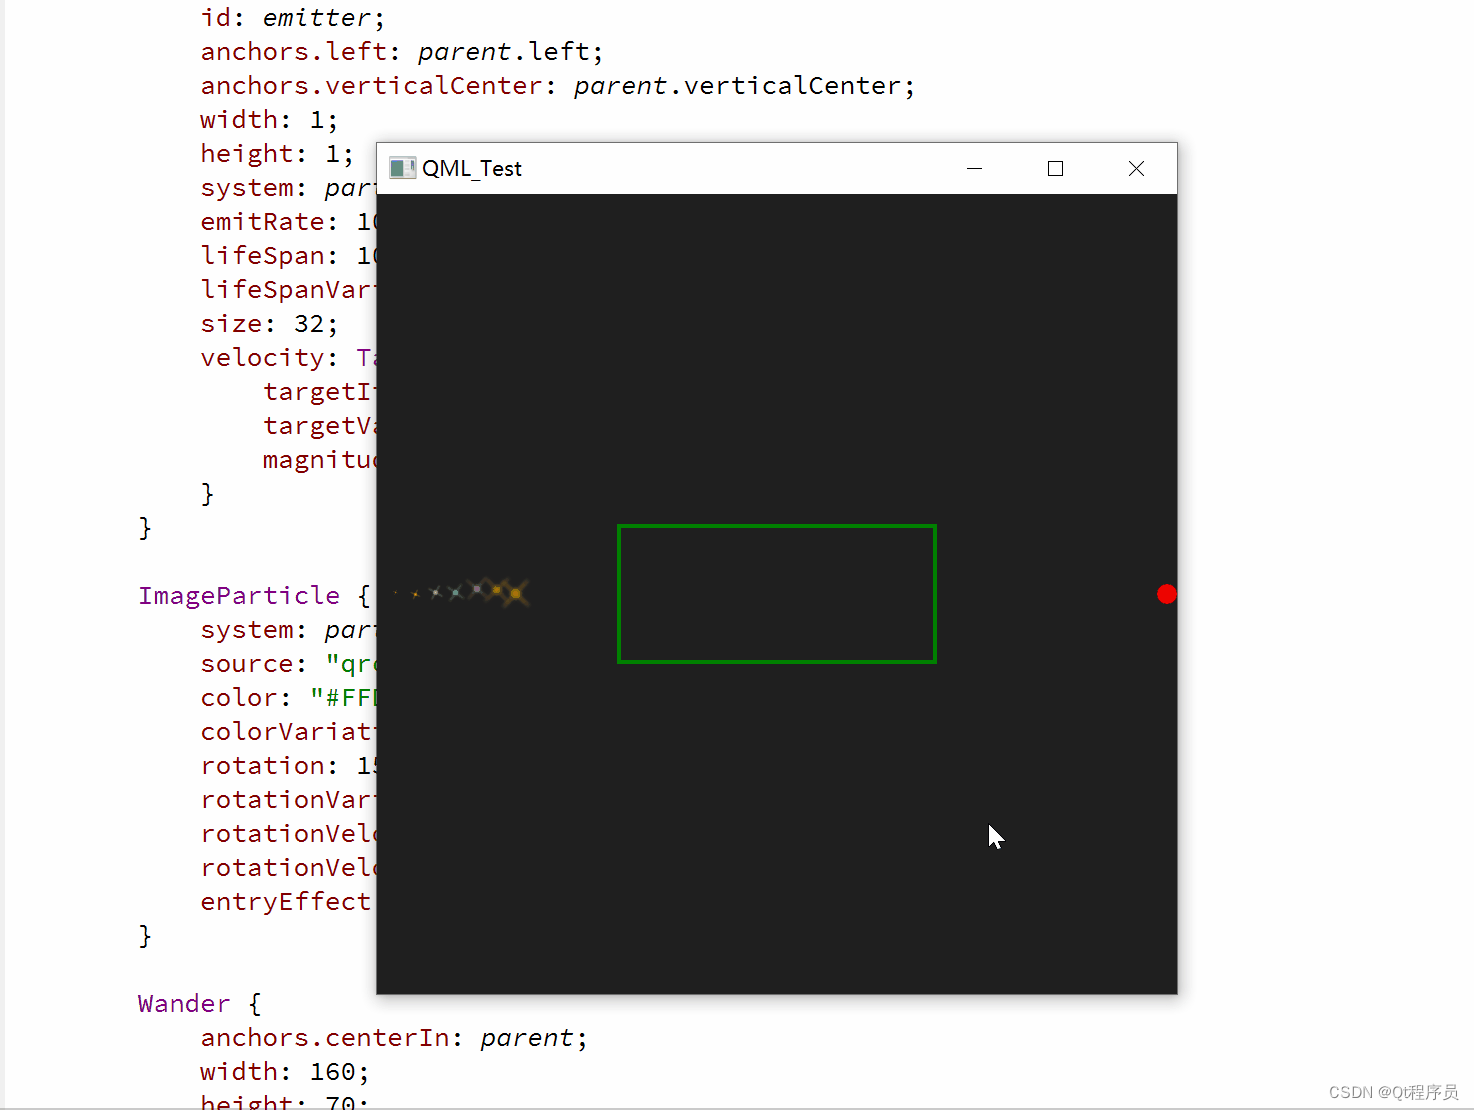
8.6、Wander
Wander控制轨迹,affectedParameter属性指定控制哪一属性(速度/位置/加速度),pace属性指定每秒该属性变化的最大值,xVariance和yVariance指定粒子轨迹x和y坐标的浮动区间。
import QtQuick 2.12
import QtQuick.Window 2.12

import QtQuick.Particles 2.0

Window {
    id: root;
    width: 400;
    height: 400;
    visible: true;

    Rectangle {
        id: rootItem;
        width: 400;
        height: 400;
        color: "#1f1f1f";

        ParticleSystem {
            id: particleSystem;
        }

        Rectangle {
            id: targetPoint;
            anchors.right: parent.right;
            anchors.verticalCenter: parent.verticalCenter;
            width: 10;
            height: 10;
            radius: 10;
            color: "red";
        }

        Emitter {
            id: emitter;
            anchors.left: parent.left;
            anchors.verticalCenter: parent.verticalCenter;
            width: 1;
            height: 1;
            system: particleSystem;
            emitRate: 10;
            lifeSpan: 10000;
            lifeSpanVariation: 400;
            size: 32;
            velocity: TargetDirection {
                targetItem: targetPoint;
                targetVariation: 100/6;
                magnitude: 100;
            }
        }

        ImageParticle {
            system: particleSystem;
            source: "qrc:/Sources/assets/star.png";
            color: "#FFD700";
            colorVariation: 0.6;
            rotation: 15;
            rotationVariation: 5;
            rotationVelocity: 45;
            rotationVelocityVariation: 15;
            entryEffect: ImageParticle.Scale;
        }

        Wander {
            anchors.centerIn: parent;
            width: 160;
            height: 70;
            system: particleSystem;
            affectedParameter: Wander.Position;
            pace: 200;
            yVariance: 240;

            Rectangle {
                anchors.fill: parent;
                color: "transparent";
                border.color: "green";
                border.width: 2;
            }
        }
    }

}
控制器作用于粒子轨迹的位置属性,轨迹以每秒200次的频率在y轴方向上随机振动;
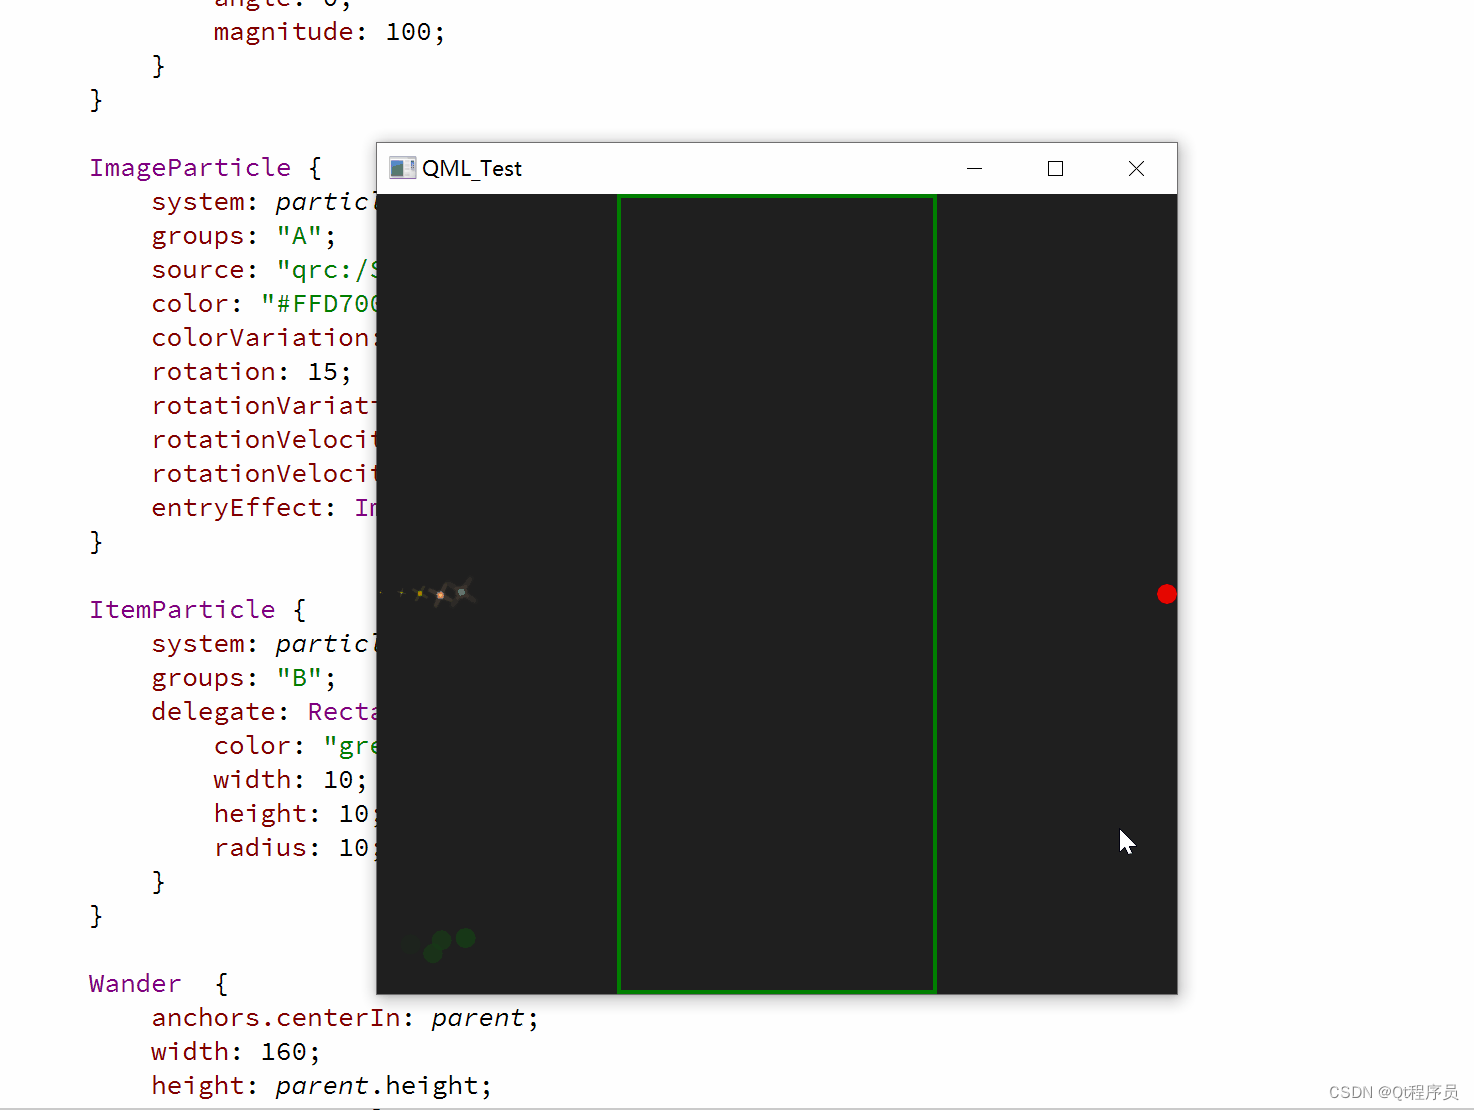
九、粒子组-ParticleGroup
每一个粒子都是粒子组(ParticleGroup)的成员,通过其name属性区分,当没有指定粒子所属的粒子组时,这些粒子默认也都在一个粒子组,不过name属性值是个空字符串,粒子组主要是为了方便控制粒子行为状态;
import QtQuick 2.12
import QtQuick.Window 2.12

import QtQuick.Particles 2.0

Window {
    id: root;
    width: 400;
    height: 400;
    visible: true;

    Rectangle {
        id: rootItem;
        width: 400;
        height: 400;
        color: "#1f1f1f";

        ParticleSystem {
            id: particleSystem;
        }

        Rectangle {
            id: targetPoint;
            anchors.right: parent.right;
            anchors.verticalCenter: parent.verticalCenter;
            width: 10;
            height: 10;
            radius: 10;
            color: "red";
        }

        Emitter {
            id: emitter;
            anchors.left: parent.left;
            anchors.verticalCenter: parent.verticalCenter;
            group: "A";
            width: 1;
            height: 1;
            system: particleSystem;
            emitRate: 10;
            lifeSpan: 6400;
            lifeSpanVariation: 400;
            size: 32;
            velocity: TargetDirection {
                targetItem: targetPoint;
                targetVariation: 100/6;
                magnitude: 100;
            }
        }

        Emitter {
            id: emitter2;
            anchors.left: parent.left;
            anchors.bottom: parent.bottom;
            anchors.bottomMargin: 20;
            group: "B";
            width: 10;
            height: 10;
            system: particleSystem;
            emitRate: 10;
            lifeSpan: 6400;
            lifeSpanVariation: 400;
            size: 10;
            velocity: AngleDirection {
                angle: 0;
                magnitude: 100;
            }
        }

        ImageParticle {
            system: particleSystem;
            groups: "A";
            source: "qrc:/Sources/assets/star.png";
            color: "#FFD700";
            colorVariation: 0.6;
            rotation: 15;
            rotationVariation: 5;
            rotationVelocity: 45;
            rotationVelocityVariation: 15;
            entryEffect: ImageParticle.Scale;
        }

        ItemParticle {
            system: particleSystem;
            groups: "B";
            delegate: Rectangle {
                color: "green";
                width: 10;
                height: 10;
                radius: 10;
            }
        }

        Wander  {
            anchors.centerIn: parent;
            width: 160;
            height: parent.height;
            system: particleSystem;
            groups: ["A","B"];
            affectedParameter: Wander.Position;
            pace: 500;
            yVariance: 400;

            Rectangle {
                anchors.fill: parent;
                color: "transparent";
                border.color: "green";
                border.width: 2;
            }
        }
    }

}
定义了两个粒子发射器,分别是groupA和groupB;
groupA使用的是ImageParticle画刷,groupB使用的是ItemParticle画刷;
两个组同时使用Wander控制器;
本文福利,莬费领取Qt开发学习资料包、技术视频,内容包括(Qt实战项目视频教程+代码,C++语言基础,C++设计模式,Qt编程入门,QT信号与槽机制,QT界面开发-图像绘制,QT网络,QT数据库编程,QT项目实战,QSS,OpenCV,Quick模块,面试题等等)↓↓↓↓↓↓见下面↓↓文章底部点击莬费领取↓↓