多线程(二):线程池的使用
一、为什么要使用线程池
在java的日常开发中,如果频繁的创建线程,对系统的开销是非常大的,可能会使系统由于过度消耗内存或切换过度而导致系统资源不足。而线程池包含池管理器、工作线程、任务列队、任务接口等模块,可以减少线程的创建和销毁次数,解决线程生命周期开销问题和资源不足问题,从而提高服务器的工作效率。
使用对比
1.线程
public void thread01(int taskCount){


    for (int i = 0; i < taskCount; i++) {


        int j = i+1;
        new Thread(()->{


            try {


                Thread.sleep(1000);
            } catch (InterruptedException e) {


                e.printStackTrace();
            }
            System.out.println(System.currentTimeMillis()/1000 +"——执行到第:"+ j +"线程");
        }).start();
    }
}
运行结果:

分析结果:
若taskCount=14,一次性分配14个线程执行
2.线程池
public void pool(int taskCount){
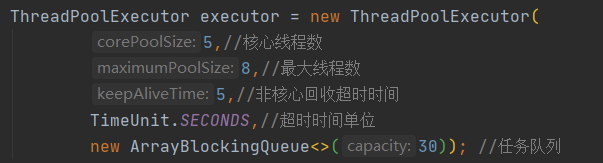
ThreadPoolExecutor executor = new ThreadPoolExecutor(5,8,5,TimeUnit.SECONDS,new ArrayBlockingQueue<>(50));
for (int i = 0; i < taskCount; i++) {
int j = i+1;
Thread thread = new Thread(()->{
try {
Thread.sleep(1000);
} catch (InterruptedException e) {
e.printStackTrace();
}
System.out.println(System.currentTimeMillis()/1000 +"——执行到第:"+ j +"线程");
});
executor.execute(thread);
}
}
运行结果:

分析结果:
若taskCount=14,线程池中每次只提供5个线程执行,多批次执行。"5+5+4"共三个批次执行
二、使用线程池的三种方式
方式一:使用ThreadPoolExecutor
使用方式如上文"2.线程池",关键参数:
方式二:Springboot中把线程池纳入到Spring容器管理
第一步:增加配置类(把ThreadPoolExecutor放入Spring容器管理)
@Configuration
public class ThreadPoolExecutorConfig {


    @Bean
    public ThreadPoolExecutor threadPoolExecutor() {


        ThreadPoolExecutor executor = new ThreadPoolExecutor(5, 8, 5, TimeUnit.SECONDS, new ArrayBlockingQueue<>(30));
        executor.allowCoreThreadTimeOut(true);
        return executor;
    }
}
第二步:在使用类中注入ThreadPoolExecutor,使用方式如上文"2.线程池"
@RestController
@RequestMapping("/file")
public class FileController {


    @Autowired
    private ThreadPoolExecutor executor;
    //TODO 业务逻辑
}
方式三:Springboot中使用CompletableFuture
第一步:增加异步配置
@Configuration
@EnableAsync  // 启用异步任务
public class AsyncConfiguration {


    // 声明一个线程池(并指定线程池的名字)
    @Bean("taskExecutor")
    public Executor asyncExecutor() {


        ThreadPoolTaskExecutor executor = new ThreadPoolTaskExecutor();
        //核心线程数5:线程池创建时候初始化的线程数
        executor.setCorePoolSize(5);
        //最大线程数5:线程池最大的线程数,只有在缓冲队列满了之后才会申请超过核心线程数的线程
        executor.setMaxPoolSize(5);
        //缓冲队列500:用来缓冲执行任务的队列
        executor.setQueueCapacity(500);
        //允许线程的空闲时间60秒:当超过了核心线程出之外的线程在空闲时间到达之后会被销毁
        executor.setKeepAliveSeconds(60);
        //线程池名的前缀:设置好了之后可以方便我们定位处理任务所在的线程池
        executor.setThreadNamePrefix("DailyAsync-");
        executor.initialize();
        return executor;
    }
}
第二步:编写线程service方法,并在方法上加@Async注解
IService
public interface PushDetailService extends IService<PushDetail> {


    CompletableFuture<String> testThread();
}
ServiceImpl
@Service
public class PushDetailServiceImpl extends ServiceImpl<PushDetailMapper, PushDetail> implements PushDetailService {


    @Async("taskExecutor")
    public CompletableFuture<String> testThread() {


        try {


            Thread.sleep(3000);
        } catch (InterruptedException e) {


            e.printStackTrace();
        }
        return CompletableFuture.completedFuture("当前时间:"+System.currentTimeMillis());
    }
}
第三步:编写调用的controller方法
@GetMapping("/testThread")
public String testThread() throws ExecutionException, InterruptedException {


    Long begin = System.currentTimeMillis();
    CompletableFuture<String> future1 = pushService.testThread();
    CompletableFuture<String> future2 = pushService.testThread();
    //join让“主线程”等待“子线程”结束之后才能继续运行
    CompletableFuture.allOf(future1,future2).join();
    log.info("time1 ==> "+future1.get());
    log.info("time2 ==> "+future2.get());
    return System.currentTimeMillis()-begin;
}