一、介绍
Android原生控件,无法满足我们需求时,我们可以完全创建一个新的view,来实现自己需要的功能
创建View的难点在于控件的重绘和实现交互
通常需要重写onDraw OnMeasure等方法实现绘制逻辑,重写onTouchEvent等实现交互逻辑
当然我们也可以向组合控件那样加入自定义属性
我们来实现一个下图红框内的效果(步数有点少,大家不要笑)

我的效果:
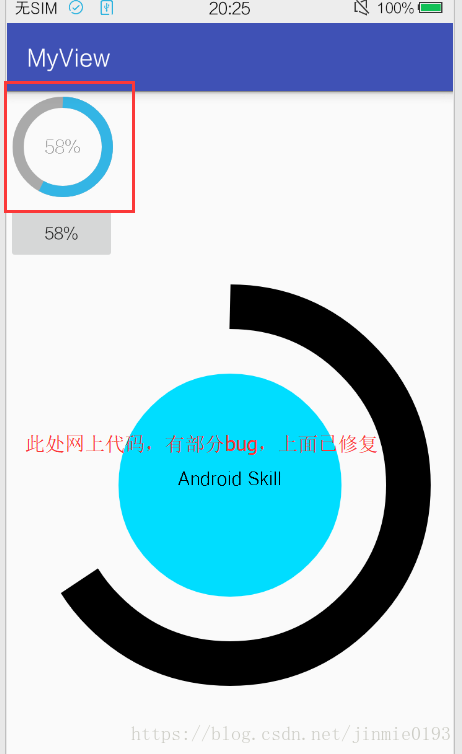
二、重写View实现全新控件
分析一下 这个View分为背景,灰度圆圈,进度圆弧,文字等
1.新建java类MyProgress,继承View

2.确定绘制图形的大小
绘制控件,首先我们需要知道绘制图形的大小,
这个过程在OnMeasure中进行,如果不重写OnMeasure方法,自定义的View会默认充满父布局
首先重写onMeasure,按住ctrl点击super.onMeasure查看,发现其实是调用的setMeasuredDimension(mWidth,mHeihgt);方法,此方法将测量的宽高传进去从而完成测量工作
所以重写onMeasure方法,就是把参数传给setMeasuredDimension
    //对宽高重新进行定义
    @Override
    protected void onMeasure(int widthMeasureSpec, int heightMeasureSpec) {
        //我们调用自己的自定义方法measureSize对宽高重新定义,参数宽和高是MeasureSpec对象
        //MeasureSpec对象有两个常用方法
        //MeasureSpec.getMode(measureSpec)  得到测量模式
        //MeasureSpec.getSize(measureSpec)  得到测量大小
        mWidth = measureSize(widthMeasureSpec);
        mHeihgt = measureSize(heightMeasureSpec);
        setMeasuredDimension(mWidth,mHeihgt);
    }
通过自定义方法measureSize得到应该绘制的大小
    //我们通过测量模式,给出不同的测量值
    //当specMode = EXACTLY时,直接指定specSize即可
    //当specMode != EXACTLY时,需要指出默认大小
    //当specMode = AT_MOST时,即指定了wrap_content属性时,需要取出我们指定大小和specSize中最小的一个为最后测量值
    private int measureSize(int measureSpec) {
        int result = 0;

        int specMode = MeasureSpec.getMode(measureSpec);
        int specSize = MeasureSpec.getSize(measureSpec);

        if (specMode == MeasureSpec.EXACTLY){
            result = specSize;
        }else {
            result = 180;   //指定默认大小
            if (specMode == MeasureSpec.AT_MOST){
                result = Math.min(result,specSize);
            }
        }
        return result;
    }
3.绘制View的样式
知道大小之后就可以在OnDraw中绘图了,先说说绘图的一个注意点,新手容易卡半天
    // 1.一般来说,对于绘图时,要在父类方法super.onDraw(canvas)前,重新调用画笔的设置等,这样才可以得到重绘效果
    // 2.比如画笔初始化函数放在onMeasure中
    //     当你在activity中要设置进度动态更新,文字重绘等方法,必须要重新调用myProgress.onMeasure()方法,自定义的控件才会更新
    //     但如果你画笔初始化函数放在onDraw中,要进行View的更新只需要调用myProgress.invalidate()方法即可,
    //     甚至可以不用调用,因为onDraw方法会在子线程中一直调用,实时更新控件
    // 3.举个我写程序的错误
    //     当时我就把画笔初始化函数放在onMeasure方法中,结果我在activity中设置进度条以及文本更新时,发现自定义控件并没有变化,
    //     只有我在设置文字后调用myProgress.onMeasure()方法,控件才会更新
    // 4.此时我发现其实是我画笔初始化函数放置的位置不对,其实画笔初始化函数放在不同的地方只要使用相应的函数调用对应的方法就可以
    //     即画笔初始化函数放在onMeasure中,调用myProgress.onMeasure()方法
    //     即画笔初始化函数放在onDraw中,调用myProgress.invalidate()方法,此时也可以不调用
所以在OnDraw方法中super.onDraw(canvas);的前面调用画笔初始化initView,在其后面绘制图形
    protected void onDraw(Canvas canvas) {
        //初始化画笔风格,图形参数,如圆圈的颜色,绘制的文字等
        initView();
        super.onDraw(canvas);       //父类方法
        //设置背景
        //setBackground(ContextCompat.getDrawable(getContext(), R.color.colorAccent));
        //绘制弧线
        /**
         * 参数
         * mArcRectF : 指定圆弧的外轮廓矩形区域。
         * startAngle: 圆弧起始角度,单位为度。
         * sweepAngle: 圆弧扫过的角度,顺时针方向,单位为度。
         * useCenter: 如果为True时,在绘制圆弧时将圆心包括在内,通常用来绘制扇形。
         * paint: 绘制圆弧的画板属性,如颜色,是否填充等。
         */
        //度数为顺时针:圆的最右边为0,顺时针依次偏移,正下方为90,正上方为-90或270度
        //绘制为顺时针画图
        //背景圆弧
        canvas.drawArc(mArcRectF, 180, 360, false, grayArcPaint);
        //进度圆弧
        canvas.drawArc(mArcRectF, -90, mSweepAngle, false, proArcPaint);
        //绘制文字
        /**
         * 参数
         * text :   文本
         * start :  要绘制的文本中第一个字符的索引
         * end :    要绘制的文本中最后一个字符的索引
         * x :      所绘制文本原点的x坐标
         * y :      所绘制文本的基线的y坐标
         * paint :  画笔,控制文字风格
         */
        /*
        这是一个确定圆心的十字架,绘图时作比较用的
        textPaint.setStrokeWidth(1f);   //画笔宽度
        canvas.drawLine(0,mHeihgt/2,mWidth,mHeihgt/2,textPaint);
        canvas.drawLine(mWidth/2,0,mWidth/2,mHeihgt,textPaint);*/

        //确定文字基线在圆心
        Paint.FontMetrics fm = textPaint.getFontMetrics();
        //粗略计算:基线位置约等于mCircleXY + halfTextHeight
        float halfTextHeight = Math.abs(fm.bottom-fm.top) / 4;

        canvas.drawText(proText,0,proText.length(),mCircleXY,mCircleXY + halfTextHeight,textPaint);

        //调用父类方法后,实现自己的逻辑
        canvas.restore();            //合并图像
    }
主要看看drawText详解中文字基线的描述
说了这么多画笔初始化,那么其函数如下:
    public void initView(){
        //设置圆的参数
        float length=0;                      //自定义View的宽度
        length = Math.max(mWidth,mHeihgt);  //宽高的中较大的一个
        //定义的圆弧的形状和大小的范围
        mCircleXY = (float) (length/2);     //圆心坐标
        //设置弧线
        /*
        * 参数:
        * left :  矩形左边的X坐标
        * top :   矩形顶部的Y坐标
        * right :  矩形右边的X坐标
        * bottom: 矩形底部的Y坐标*/
        mArcRectF = new RectF(
                (float)(length*0.1),
                (float)(length*0.1),
                (float)(length*0.9),
                (float)(length*0.9));
        //扫描过的角度,除以100表示圆圈进度为0-100,乘以360表示1%圆代表的度数
        mSweepAngle = (mSweepValue/100f)*360f;
        //设置文字信息
        proText = setShowText(mSweepValue);
        proTextSize = setShowTextSize(30);

        //圆圈画笔
        grayArcPaint = new Paint();      //画笔
        grayArcPaint.setAntiAlias(true); //平滑
        grayArcPaint.setColor(ContextCompat.getColor(getContext(),android.R.color.darker_gray));
        grayArcPaint.setStyle(Paint.Style.STROKE);   //空心
        grayArcPaint.setStrokeWidth(length * 0.1f);   //画笔宽度
        //弧度画笔
        proArcPaint = new Paint();          //画笔
        proArcPaint.setAntiAlias(true);     //平滑
        proArcPaint.setColor(ContextCompat.getColor(getContext(),android.R.color.holo_blue_light));
        proArcPaint.setStyle(Paint.Style.STROKE);   //空心
        proArcPaint.setStrokeWidth(length * 0.1f);   //画笔宽度
        //文字的画笔
        textPaint = new Paint();
        textPaint.setTextSize(proTextSize);         //文字尺寸
        textPaint.setTextAlign(Paint.Align.CENTER); //文字居中
        textPaint.setColor(ContextCompat.getColor(getContext(),android.R.color.darker_gray));
        textPaint.setStrokeWidth(length * 0.1f);   //画笔宽度
        //this.invalidate();//刷新View,在UI线程中进行
    }
4.引用自定义控件
通过上面步骤我们就定义好了自己的View,之后引用就可以了
    <myView.MyProgress
        android:id="@+id/my_progress"
        android:layout_width="wrap_content"
        android:layout_height="wrap_content" />
效果:
5.实例化控件
private MyProgress myProgress;
myProgress = (MyProgress) findViewById(R.id.my_progress);
myProgress.setSweepValue(1);
        myProgress.setOnClickListener(new View.OnClickListener() {
            @Override
            public void onClick(View v) {
                //点击事件
            }
        });
    }
6.最后给出我的部分代码
MyProgress:
package myView;

import android.content.Context;
import android.graphics.Canvas;
import android.graphics.Paint;
import android.graphics.RectF;
import android.support.annotation.Nullable;
import android.support.v4.content.ContextCompat;
import android.util.AttributeSet;
import android.util.Log;
import android.view.View;

import com.liang.myview.R;

/**
 * Created by Amarao on 2018/6/23.
 */

public class MyProgress extends View {

    /*
    * 这个View分为背景,灰度圆圈,进度圆弧,文字
    * */
    private int mWidth;
    private int mHeihgt;

    private Paint grayArcPaint,proArcPaint,textPaint;
    private float mCircleXY;        //圆心坐标
    private RectF mArcRectF;         //定义的圆弧的形状和大小的范围
    private float mSweepValue=25;   //当前进度百分比0-100
    private float mSweepAngle;      //圆弧扫过的角度,顺时针方向,单位为度
    private String proText;
    private float proTextSize;


    public MyProgress(Context context) {
        super(context);
    }

    public MyProgress(Context context, @Nullable AttributeSet attrs) {
        super(context, attrs);
        setWillNotDraw(false);// 防止onDraw方法不执行
    }

    //第一步,我们需要知道绘制图形的大小,这个过程在OnMeasure中进行,如果不重写OnMeasure方法,自定义的View会默认充满父布局
    //首先重写onMeasure,按住ctrl点击super.onMeasure查看,发现其实是调用的setMeasuredDimension(mWidth,mHeihgt);方法,此方法将测量的宽高穿进去从而完成测量工作
    //所以重写onMeasure方法,就是把参数传给setMeasuredDimension

    //对宽高重新进行定义
    @Override
    protected void onMeasure(int widthMeasureSpec, int heightMeasureSpec) {
        //我们调用自己的自定义方法measureSize对宽高重新定义,参数宽和高是MeasureSpec对象
        //MeasureSpec对象有两个常用方法
        //MeasureSpec.getMode(measureSpec)  得到测量模式
        //MeasureSpec.getSize(measureSpec)  得到测量大小
        mWidth = measureSize(widthMeasureSpec);
        mHeihgt = measureSize(heightMeasureSpec);
        setMeasuredDimension(mWidth,mHeihgt);
        //初始化图形
        //initView();
    }

    //我们通过测量模式,给出不同的测量值
    //当specMode = EXACTLY时,直接指定specSize即可
    //当specMode != EXACTLY时,需要指出默认大小
    //当specMode = AT_MOST时,即指定了wrap_content属性时,需要取出我们指定大小和specSize中最小的一个为最后测量值
    private int measureSize(int measureSpec) {
        int result = 0;

        int specMode = MeasureSpec.getMode(measureSpec);
        int specSize = MeasureSpec.getSize(measureSpec);

        if (specMode == MeasureSpec.EXACTLY){
            result = specSize;
        }else {
            result = 180;   //指定默认大小
            if (specMode == MeasureSpec.AT_MOST){
                result = Math.min(result,specSize);
            }
        }
        return result;
    }

    public void initView(){
        //设置圆的参数
        float length=0;                      //自定义View的宽度
        length = Math.max(mWidth,mHeihgt);  //宽高的中较大的一个
        //定义的圆弧的形状和大小的范围
        mCircleXY = (float) (length/2);     //圆心坐标
        //设置弧线
        /*
        * 参数:
        * left :  矩形左边的X坐标
        * top :   矩形顶部的Y坐标
        * right :  矩形右边的X坐标
        * bottom: 矩形底部的Y坐标*/
        mArcRectF = new RectF(
                (float)(length*0.1),
                (float)(length*0.1),
                (float)(length*0.9),
                (float)(length*0.9));
        //扫描过的角度,除以100表示圆圈进度为0-100,乘以360表示1%圆代表的度数
        mSweepAngle = (mSweepValue/100f)*360f;
        //设置文字信息
        proText = setShowText(mSweepValue);
        proTextSize = setShowTextSize(30);

        //圆圈画笔
        grayArcPaint = new Paint();      //画笔
        grayArcPaint.setAntiAlias(true); //平滑
        grayArcPaint.setColor(ContextCompat.getColor(getContext(),android.R.color.darker_gray));
        grayArcPaint.setStyle(Paint.Style.STROKE);   //空心
        grayArcPaint.setStrokeWidth(length * 0.1f);   //画笔宽度
        //弧度画笔
        proArcPaint = new Paint();          //画笔
        proArcPaint.setAntiAlias(true);     //平滑
        proArcPaint.setColor(ContextCompat.getColor(getContext(),android.R.color.holo_blue_light));
        proArcPaint.setStyle(Paint.Style.STROKE);   //空心
        proArcPaint.setStrokeWidth(length * 0.1f);   //画笔宽度
        //文字的画笔
        textPaint = new Paint();
        textPaint.setTextSize(proTextSize);         //文字尺寸
        textPaint.setTextAlign(Paint.Align.CENTER); //文字居中
        textPaint.setColor(ContextCompat.getColor(getContext(),android.R.color.darker_gray));
        textPaint.setStrokeWidth(length * 0.1f);   //画笔宽度
        //this.invalidate();//刷新View,在UI线程中进行
    }

    //绘制图像
    // 一般来说,对于绘图时,要在父类方法super.onDraw(canvas)前,重新调用画笔的设置等,这样才可以得到重绘效果
    // 比如画笔初始化函数放在onMeasure中
    // 当你在activity中要设置进度动态更新,文字重绘等方法,必须要重新调用myProgress.onMeasure()方法,自定义的控件才会更新
    // 但如果你画笔初始化函数放在onDraw中,要进行View的更新只需要调用myProgress.invalidate()方法即可,
    // 甚至可以不用调用,因为onDraw方法会在子线程中一直调用,实时更新控件
    // 举个我写程序的错误
    // 当时我就把画笔初始化函数放在onMeasure方法中,结果我在activity中设置进度条以及文本更新时,发现自定义控件并没有变化,
    // 只有我在设置文字后调用myProgress.onMeasure()方法,控件才会更新
    // 此时我发现其实是我画笔初始化函数放置的位置不对,其实画笔初始化函数放在不同的地方只要使用相应的函数调用对应的方法就可以
    // 即画笔初始化函数放在onMeasure中,调用myProgress.onMeasure()方法
    // 即画笔初始化函数放在onDraw中,调用myProgress.invalidate()方法,此时也可以不调用
    @Override
    protected void onDraw(Canvas canvas) {
        //初始化画笔风格,图形参数,如圆圈的颜色,绘制的文字等
        initView();
        super.onDraw(canvas);       //父类方法
        //设置背景
        //setBackground(ContextCompat.getDrawable(getContext(), R.color.colorAccent));
        //绘制弧线
        /**
         * 参数
         * mArcRectF : 指定圆弧的外轮廓矩形区域。
         * startAngle: 圆弧起始角度,单位为度。
         * sweepAngle: 圆弧扫过的角度,顺时针方向,单位为度。
         * useCenter: 如果为True时,在绘制圆弧时将圆心包括在内,通常用来绘制扇形。
         * paint: 绘制圆弧的画板属性,如颜色,是否填充等。
         */
        //度数为顺时针:圆的最右边为0,顺时针依次偏移,正下方为90,正上方为-90或270度
        //绘制为顺时针画图
        //背景圆弧
        canvas.drawArc(mArcRectF, 180, 360, false, grayArcPaint);
        //进度圆弧
        canvas.drawArc(mArcRectF, -90, mSweepAngle, false, proArcPaint);
        //绘制文字
        /**
         * 参数
         * text :   文本
         * start :  要绘制的文本中第一个字符的索引
         * end :    要绘制的文本中最后一个字符的索引
         * x :      所绘制文本原点的x坐标
         * y :      所绘制文本的基线的y坐标
         * paint :  画笔,控制文字风格
         */
        /*
        这是一个确定圆心的十字架,绘图时作比较用的
        textPaint.setStrokeWidth(1f);   //画笔宽度
        canvas.drawLine(0,mHeihgt/2,mWidth,mHeihgt/2,textPaint);
        canvas.drawLine(mWidth/2,0,mWidth/2,mHeihgt,textPaint);*/

        //确定文字基线在圆心
        Paint.FontMetrics fm = textPaint.getFontMetrics();
        //粗略计算:基线位置约等于mCircleXY + halfTextHeight
        float halfTextHeight = Math.abs(fm.bottom-fm.top) / 4;

        canvas.drawText(proText,0,proText.length(),mCircleXY,mCircleXY + halfTextHeight,textPaint);

        //调用父类方法后,实现自己的逻辑
        canvas.restore();            //合并图像
    }

    //设置字体大小
    private float setShowTextSize(int size){
        //通知View重绘
        //this.invalidate();
        return  size;
    }

    //设置当前进度百分比
    private String setShowText(float sweepValue){
        //通知View重绘
        //this.invalidate();
        return String.valueOf((int)sweepValue)+"%";
    }

    //设置不同弧度的状态值
    public void setSweepValue(float sweepValue){
        if(sweepValue>=0){
            mSweepValue=sweepValue;
        }else{
            mSweepValue=0;
        }
        //通知View重绘
        //this.invalidate();
    }
}
MyProgressActivity调用自定义控件,实现控件进度由0-100-0如此循环,并且点击后暂停,再次点击进度继续变化
package com.liang.myview.mytest;

import android.os.Handler;
import android.os.Message;
import android.support.v7.app.AppCompatActivity;
import android.os.Bundle;
import android.util.Log;
import android.view.View;
import android.widget.Button;
import android.widget.Toast;

import com.liang.myview.R;

import org.w3c.dom.ls.LSException;

import java.util.Timer;
import java.util.TimerTask;

import myView.HomeArc;
import myView.MyProgress;

public class MyProgressActivity extends AppCompatActivity {

    private static final String TAG = "LIANG";

    private MyProgress myProgress;
    private Button button;
    private HomeArc homeArc;

    private Handler handler;
    private Message message;
    private static final int UPDATETEXT = 1;
    private float sweepValue = 0;
    private boolean clickFlag = false;
    private int offset = 1;
    private Timer timer;
    private TimerTask timerTask;
    @Override
    protected void onCreate(Bundle savedInstanceState) {
        super.onCreate(savedInstanceState);
        setContentView(R.layout.activity_my_progress);

        initEvent();
        initView();
    }

    private void initEvent() {
        timer = new Timer();
        timerTask = new TimerTask() {
            @Override
            public void run() {
                message = new Message();
                message.what = UPDATETEXT;
                handler.sendMessage(message);
            }
        };
        handler = new Handler(new Handler.Callback() {
            @Override
            public boolean handleMessage(Message msg) {
                switch (msg.what){
                    case UPDATETEXT:
                        if ( sweepValue < 0 || sweepValue > 100){
                            offset = -offset;
                        }
                        updateProgress();
                        myProgress.setSweepValue(sweepValue);
                        button.setText((int)sweepValue+"%");
                        //刷新View,在UI线程中进行
                        myProgress.invalidate();
                        break;
                }
                return false;
            }
        });
    }

    private void initView() {
        myProgress = (MyProgress) findViewById(R.id.my_progress);
        myProgress.setSweepValue(1);
        button = (Button) findViewById(R.id.my_button);

        myProgress.setOnClickListener(new View.OnClickListener() {
            @Override
            public void onClick(View v) {
                if (clickFlag){
                    timer = new Timer();
                    timerTask = new TimerTask() {
                        @Override
                        public void run() {
                            message = new Message();
                            message.what = UPDATETEXT;
                            handler.sendMessage(message);
                        }
                    };
                    timer.schedule(timerTask,0,50);
                    clickFlag = false;
                }else {
                    clickFlag = true;
                    timer.cancel();
                    //timer.purge();
                    timerTask.cancel();
                    timer.purge();
                    timerTask = null;
                    timer = null;
                }
            }
        });
        timer.schedule(timerTask,0,50);
    }

    public void updateProgress(){
        if ( sweepValue <= 100){
            sweepValue += offset;
        }else {
            sweepValue = 100;
        }
        //Log.e(TAG, "updateProgress: sweepValue" + sweepValue );
    }

    @Override
    public void onBackPressed() {
        //返回后取消定时任务,否则后台会继续执行
        super.onBackPressed();
        timer.cancel();
        timerTask.cancel();
        timer = null;
        timerTask = null;
    }
}