部分例子Demo,该例子实现了:
- 用户自定义登陆,没有连接数据库
- https://download.csdn.net/download/zhou199252/10486047
使用Spring Security很简单,只要在pom.xml文件中,引入spring security的依赖就可以了。
<!-- spring security依赖 -->
<dependency>
<groupId>org.springframework.boot</groupId>
<artifactId>spring-boot-starter-security</artifactId>
</dependency>
慕课 demo

package
com.imooc.springboot.config
;
import
org.springframework.context.annotation.
Configuration
;
import
org.springframework.security.config.annotation.web.builders.HttpSecurity
;
import
org.springframework.security.config.annotation.web.builders.WebSecurity
;
import
org.springframework.security.config.annotation.web.configuration.
EnableWebSecurity
;
import
org.springframework.security.config.annotation.web.configuration.WebSecurityConfigurerAdapter
;
/**
*
@Auther:
封玉书
FYS
*
@Date:
2018.6.12 22:49
*
@Description:
*/
@Configuration
@EnableWebSecurity
// 这两个注解非常重要,关系到是否能拦截下相关地址
public class
SpringSecurityConfig
extends
WebSecurityConfigurerAdapter
{
/**
*
可以忽略哪些资源,不处理登录过程
*
*
@param
web
*
@throws
Exception
*/
@Override
public void
configure
(WebSecurity web)
throws
Exception
{
web.ignoring().antMatchers(
"/js/**"
,
"/css/**"
,
"/images/**"
)
;
}
/**
*
@param
http
*
@throws
Exception
*/
@Override
protected void
configure
(HttpSecurity http)
throws
Exception
{
http.authorizeRequests()
.antMatchers(
"/"
).permitAll()
// /
该路径放行
.anyRequest().authenticated()
//
其他都需要验证
.and().logout().permitAll()
//
登出不需要验证
.and().formLogin()
;
//
允许表单登录
http.csrf().disable()
;
//
关闭
scrf
认证
}
}
测试类
package
com.imooc.springboot.controller
;
import
org.springframework.stereotype.
Controller
;
import
org.springframework.web.bind.annotation.
RequestMapping
;
import
org.springframework.web.bind.annotation.
RestController
;
/**
*
@Auther:
封玉书
FYS
*
@Date:
2018.6.12 23:09
*
@Description:
*/
@RestController
public class
LoginController
{
@RequestMapping
(
"/"
)
public
String
loginEvent
()
{
return
"Login Request.."
;
}
@RequestMapping
(
"/hello"
)
public
String
helloEvent
()
{
return
"hello Request.."
;
}
}
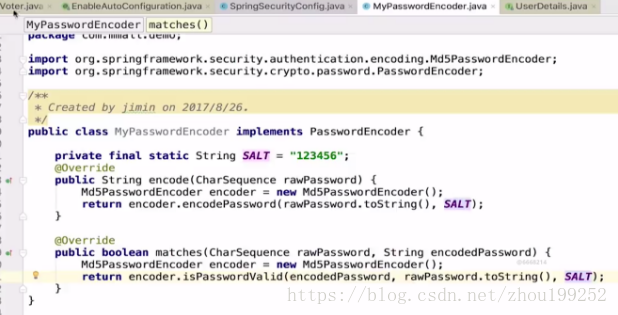
自定义加密方式与校验方式
public class MyPasswordEncoder implements PasswordEncoder {
private final static String SALT = "123456";
@Override
public String encode(CharSequence rawPassword) {
Md5PasswordEncoder encoder = new Md5PasswordEncoder();
return encoder.encodePassword(rawPassword.toString(), SALT);
}
@Override
public boolean matches(CharSequence rawPassword, String encodedPassword) {
Md5PasswordEncoder encoder = new Md5PasswordEncoder();
return encoder.isPasswordValid(encodedPassword, rawPassword.toString(), SALT);
}
}
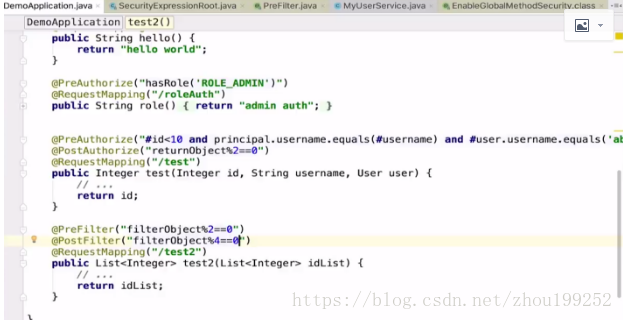
允许哪些角色访问
@PreAuthorize("hasRole('ROLE_ADMIN')")
@RequestMapping("/roleAuth")
public String role() {
return "admin auth";
}
允许哪些条件访问
@PreAuthorize("#id<10 and principal.username.equals(#username) and #user.username.equals('abc')")
@PostAuthorize("returnObject%2==0")
@RequestMapping("/test")
public Integer test(Integer id, String username, User user) {
// ...
return id;
}
经过该接口后,过滤那些内容,如:被2整除的,被4整除的
@PreFilter("filterObject%2==0")
@PostFilter("filterObject%4==0")
@RequestMapping("/test2")
public List<Integer> test2(List<Integer> idList) {
// ...
return idList;
}
开发中问题:
定义了如下方法之后,即使成功登陆也无法跳转到预期的界面。解决方案:
@Configuration
@EnableWebSecurity
public class
SecurityConfiguration
extends
WebSecurityConfigurerAdapter
{
@Override
protected void
configure
(AuthenticationManagerBuilder auth)
throws
Exception
{
auth.inMemoryAuthentication().passwordEncoder(
new
BCryptPasswordEncoder())
.withUser(
"root"
).password(
new
BCryptPasswordEncoder()
.encode(
"123"
)).roles(
"ADMIN"
)
;
auth.inMemoryAuthentication().passwordEncoder(
new
BCryptPasswordEncoder())
.withUser(
"123"
).password(
new
BCryptPasswordEncoder()
.encode(
"123"
)).roles(
"USER"
)
;
}
}
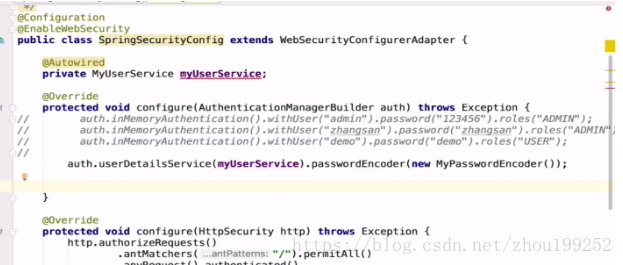
编写好继承了WebSecurityConfigurerAdapter类的WebSecurityConfig类后,我们需要在configure(AuthenticationManagerBuilder auth) 方法中定义认证用于信息获取来源以及密码校验规则等。(configure函数名字不重要,官方用的好像是configureGlobal(……),重要的是在这个被@EnableWebSecurity或@EnableGlobalMethodSecurity,或者@EnableGlobalAuthentication注解 的类中配置了AuthenticationManagerBuilder)。
我一开始用的认证信息获取来源是内存获取——inMemoryAuthentication,代码如下
- protected void configure(AuthenticationManagerBuilder auth) throws Exception {
- //inMemoryAuthentication 从内存中获取
- auth.inMemoryAuthentication().withUser("user1").password("123456").roles("USER");
- }
使用的是spring security自带的login页面,结果登陆的时候,用户名和密码正确也无法打开资源,还是停留在login页面。而且发现控制台报了异常——There is no PasswordEncoder mapped for the id “null”。
网上百度了一下发现这是因为Spring security 5.0中新增了多种加密方式,也改变了密码的格式。
我们来看一下官方文档,以下是官方文档原话:
-------------------------------------------------------------------------------------------------------------------
The general format for a password is:
{id}encodedPassword
Such that
id
is an identifier used to look up which
PasswordEncoder
should be used and
encodedPassword
is the original encoded password for the selected
PasswordEncoder
. The
id
must be at the beginning of the password, start with
{
and end with
}
. If the
id
cannot be found, the
id
will be null. For example, the following might be a list of passwords encoded using different
id
. All of the original passwords are "password".
{bcrypt}$2a$10$dXJ3SW6G7P50lGmMkkmwe.20cQQubK3.HZWzG3YB1tlRy.fqvM/BG {noop}password {pbkdf2}5d923b44a6d129f3ddf3e3c8d29412723dcbde72445e8ef6bf3b508fbf17fa4ed4d6b99ca763d8dc {scrypt}$e0801$8bWJaSu2IKSn9Z9kM+TPXfOc/9bdYSrN1oD9qfVThWEwdRTnO7re7Ei+fUZRJ68k9lTyuTeUp4of4g24hHnazw==$OAOec05+bXxvuu/1qZ6NUR+xQYvYv7BeL1QxwRpY5Pc= {sha256}97cde38028ad898ebc02e690819fa220e88c62e0699403e94fff291cfffaf8410849f27605abcbc0
-------------------------------------------------------------------------------------------------------------------
上面这段话的意思是说,现如今Spring Security中密码的存储格式是“{id}…………”。前面的id是加密方式,id可以是bcrypt、sha256等,后面跟着的是加密后的密码。也就是说,程序拿到传过来的密码的时候,会首先查找被“{”和“}”包括起来的id,来确定后面的密码是被怎么样加密的,如果找不到就认为id是null。这也就是为什么我们的程序会报错:There is no PasswordEncoder mapped for the id “null”。官方文档举的例子中是各种加密方式针对同一密码加密后的存储形式,原始密码都是“password”。
要想我们的项目还能够正常登陆,需要修改一下configure中的代码。我们要将前端传过来的密码进行某种方式加密,spring security 官方推荐的是使用bcrypt加密方式。那么如何对密码加密呢,只需要在configure方法里面指定一下。
修改后是这样的:
- protected void configure(AuthenticationManagerBuilder auth) throws Exception {
- //inMemoryAuthentication 从内存中获取
- auth.inMemoryAuthentication().passwordEncoder(new BCryptPasswordEncoder()).withUser("user1").password(new BCryptPasswordEncoder().encode("123456")).roles("USER");
- }
在inMemoryAuthentication()后面多了".passwordEncoder(new BCryptPasswordEncoder())",这相当于登陆时用BCrypt加密方式对用户密码进行处理。以前的".password("123456")" 变成了 ".password(new BCryptPasswordEncoder().encode("123456"))" ,这相当于对内存中的密码进行Bcrypt编码加密。比对时一致,说明密码正确,允许登陆。
如果你现在用的也是从内存中取密码,那么按照上面这么修改后应该会成功登录没有问题的。
如果你用的是在数据库中存储用户名和密码,那么一般是要在用户注册时就使用BCrypt编码将用户密码加密处理后存储在数据库中。并且修改configure()方法,加入".passwordEncoder(new BCryptPasswordEncoder())",保证用户登录时使用bcrypt对密码进行处理再与数据库中的密码比对。如下:
- //注入userDetailsService的实现类
- auth.userDetailsService(userService).passwordEncoder(new BCryptPasswordEncoder());