Docker 安装部署 ORACLE 11g数据库
背景:
最新在开发数据中台数据接入模块,其中设计很多数据类型,包括ORACLE ,因为是测试使用,想着快速部署测试,于是使用Docker 部署 Oracle , 生产环境不建议使用Docker 安装。
1、安装Docker
首选确保你的机器上已经部署了Docker , Centos7安装部署 docker容器 https://blog.csdn.net/zhangli_li520/article/details/126847001
2、拉去 oracle Docker 镜像
oracle11g 镜像文件很大,要等待一会
[root@bigdata01 ~]# docker pull registry.cn-hangzhou.aliyuncs.com/helowin/oracle_11g
Using default tag: latest
latest: Pulling from helowin/oracle_11g
[DEPRECATION NOTICE] Docker Image Format v1, and Docker Image manifest version 2, schema 1 support will be removed in an upcoming release. Suggest the author of registry.cn-hangzhou.aliyuncs.com/helowin/oracle_11g:latest to upgrade the image to the OCI Format, or Docker Image manifest v2, schema 2. More information at https://docs.docker.com/go/deprecated-image-specs/
ed5542b8e0e1: Already exists
a3ed95caeb02: Already exists
1e8f80d0799e: Already exists
Digest: sha256:4c12b98372dfcbaafcd9564a37c8d91456090a5c6fb07a4ec18270c9d9ef9726
Status: Image is up to date for registry.cn-hangzhou.aliyuncs.com/helowin/oracle_11g:latest
registry.cn-hangzhou.aliyuncs.com/helowin/oracle_11g:latest
查看下载的镜像
[root@bigdata01 ~]# docker images
REPOSITORY                                             TAG                                 IMAGE ID       CREATED         SIZE
registry.cn-hangzhou.aliyuncs.com/helowin/oracle_11g   latest                              3fa112fd3642   8 years ago     6.85GB
3、创建启动容器
[root@bigdata01 ~]# docker run -d -p 1521:1521 --name oracle11g registry.cn-hangzhou.aliyuncs.com/helowin/oracle_11g
95469043158a49b15ce1d290ffe0c23413b860aeed20eb7b6da24359fd3262e4
-d: 表示以后台运行的方式启动容器。
-p 1521:1521: 将主机的端口映射到容器的端口,这里是将主机的 1521 端口映射到容器的 1521 端口,用于访问 Oracle 数据库。
–name oracle11g: 为容器指定一个名称,这里是 “oracle11g”。
查看容器
[root@bigdata01 ~]# docker ps
CONTAINER ID   IMAGE                                                  COMMAND                   CREATED         STATUS         PORTS                                                  NAMES
95469043158a   registry.cn-hangzhou.aliyuncs.com/helowin/oracle_11g   "/bin/sh -c '/home/o…"   7 minutes ago   Up 2 minutes   0.0.0.0:1521->1521/tcp, :::1521->1521/tcp              oracle11g
4、进入Oracle 容器
[root@bigdata01 ~]# docker exec -it 95469043158a bash
# 切换 至 root 用户
[oracle@95469043158a /]$ su root
Password: helowin
# 编辑环境变量文件 profile
[root@95469043158a /]# vi /etc/profile
# 在文件末尾加上
export ORACLE_HOME=/home/oracle/app/oracle/product/11.2.0/dbhome_2
export ORACLE_SID=helowin
export PATH=$ORACLE_HOME/bin:$PATH
# 保存退出
# source 一下使得环境变量生效
[root@95469043158a /]# source /etc/profile
# 编辑环境变量文件 .bashrc
[root@95469043158a /]# vi /home/oracle/.bashrc
# 在文件末尾加上
export ORACLE_HOME=/home/oracle/app/oracle/product/11.2.0/dbhome_2
export ORACLE_SID=helowin
export PATH=$ORACLE_HOME/bin:$PATH
# 保存退出
# source 一下使得环境变量生效
[root@95469043158a /]# source /home/oracle/.bashrc
5、设置 Oracle 数据库
[root@95469043158a /]# su oracle
[oracle@95469043158a ~]$ sqlplus /nolog

SQL*Plus: Release 11.2.0.1.0 Production on Wed Mar 13 17:25:39 2024

Copyright (c) 1982, 2009, Oracle.  All rights reserved.
# 使用 SYSDBA 角色登录,该角色具有最高级别的数据库权限
SQL> CONNECT / AS SYSDBA;
Connected.
# 修改 system 密码
SQL> alter user system identified by oracle;
# 创建表空间
SQL> Create TableSpace test_tablespace_zl
SQL> DataFile '/home/oracle/app/oracle/oradata/helowin/test_tablespace_zl.dbf'
SQL> Size 100m
SQL> Autoextend on;
# 查看表空间
SQL> select name from v$TABLESPACE;
NAME
SYSTEM
SYSAUX
UNDOTBS1
USERS
EXAMPLE
TEMP
TEST_TABLESPACE_ZL
# 创建用户 分配表空间
SQL> CREATE USER zhangli
SQL> IDENTIFIED BY zhangli
SQL> DEFAULT TABLESPACE test_tablespace_zl
SQL> TEMPORARY TABLESPACE TEMP;

# 有了用户,要想使用用户账号管理自己的表空间,还得给它分权限:
SQL> GRANT CONNECT TO zhangli;
SQL> GRANT RESOURCE TO zhangli;
#  dba为最高级权限,可以创建数据库,表等。
SQL> GRANT dba TO zhangli;

# 查看用户
SQL> select * from dba_users;

# 创建表: student
SQL> create table zhangli.student (
SQL>   sno         number(10) constraint pk_si_sno primary key,
SQL>   sname       varchar2(10),
SQL>   sex         varchar2(2),
SQL>   create_date date
SQL> );

# 添加注释
SQL> comment on table zhangli.student is '学生信息表';
SQL> comment on column zhangli.student.sno is '学号';
SQL> comment on column zhangli.student.sname is '姓名';
SQL> comment on column zhangli.student.sex is '性别';
SQL> comment on column zhangli.student.create_date is '创建日期';

# 给其他用户授权 student 表的 权限
SQL> grant select, insert, update, delete on zhangli.student to other_user;

# 插入数据
SQL> insert into zhangli.student (sno, sname, sex, create_date)values (1, '张三', '1', sysdate);
SQL> insert into zhangli.student (sno, sname, sex, create_date)values (2, '李四', '2', sysdate);
SQL> insert into zhangli.student (sno, sname, sex, create_date)values (3, '王五', '1', sysdate);
SQL> insert into zhangli.student (sno, sname, sex, create_date)values (4, '赵六', '2', sysdate);
SQL> commit;
# 修改数据
SQL> update zhangli.student si
SQL> set si.sex = '2'
SQL> where si.sno = 3;
SQL> commit;

# 删除数据
SQL> delete zhangli.student si where si.sno = 1;
SQL> commit;

# 查询数据
SQL> select * from zhangli.student;
6、设置远程连接
# 修改监听配置文件 tnsnames.ora , listener.ora 将文件里的 HOST 改成 访问的ip地址  测试环境 改 0.0.0.0 全部方通,现网环境需要注意
[oracle@95469043158a ~]$ cd /home/oracle/app/oracle/product/11.2.0/dbhome_2/network/admin
[oracle@95469043158a admin]$ ls
listener.ora  samples  shrept.lst  sqlnet.ora  tnsnames.ora
[oracle@95469043158a admin]$ vi listener.ora
# listener.ora Network Configuration File: /home/oracle/app/oracle/product/11.2.0/dbhome_2/network/admin/listener.ora
# Generated by Oracle configuration tools.

LISTENER =
  (DESCRIPTION_LIST =
    (DESCRIPTION =
      (ADDRESS = (PROTOCOL = IPC)(KEY = EXTPROC1521))
      (ADDRESS = (PROTOCOL = TCP)(HOST =0.0.0.0 )(PORT = 1521))
    )
  )

ADR_BASE_LISTENER = /home/oracle/app/oracle

[oracle@95469043158a admin]$ vi tnsnames.ora
# tnsnames.ora Network Configuration File: /home/oracle/app/oracle/product/11.2.0/dbhome_2/network/admin/tnsnames.ora
# Generated by Oracle configuration tools.

LISTENER_HELOWIN =
  (ADDRESS = (PROTOCOL = TCP)(HOST = 0.0.0.0)(PORT = 1521))


HELOWIN =
  (DESCRIPTION =
    (ADDRESS = (PROTOCOL = TCP)(HOST = 0.0.0.0)(PORT = 1521))
    (CONNECT_DATA =
      (SERVER = DEDICATED)
      (SERVICE_NAME = helowin)
    )
  )

# 修改完重启 oracle 容器
[root@bigdata01 ~]# docker restart 95469043158a
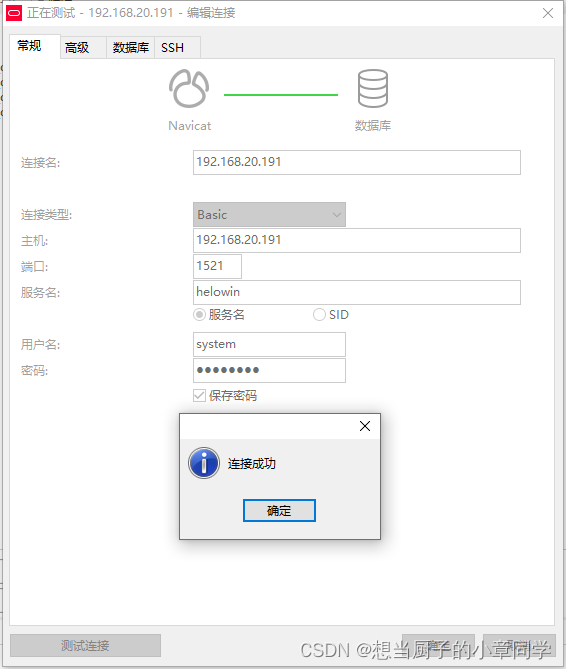
7、使用客户端工具连接
填写好用户名密码 服务名等参数,点击测试连接,显示连接成功。