拖拽,顾名思义拖着一块区域进行移动。比如拖着文件上传,拖动整个qq等。
下面呢,小编编写两个极为简单的代码。
首先呢写个简单易懂但有点复杂的,编写一个class.box,背景颜色为红色的box如下:
<!DOCTYPE HTML>
<html lang="en-US">
<head>
	<meta charset="UTF-8">
	<title>拖拽</title>
	<style type="text/css">
		#box {width:100px; height:100px; background:red;position:absolute;}
	</style>
</head>
<body>

	<div id="box">

	</div>
</body>
</html>
其次,我们需要知道每一个事件中,要完成什么任务?
在mousedown的时候,需要开启开关,用来表示可以拖动
在mouseup的时候,需要关闭开关
在mousemove的时候,需要时刻改变div的位置(left和top属性)
全局变量如下:
var box = document.getElementById('box');
		//定义全局变量
		var divX = 0; //div的x坐标
		var divY = 0; //div的y坐标
		var mouseX = 0; //鼠标的x坐标
		var mouseY = 0; //属性的y坐标
		var sw = false; //表示开关,出发拖拽的开关
1、绑定mousedown事件:
box.onmousedown = function(evt){
var e = evt || window.event;
console.log(e);
//获取div的位置
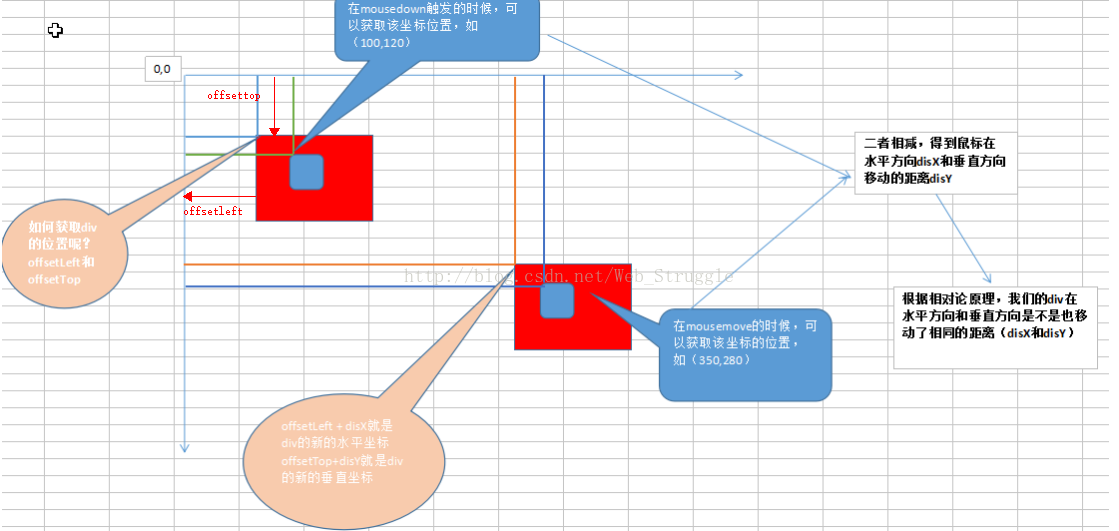
divX = this.offsetLeft; //值是没有单位的.offsetLeft可以理解成该盒模结构的左边离定义好的外盒模左边的距离
divY = this.offsetTop;
//获取鼠标所处的位置
mouseX = e.clientX; //可视化窗口的宽
mouseY = e.clientY; //可视化窗口的高
//开启开关
sw = true;
}上图:
2、绑定mousemove事件:
document.onmousemove = function(evt){
			var e = evt || window.event;
			//只有开启了开关,才有效
			if (sw) {
				var disX = e.clientX - mouseX;
				var disY = e.clientY - mouseY;
				//console.log(disX,disY);
				//利用相对论,设置div的left和top值就可以了
				box.style.left = divX + disX + "px"; //注意加单位
				box.style.top = divY + disY + "px";
			}
		}
3、绑定mouseup事件:
document.onmouseup = function(){
			sw = false;//开关关闭
		}
来到这里,可能会有疑问,为什么
mousemove和mouseup的事件源不是box呢,其实,我们选择document是最好的,如果选择了box,那么就会出现鼠标离开了整个div也会随着鼠标的移动而移动,
在体验拖动的时候,出现了问题:一旦拖动速度过快,就会出现bug
所以,需要改进。需要扩大mousemove和mouseup的捕捉范围。
利用前面所讲的事件冒泡。直接绑定到document上。
附上整个代码:
<!DOCTYPE HTML>
<html lang="en-US">
<head>
	<meta charset="UTF-8">
	<title>拖拽</title>
	<style type="text/css">
		#box {width:100px; height:100px; background:red;position:absolute;}
	</style>
</head>
<body>

	<div id="box">

	</div>
	<script type="text/javascript">

		var box = document.getElementById('box');
		//定义全局变量
		var divX = 0; //div的x坐标
		var divY = 0; //div的y坐标
		var mouseX = 0; //鼠标的x坐标
		var mouseY = 0; //属性的y坐标
		var sw = false; //表示开关

		//绑定mouserdown事件
		box.onmousedown = function(evt){
			var e = evt || window.event;
			console.log(e);
			//获取div的位置
			divX = this.offsetLeft; //值是没有单位的
			divY = this.offsetTop;
			//获取鼠标所处的位置
			mouseX = e.clientX;
			mouseY = e.clientY;
			//开启开关
			sw = true;
		}

		//绑定mousemove事件
		document.onmousemove = function(evt){
			var e = evt || window.event;
			//只有开启了开关,才有效
			if (sw) {
				var disX = e.clientX - mouseX;
				var disY = e.clientY - mouseY;
				//console.log(disX,disY);
				//利用相对论,设置div的left和top值就可以了
				box.style.left = divX + disX + "px"; //注意加单位
				box.style.top = divY + disY + "px";
			}
		}
		//绑定mouseup事件
		document.onmouseup = function(){
			sw = false;
		}

	</script>
</body>
</html>
这个div .box就可以随意的拖动了。
二、拖拽的改进:
第一个拖拽显然是很随意的,没有控制范围,所以一下这个是改进后的代码:
<!DOCTYPE html PUBLIC "-//W3C//DTD XHTML 1.0 Transitional//EN" "http://www.w3.org/TR/xhtml1/DTD/xhtml1-transitional.dtd">
<html xmlns="http://www.w3.org/1999/xhtml">
<head>
<style>
#div1 {width:100px; height:100px; background:red; position:absolute;}
</style>
<meta http-equiv="Content-Type" content="text/html; charset=utf-8" />
<title>无标题文档</title>
<script>
window.onload=function ()
{
	var oDiv=document.getElementById('div1');

	var disX=0;
	var disY=0;

	oDiv.onmousedown=function (ev)
	{
		var oEvent=ev||event;

		disX=oEvent.clientX-oDiv.offsetLeft;
		disY=oEvent.clientY-oDiv.offsetTop;

		document.onmousemove=function (ev)
		{
			var oEvent=ev||event;
			var l=oEvent.clientX-disX;
			var t=oEvent.clientY-disY;

			if(l<0)
			{
				l=0;
			}
			else if(l>document.documentElement.clientWidth-oDiv.offsetWidth)
			{
				l=document.documentElement.clientWidth-oDiv.offsetWidth;
			}

			if(t<0)
			{
				t=0;
			}
			else if(t>document.documentElement.clientHeight-oDiv.offsetHeight)
			{
				t=document.documentElement.clientHeight-oDiv.offsetHeight;
			}

			oDiv.style.left=l+'px';
			oDiv.style.top=t+'px';
		};

		document.onmouseup=function ()
		{
			document.onmousemove=null;
			document.onmouseup=null;
		};

		return false;
	};
};
</script>
</head>

<body>
<div id="div1"></div>
</body>
</html>
如果有能力的话就可以去理解一下,并不难。
好了,拖拽的就写到这。