使用idea搭建简单的springboot+mybatis项目
使用的工具:idea,maven
使用的技术:springboot mybatis spring
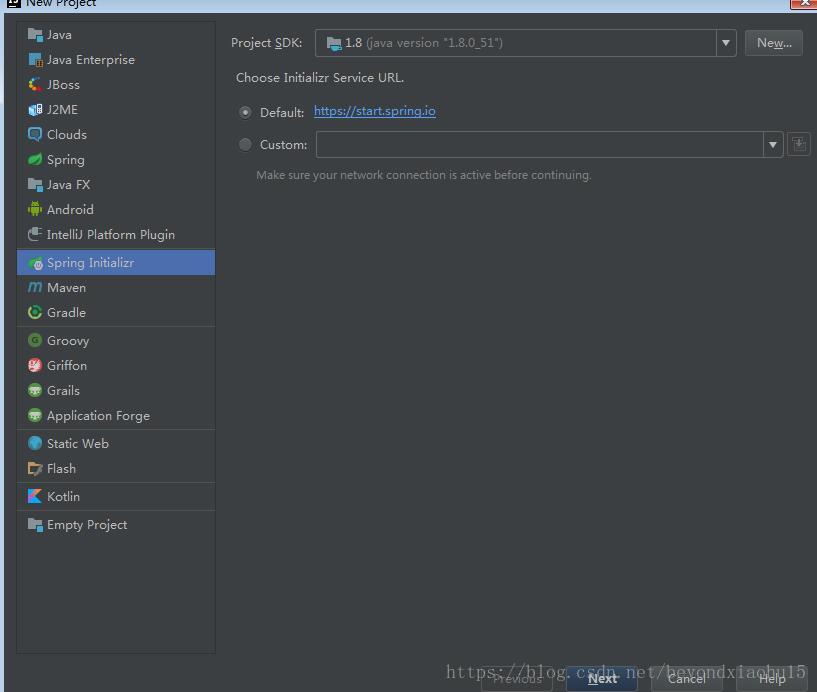
一、项目的创建
1. 创建项目
填写Group和Artifact
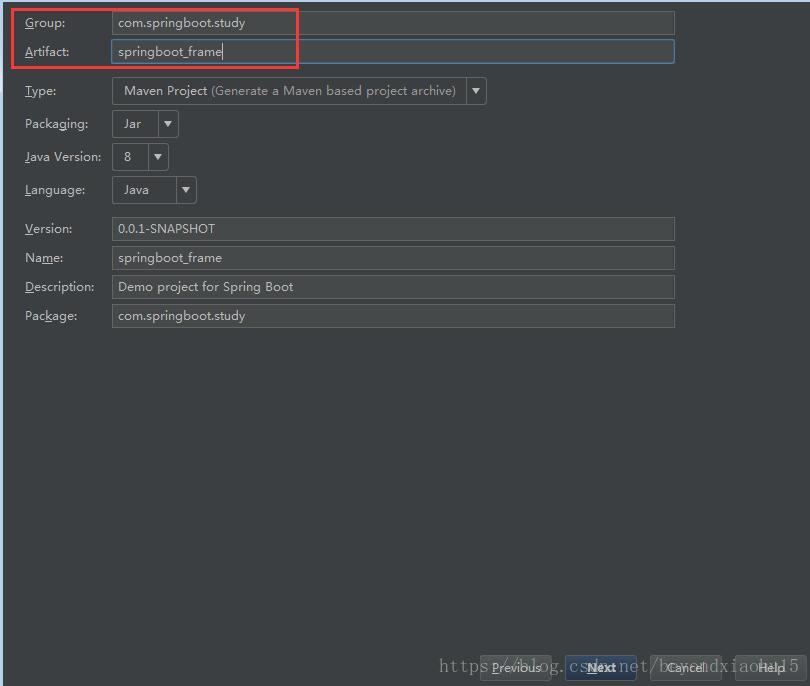
添加需要的依赖

然后next ;第一次创建会比较慢。可以添加archecatolog=internal
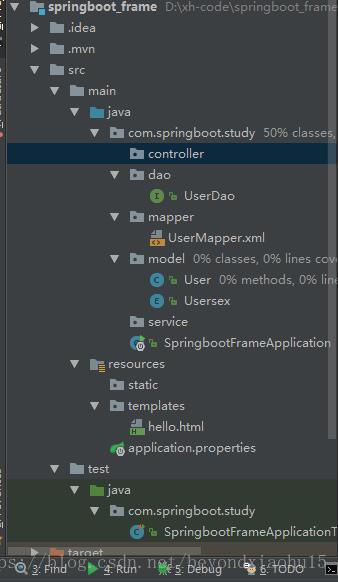
2.然后创建相应的文件夹。比如Java,resources.在idea右键可以make directory as.
然后在创建controller,service,model,mapper,dao等
二、配置文件相关
3.pom.xml
<?xml version="1.0" encoding="UTF-8"?>
<project xmlns="http://maven.apache.org/POM/4.0.0" xmlns:xsi="http://www.w3.org/2001/XMLSchema-instance"
    xsi:schemaLocation="http://maven.apache.org/POM/4.0.0 http://maven.apache.org/xsd/maven-4.0.0.xsd">
    <modelVersion>4.0.0</modelVersion>

    <groupId>com.springboot.study</groupId>
    <artifactId>springboot_frame</artifactId>
    <version>0.0.1-SNAPSHOT</version>
    <packaging>jar</packaging>

    <name>springboot_frame</name>
    <description>Demo project for Spring Boot</description>

    <parent>
        <groupId>org.springframework.boot</groupId>
        <artifactId>spring-boot-starter-parent</artifactId>
        <version>2.0.3.RELEASE</version>
        <relativePath/> <!-- lookup parent from repository -->
    </parent>

    <properties>
        <project.build.sourceEncoding>UTF-8</project.build.sourceEncoding>
        <project.reporting.outputEncoding>UTF-8</project.reporting.outputEncoding>
        <java.version>1.8</java.version>
    </properties>

    <dependencies>
        <dependency>
            <groupId>org.springframework.boot</groupId>
            <artifactId>spring-boot-starter-data-redis</artifactId>
        </dependency>
        <dependency>
            <groupId>org.springframework.boot</groupId>
            <artifactId>spring-boot-starter-thymeleaf</artifactId>
        </dependency>
        <dependency>
            <groupId>org.springframework.boot</groupId>
            <artifactId>spring-boot-starter-web</artifactId>
        </dependency>

        <dependency>
            <groupId>org.springframework.boot</groupId>
            <artifactId>spring-boot-devtools</artifactId>
            <scope>runtime</scope>
        </dependency>
        <dependency>
            <groupId>mysql</groupId>
            <artifactId>mysql-connector-java</artifactId>
            <scope>runtime</scope>
        </dependency>
        <dependency>
            <groupId>org.projectlombok</groupId>
            <artifactId>lombok</artifactId>
            <optional>true</optional>
        </dependency>
        <dependency>
            <groupId>org.springframework.boot</groupId>
            <artifactId>spring-boot-starter-test</artifactId>
            <scope>test</scope>
        </dependency>
        <dependency>
            <groupId>org.mybatis.spring.boot</groupId>
            <artifactId>mybatis-spring-boot-starter</artifactId>
            <version>1.3.0</version>
        </dependency>
        <dependency>
            <groupId>com.alibaba</groupId>
            <artifactId>druid</artifactId>
            <version>1.1.8</version>
        </dependency>
    </dependencies>

    <build>
        <plugins>
            <plugin>
                <groupId>org.springframework.boot</groupId>
                <artifactId>spring-boot-maven-plugin</artifactId>
            </plugin>
        </plugins>
        <resources>
            <resource>
                <directory>src/main/java</directory>
                <includes>
                    <!-- 默认不会加载src/main/java里面的xml文件 -->
                    <include>**/*.xml</include>
                </includes>
            </resource>
            <resource>
                <directory>src/main/resources</directory>
                <includes>
                    <include>*.properties</include>
                    <include>static/*.*</include>
                    <include>templates/*.*</include>
                </includes>
            </resource>
        </resources>
    </build>
</project>
4.application.properties
#数据库的配置
spring.datasource.driver-class-name=com.mysql.jdbc.Driver
spring.datasource.url=jdbc:mysql://XXXX/XXXXX?useUnicode=true&characterEncoding=utf8
spring.datasource.username=XXX
spring.datasource.password=XXX

#mybatis配置
mybatis.type-aliases-package=com.springboot.study.model
mybatis.mapper-locations=com/springboot/study/mapper/*.xml
三、各层代码
5.User
这里用到了lombok
@Data
public class User {
    private  long id;
    private String username;
    private String password;
    private String usersex;
    private String nickname;

}
6.UserDao
这里需要加上@Mapper注解
@Mapper
public interface UserDao {
     List<User> getAll();
    User getOne(long id);
    void insert(User user);
    void update(User user);
    void delete(long id);
}
7.UserMapper.xml
这里可以根据自己的需求,合理的使用mybatis的知识,动态sql的知识
<?xml version="1.0" encoding="UTF-8"?>
<!DOCTYPE mapper PUBLIC "-//mybatis.org//DTD Mapper 3.0//EN" "http://mybatis.org/dtd/mybatis-3-mapper.dtd">
<mapper namespace="com.springboot.study.dao.UserDao">
    <resultMap id="BaseResultMap" type="com.springboot.study.model.User">
        <id  property="id" column="id" jdbcType="BIGINT"/>
        <result property="username" column="username" jdbcType="VARCHAR"/>
        <result property="password" column="password" jdbcType="VARCHAR"/>
        <result property="usersex" column="user_sex" jdbcType="VARCHAR"/>
        <result property="nickname" column="nick_name" jdbcType="VARCHAR"/>
    </resultMap>
    <sql id="Base_column_list">
        id,username,password,user_sex,nick_name
    </sql>

    <select id="getAll" resultMap="BaseResultMap">
        SELECT
        <include refid="Base_column_list"/>
        FROM USER
    </select>

    <select id="getOne" resultMap="BaseResultMap">
        SELECT user_sex
        <include refid="Base_column_list"/>
        FROM  USER WHERE id = #{id}
    </select>

    <insert id="insert" parameterType="com.springboot.study.model.User">
        INSERT into
        USER
        (username,password,user_sex)
        VALUES
         (#{username},#{password},#{usersex})
    </insert>

    <delete id="delete" parameterType="java.lang.Long">
        DELETE FROM USER WHERE id =#{id}
    </delete>

    <update id="update" parameterType="com.springboot.study.model.User">
        update USER
        <set> <if test="username != null">username = #{username},</if>
             <if test="usersex != null">user_sex = #{usersex},</if>
              nick_name = #{nickname}
        </set>
        WHERE  id = #{id}
    </update>

</mapper>
到此springboot 结合mybatis的配置就完了。springboot的确帮我们简化了很多。
四、测试
8.test
@RunWith(SpringRunner.class)
@SpringBootTest
public class SpringbootFrameApplicationTests {
    @Autowired
    private UserDao userDao;
    @Test
    public void contextLoads() {
    }
    @Test
    public void getOne() throws Exception {
        System.out.println("getOne  test!!");
        User user= userDao.getOne(1);
        System.out.println(user.getPassword());

    }

    @Test
    public void update() throws Exception {
        System.out.println("update  test!!");
        User user = new User();
        user.setPassword("1111");
        user.setNickname("111");
        user.setUsersex("2");
         userDao.update(user);
        System.out.println(user.getPassword());

    }
}