前言
最近在工作上用到了ES,于是自己在阿里云上部署了个ES,由于ES我个人部署过程中相对还是比较顺利简单的,随意就没记录安装部署过程,只不过启动过程中遇到了一些问题,记录在《Elasticsearchan安装初尝01-问题记录》这个随笔中。
再来,前不久有学习了一下spring的定时任务,所以就想做个简单的实践——定时任务同步数据库数据到ES。
本片是在《spring+mybatis数据库读写分离》基础上进行的。
实践
1.引入相关依赖
 1         <!--引入elasticsearch依赖-->
 2         <dependency>
 3             <groupId>org.elasticsearch.client</groupId>
 4             <artifactId>transport</artifactId>
 5             <version>5.5.1</version>
 6         </dependency>
 7         <!--引入quartz相关依赖-->
 8         <dependency>
 9             <groupId>org.springframework</groupId>
10             <artifactId>spring-context-support</artifactId>
11             <version>4.3.12.RELEASE</version>
12         </dependency>
13         <dependency>
14             <groupId>org.quartz-scheduler</groupId>
15             <artifactId>quartz</artifactId>
16             <version>2.3.0</version>
17         </dependency>
2.编写Elasticsearch工具类


  1 import com.alibaba.fastjson.JSONObject;
  2 import com.alibaba.fastjson.serializer.SerializeConfig;
  3 import com.alibaba.fastjson.serializer.SerializerFeature;
  4 import com.alibaba.fastjson.serializer.SimpleDateFormatSerializer;
  5 import org.elasticsearch.action.bulk.BulkRequestBuilder;
  6 import org.elasticsearch.action.bulk.BulkResponse;
  7 import org.elasticsearch.action.index.IndexResponse;
  8 import org.elasticsearch.client.transport.TransportClient;
  9 import org.elasticsearch.common.settings.Settings;
 10 import org.elasticsearch.common.transport.InetSocketTransportAddress;
 11 import org.elasticsearch.common.unit.TimeValue;
 12 import org.elasticsearch.common.xcontent.XContentType;
 13 import org.elasticsearch.rest.RestStatus;
 14 import org.elasticsearch.transport.client.PreBuiltTransportClient;
 15
 16 import java.net.InetAddress;
 17 import java.util.Date;
 18 import java.util.List;
 19 import java.util.ResourceBundle;
 20 import java.util.concurrent.TimeUnit;
 21
 22 /**
 23  * elasticsearch工具类
 24  *
 25  * @author xujian
 26  * @create 2018-04-28 17:00
 27  **/
 28 public class ElasticSearchUtils {
 29
 30     /**
 31      *  es集群名称,默认为elasticsearch
 32      */
 33     private static String clusterName;
 34
 35     /**
 36      *  es节点ip,我的阿里云是个单节点。。。
 37      */
 38     private static String esIpAddress;
 39
 40     public static void setClusterName(String clusterName) {
 41         ElasticSearchUtils.clusterName = clusterName;
 42     }
 43
 44     public static void setEsIpAddress(String esIpAddress) {
 45         ElasticSearchUtils.esIpAddress = esIpAddress;
 46     }
 47
 48     private static TransportClient client = null;
 49
 50     private static TimeValue searchTimeOut = new TimeValue(2, TimeUnit.SECONDS);
 51     private static TimeValue updateTimeOut = new TimeValue(10, TimeUnit.SECONDS);
 52
 53     private static void initConnection() {
 54         if (client == null) {
 55             if (clusterName == null) {
 56                 //从配置文件加载相关配置
 57                 ResourceBundle resourceBundle = ResourceBundle.getBundle("application_es");
 58                 clusterName = resourceBundle.getString("ES.clusterName");
 59                 esIpAddress = resourceBundle.getString("ES.ipAddress");
 60             }
 61             //集群名只要不等于elasticsearch必须设置
 62 //            Settings settings = Settings.builder().put("cluster.name", clusterName).build();
 63             try {
 64                 synchronized (ElasticSearchUtils.class) {
 65                     /*
 66                      *9300端口号是本机客户端与ES通信的端口
 67                      *本机和es通信有两种方式1:把本机当成一个es节点,2:直接通过客户端client通信
 68                      *我使用的是第二中
 69                      */
 70                     if (client == null) {
 71                         //可以通过addTransportAddress(new InetSocketTransportAddress(InetAddress.getByName(esIpAddress), 9300))继续添加节点
 72                         client = new PreBuiltTransportClient(Settings.EMPTY).addTransportAddress(new InetSocketTransportAddress(InetAddress.getByName(esIpAddress), 9300));
 73                     }
 74                 }
 75             } catch (Exception e) {
 76                 System.out.println(e.getMessage());
 77             }
 78         }
 79     }
 80
 81     /**
 82      * 写入数据
 83      * @param index
 84      * @param type
 85      * @param id
 86      * @param json
 87      * @return
 88      * @throws Exception
 89      */
 90     public static String putDocument(String index, String type, String id, String json) throws Exception {
 91         initConnection();
 92         if (index == null || type == null || id == null || json == null || "".equals(index) || "".equals(type) || "".equals(id) || "".equals(json)) {
 93             throw new IllegalArgumentException("参数不对");
 94         }
 95         IndexResponse response = client.prepareIndex(index, type).setTimeout(updateTimeOut).setId(id).setSource(json,XContentType.JSON).get();
 96         if (RestStatus.CREATED.getStatus() == response.status().getStatus()) {
 97             return response.getId();
 98         } else {
 99             throw new RuntimeException("创建文档失败");
100         }
101     }
102
103     /**
104      * 批量写入数据
105      * @param index
106      * @param type
107      * @param objectList
108      * @return
109      * @throws Exception
110      */
111     public static String putListDocument(String index, String type, List objectList) throws Exception {
112         initConnection();
113         if (index == null || type == null || objectList.isEmpty() || "".equals(index) || "".equals(type)) {
114             throw new IllegalArgumentException("参数不对");
115         }
116         BulkRequestBuilder bulkRequest = client.prepareBulk().setTimeout(updateTimeOut);
117         SerializeConfig config = new SerializeConfig();
118         config.put(Date.class, new SimpleDateFormatSerializer("yyyy-MM-dd HH:mm:ss"));
119         for (Object item: objectList) {
120             String jsonStr = JSONObject.toJSONString(item, config, SerializerFeature.WriteMapNullValue);
121             JSONObject jObj = JSONObject.parseObject(jsonStr);
122             if (jObj.get("id") == null || "".equals(jObj.get("id"))) {
123                 throw new RuntimeException("对象没有id信息");
124             }
125             bulkRequest.add(client.prepareIndex(index, type, jObj.get("id").toString()).setTimeout(updateTimeOut).setSource(jsonStr, XContentType.JSON));
126         }
127         BulkResponse bulkResponse = bulkRequest.setTimeout(updateTimeOut).get();
128         if (bulkResponse.hasFailures()) {
129             throw new RuntimeException("存在插入失败情况!");
130         } else {
131             return "success";
132         }
133     }
134 }
代码中涉及到了属性文件application_es.properties,其内容如下
#es集群名称
ES.clusterName=elasticsearch
#集群节点地址
ES.ipAddress=47.97.167.207
3.编写定时任务Schedule
实现定时任务有两种方式,1:定义自己的任务类,在spring配置文件中将该类配置为Quartz执行目标类;2:继承QuartzJobBean类
我用的第二种,这种涉及到一个问题就是service注入失败问题(第一种由于自己定义的是普通类,直接交给spring管理,所以可以直接注入service),我在下面再说,先贴代码实现:
 1 import com.jarry.dmo.UserInfo;
 2 import com.jarry.elasticsearch.ElasticSearchUtils;
 3 import com.jarry.service.StudentService;
 4 import org.quartz.DisallowConcurrentExecution;
 5 import org.quartz.JobExecutionContext;
 6 import org.quartz.JobExecutionException;
 7 import org.slf4j.Logger;
 8 import org.slf4j.LoggerFactory;
 9 import org.springframework.beans.factory.annotation.Autowired;
10 import org.springframework.scheduling.quartz.QuartzJobBean;
11
12 import java.text.SimpleDateFormat;
13 import java.util.Date;
14 import java.util.List;
15
16 /**
17  * 定时同步数据到ES
18  *
19  * @author xujian
20  * @create 2018-05-02 11:31
21  **/
22 @DisallowConcurrentExecution
23 public class SyncDataToEsSchedule extends QuartzJobBean {
24     Logger logger = LoggerFactory.getLogger(SyncDataToEsSchedule.class);
25
26     @Autowired
27     private StudentService studentService;
28     /**
29      *是否是第一次同步
30      */
31     private static boolean isFirstSync=true;
32     /**
33      *同步次数计数器
34      */
35     private static int counter=1;
36     @Override
37     protected void executeInternal(JobExecutionContext context) throws JobExecutionException {
38         List<UserInfo> list = null;
39         try {
40             logger.info("---------第"+counter+"次同步开始!----------");
41             //首次同步
42             if(isFirstSync) {
43                 //获取当前表中数据,结果按时间降序排序
44                 list = studentService.queryUsers();
45             } else {
46                 /*
47                  *增量同步
48                  *
49                  *数据库第一条数据即id=-1为无效数据,主要用来保存上次同步时最新的时间,以便于下次从该时间开始进行增量同步
50                  * getLastCreateTime()该方法用来获取上次同步时最新的时间
51                  */
52                 Date lastTime = studentService.getLastCreateTime();
53                 //获取增量数据,结果按时间降序排序
54                 list = studentService.getAddedUserInfoList(lastTime);
55             }
56             if(list!=null&&list.size()>0) {
57                 //数据库第一条数据即id=-1为无效数据,主要用来保存上次同步时最新的时间,以便于下次从该时间开始进行增量同步
58                 Date newTime = list.get(0).getCreateTime();
59                 //将增量数据最新的时间设置到id=-1的数据库记录里保存起来
60                 studentService.updateLastCreateTime(newTime);
61                 ElasticSearchUtils.putListDocument("user_info","user",list);
62                 isFirstSync = false;
63             }
64             logger.info("---------第"+counter+"次同步完成!----------");
65             counter++;
66         } catch (Exception e) {
67             logger.error("--------第"+counter+"次同步异常!---------");
68             e.printStackTrace();
69         }
70     }
71 }
可以看到我用到了注解@DisallowConcurrentExecution,先来介绍一下它的作用吧(我的大致理解...)
@DisallowConcurrentExecution:
其作用是不允许同步执行任务,同步执行任务出现的场景是,任务执行时间大于执行周期时,quartz会在上一个周期任务还没结束,但是下一个任务周期到来的时候重新开启一个线程去执行任务,这样严格保证了任务执行时间按照计划的来,缺点是这样可能影响业务逻辑;禁用同步执行以后不会开启新线程执行任务,而是等待上一个周期任务执行结束后马上开始下一个周期,因此任务执行时间可能会有延时。
4.定时任务的配置
<bean id="pushDataToESJob" class="org.springframework.scheduling.quartz.JobDetailFactoryBean">
        <property name="jobClass" value="com.jarry.elasticsearch.schedule.SyncDataToEsSchedule"></property>
    </bean>
    <bean id="triger_pushDataToESJob" class="org.springframework.scheduling.quartz.CronTriggerFactoryBean">
        <property name="jobDetail" ref="pushDataToESJob"></property>
        <!--每10秒执行一次 -->
        <property name="cronExpression" value="*/10 * * * * ?" />
    </bean>
    <bean id="myJobFactory" class="com.jarry.elasticsearch.schedule.MyJobFactory"></bean>
    <!-- ======================== 调度工厂 ======================== -->
    <bean id="springJobSchedulerFactoryBean" class="org.springframework.scheduling.quartz.SchedulerFactoryBean">
        <property name="jobFactory" ref="myJobFactory"/>
        <property name="triggers">
            <list>
                <ref bean="triger_pushDataToESJob"/>
            </list>
        </property>
    </bean>
上面说到继承QuartzJobBean会有注入service失败问题,是因为这样实现的任务类是由Quartz管理的,spring不参与管理,所以需要定义一个类MyJobFactory来将Quartz生成的任务类实例注入到spring中,交给spring管理。
MyJobFactory实现如下:
import org.quartz.spi.TriggerFiredBundle;
import org.springframework.beans.factory.annotation.Autowired;
import org.springframework.beans.factory.config.AutowireCapableBeanFactory;
import org.springframework.scheduling.quartz.AdaptableJobFactory;

/**
 * 自定义jobfactory
 *
 * @author xujian
 * @create 2018-05-03 11:13
 **/
public class MyJobFactory extends AdaptableJobFactory {

    @Autowired
    private AutowireCapableBeanFactory capableBeanFactory;

    @Override
    protected Object createJobInstance(TriggerFiredBundle bundle) throws Exception {
        //调用父类的方法
        Object jobInstance = super.createJobInstance(bundle);
        //进行注入,这属于Spring的技术,不清楚的可以查看Spring的API.
        capableBeanFactory.autowireBean(jobInstance);
        return jobInstance;
    }
}
5.测试
将项目部署到tomcat并启动。
同步之前:


往数据库添加一条数据

同步之后:
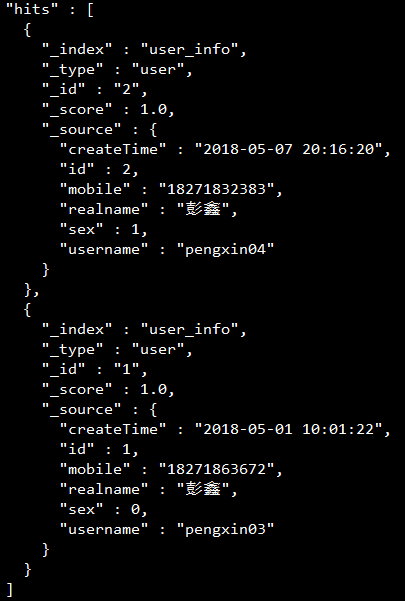
成功!