生命周期流程图
我们先通过一个流程图,对Bean的生命周期先做一个整体的认识和了解。
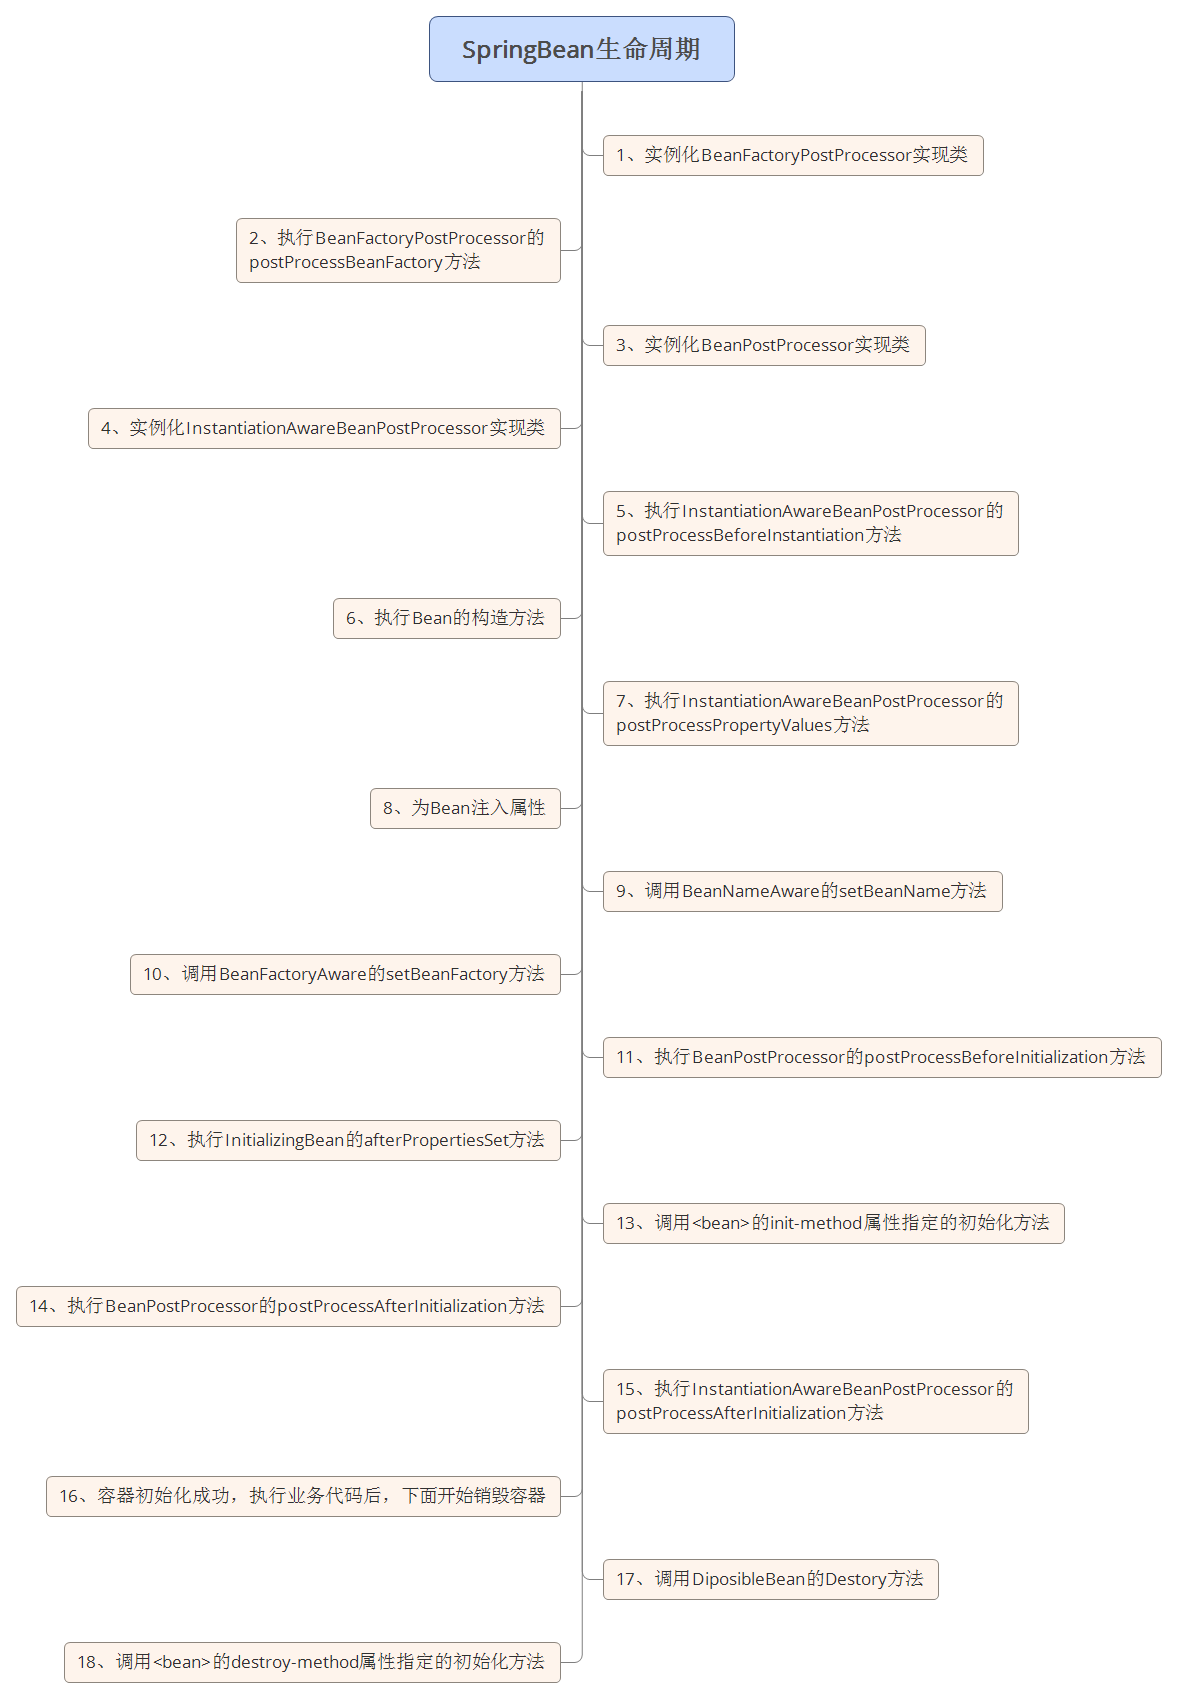
若容器实现了流程图中涉及的接口,程序将按照以上流程进行。需要我们注意的是,这些接口并不是必须实现的,可根据自己开发中的需要灵活地进行选择,没有实现相关接口时,将略去流程图中的相关步骤。
接口方法的分类
上面流程图当中涉及调用很多的方法,可能我们直接去理解和记忆比较困难,其实对于这么一大堆方法我们可以根据它们的特点对他们进行整理分类,下面提供一种可供大家参考的分类模型:
| 分类类型 | 所包含方法 |
|---|---|
| Bean自身的方法 | 配置文件中的init-method和destroy-method配置的方法、Bean对象自己调用的方法 |
| Bean级生命周期接口方法 | BeanNameAware、BeanFactoryAware、InitializingBean、DiposableBean等接口中的方法 |
| 容器级生命周期接口方法 | InstantiationAwareBeanPostProcessor、BeanPostProcessor等后置处理器实现类中重写的方法 |
这时回过头再来看这些方法轮廓上就比较清晰了,记忆的时候我们可通过记忆分类的类型来理解性的记忆所涉及的方法。
编程实践
有了上面的理论分析,我们再来通过编程实践来验证下我们的结论,顺便进一步加深我们对整个生命周期的理解。
准备工作
编写测试Bean
我们先编写一个测试Bean来实现流程图中的相关接口.
StudentBean.java
package com.yanxiao.cyclelife;

import org.springframework.beans.BeansException;
import org.springframework.beans.factory.BeanFactory;
import org.springframework.beans.factory.BeanFactoryAware;
import org.springframework.beans.factory.BeanNameAware;
import org.springframework.beans.factory.DisposableBean;
import org.springframework.beans.factory.InitializingBean;

/**
 * 测试生命周期的Bean
 * Created by yanxiao on 2016/8/1.
 */
public class StudentBean implements InitializingBean, DisposableBean, BeanNameAware, BeanFactoryAware {
    private String name;
    private int age;

    private String beanName;//实现了BeanNameAware接口,Spring可以将BeanName注入该属性中
    private BeanFactory beanFactory;//实现了BeanFactory接口,Spring可将BeanFactory注入该属性中


    public StudentBean(){
        System.out.println("【Bean构造方法】学生类的无参构造方法");
    }

    @Override
    public String toString() {
        return "StudentBean{" +
                "name='" + name + '\'' +
                ", age=" + age +
                ", beanName='" + beanName + '\'' +
                '}';
    }

    public String getName() {
        return name;
    }

    public void setName(String name) {
        System.out.println("【set注入】注入学生的name属性");
        this.name = name;
    }

    public int getAge() {
        return age;
    }

    public void setAge(int age) {
        System.out.println("【set注入】注入学生的age属性");
        this.age = age;
    }

    /**
     * 自己编写的初始化方法
     */
    public void myInit(){
        System.out.println("【init-method】调用init-method属性配置的初始化方法");
    }

    /**
     * 自己编写的销毁方法
     */
    public void myDestroy(){
        System.out.println("【destroy-method】调用destroy-method属性配置的销毁方法");
    }

    /**
     * BeanFactoryAware接口的方法
     * @param beanFactory
     * @throws BeansException
     */
    @Override
    public void setBeanFactory(BeanFactory beanFactory) throws BeansException {
        this.beanFactory = beanFactory;
        System.out.println("【BeanFactoryAware接口】调用BeanFactoryAware的setBeanFactory方法得到beanFactory引用");
    }

    /**
     * BeanNameAware接口的方法
     * @param name
     */
    @Override
    public void setBeanName(String name) {
        this.beanName = name;
        System.out.println("【BeanNameAware接口】调用BeanNameAware的setBeanName方法得到Bean的名称");
    }

    /**
     * InitializingBean接口的方法
     * @throws Exception
     */
    @Override
    public void afterPropertiesSet() throws Exception {
        System.out.println("【InitializingBean接口】调用InitializingBean接口的afterPropertiesSet方法");
    }

    /**
     * DisposableBean接口的方法
     * @throws Exception
     */
    @Override
    public void destroy() throws Exception {
        System.out.println("【DisposableBean接口】调用DisposableBean接口的destroy方法");
    }
}
上面代码中的
myInit() 和 ·myDestroy()· 方法供我们在配置文件中通过init-method和destroy-method属性进行指定。
实现BeanPostProcessor接口
我们编写BeanPostProcessor接口的一个实现类: MyBeanPostProcessor.java
package com.yanxiao.cyclelife;

import org.springframework.beans.BeansException;
import org.springframework.beans.factory.config.BeanPostProcessor;

/**
 * Created by yanxiao on 2016/8/1.
 */
public class MyBeanPostProcessor implements BeanPostProcessor {

    public MyBeanPostProcessor(){
        System.out.println("【BeanPostProcessor接口】调用BeanPostProcessor的构造方法");
    }

    @Override
    public Object postProcessBeforeInitialization(Object bean, String beanName) throws BeansException {
        System.out.println("【BeanPostProcessor接口】调用postProcessBeforeInitialization方法,这里可对"+beanName+"的属性进行更改。");
        return bean;
    }

    @Override
    public Object postProcessAfterInitialization(Object bean, String beanName) throws BeansException {
        System.out.println("【BeanPostProcessor接口】调用postProcessAfterInitialization方法,这里可对"+beanName+"的属性进行更改。");
        return bean;
    }
}
实现BeanPostProcessor接口
编写BeanPostProcessor接口的一个实现类 MyBeanPostProcessor.java
package com.yanxiao.cyclelife;

import org.springframework.beans.BeansException;
import org.springframework.beans.factory.config.BeanPostProcessor;

/**
 * Created by yanxiao on 2016/8/1.
 */
public class MyBeanPostProcessor implements BeanPostProcessor {

    public MyBeanPostProcessor(){
        System.out.println("【BeanPostProcessor接口】调用BeanPostProcessor的构造方法");
    }

    @Override
    public Object postProcessBeforeInitialization(Object bean, String beanName) throws BeansException {
        System.out.println("【BeanPostProcessor接口】调用postProcessBeforeInitialization方法,这里可对"+beanName+"的属性进行更改。");
        return bean;
    }

    @Override
    public Object postProcessAfterInitialization(Object bean, String beanName) throws BeansException {
        System.out.println("【BeanPostProcessor接口】调用postProcessAfterInitialization方法,这里可对"+beanName+"的属性进行更改。");
        return bean;
    }
}
实现InstantiationAwareBeanPostProcessor接口
实现InstantiationAwareBeanPostProcessor接口,为了编程方便我们直接通过继承Spring中已经提供的一个实现了该接口的适配器类InstantiationAwareBeanPostProcessorAdapter来进行测试。
MyInstantiationAwareBeanPostProcessor.java
package com.yanxiao.cyclelife;

import org.springframework.beans.BeansException;
import org.springframework.beans.PropertyValues;
import org.springframework.beans.factory.config.InstantiationAwareBeanPostProcessorAdapter;

import java.beans.PropertyDescriptor;

/**
 * 一般情况下,当我们需要实现InstantiationAwareBeanPostProcessor接口时,是通过继承Spring框架中InstantiationAwareBeanPostProcessor接口实现类
 * InstantiationAwareBeanPostProcessorAdapter这个适配器类来简化我们实现接口的工作
 * Created by yanxiao on 2016/8/1.
 */
public class MyInstantiationAwareBeanPostProcessor extends InstantiationAwareBeanPostProcessorAdapter {

    public MyInstantiationAwareBeanPostProcessor() {
        System.out.println("【InstantiationAwareBeanPostProcessor接口】调用InstantiationAwareBeanPostProcessor构造方法");
    }

    /**
     * 实例化Bean之前调用
    */
    @Override
    public Object postProcessBeforeInstantiation(Class beanClass, String beanName) throws BeansException {
        System.out.println("【InstantiationAwareBeanPostProcessor接口】调用InstantiationAwareBeanPostProcessor接口的postProcessBeforeInstantiation方法");
        return null;
    }

    /**
     * 实例化Bean之后调用
     */
    @Override
    public Object postProcessAfterInitialization(Object bean, String beanName) throws BeansException {
        System.out.println("【InstantiationAwareBeanPostProcessor接口】调用InstantiationAwareBeanPostProcessor接口的postProcessAfterInitialization方法");
        return bean;
    }

    /**
     * 设置某个属性时调用
     */
    @Override
    public PropertyValues postProcessPropertyValues(PropertyValues pvs, PropertyDescriptor[] pds, Object bean, String beanName)
            throws BeansException {
        System.out.println("【InstantiationAwareBeanPostProcessor接口】调用InstantiationAwareBeanPostProcessor接口的postProcessPropertyValues方法");
        return pvs;
    }
}
BeanFactoryPostProcessor接口
我们编写BeanFactoryPostProcessor接口的一个实现类 BeanFactoryPostProcessor.java
package com.yanxiao.cyclelife;

import org.springframework.beans.BeansException;
import org.springframework.beans.factory.config.BeanDefinition;
import org.springframework.beans.factory.config.BeanFactoryPostProcessor;
import org.springframework.beans.factory.config.ConfigurableListableBeanFactory;

/**
 * Created by yanxiao on 2016/8/1.
 */
public class MyBeanFactoryPostProcessor implements BeanFactoryPostProcessor {

    public MyBeanFactoryPostProcessor() {
        System.out.println("【BeanFactoryPostProcessor接口】调用BeanFactoryPostProcessor实现类构造方法");
    }

    /**
     * 重写BeanFactoryPostProcessor接口的postProcessBeanFactory方法,可通过该方法对beanFactory进行设置
     */
    @Override
    public void postProcessBeanFactory(ConfigurableListableBeanFactory beanFactory)
            throws BeansException {
        System.out.println("【BeanFactoryPostProcessor接口】调用BeanFactoryPostProcessor接口的postProcessBeanFactory方法");
        BeanDefinition beanDefinition = beanFactory.getBeanDefinition("studentBean");
        beanDefinition.getPropertyValues().addPropertyValue("age", "21");
    }
}
编写Spring配置文件beans.xml
<?xml version="1.0" encoding="UTF-8"?>

<beans xmlns="http://www.springframework.org/schema/beans"
       xmlns:xsi="http://www.w3.org/2001/XMLSchema-instance" xmlns:p="http://www.springframework.org/schema/p"
       xmlns:aop="http://www.springframework.org/schema/aop" xmlns:tx="http://www.springframework.org/schema/tx"
       xsi:schemaLocation="
            http://www.springframework.org/schema/beans
            http://www.springframework.org/schema/beans/spring-beans-3.2.xsd">

    <!--配置Bean的后置处理器-->
    <bean id="beanPostProcessor" class="com.yanxiao.cyclelife.MyBeanPostProcessor">
    </bean>

    <!--配置instantiationAwareBeanPostProcessor-->
    <bean id="instantiationAwareBeanPostProcessor" class="com.yanxiao.cyclelife.MyInstantiationAwareBeanPostProcessor">
    </bean>

    <!--配置BeanFactory的后置处理器-->
    <bean id="beanFactoryPostProcessor" class="com.yanxiao.cyclelife.MyBeanFactoryPostProcessor">
    </bean>

    <bean id="studentBean" class="com.yanxiao.cyclelife.StudentBean" init-method="myInit"
          destroy-method="myDestroy" scope="singleton">
        <property name="name" value="yanxiao"></property>
        <property name="age" value="21"></property>
    </bean>

</beans>
进行测试
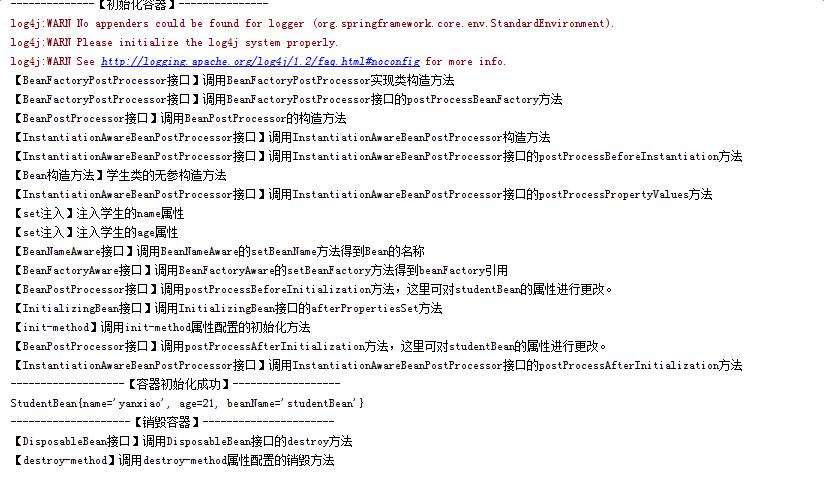
通过上面的准备工作我们已经把相关的类和测试文件编写完毕,下面我们就通过测试代码来验证我们的成果。
package com.yanxiao.cyclelife;


import org.springframework.context.ApplicationContext;
import org.springframework.context.support.ClassPathXmlApplicationContext;

/**
 * Created by yanxiao on 2016/8/1.
 */
public class TestCyclelife {

    public static void main(String[] args){
        System.out.println("--------------【初始化容器】---------------");

        ApplicationContext context = new ClassPathXmlApplicationContext("META-INF/beans1.xml");
        System.out.println("-------------------【容器初始化成功】------------------");
        //得到studentBean,并显示其信息
        StudentBean studentBean = context.getBean("studentBean",StudentBean.class);
        System.out.println(studentBean);

        System.out.println("--------------------【销毁容器】----------------------");
        ((ClassPathXmlApplicationContext)context).registerShutdownHook();
    }
}