一 介绍
编写一个Config Server。在本例中,使用Git作为Config Server的后端存储。
二 在Git仓库https://gitee.com/cakin24/spring-cloud-config-repo中新建几个配置文件
例如:
microservice-foo.properties
microservice-foo-dev.properties
microservice-froo-test.properties
microservice-froo-production.properties
内容分别为:
profile=default-1.0
profile=dev-1.0
profile=test-1.0
profile=production-1.0
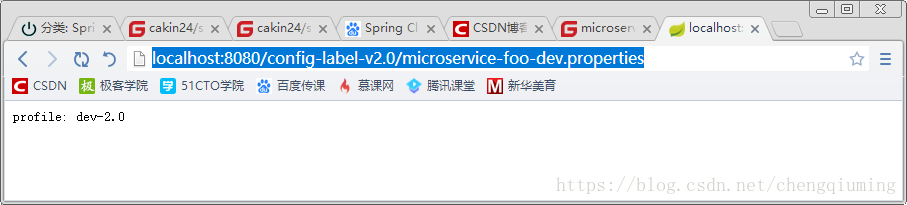
为了测试版本控制,为该Git仓库创建Config-label-v2.0分支,并将各个配置文件中的1.0改为2.0
三 创建一个Maven工程,工程名为microservice-config-server,并为项目添加以下的依赖
  <dependencies>
    <dependency>
      <groupId>org.springframework.cloud</groupId>
      <artifactId>spring-cloud-config-server</artifactId>
    </dependency>
  </dependencies>
四 编写启动类,并在启动类上添加注解@EnableConfigServer,声明这是一个Config Server
package com.itmuch.cloud.study;

import org.springframework.boot.SpringApplication;
import org.springframework.boot.autoconfigure.SpringBootApplication;
import org.springframework.cloud.config.server.EnableConfigServer;

@SpringBootApplication
@EnableConfigServer
public class ConfigServerApplication {
  public static void main(String[] args) {
    SpringApplication.run(ConfigServerApplication.class, args);
  }
}
五 编写配置文件,并在配置文件中增加以下内容
server:
  port: 8080
spring:
  application:
    name: microservice-config-server
  cloud:
    config:
      server:
        git:
          uri:https://git.oschina.net/cakin24/spring-cloud-config-repo# 配置Git仓库的地址
          username:                                                         # Git仓库的账号
          password:                                                         # Git仓库的密码
六 Config Server的端口
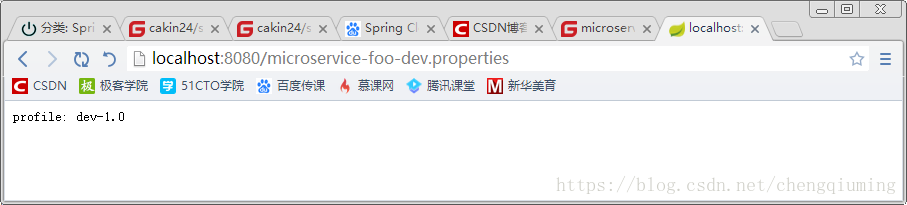
可以使用Config Server的端点获取配置文件的内容。端点与配置文件的映射规则如下:
/{application}/{profile}[/{label}]
/{application}-{profile}.yml
/{label}/{application}-{profile}.yml
/{application}-{profile}.properties
/{label}/{application}-{profile}.properties
以上端点都可以映射到{application}-{profile}.properties这个配置文件,{application}表示微服务的名称,{label}对应Git仓库的分支,默认是master。
按照以上规则,对于本例,可使用以下URL访问到Git仓库master分支的microservice-foo-dev.properties。
七测试
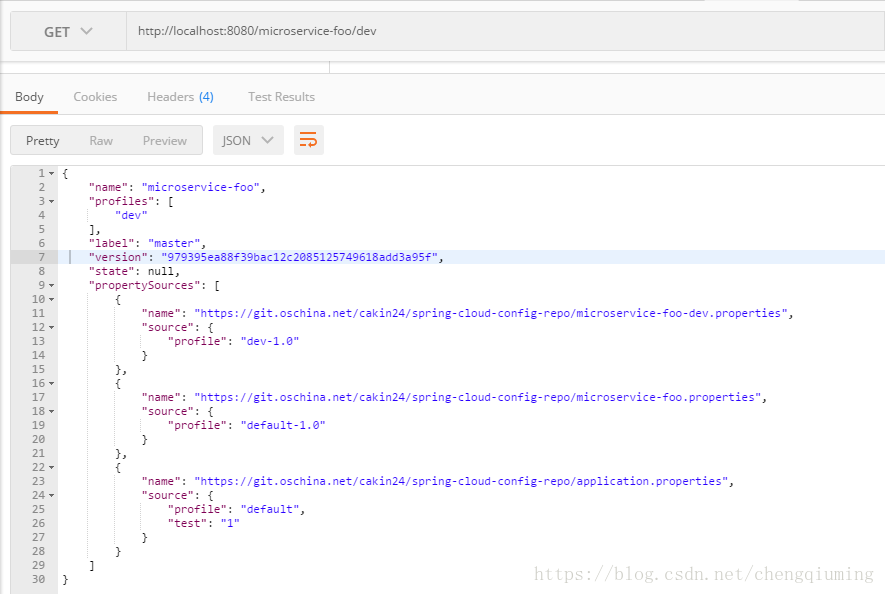
从结果可以直观地看到应用名称、项目profile、Git label、Git version、配置文件URL、配置详情等信息。
八 注意
访问
http://localhost:8080/microservice-foo/dev,结果中类似
https://git.oschina.net/cakin24/spring-cloud-config-repo/microservice-foo-dev.properties的URL并不能访问。这是正常的,因为它并不代表配置文件的实际URL路径,而只是一个标识。