一、概述
- spring是一站式服务站点。
- Spring 是轻量级的框架,核心特性是可以用于开发任何 Java 应用程序
- Spring 最认同的技术是控制反转的依赖注入(DI)模式。对于依赖注入,举例:我是这样理解的,将依赖注入四字拆开。依赖:类A依赖于类B。注入:类B通过反转IOC注入到类A中。
- 面向方面的程序设计(AOP):一个程序中跨越多个点的功能被称为横切关注点。
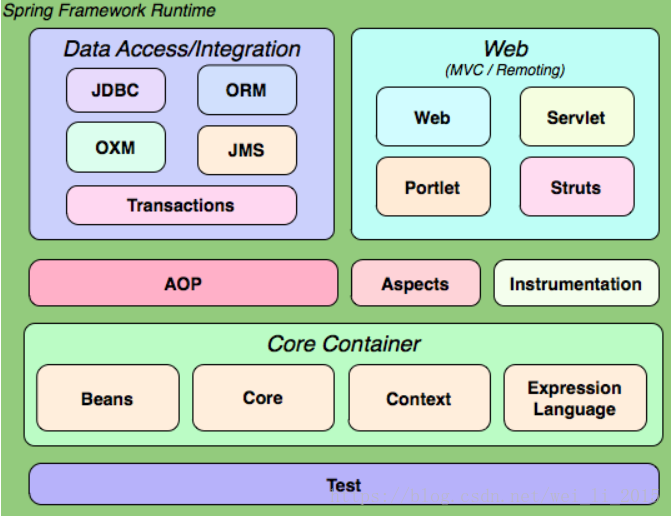
- 结构图如下:
二、HelloWorld案例
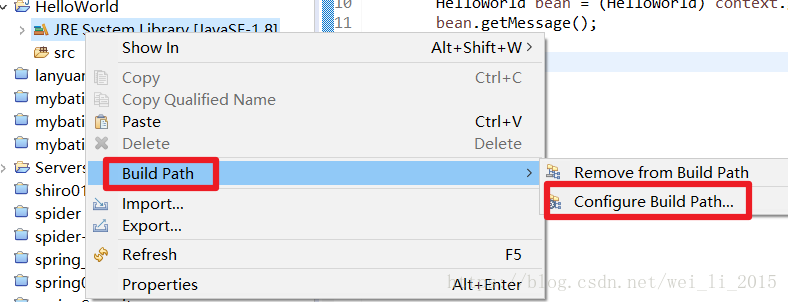
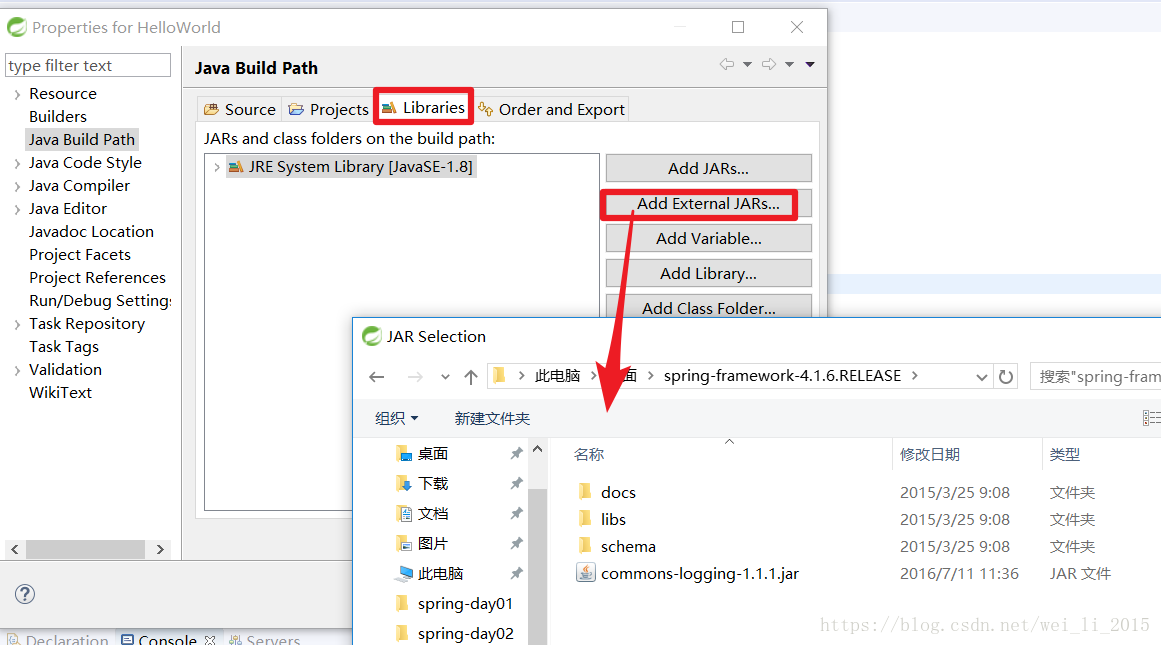
spring的jar包可以从 http://repo.spring.io/release/org/springframework/spring下载。第一步:使用eclipse开发软件,创建java Project项目,导入spring的核心库和通用日志包。

项目结构如下:

相应的代码如下:
Test程序入口文件:
package com.liwei.test;

import org.springframework.context.ApplicationContext;
import org.springframework.context.support.ClassPathXmlApplicationContext;

public class Test {

	public static void main(String[] args) {
		ApplicationContext ac = new ClassPathXmlApplicationContext("beans.xml");
		HelloWorld helloWorld = (HelloWorld) ac.getBean("helloWorld");
		helloWorld.getTestHelloWorld();
	}

}
HelloWorld文件:
package com.liwei.test;

public class HelloWorld {
	private String testHelloWorld;

	public String getTestHelloWorld() {
		return testHelloWorld;
	}

	public void setTestHelloWorld(String testHelloWorld) {
		System.out.println("打印信息:" + testHelloWorld);
	}

}
beans配置文件:
<?xml version="1.0" encoding="UTF-8"?>
<beans xmlns="http://www.springframework.org/schema/beans"
	xmlns:xsi="http://www.w3.org/2001/XMLSchema-instance"
	xsi:schemaLocation="http://www.springframework.org/schema/beans
    http://www.springframework.org/schema/beans/spring-beans-3.0.xsd">
    <bean name="helloWorld" class="com.liwei.test.HelloWorld">
    	<property name="testHelloWorld" value="世界,你好!"/>
    </bean>
</beans>- beans.xml文件中,property属性中的name必须是HelloWorld中的属性。
- Test中的getBean中的字段属性,必须是beans.xml中的name属性名称
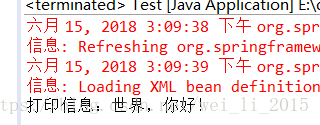
输出结果如下:
三、spring的相关配置
1.id和name属性
id:给Bean 起个名字, 在约束中采用 ID 的约束:唯一, 必须以字母开始,可以使用字母、数字、连字符、下划线、句话、冒号 。id不能出现特殊字符。
name:Bean 起个名 name可以出现特殊字符,如果<bean>没有 id 的话 , name 可以当做 id 使用。
2.scope 属性
scope:控制Bean 的作用范围。
singleton :默认值,单例的。
prototype :多例的。
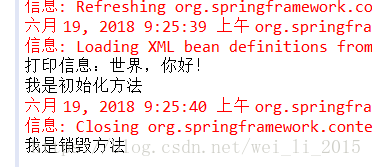
3.Bean 的生命周期
初始化:通过配置<bean>标签上的 init-method 作为 Bean 的初始化的时候执行的方法
销毁:配置 destroy-method作为 Bean 的销毁的时候执行的方法。销毁方法想要执行,需要是单例创建的 Bean 而且在工厂关闭的时候,Bean 才会被销毁。
<?xml version="1.0" encoding="UTF-8"?>
<beans xmlns="http://www.springframework.org/schema/beans"
	xmlns:xsi="http://www.w3.org/2001/XMLSchema-instance"
	xsi:schemaLocation="http://www.springframework.org/schema/beans
    http://www.springframework.org/schema/beans/spring-beans-3.0.xsd">
    <bean name="helloWorld" class="com.liwei.test.HelloWorld" init-method="init" destroy-method="destroy">
    	<property name="testHelloWorld" value="世界,你好!"/>
    </bean>
</beans>
除此之外,还需要配置实体类中初始化方法。
package com.liwei.test;

public class HelloWorld {
	private String testHelloWorld;

	public String getTestHelloWorld() {
		return testHelloWorld;
	}

	public void setTestHelloWorld(String testHelloWorld) {
		System.out.println("打印信息:" + testHelloWorld);
	}

	public void init() {
		System.out.println("我是初始化方法");
	}

	public void destroy() {
		System.out.println("我是销毁方法");
	}

}
Test.java文件:
package com.liwei.test;

import org.springframework.context.support.ClassPathXmlApplicationContext;

public class Test {

	public static void main(String[] args) {
		ClassPathXmlApplicationContext ac = new ClassPathXmlApplicationContext("beans.xml");
		HelloWorld helloWorld = (HelloWorld) ac.getBean("helloWorld");
		helloWorld.getTestHelloWorld();
		ac.close();
	}
}
打印:
四、spring的依赖注入
1. spring构造函数的注入
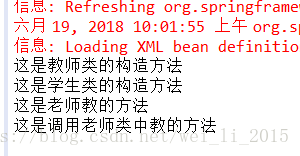
当容器调用带有一组参数的类构造函数时,基于构造函数的依赖注入(DI) 就完成了,其中每个参数代表一个对其他类的依赖。
Teacher.java文件:
package com.liwei.test;

public class Teacher {
	public Teacher() {
		System.out.println("这是教师类的构造方法");
	}

	public void teaching() {
		System.out.println("这是老师教的方法");
	}
}
Student.java文件:
package com.liwei.test;

public class Student {
	private Teacher teacher;

	public Student(Teacher teacher) {
		System.out.println("这是学生类的构造方法");
		this.teacher = teacher;
	}
	public void teaching() {
		teacher.teaching();
		System.out.println("这是调用老师类中教的方法");
	}

}
Test.java文件:
package com.liwei.test;

import org.springframework.context.ApplicationContext;
import org.springframework.context.support.ClassPathXmlApplicationContext;

public class Test {

	public static void main(String[] args) {
		ApplicationContext ac = new ClassPathXmlApplicationContext("beans.xml");
		Student student = (Student)ac.getBean("student");
		student.teaching();
	}
}
beans.xml配置文件:
<?xml version="1.0" encoding="UTF-8"?>

<beans xmlns="http://www.springframework.org/schema/beans"
    xmlns:xsi="http://www.w3.org/2001/XMLSchema-instance"
    xsi:schemaLocation="http://www.springframework.org/schema/beans
    http://www.springframework.org/schema/beans/spring-beans-3.0.xsd">
    <bean name="student" class="com.liwei.test.Student">
    	<constructor-arg ref="teacher"/>
    </bean>

    <bean name="teacher" class="com.liwei.test.Teacher"></bean>
</beans>
2. spring的set方式的注入
Teacher.java文件:
package com.liwei.test;

public class Teacher {
	private String name;

	public String getName() {
		return name;
	}

	public void setName(String name) {
		System.out.println("这是set方式的注入");
		this.name = name;
	}

	public void teaching() {
		System.out.println(name + "老师, 您好,非常感谢您教我们这个方法!");
	}
}
Student.java文件:
package com.liwei.test;

public class Student {
	private Teacher teacher;

	public Teacher getTeacher() {
		return teacher;
	}

	public void setTeacher(Teacher teacher) {
		this.teacher = teacher;
	}

	public void teaching() {
		teacher.teaching();
	}

}
beans.xml文件:
<?xml version="1.0" encoding="UTF-8"?>
<beans xmlns="http://www.springframework.org/schema/beans"
xmlns:xsi="http://www.w3.org/2001/XMLSchema-instance"
xsi:schemaLocation="http://www.springframework.org/schema/beans
http://www.springframework.org/schema/beans/spring-beans-3.0.xsd">
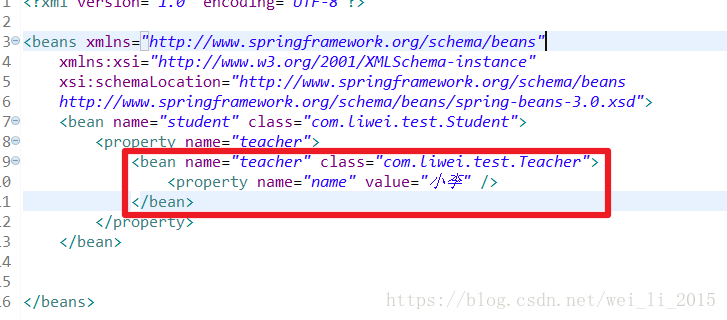
<bean name="student" class="com.liwei.test.Student">
<property name="teacher" ref="teacher"></property>
</bean>
<bean name="teacher" class="com.liwei.test.Teacher">
<property name="name" value="小李"/>
</bean>
</beans>Test.java文件:
package com.liwei.test;

import org.springframework.context.ApplicationContext;
import org.springframework.context.support.ClassPathXmlApplicationContext;

public class Test {

	public static void main(String[] args) {
		ApplicationContext ac = new ClassPathXmlApplicationContext("beans.xml");
		Student student = (Student)ac.getBean("student");
		student.teaching();
	}
}
你应该注意定义在基于构造函数注入和基于设值函数注入中的 Beans.xml 文件的区别。唯一的区别就是
第一:在基于构造函数注入中,我们使用的是〈bean〉标签中的〈constructor-arg〉元素,而在基于设值函数的注入中,我们使用的是〈bean〉标签中的〈property〉元素。
第二个:你需要注意的点是,如果你要把一个引用传递给一个对象,那么你需要使用 标签的 ref 属性,而如果你要直接传递一个值,那么你应该使用 value 属性。
3. 对象类型的注入
对象类型的注入,其实就如上边所示中:
对teacher类文件进行引入。
另外一种方式如下:
直接将对象放入<property>属性中:
以上两种其结果都是一样的。

4. 注入集合
在上面你已经看到,使用 value 属性来配置基本数据类型和在bean 配置文件中使用
<property>标签的 ref 属性来配置对象引用。这两种情况是将值传递给一个 bean。如果想传递多个值,可以使用 Java Collection 类型 List、Set、Map 和 Properties。
元素 描述 <list> 它有助于连线,如注入一列值,允许重复。 <set> 它有助于连线一组值,但不能重复。 <map> 它可以用来注入名称-值对的集合,其中名称和值可以是任何类型。 <props> 它可以用来注入名称-值对的集合,其中名称和值都是字符串类型。 1)List的注入
Teacher.java文件:
package com.liwei.test;
import java.util.List;

public class Teacher {
	private List<String> name;


	public List<String> getName() {
		return name;
	}


	public void setName(List<String> name) {
		this.name = name;
	}


	public void teaching() {
		for (String string : name) {
			System.out.println(string + "老师, 您好,非常感谢您教我们这个方法!");
		}
	}
}
beans.xml文件:
<?xml version="1.0" encoding="UTF-8"?>
<beans xmlns="http://www.springframework.org/schema/beans"
xmlns:xsi="http://www.w3.org/2001/XMLSchema-instance"
xsi:schemaLocation="http://www.springframework.org/schema/beans
http://www.springframework.org/schema/beans/spring-beans-3.0.xsd">
<bean name="student" class="com.liwei.test.Student">
<property name="teacher" ref="teacher"></property>
</bean>
<bean name="teacher" class="com.liwei.test.Teacher">
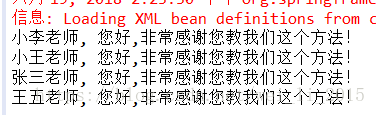
<property name="name">
<list>
<value>小李</value>
<value>小王</value>
<value>张三</value>
<value>王五</value>
</list>
</property>
</bean>
</beans>Student.java和Test.java文件和上面的一样。
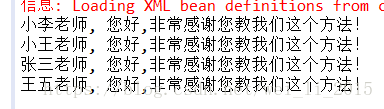
打印结果:
2)set的注入
主要是beans.xml中的配置,其余的和上面的一样。
<?xml version="1.0" encoding="UTF-8"?>

<beans xmlns="http://www.springframework.org/schema/beans"
	xmlns:xsi="http://www.w3.org/2001/XMLSchema-instance"
	xsi:schemaLocation="http://www.springframework.org/schema/beans
    http://www.springframework.org/schema/beans/spring-beans-3.0.xsd">
	<bean name="student" class="com.liwei.test.Student">
		<property name="teacher" ref="teacher"></property>
	</bean>

	<bean name="teacher" class="com.liwei.test.Teacher">
		<property name="name">
			<set>
				<value>小李</value>
				<value>小王</value>
				<value>张三</value>
				<value>王五</value>
				<value>小李</value>
			</set>
		</property>
	</bean>
</beans>
打印结果:
Teacher.java文件:3)map的注入
package com.liwei.test;

import java.util.Map;

public class Teacher {
	private Map<String,String> name;

	public Map<String, String> getName() {
		return name;
	}

	public void setName(Map<String, String> name) {
		this.name = name;
	}

	public void teaching() {
			System.out.println(name.get("one") + "老师, 您好,非常感谢您教我们这个方法!");
	}
}
beans.xml文件:
<?xml version="1.0" encoding="UTF-8"?>

<beans xmlns="http://www.springframework.org/schema/beans"
	xmlns:xsi="http://www.w3.org/2001/XMLSchema-instance"
	xsi:schemaLocation="http://www.springframework.org/schema/beans
    http://www.springframework.org/schema/beans/spring-beans-3.0.xsd">
	<bean name="student" class="com.liwei.test.Student">
		<property name="teacher" ref="teacher"></property>
	</bean>

	<bean name="teacher" class="com.liwei.test.Teacher">
		<property name="name">
			<map>
				<entry key="one" value="小李"></entry>
				<entry key="two" value="小王"></entry>
				<entry key="three" value="张三"></entry>
			</map>
		</property>
	</bean>
</beans>
Student.java和Test.java文件和上面使用的一样,没有变。
打印结果:

注意:在teacher.java文件中name.get("one")中的one,就是beans.xml文件中的one。
Teacher.java文件:
4)Properties的注入
package com.liwei.test;

import java.util.Properties;

public class Teacher {
	private Properties name;

	public Properties getName() {
		return name;
	}


	public void setName(Properties name) {
		this.name = name;
	}


	public void teaching() {
			System.out.println(name.get("one") + "老师, 您好,非常感谢您教我们这个方法!");
	}
}
beans.xml文件:
<?xml version="1.0" encoding="UTF-8"?>

<beans xmlns="http://www.springframework.org/schema/beans"
	xmlns:xsi="http://www.w3.org/2001/XMLSchema-instance"
	xsi:schemaLocation="http://www.springframework.org/schema/beans
    http://www.springframework.org/schema/beans/spring-beans-3.0.xsd">
	<bean name="student" class="com.liwei.test.Student">
		<property name="teacher" ref="teacher"></property>
	</bean>

	<bean name="teacher" class="com.liwei.test.Teacher">
		<property name="name">
			<props>
				<prop key="one">小李</prop>
				<prop key="two">小王</prop>
				<prop key="three">张三</prop>
			</props>
		</property>
	</bean>
</beans>
打印结果:
