⦁ 下载Hue及解压
⦁ 准备编译环境
⦁ 编译
⦁ 测试启动
Hue3.12的编译安装以及编译过程中遇到的一些坑
虚拟机使用的是CentOS7系统,编译Hue3.12包
1. 下载Hue及解压
http://gethue.com/打开链接,下载3.12版本
Linux将下载的hue-3.12.0.tgz包拷贝到系统/hasoft目录下,解压到/hasoft目录下
命令: tar -zxvf hue-3.12.0.tgz -C /usr/local/
2. 准备编译环境
由于参考别的文章准备的环境,实际操作还是有问题,在此先说一下遇到的问题,最后再总结CentOS系统需要安装的依赖软件包
编译Redis先前时已经安装好gcc
命令: yum install gcc
Hue安装配置实践参考安装的依赖软件包
命令: yum install krb5-devel cyrus-sasl-gssapi cyrus-sasl-deve libxml2-devel libxslt-devel mysql mysql-devel openldap-devel python-devel python-simplejson sqlite-devel
由于我先前装了gcc,搜索此问题发现还需要安装g++
需要安装g++
命令: yum install gcc-c++
安装好之后编译成功。
在CentOS环境下编译Hue安装的依赖包如下:
命令: yum install krb5-devel cyrus-sasl-gssapi cyrus-sasl-deve libxml2-devel libxslt-devel mysql mysql-devel openldap-devel python-devel python-simplejson sqlite-devel libffi-devel openssl-devel gmp-devel gcc gcc-c++
3. 编译
进入到Hue安装目录下执行make apps进行编译
命令: cd /hasoft/hue-3.12.0/
命令: make apps
编译成功,没有error错误
1274 static files copied to '/usr/local/hue-3.11.0/build/static', 1274 post-processed.make[1]: Leaving directory `/usr/local/hue-3.11.0/apps'
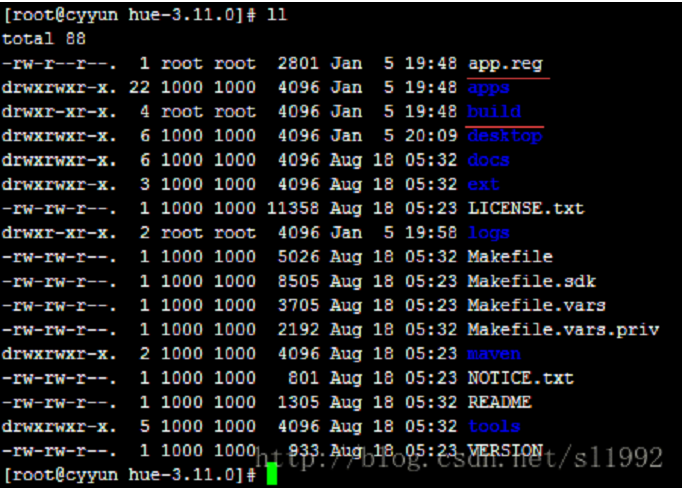
编译完成后,目录下多了两个文件,就证明已经编译成功
4. 测试启动
Ubuntu编译Hue参照网站上
Just start the development server:
命令: ./build/env/bin/hue runserver
http://127.0.0.1:8000/and visit !
仅仅启动开发服务
命令: cd /usr/local/hue-3.12.0/build/env/bin
命令: ./hue runserver
linuxhttp://127.0.0.1:8000/在系统界面上打开浏览器输入地址
要在Windows系统下访问,需要修改配置文件:
/usr/local/hue-3.11.0/desktop/conf/目录下有个hue.ini文件
命令: cd /usr/local/hue-3.11.0/desktop/conf/
命令: vi hue.ini
修改地方如下
[desktop] # Set this to a random string, the longer the better. # This is used for secure hashing in the session store. secret_key=c!@#$%^&*yy{}[]<>?un`~:. # Execute this script to produce the Django secret key. This will be used when # 'secret_key'isnotset. ## secret_key_script= # Webserver listens on this address and port http_host=cyyun http_port=8888 # Time zone name time_zone=Asia/Shanghai
注意:secret_key随便填写一个字符串即可,如果不填写的话Hue会提示错误信息,这个secret_key主要是出于安全考虑用来存储在session store中进行安全验证的。
主机修改成机器上的主机名或IP,时区修改成亚洲时区。
在/usr/local/hue-3.11.0/build/env/bin目录下运行supervisor
[root@cyyun bin]# supervisor Traceback (most recent call last):File"./supervisor", line 9, in <module> load_entry_point('desktop==3.11.0', 'console_scripts', 'supervisor')() File"/usr/local/hue-3.11.0/desktop/core/src/desktop/supervisor.py", line 319, in main setup_user_info() File"/usr/local/hue-3.11.0/desktop/core/src/desktop/supervisor.py", line 257, in setup_user_info desktop.lib.daemon_utils.get_uid_gid(SETUID_USER, SETGID_GROUP) File"/usr/local/hue-3.11.0/desktop/core/src/desktop/lib/daemon_utils.py", line 45, in get_uid_gid raise KeyError("Couldn't get user id for user %s" % (username,))KeyError:"Couldn't get user id for user hue"
https://github.com/cloudera/hue/issues/27发现出错,参见,需要添加一个hue用户
命令: adduser hue
再次运行,正常运行
命令: supervisor
打开浏览器输入IP:8888或主机名:8888,发现500错误
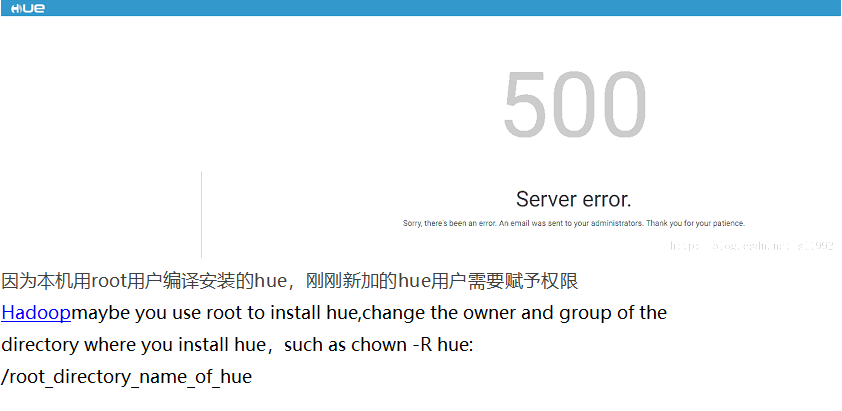
因为本机用root用户编译安装的hue,刚刚新加的hue用户需要赋予权限
Hadoopmaybe you use root to install hue,change the owner and group of the directory where you install hue,such as chown -R hue: /root_directory_name_of_hue
命令: chown -R hue /usr/local/hue-3.12.0/
执行后再次刷新浏览器,可正常访问
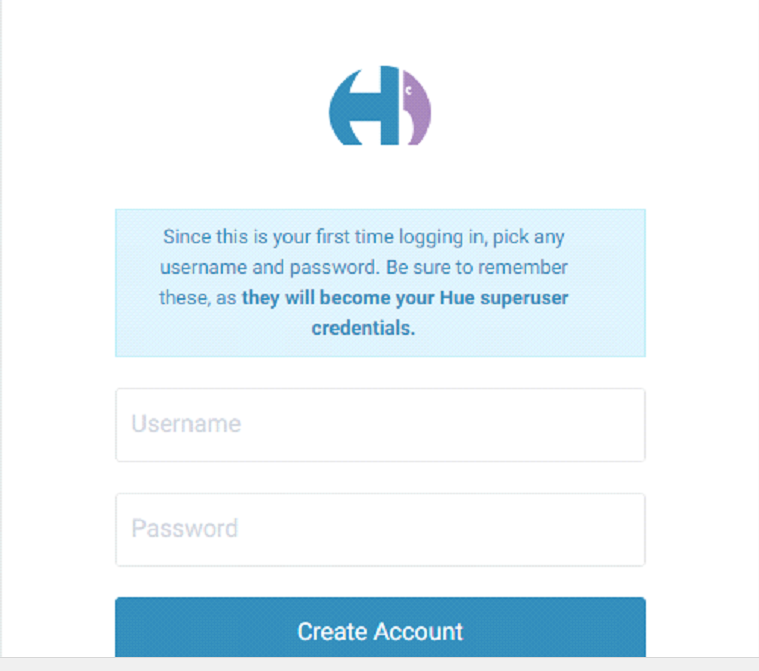
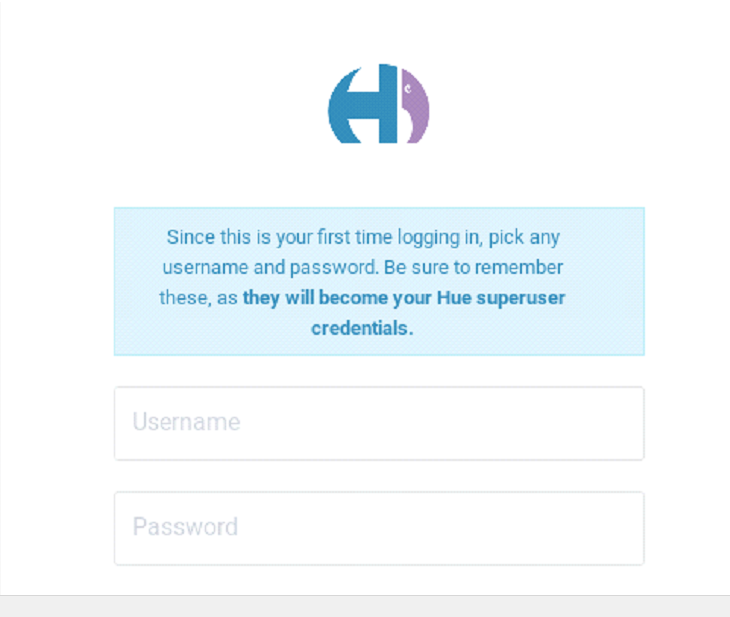
输入任意用户名和密码(能记住的)创建账号登录
hadoop HYPERLINK "http://lib.csdn.net/base/hive"Hive至此,Hue已经安装成功,可以在上面集成、等。
本文参考:
http://blog.csdn.net/eason_oracle/article/details/52153061
http://ju.outofmemory.cn/entry/105162
http://gethue.com/how-to-build-hue-on-ubuntu-14-04-trusty/