前言
一般产品到了一定规模内部的maven是必须要搭建的—-当然,不到一定规模也可以搭建的,关键就看整个开发流程和团队配合了。
注意,这个搭建maven在网上已经一堆实践了的,跟着做即可。当然,假如有坑的话我也会先填上去的。
准备工作
分别先安装jdk及maven。
执行:
java -version
看看有没有安装java,服务器不要随便换环境。
假如没有的话就用:
yum install java
安装java。

服务器已经安装java,跳过这一步。
看看有没有安装maven,没有就安装,有就跳过。
mvn -version
安装maven:
yum install maven
刚好我没有安装,那么就安装先:
yum install maven


安装成功。
安装nexus
到官网下载页面看看:
可以看到:

好了忽略加入注册种种步骤,下载地址是:
https://sonatype-download.global.ssl.fastly.net/repository/repositoryManager/3/nexus-3.12.1-01-unix.tar.gz在centos下下载:
wget https://sonatype-download.global.ssl.fastly.net/repository/repositoryManager/3/nexus-3.12.1-01-unix.tar.gz
保存成功。
解压缩
tar -zxvf nexus-3.12.1-01-unix.tar.gz -C /usr/local/
解压成功。
------重命名nexus文件夹
cd /usr/local
mv nexus-3.12.1-01 nexus3
创建软连接
sudo ln -s nexus3 nexus
创建 nexus 用户
# sudo useradd nexus -M -s /sbin/nologin
注意,这条命令后续会出问题的,在我上一篇文章已经将坑都排出来了:
https://blog.csdn.net/cdnight/article/details/80673110
所以,正式的命令是新建普通的账号:
sudo useradd nexus -m -s /bin/bash
授权
sudo chown -R nexus:nexus /usr/local/nexus
sudo chown -R nexus:nexus /usr/local/sonatype-work/
打开 /usr/local/nexus/bin/nexus.rc 文件, 去掉 run_as_user 变量的注释
sudo vim /usr/local/nexus/bin/nexus.rc
run_as_user="nexus"
安装nexus到系统服务
安装服务(本例以 systemd 为例)
创建服务文件

sudo vim /etc/systemd/system/nexus.service

添加如下内容

[Unit]
Description=nexus service
After=network.target
[Service]
Type=forking
LimitNOFILE=65536
ExecStart=/usr/local/nexus/bin/nexus start
ExecStop=/usr/local/nexus/bin/nexus stop
User=nexus
Restart=on-abort
[Install]
WantedBy=multi-user.target

其中LimitNOFILE=65536用于调整文件描述符数量。
安装并启动服务
sudo systemctl daemon-reload
sudo systemctl enable nexus
sudo systemctl start nexus

查看服务
sudo systemctl status nexus
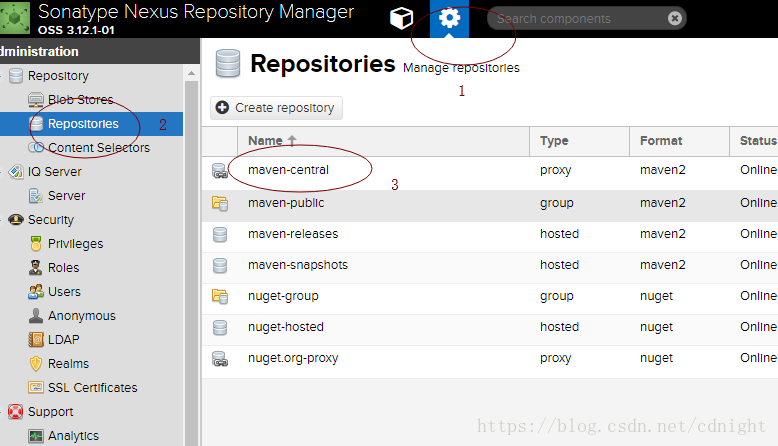
nexus3中央仓库改为阿里云
参考:这里写链接内容
找到中央仓库
然后修改成:
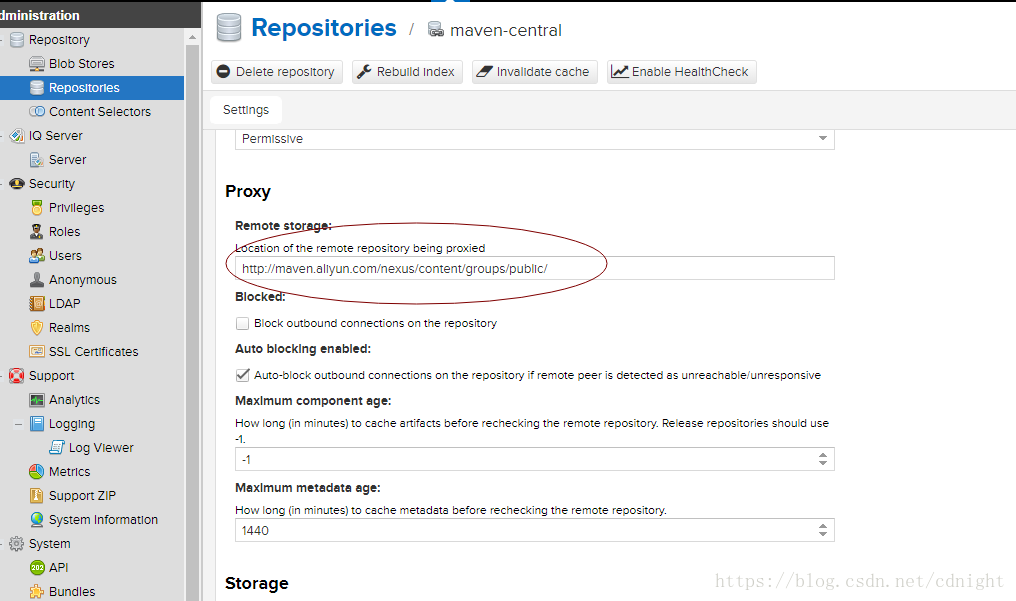
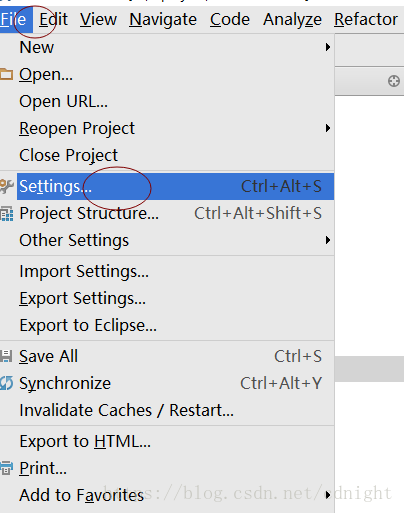
http://maven.aliyun.com/nexus/content/groups/public/idea使用私服maven及对应配置
参考:
这里写链接内容
首先,新建一个maven项目—自己新建吧。
然后,
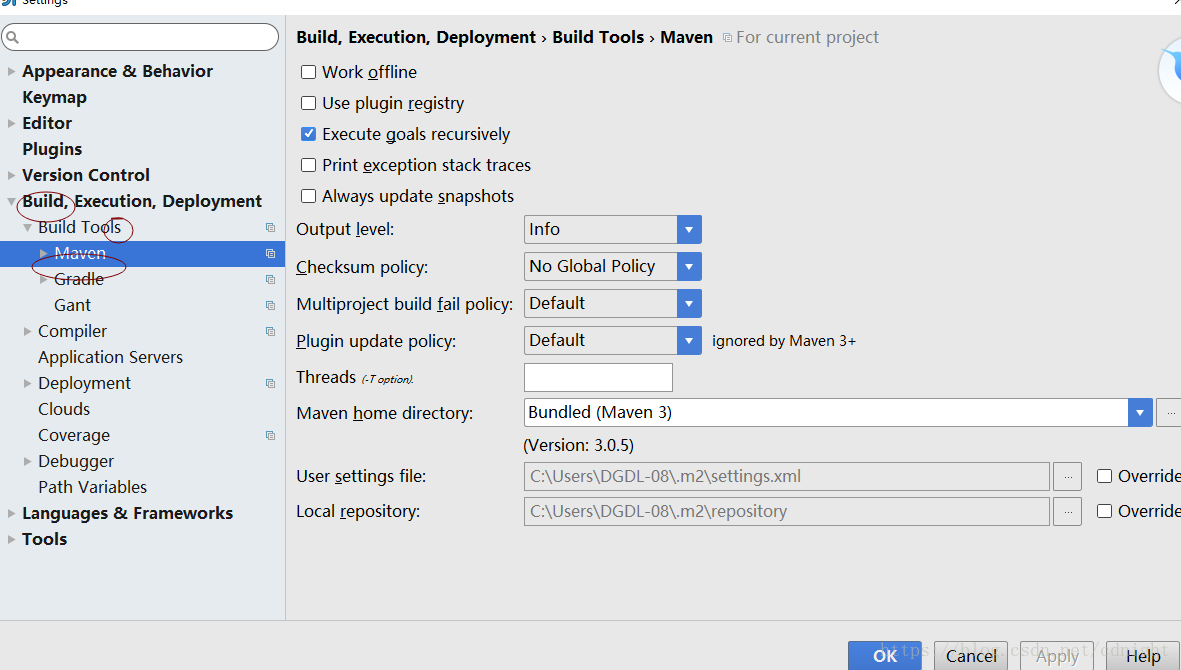
看到本机的maven 配置文件,

打开来,然后:
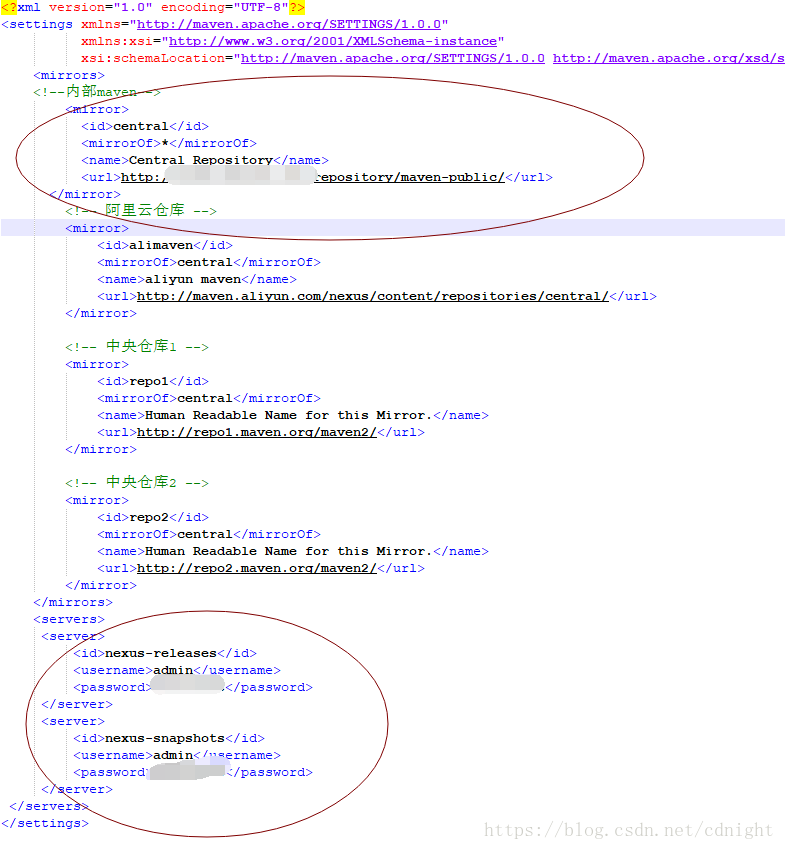
添加我们的maven私服及servers—用来发布类库的。
格式如下:
<?xml version="1.0" encoding="UTF-8"?>
<settings xmlns="http://maven.apache.org/SETTINGS/1.0.0"
          xmlns:xsi="http://www.w3.org/2001/XMLSchema-instance"
          xsi:schemaLocation="http://maven.apache.org/SETTINGS/1.0.0 http://maven.apache.org/xsd/settings-1.0.0.xsd">
    <mirrors>
    <!--内部maven-->
        <mirror>
          <id>central</id>
          <mirrorOf>*</mirrorOf>
          <name>Central Repository</name>
          <url>http://你仓库的地址/repository/maven-public/</url>
      </mirror>
        <!-- 阿里云仓库 -->
        <mirror>
            <id>alimaven</id>
            <mirrorOf>central</mirrorOf>
            <name>aliyun maven</name>
            <url>http://maven.aliyun.com/nexus/content/repositories/central/</url>
        </mirror>

        <!-- 中央仓库1 -->
        <mirror>
            <id>repo1</id>
            <mirrorOf>central</mirrorOf>
            <name>Human Readable Name for this Mirror.</name>
            <url>http://repo1.maven.org/maven2/</url>
        </mirror>

        <!-- 中央仓库2 -->
        <mirror>
            <id>repo2</id>
            <mirrorOf>central</mirrorOf>
            <name>Human Readable Name for this Mirror.</name>
            <url>http://repo2.maven.org/maven2/</url>
        </mirror>
    </mirrors>
    <servers>
     <server>
         <id>nexus-releases</id>
         <username>admin</username>
         <password>你的密码</password>
     </server>
     <server>
         <id>nexus-snapshots</id>
         <username>admin</username>
         <password>你的密码</password>
     </server>
 </servers>
</settings>
发布快照及正式版本
maven(15),快照与发布,RELEASE与SNAPSHOT
在pom.xml文件最后添加distributionManagement发布管理节点:
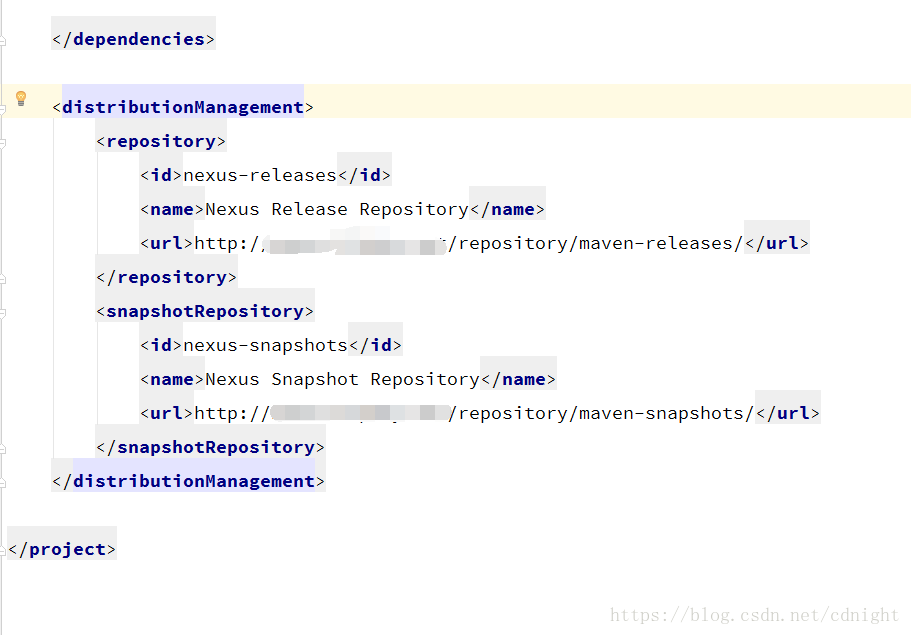
例如:
    <distributionManagement>
        <repository>
            <id>nexus-releases</id>
            <name>Nexus Release Repository</name>
            <url>http://你的maven地址/repository/maven-releases/</url>
        </repository>
        <snapshotRepository>
            <id>nexus-snapshots</id>
            <name>Nexus Snapshot Repository</name>
            <url>http://你的maven地址/repository/maven-snapshots/</url>
        </snapshotRepository>
    </distributionManagement>
注意一下
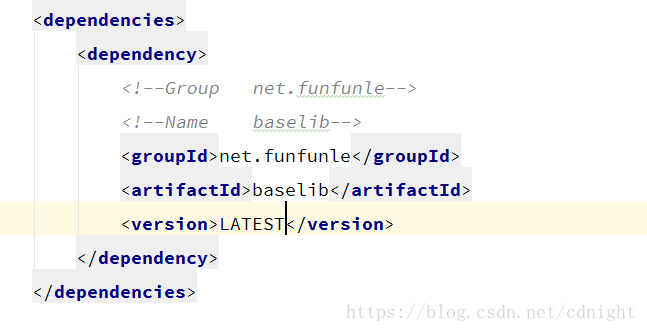
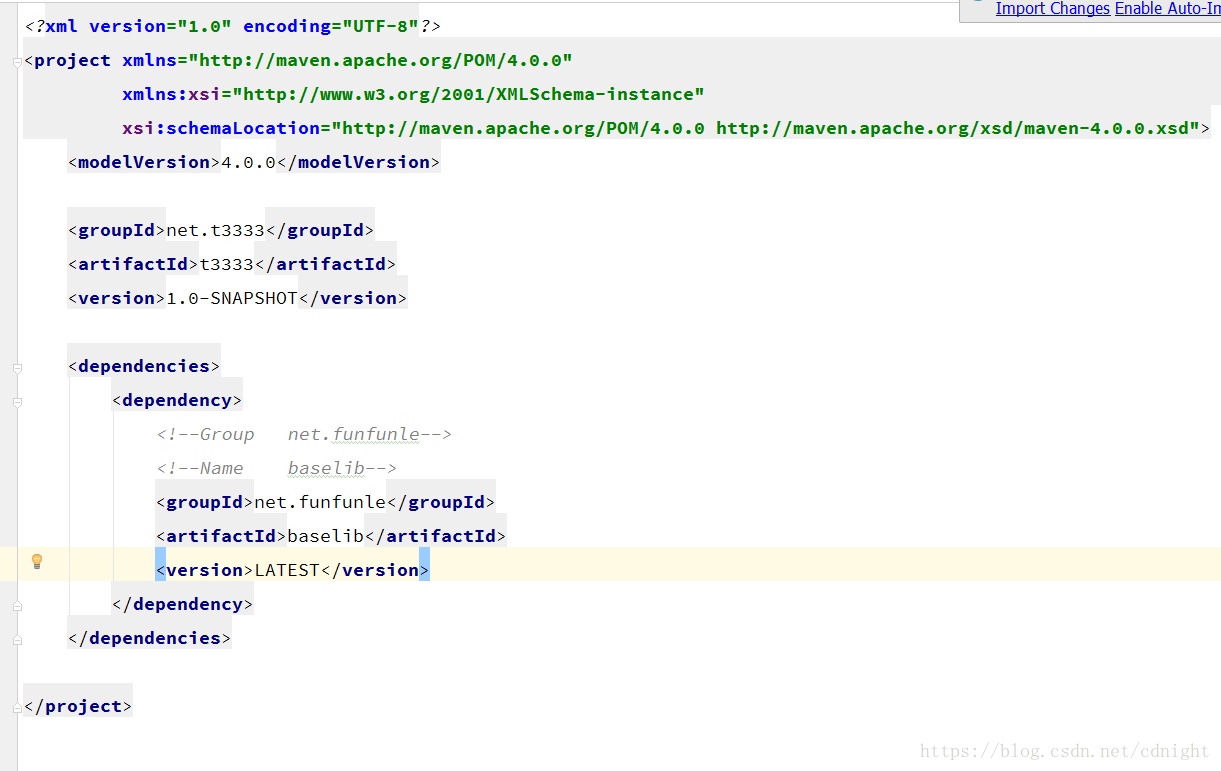
    <groupId>net.funfunle</groupId>
    <artifactId>baselib</artifactId>
    <!--<version>1.0-SNAPSHOT</version>-->
    <version>1.0.1-RELEASE</version>
groupid这些,
    <groupId>net.funfunle</groupId>
    <artifactId>baselib</artifactId>
    <!--<version>1.0-SNAPSHOT</version>-->
    <version>1.0.1-RELEASE</version>
决定发布的是正式版本release还是快照snapshot的是
    <!--<version>1.0-SNAPSHOT</version>-->
    <version>1.0.1-RELEASE</version>
版本号及发布类型,有一点也需要注意,snapshot快照允许重复发布更新同一个版本,而release是不允许的,release每次发布版本号都要加的。
发布方式:
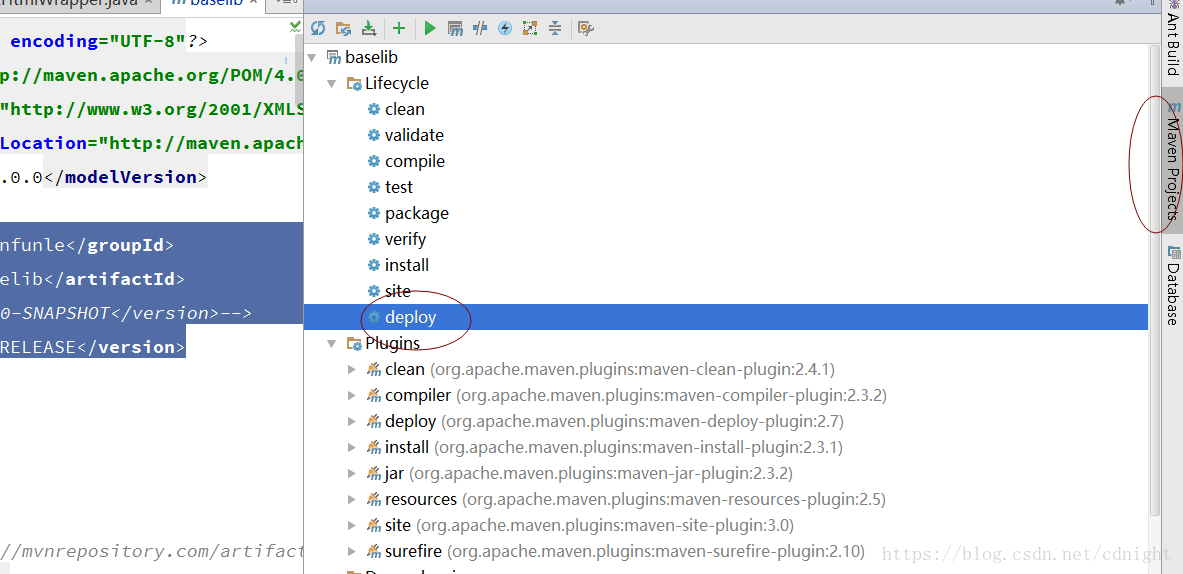
在mavenproject点击发布deploy。
新项目中引用发布的类库
maven2获取最新版本方式。
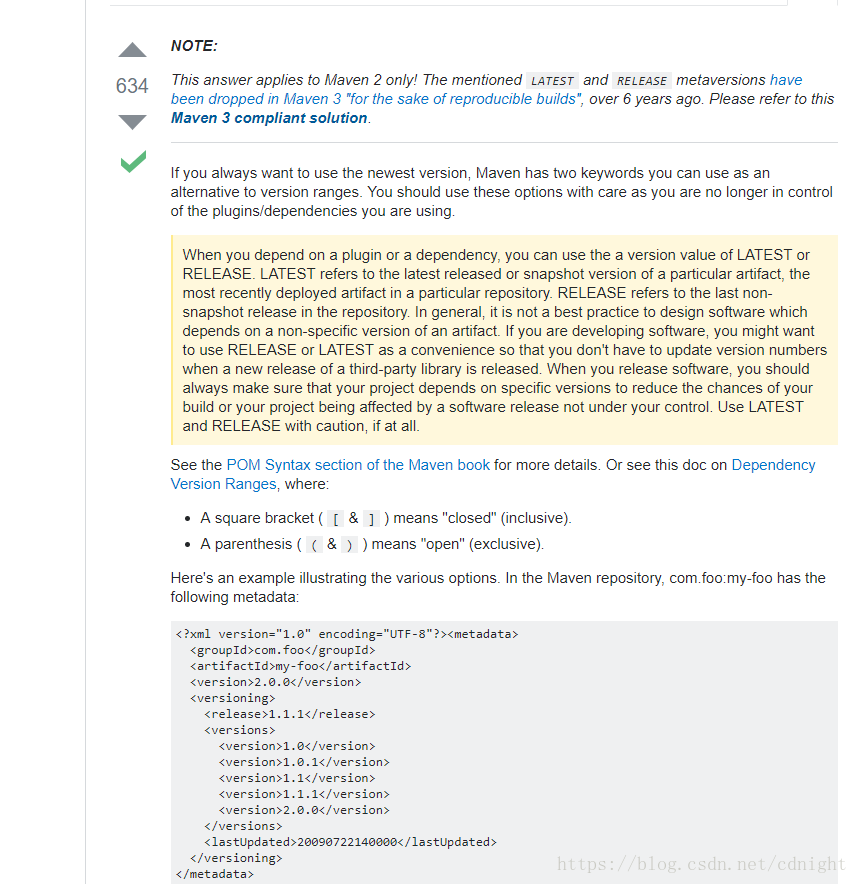
maven3获取最新版本方式
这里写链接内容
Now I know this topic is old, but reading the question and the OP supplied answer it seems the Maven Versions Plugin might have actually been a better answer to his question:

In particular the following goals could be of use:

versions:use-latest-versions searches the pom for all versions which have been a newer version and replaces them with the latest version.
versions:use-latest-releases searches the pom for all non-SNAPSHOT versions which have been a newer release and replaces them with the latest release version.
versions:update-properties updates properties defined in a project so that they correspond to the latest available version of specific dependencies. This can be useful if a suite of dependencies must all be locked to one version.
The following other goals are also provided:

versions:display-dependency-updates scans a project's dependencies and produces a report of those dependencies which have newer versions available.
versions:display-plugin-updates scans a project's plugins and produces a report of those plugins which have newer versions available.
versions:update-parent updates the parent section of a project so that it references the newest available version. For example, if you use a corporate root POM, this goal can be helpful if you need to ensure you are using the latest version of the corporate root POM.
versions:update-child-modules updates the parent section of the child modules of a project so the version matches the version of the current project. For example, if you have an aggregator pom that is also the parent for the projects that it aggregates and the children and parent versions get out of sync, this mojo can help fix the versions of the child modules. (Note you may need to invoke Maven with the -N option in order to run this goal if your project is broken so badly that it cannot build because of the version mis-match).
versions:lock-snapshots searches the pom for all -SNAPSHOT versions and replaces them with the current timestamp version of that -SNAPSHOT, e.g. -20090327.172306-4
versions:unlock-snapshots searches the pom for all timestamp locked snapshot versions and replaces them with -SNAPSHOT.
versions:resolve-ranges finds dependencies using version ranges and resolves the range to the specific version being used.
versions:use-releases searches the pom for all -SNAPSHOT versions which have been released and replaces them with the corresponding release version.
versions:use-next-releases searches the pom for all non-SNAPSHOT versions which have been a newer release and replaces them with the next release version.
versions:use-next-versions searches the pom for all versions which have been a newer version and replaces them with the next version.
versions:commit removes the pom.xml.versionsBackup files. Forms one half of the built-in "Poor Man's SCM".
versions:revert restores the pom.xml files from the pom.xml.versionsBackup files. Forms one half of the built-in "Poor Man's SCM".
Just thought I'd include it for any future reference.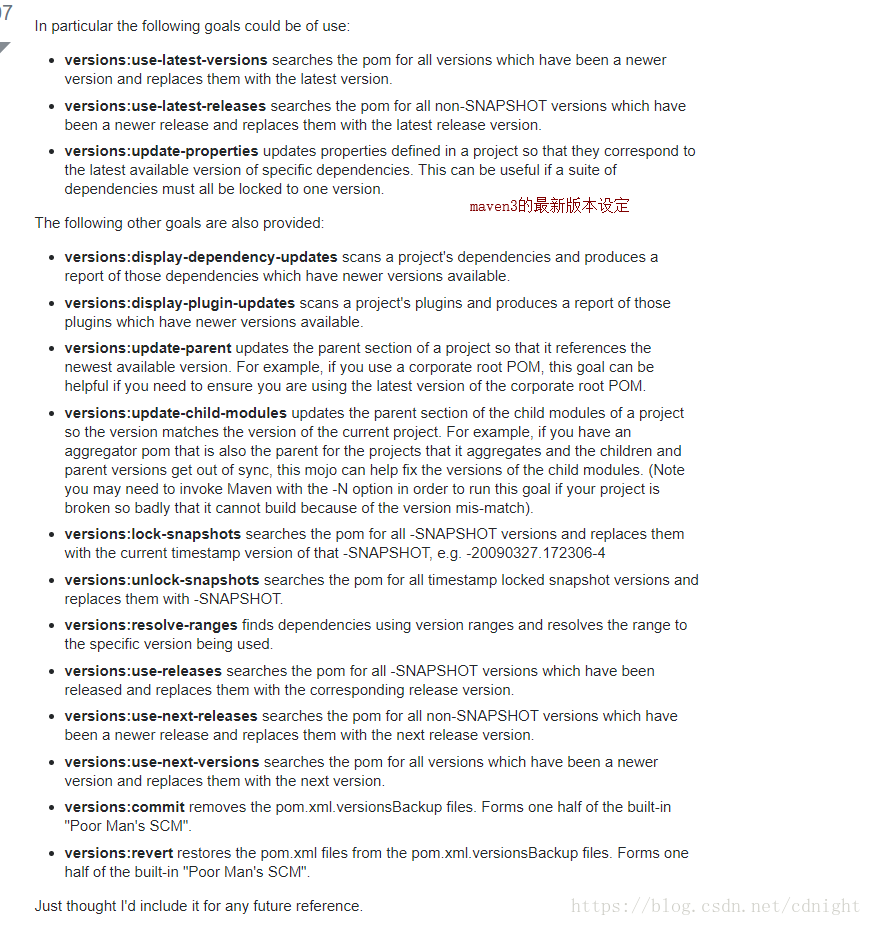
譬如:
配置优化及内存问题
nexus本身耗费的内存是非常大的。竟然到达了1g,对于小作坊是很致命的。
vim /usr/local/nexus3/bin/nexus.vmoptions默认配置如下

改为:

重启服务