opencv英文文档
Geometric Image Transformations
The functions in this section perform various geometrical transformations of 2D images. They do not change the image content but deform the pixel grid and map this deformed grid to the destination image. In fact, to avoid sampling artifacts, the mapping is done in the reverse order, from destination to the source. That is, for each pixel  of the destination image, the functions compute coordinates of the corresponding “donor” pixel in the source image and copy the pixel value:
The functions in this section perform various geometrical transformations of 2D images. They do not change the image content but deform the pixel grid and map this deformed grid to the destination image. In fact, to avoid sampling artifacts, the mapping is done in the reverse order, from destination to the source. That is, for each pixel of the destination image, the functions compute coordinates of the corresponding “donor” pixel in the source image and copy the pixel value: .. math:
\texttt{dst} (x,y)= \texttt{src} (f_x(x,y), f_y(x,y))
In case when you specify the forward mapping  , the OpenCV functions first compute the corresponding inverse mapping
  and then use the above formula.
convertMaps
Converts image transformation maps from one representation to another.
- C++: void convertMaps (InputArray map1, InputArray map2, OutputArray dstmap1, OutputArray dstmap2, int dstmap1type, bool nninterpolation=false )
- Python: cv2. convertMaps (map1, map2, dstmap1type [, dstmap1 [, dstmap2 [, nninterpolation ] ] ] ) → dstmap1, dstmap2
-
Parameters: - map1 – The first input map of type CV_16SC2 , CV_32FC1 , or CV_32FC2 .
- map2 – The second input map of type CV_16UC1 , CV_32FC1 , or none (empty matrix), respectively.
- dstmap1 – The first output map that has the type dstmap1type and the same size as src .
- dstmap2 – The second output map.
- dstmap1type – Type of the first output map that should be CV_16SC2 , CV_32FC1 , or CV_32FC2 .
- nninterpolation – Flag indicating whether the fixed-point maps are used for the nearest-neighbor or for a more complex interpolation.
The function converts a pair of maps for remap() from one representation to another. The following options ( (map1.type(), map2.type())  (dstmap1.type(), dstmap2.type()) ) are supported:
 . This is the most frequently used conversion operation, in which the original floating-point maps (see remap() ) are converted to a more compact and much faster fixed-point representation. The first output array contains the rounded coordinates and the second array (created only when nninterpolation=false ) contains indices in the interpolation tables.
 . The same as above but the original maps are stored in one 2-channel matrix.
- Reverse conversion. Obviously, the reconstructed floating-point maps will not be exactly the same as the originals.
- 第一个输出是dst
 contains pairs (cvFloor(x), cvFloor(y))
 - 第二个输出dst
 contains indices in a table of interpolation coefficients.
 - 输出一定都是(CV_16SC2,CV_16UC1)
remap
Applies a generic geometrical transformation to an image.
- C++: void remap (InputArray src, OutputArray dst, InputArray map1, InputArray map2, int interpolation, int borderMode=BORDER_CONSTANT, const Scalar& borderValue=Scalar() )
- Python: cv2. remap (src, map1, map2, interpolation [, dst [, borderMode [, borderValue ] ] ] ) → dst
- C: void cvRemap (const CvArr* src, CvArr* dst, const CvArr* mapx, const CvArr* mapy, int flags=CV_INTER_LINEAR+CV_WARP_FILL_OUTLIERS, CvScalar fillval=cvScalarAll(0) )
- Python: cv. Remap (src, dst, mapx, mapy, flags=CV_INNER_LINEAR+CV_WARP_FILL_OUTLIERS, fillval=(0, 0, 0, 0) ) → None
-
Parameters: - src – Source image.
- dst – Destination image. It has the same size as map1 and the same type as src .
- map1 – The first map of either (x,y) points or just x values having the type CV_16SC2 , CV_32FC1 , or CV_32FC2 . See convertMaps() for details on converting a floating point representation to fixed-point for speed.
- map2 – The second map of y values having the type CV_16UC1 , CV_32FC1 , or none (empty map if map1 is (x,y) points), respectively.
- interpolation – Interpolation method (see resize() ). The method INTER_AREA is not supported by this function.
- borderMode – Pixel extrapolation method (see borderInterpolate() ). When borderMode=BORDER_TRANSPARENT , it means that the pixels in the destination image that corresponds to the “outliers” in the source image are not modified by the function.
- borderValue – Value used in case of a constant border. By default, it is 0.
The function remap transforms the source image using the specified map:

where values of pixels with non-integer coordinates are computed using one of available interpolation methods.
 and
and  can be encoded as separate floating-point maps in and respectively, or interleaved floating-point maps of
  in , or fixed-point maps created by using convertMaps() . The reason you might want to convert from floating to fixed-point representations of a map is that they can yield much faster (~2x) remapping operations. In the converted case, contains pairs (cvFloor(x), cvFloor(y)) and contains indices in a table of interpolation coefficients.
This function cannot operate in-place.
invertAffineTransform
Inverts an affine transformation.
- Python: cv2. invertAffineTransform (M [, iM ] ) → iM
-
Parameters: - M – Original affine transformation.
- iM – Output reverse affine transformation.
The function computes an inverse affine transformation represented by  matrix M :
The result is also a matrix of the same type as M .
 cv::invertAffineTransform(InputArray _matM, OutputArray __iM)
{
    Mat matM = _matM.getMat();
    CV_Assert(matM.rows == 2 && matM.cols == 3);
    __iM.create(2, 3, matM.type());
    Mat _iM = __iM.getMat();

    if( matM.type() == CV_32F )
    {
        const float* M = (const float*)matM.data;
        float* iM = (float*)_iM.data;
        int step = (int)(matM.step/sizeof(M[0])), istep = (int)(_iM.step/sizeof(iM[0]));

        double D = M[0]*M[step+1] - M[1]*M[step];
        D = D != 0 ? 1./D : 0;
        double A11 = M[step+1]*D, A22 = M[0]*D, A12 = -M[1]*D, A21 = -M[step]*D;
        double b1 = -A11*M[2] - A12*M[step+2];
        double b2 = -A21*M[2] - A22*M[step+2];

        iM[0] = (float)A11; iM[1] = (float)A12; iM[2] = (float)b1;
        iM[istep] = (float)A21; iM[istep+1] = (float)A22; iM[istep+2] = (float)b2;
    }
    else if( matM.type() == CV_64F )
    {
        const double* M = (const double*)matM.data;
        double* iM = (double*)_iM.data;
        int step = (int)(matM.step/sizeof(M[0])), istep = (int)(_iM.step/sizeof(iM[0]));

        double D = M[0]*M[step+1] - M[1]*M[step];
        D = D != 0 ? 1./D : 0;
        double A11 = M[step+1]*D, A22 = M[0]*D, A12 = -M[1]*D, A21 = -M[step]*D;
        double b1 = -A11*M[2] - A12*M[step+2];
        double b2 = -A21*M[2] - A22*M[step+2];

        iM[0] = A11; iM[1] = A12; iM[2] = b1;
        iM[istep] = A21; iM[istep+1] = A22; iM[istep+2] = b2;
    }
    else
        CV_Error( CV_StsUnsupportedFormat, "" );
}
warpAffine
Applies an affine transformation to an image.
- C++: void warpAffine (InputArray src, OutputArray dst, InputArray M, Size dsize, int flags=INTER_LINEAR, int borderMode=BORDER_CONSTANT, const Scalar& borderValue=Scalar() )
- C: void cvWarpAffine (const CvArr* src, CvArr* dst, const CvMat* mapMatrix, int flags=CV_INTER_LINEAR+CV_WARP_FILL_OUTLIERS, CvScalar fillval=cvScalarAll(0) )
- Python: cv. WarpAffine (src, dst, mapMatrix, flags=CV_INTER_LINEAR+CV_WARP_FILL_OUTLIERS, fillval=(0, 0, 0, 0) ) → None
- Python: cv. GetQuadrangleSubPix (src, dst, mapMatrix ) → None
-
Parameters: - src – Source image.
- dst – Destination image that has the size dsize and the same type as src .
- M –
 transformation matrix.
 - dsize – Size of the destination image.
- flags – Combination of interpolation methods (see resize() ) and the optional flag WARP_INVERSE_MAP that means that M is the inverse transformation (
 ).
). - borderMode – Pixel extrapolation method (see borderInterpolate() ). When borderMode=BORDER_TRANSPARENT , it means that the pixels in the destination image corresponding to the “outliers” in the source image are not modified by the function.
- borderValue – Value used in case of a constant border. By default, it is 0.
The function warpAffine transforms the source image using the specified matrix:

when the flag WARP_INVERSE_MAP is set. Otherwise, the transformation is first inverted with invertAffineTransform() and then put in the formula above instead of M . The function cannot operate in-place.
etRotationMatrix2D
Calculates an affine matrix of 2D rotation.
- Python: cv. GetRotationMatrix2D (center, angle, scale, mapMatrix ) → None
-
Parameters: - center – Center of the rotation in the source image.
- angle – Rotation angle in degrees. Positive values mean counter-clockwise rotation (the coordinate origin is assumed to be the top-left corner).
- scale – Isotropic scale factor.
- mapMatrix – The output affine transformation, 2x3 floating-point matrix.
The function calculates the following matrix:

where
The transformation maps the rotation center to itself. If this is not the target, adjust the shift.

getAffineTransform
Calculates an affine transform from three pairs of the corresponding points.
- C: CvMat* cvGetAffineTransform (const CvPoint2D32f* src, const CvPoint2D32f* dst, CvMat* mapMatrix )
- Python: cv. GetAffineTransform (src, dst, mapMatrix ) → None
-
Parameters: - src – Coordinates of triangle vertices in the source image.
- dst – Coordinates of the corresponding triangle vertices in the destination image.
The function calculates the matrix of an affine transform so that:
where

已知对应三点求变换矩阵
Mat getAffineTransform_self(const Point2f src[], const Point2f dst[])
{
	Mat M(2, 3, CV_64F), X(6, 1, CV_64F, M.data);
	double a[6 * 6], b[6];
	Mat A(6, 6, CV_64F, a), B(6, 1, CV_64F, b);

	for (int i = 0; i < 3; i++)
	{
		//*which maps(xi, yi) to(ui, vi), (i = 1, 2, 3) :
		//	*
		//	* ui = c00*xi + c01*yi + c02
		//	*
		//	* vi = c10*xi + c11*yi + c12
		//	*
		//  * where:cij - matrix coefficients
		// / x0 y0  1  0  0  0 \ /c00\ /u0\
		// \  0  0  0 x0 y0  1 / \c01/ \v0/
                // / x1 y1  1  0  0  0 \ /c02\ /u1\
		// \  0  0  0 x1 y1  1 / \c10/ \v1/
                // / x2 y2  1  0  0  0 \ /c11\ /u2\
		// \  0  0  0 x2 y2  1 / \c12/ \v2/
		int j = i * 12;
		int k = i * 12 + 6;
		a[j] = a[k + 3] = src[i].x;
		a[j + 1] = a[k + 4] = src[i].y;
		a[j + 2] = a[k + 5] = 1;
		a[j + 3] = a[j + 4] = a[j + 5] = 0;
		a[k] = a[k + 1] = a[k + 2] = 0;
		b[i * 2] = dst[i].x;
		b[i * 2 + 1] = dst[i].y;
	}

	solve(A, B, X);//Ax=B
	return M;
}
已知两图像
Mat getAffineTransform_self(InputArray _src, InputArray _dst)
{
	Mat src = _src.getMat(), dst = _dst.getMat();
	CV_Assert(src.checkVector(2, CV_32F) == 3 && dst.checkVector(2, CV_32F) == 3);
	return getAffineTransform((const Point2f*)src.data, (const Point2f*)dst.data);
}
int main()
{
Mat src = imread("E:\\D\\ruanjianxiangmu\\vs\\2018_6_5\\interpolation_realize\\interpolation_realize\\cameraman.tif");
cvtColor(src, src, CV_BGR2GRAY);
cv::imshow("src", src);
Size ssize = src.size();
int width = src.cols;
int height = src.rows;
//保证原图可以任意旋转的最小尺寸
int dstLength = 3 * sqrt((double)width * width + (double)height *height) + 10;
int dstX = (dstLength + 1) / 2 - width / 2;
int dstY = (dstLength + 1) / 2 - height / 2;
Mat dst(Size(dstLength, dstLength), src.type(), Scalar::all(0));
Size dsize = dst.size();
Point2f src_point[1][3];
Point2f dst_point[1][3];
Point2f s1(100, 100);
Point2f s2(100, 120);
Point2f s3(150, 100);
Point2f d1(100, 100);
Point2f d2(80, 100);
Point2f d3(100, 150);
src_point[0][0] = s1;
src_point[0][1] = s2;
src_point[0][2] = s3;
dst_point[0][0] = d1;
dst_point[0][1] = d2;
dst_point[0][2] = d3;
Mat MM(2, 3, CV_64F), XX(6, 1, CV_64F, MM.data);
double aa[6 * 6], bb[6];
Mat AA(6, 6, CV_64F, aa), BB(6, 1, CV_64F, bb);
//相当于getAffineTransform( const Point2f src[], const Point2f dst[] )
// = getAffineTransform( dst_point,src_point);
for (int i = 0; i < 3; i++)
{
int j = i * 12;
int k = i * 12 + 6;
aa[j] = aa[k + 3] = dst_point[0][i].x;
aa[j + 1] = aa[k + 4] = dst_point[0][i].y;
aa[j + 2] = aa[k + 5] = 1;
aa[j + 3] = aa[j + 4] = aa[j + 5] = 0;
aa[k] = aa[k + 1] = aa[k + 2] = 0;
bb[i * 2] = src_point[0][i].x;
bb[i * 2 + 1] = src_point[0][i].y;
}
cv::solve(AA, BB, XX);
double *mm = (double*)MM.data;
mm[2] += (dst.cols - src.cols) / 2;
mm[5] += (dst.rows - src.rows) / 2;
cv::imshow("src", src);
warpAffine(src, dst, MM, dsize, 1, 0, Scalar::all(0));
cv::imshow("dst", dst);
cv::waitKey();
return 0;
}
效果图:和预期的一样

//当的输入getAffineTransform( const Point2f src[], const Point2f dst[] )
// = getAffineTransform( src_point,dst_point);
效果图;相当于使用了逆变换

所以说当getAffineTransform( const Point2f src[], const Point2f dst[] )第一个参数为变换前的图像时;
warpAffine_self(InputArray _src, OutputArray _dst,InputArray _M0, Size
dsize,int flags,int borderType, const Scalar& borderValue)
The function warpAffine transforms the source image using the specified matrix:
when the flag WARP_INVERSE_MAP is set. Otherwise, the transformation is first inverted with invertAffineTransform() and then put in the formula above instead of M . The function cannot operate in-place.
if( !(flags & WARP_INVERSE_MAP) )
    {
        double D = M[0]*M[4] - M[1]*M[3];
        D = D != 0 ? 1./D : 0;
        double A11 = M[4]*D, A22=M[0]*D;
        M[0] = A11; M[1] *= -D;
        M[3] *= -D; M[4] = A22;
        double b1 = -M[0]*M[2] - M[1]*M[5];
        double b2 = -M[3]*M[2] - M[4]*M[5];
        M[2] = b1; M[5] = b2;
}不设置flag WARP_INVERSE_MAP时,应该就是前后映射;也就是opencv默认向后映射;
getAffineTransform( const Point2f src[], const Point2f dst[] )第一个参数为变换前的图像时src;
warpAffine_self(InputArray _src, OutputArray _dst,InputArray _M0, Size
dsize,int flags,int borderType, const Scalar& borderValue)
其中flags=16,效果图如图所示
效果图:

另一种
  // 获取变换矩阵
    rot = getRotationMatrix2D(center,degree,scale);
    rimg;
    warpAffine(img,rimg,rot,img.size());
    imshow("img",img);
    imshow("rimg",rimg);

    // 获取变换之后的 区域,这个很重要,不然的话,变换之后的图像显示不全
    Rect bbox;
    bbox = RotatedRect(center,Size(scale*img.cols,scale*img.rows),degree).boundingRect();

    // 对变换矩阵的最后一列做修改,重新定义变换的 中心

    rot.at<double>(0,2) += bbox.width/2 - center.x;
    rot.at<double>(1,2) += bbox.height/2 - center.y;


    Mat dst;
    warpAffine(img,dst,rot, bbox.size());
    imshow("dst",dst);
box = RotatedRect(center,Size(scale*img.cols,scale*img.rows),degree).boundingRect(); 是什么鬼?**
答:这一句就是获取,展示变换之后图像所需图片的大小。
手册中 RotatedRect 给出的一个例子很好的展示了这个意思: 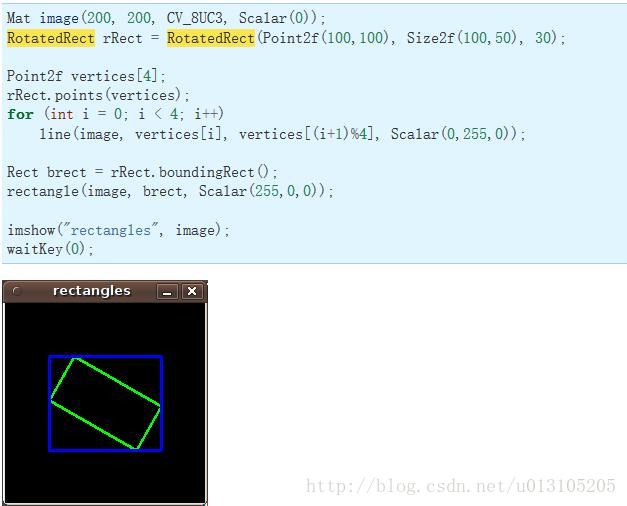
图中蓝色是利用 RotatedRect 得到的 Rect 的区域,绿色是变换之后的图像。
问题:最后boundingRect(); 表示什么意思呢?
答:直观理解相当于对这个区域“向大取整”。
**问题:代码中 rot.at<double>(0,2) += bbox.width/2 - center.x;
rot.at<double>(1,2) += bbox.height/2 - center.y;
是什么意思呢?**
答:还记得前面最后推导出来的公式么: 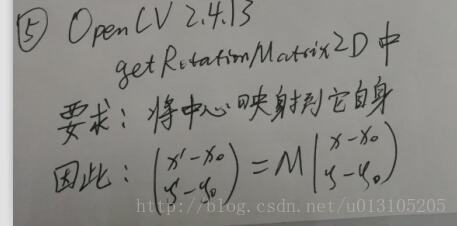
这两行代码的意思就相当于:
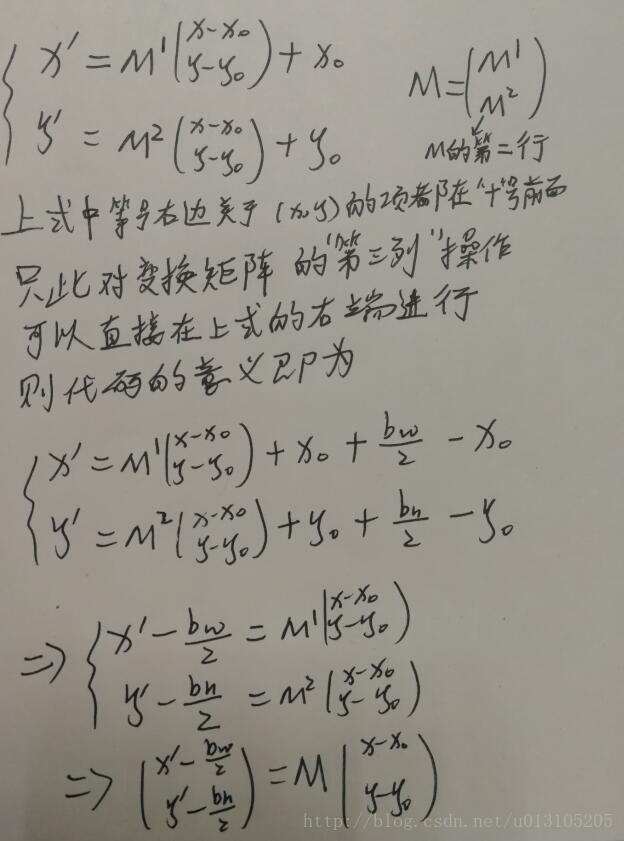
直观的意义就是:变换前的中心(x0,y0),在变换之后在(bw/2,bh/2)。也就是 dst 的中心。
**问题:为什么你代码中,将变换前的中心设置为center = Point2f(img.cols/2.0, img.rows/2.0);?
设置为其他的点不可以么?**
答:设置为其他的点,确实不可以,还是会出现显示不全的问题。我们关心的是放射变换之后的全图是生么样的,与变换前的中心在哪里没有关系,只是相当于将变换之后的图像进行了平移。因此,我们用这种最简单粗暴的方式来得到我们想要的效果。
(1)
图像重映射:即是把一个图像中一个位置的像素放置到另一个图像指定位置的过程因为有时候源图像和目标图像并不总是一一对应的关系(目标图像的像素可能映射到源图像的非整数坐标上),所以有时候会需要做插值。
描述映射过程:通过重映射来表达每个像素的位置(x,y):g(x,y)= f(h(x,y))
其中:克()是目标图像,即重映射的结果; f()的是源图像; H(X,Y)是作用于(X,Y)的映射方法函数如H(X,Y)=(。 I.cols-X,Y),得到的目标图像将是按照X轴方向发生翻转。
映射分为向前映射和向后映射。将输入映射到输出的向前映射,反正就是向后映射。即如果已知源图像到目标图像的坐标变换,即可以知道源图像的一点在变换后在目标图像的位置,称为向前映射。如果知道目标图像的一点在变换前在源图像上的位置,称为向后映射,向后映射比较直观,计算量小,OpenCV中的中经常使用的图像变换都是采用向后映射的方法来处理。但向后映射需要知道变换的反变换公式,但在有些变换比较复杂的场合,这个反变换是很难得到的。此时就需要采用前向映射的方法进行变换了。
(2)

opencv里面用的±符号有差别
(1)
OpenCV 从2.4.3开始加入了并行计算的函数parallel_for和parallel_for_(更准确地讲,parallel_for以前就存在于tbb模块中,但是OpenCV官网将其列在2.4.3.的New Features中,应该是重新改写过的)。
2.4.3中自带的calcOpticalFlowPyrLK函数也用parallel_for重写过了,之前我一直认为parallel_for就是用来并行计算的,之前也自己写了一些用parallel_for实现的算法。直到今天在opencv官网中看到别人的提问,才发现parallel_for实际上是serial loop,而parallel_for_才是parallel loop(OpenCV官网answer)。
为了比较for循环,parallel_for和parallel_for_ 三者的差异,下面做了一个简单的测试,对一个Mat中所有的元素(按列为单位)做立方操作。
Code
test.hpp
- /**@ Test parallel_for and parallel_for_
- /**@ Author: chouclee
- /**@ 03/17/2013*/
- #include <opencv2/core/internal.hpp>
- namespace cv
- {
- namespace test
- {
- class parallelTestBody : public ParallelLoopBody//参考官方给出的answer,构造一个并行的循环体类
- {
- public:
- parallelTestBody(Mat& _src)//class constructor
- {
- src = &_src;
- }
- void operator()(const Range& range) const//重载操作符()
- {
- Mat& srcMat = *src;
- int stepSrc = (int)(srcMat.step/srcMat.elemSize1());//获取每一行的元素总个数(相当于cols*channels,等同于step1)
- for (int colIdx = range.start; colIdx < range.end; ++colIdx)
- {
- float* pData = (float*)srcMat.col(colIdx).data;
- for (int i = 0; i < srcMat.rows; ++i)
- pData[i*stepSrc] = std::pow(pData[i*stepSrc],3);
- }
- }
- private:
- Mat* src;
- };
- struct parallelTestInvoker//构造一个供parallel_for使用的循环结构体
- {
- parallelTestInvoker(Mat& _src)//struct constructor
- {
- src = &_src;
- }
- void operator()(const BlockedRange& range) const//使用BlockedRange需要包含opencv2/core/internal.hpp
- {
- Mat& srcMat = *src;
- int stepSrc = (int)(srcMat.step/srcMat.elemSize1());
- for (int colIdx = range.begin(); colIdx < range.end(); ++colIdx)
- {
- float* pData = (float*)srcMat.col(colIdx).data;
- for (int i = 0; i < srcMat.rows; ++i)
- pData[i*stepSrc] = std::pow(pData[i*stepSrc],3);
- }
- }
- Mat* src;
- };
- }//namesapce test
- void parallelTestWithFor(InputArray _src)//'for' loop
- {
- CV_Assert(_src.kind() == _InputArray::MAT);
- Mat src = _src.getMat();
- CV_Assert(src.isContinuous());
- int stepSrc = (int)(src.step/src.elemSize1());
- for (int x = 0; x < src.cols; ++x)
- {
- float* pData = (float*)src.col(x).data;
- for (int y = 0; y < src.rows; ++y)
- pData[y*stepSrc] = std::pow(pData[y*stepSrc], 3);
- }
- };
- void parallelTestWithParallel_for(InputArray _src)//'parallel_for' loop
- {
- CV_Assert(_src.kind() == _InputArray::MAT);
- Mat src = _src.getMat();
- int totalCols = src.cols;
- typedef test::parallelTestInvoker parallelTestInvoker;
- parallel_for(BlockedRange(0, totalCols), parallelTestInvoker(src));
- };
- void parallelTestWithParallel_for_(InputArray _src)//'parallel_for_' loop
- {
- CV_Assert(_src.kind() == _InputArray::MAT);
- Mat src = _src.getMat();
- int totalCols = src.cols;
- typedef test::parallelTestBody parallelTestBody;
- parallel_for_(Range(0, totalCols), parallelTestBody(src));
- };
- }//namespace cv
- /**@ Test parallel_for and parallel_for_
- /**@ Author: chouclee
- /**@ 03/17/2013*/
- #include <opencv2/opencv.hpp>
- #include <time.h>
- #include "test.hpp"
- using namespace cv;
- using namespace std;
- int main(int argc, char* argv[])
- {
- Mat testInput = Mat::ones(40,400000, CV_32F);
- clock_t start, stop;
- start = clock();
- parallelTestWithFor(testInput);
- stop = clock();
- cout<<"Running time using \'for\':"<<(double)(stop - start)/CLOCKS_PER_SEC*1000<<"ms"<<endl;
- start = clock();
- parallelTestWithParallel_for(testInput);
- stop = clock();
- cout<<"Running time using \'parallel_for\':"<<(double)(stop - start)/CLOCKS_PER_SEC*1000<<"ms"<<endl;
- start = clock();
- parallelTestWithParallel_for_(testInput);
- stop = clock();
- cout<<"Running time using \'parallel_for_\':"<<(double)(stop - start)/CLOCKS_PER_SEC*1000<<"ms"<<endl;
- system("pause");
- }
Debug模式
Running time using 'for': 1376ms
Running time using 'parallel_for': 1316ms
Running time using 'parallel_for_': 553ms
Release模式
Running time using 'for': 463ms
Running time using 'parallel_for': 475ms
Running time using 'parallel_for_': 301ms
输入改为40*400000
Debug模式
Running time using 'for': 1005ms
Running time using 'parallel_for': 1013ms
Running time using 'parallel_for_': 526ms
Release模式
Running time using 'for': 105ms
Running time using 'parallel_for': 106ms
Running time using 'parallel_for_': 81ms
输入改为4000*4000
Debug模式
Running time using 'for': 1138ms
Running time using 'parallel_for': 1136ms
Running time using 'parallel_for_': 411ms
Release模式
Running time using 'for': 234ms
Running time using 'parallel_for': 239ms
Running time using 'parallel_for_': 130ms
大多数情况下,parallel_for比for循环慢那么一丁丁点儿,有时甚至会比for循环快一些,总体上两者差不多,parallel_for_一直都是最快的。但上面的代码只是做测试使用(因此强制按列进行操作),实际上,像上面这种简单的操作,直接对Mat使用for循环和指针递增操作,只需要几十毫秒。但是,对于复杂算法,比如光流或之类的,使用parallel_for(虽然不是并行操作,但代码简洁易于维护,且速度和for循环差不多)或者parallel_for_将是不错的选择。