
一.Apache的定义:
Apache是世界使用排名第一的Web服务器软件。它可以运行在几乎所有广泛使用的计算机平台上,由于其跨平台和安全性被广泛使用,是最流行的Web服务器端软件之一。它快速、可靠并且可通过简单的API扩充,将Perl/Python等解释器编译到服务器中。
二.Apache环境配置与使用:
1.安装httpd服务,配置环境:
[root@localhost ~]# yum install httpd -y                   ##安装httpd服务
Loaded plugins: langpacks
rhel_dvd                                                 | 4.1 kB     00:00
Resolving Dependencies
--> Running transaction check
---> Package httpd.x86_64 0:2.4.6-17.el7 will be installed
--> Finished Dependency Resolution

Dependencies Resolved

================================================================================
 Package        Arch            Version                 Repository         Size
================================================================================
Installing:
 httpd          x86_64          2.4.6-17.el7            rhel_dvd          1.2 M

Transaction Summary
================================================================================
Install  1 Package

Total download size: 1.2 M
Installed size: 3.7 M
Downloading packages:
httpd-2.4.6-17.el7.x86_64.rpm                              | 1.2 MB   00:00
Running transaction check
Running transaction test
Transaction test succeeded
Running transaction
Warning: RPMDB altered outside of yum.
  Installing : httpd-2.4.6-17.el7.x86_64                                    1/1
  Verifying  : httpd-2.4.6-17.el7.x86_64                                    1/1

Installed:
  httpd.x86_64 0:2.4.6-17.el7

Complete!
[root@localhost ~]# systemctl start httpd               ##开启服务
2.apache的使用:
[root@localhost ~]# netstat -antlupe | grep httpd         ##查看服务端口
tcp6       0      0 :::80                   :::*                    LISTEN      0          132000     4335/httpd
[root@localhost ~]# cd /var/www/html/
[root@localhost html]# systemctl stop firewalld            ##关闭火墙
[root@localhost html]# vim index.html             ##编辑配置文件(默认文件)
 %%编辑内容:<h1>zgd shi hao bao bao</h1>       ##<h1></h1>字体设置
在真机中打开火狐------->172.25.254.120                ##显示编辑的内容
##显示刚才在配置文件里编辑的内容##
[root@localhost html]# vim test.html             ##编辑配置文件(自己建立的文件)
 %%编辑内容:<h1>nba.com</h1>
在真机中打开火狐------->172.25.254.120/test.html                ##显示编辑的内容
##显示刚才在配置文件里编辑的内容##
三.Apache的主要配置:
1.修改服务端口:
[root@localhost html]# vim /etc/httpd/conf/httpd.conf            ##修改配置文件
42 Listen 80(默认)-------->42 Listen 8099
[root@localhost html]# systemctl restart httpd          ##重启服务
[root@localhost html]# netstat -antlupe | grep httpd    ##查询httpd监听窗口
tcp6       0      0 :::8099 (修改后)                :::*                    LISTEN      0          135565     4580/httpd
在真机中打开火狐------->172.25.254.120:8099     ##显示编辑内容
注意:修改端口后,如果在IP后不加修改的端口,计算机还会默认80端口,那么内容将显示不出来
2.修改默认发布目录:
[root@localhost ~]# mkdir /hello/html -p         ##建立一个新的目录
[root@localhost ~]# vim /etc/httpd/conf/httpd.conf      ##编辑主配置文件
121 DocumentRoot "/hello/html"      ##发布目录修改为自己建立的目录
122 <Directory "/hello">
123     Require all granted
124 </Directory>
注意:修改完默认发布目录后,在进行网页操作时,显示的内容是现在更改后这个目录的文件。更要注意selinux状态,当selinux=disabled,重启http服务后可看到默认发布文件。但是,当selinux=enforing,必须修改安全上下文才能看到默认发布文件
3.不同主机访问认证:
[root@localhost ~]# cd /var/www/html/    ##移动路径
[root@localhost html]# ls
[root@localhost html]# mkdir westos         ##建立目录
[root@localhost html]# ls
westos
[root@localhost html]# cd westos
[root@localhost westos]# ls
[root@localhost westos]# vim index.html         ##编辑内容
%%%编辑内容:
<h1>hello dog</h1>
[root@localhost westos]# ls                  ##查看
index.html
[root@localhost westos]# vim /etc/httpd/conf/httpd.conf         ##更改主配置文件
%%%编辑内容:
119 DocumentRoot "/var/www/html"
120 <Directory "/var/www/html/westos">
121            Order Allow,Deny          ##先读ALLOW,再读DENY
122            Allow from All            ##允许所有人登陆
123            Deny from 172.25.254.20   ##不允许172.25.254.20这台主机登陆
124 </Directory>
[root@localhost westos]# systemctl restart httpd             ##重启服务
注意:因为先读的allow后读的deny,所以deny会覆盖掉allow里矛盾的东西,仅仅只有172.25.254.20不能进行登陆
4.不同用户访问认证:
(1)建立用户:
[root@localhost westos]# cd /etc/httpd/
[root@localhost httpd]# ls
conf  conf.d  conf.modules.d  logs  modules  run
[root@localhost httpd]# htpasswd -cm apacheuser admin    ##新建admin用户并设定密码
New password:      ##设定密码
Re-type new password:            ##再次输入
Adding password for user admin
[root@localhost httpd]# cat apacheuser           ##查看apache的用户
admin:$apr1$qs29ijh4$Gl1TbjyjyUE/DkFeCDx/f/
[root@localhost httpd]# htpasswd -cm apacheuser tom      ##新建tom用户并设定密码
New password:        ##设定密码
Re-type new password:       ##再次输入
Adding password for user tom
[root@localhost httpd]# cat apacheuser
tom:$apr1$dFDI9ngO$J4tZO/kXWakISoWcQgtVg.         ##admin用户被tom用户覆盖(-cm建立用户会覆盖原有用户)
[root@localhost httpd]# htpasswd -m apacheuser admin       ##用-m建立用户不会覆盖第一个用户
New password:
Re-type new password:
Adding password for user admin
[root@localhost httpd]# cat apacheuser          ##再次查看
tom:$apr1$dFDI9ngO$J4tZO/kXWakISoWcQgtVg.
admin:$apr1$vFDvqW70$.B424bwZ5Osjd1fUAHZKJ0          ##admin,tom都有
(2)设定admin可登陆,其他不被允许:
[root@localhost httpd]# vim /etc/httpd/conf/httpd.conf    ##编辑主配置文件
%%%编辑内容:
121 #<Directory "/var/www/html/westos">
122 #           Order Allow,Deny
123 #          Allow from All
124 #           Deny from 172.25.254.20
125 #</Directory>                             ##注释掉,还原环境
126
127
128 <Directory "/var/www/html/westos">
129          AuthUserFile /etc/httpd/apacheuser
130          AuthName "Please input user and password!!"
131          AuthType basic
132          Require user admin
133 </Directory>
[root@localhost httpd]# systemctl restart httpd           ##重启服务
注意:再次进行真机在网站上查看172.25.254.120的文件内容时,需要用户名与密码,用admin用户可以登陆,tom用户不能登陆。
5.Apache虚拟主机:
虚拟主机允许你从一个httpd服务器同时u为多个网站提供服务。我们将用虚拟主机其中多个主机名都指向同一个ip地址,但是web服务器根据用于到达站点的主机名提供具有不同内容的不同网站。
(1)在真机里:进行域名解析:
[root@foundation20 ~]# vim /etc/hosts             ##编辑文件
127.0.0.1   localhost localhost.localdomain localhost4 localhost4.localdomain4
::1          localhost localhost.localdomain localhost6 localhost6.localdomain6
172.25.254.250 content.example.com
172.25.254.120 www.westos.com news.westos.com music.westos.com       ##编辑网站解析
[root@foundation20 ~]# systemctl restart httpd    ##重启http服务
可以在网页上浏览到解析网站
(2)在虚拟机上:
[root@localhost httpd]# ls      ##查看
apacheuser  conf  conf.d  conf.modules.d  logs  modules  run
[root@localhost httpd]# cd conf.d/           ##移动路径
[root@localhost conf.d]# ls               ##查看
autoindex.conf  README  userdir.conf  welcome.conf
[root@localhost conf.d]# vim default.conf   ##配置默认文件
  <VirtualHost _default_:80>
        DocumentRoot /var/www/html  ##默认发布目录
        CustomLog "logs/default.log" combined  ##所有日志存放(访问,警告,拒绝,错误)
  </VirtualHost>
[root@localhost conf.d]# mkdir /var/www/virtual/westos.com/news -p   ##建立虚拟机主机默认发布的目录
[root@localhost conf.d]# mkdir /var/www/virtual/westos.com/music -p
[root@localhost conf.d]# vim /var/www/virtual/westos.com/news/index.html  ##建立虚拟机主机默认发布的文件
<h1>news's page</h1>
[root@localhost conf.d]# vim /var/www/virtual/westos.com/music/index.html
<h1>music's page</h1>
[root@localhost conf.d]# vim news.conf
编辑:
 <VirtualHost *:80>
           ServerName news.westos.com
           DocumentRoot "/var/www/virtual/westos.com/news/"
           CustomLog "logs/news.log" combined
</VirtualHost>
<Directory "/var/www/virtual/westos.com/news/">
           Require all granted
</Directory>
[root@localhost conf.d]# cp news.conf music.conf           ##复制到music.conf中
[root@localhost conf.d]# vim music.conf
:%s/news/music/g                ##替换掉
<VirtualHost *:80>
        ServerName music.westos.com
        DocumentRoot "/var/www/virtual/westos.com/music/"
        CustomLog "logs/music.log" combined
</VirtualHost>
<Directory "/var/www/virtual/westos.com/music/">
        Require all granted
</Directory>
[root@localhost conf.d]# systemctl restart httpd             ##重启服务
(3)在真机网站中:
在网页浏览www.westos.com——>hello westos
在网页浏览news.westos.com——->news’s page
在网页浏览music.westos.com———->music’s page
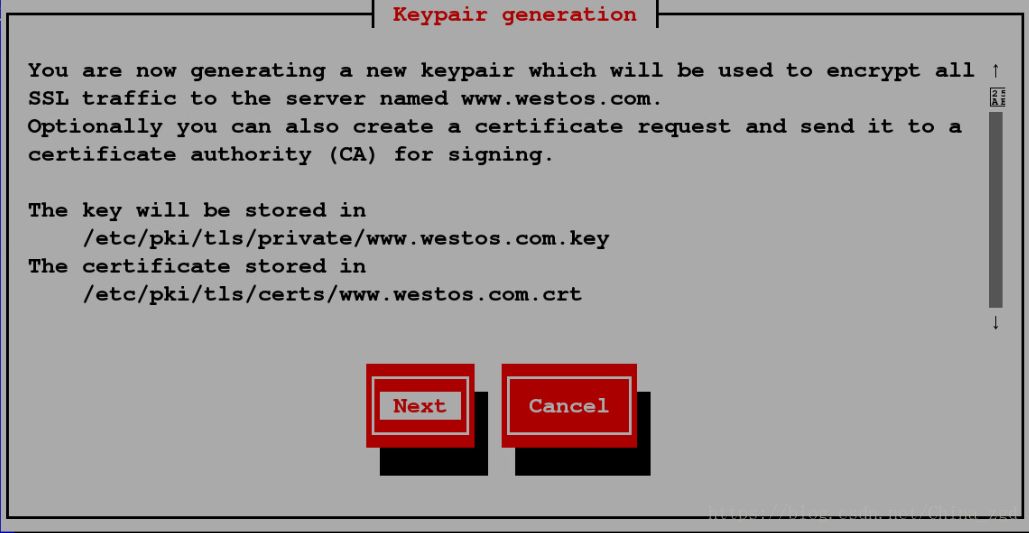
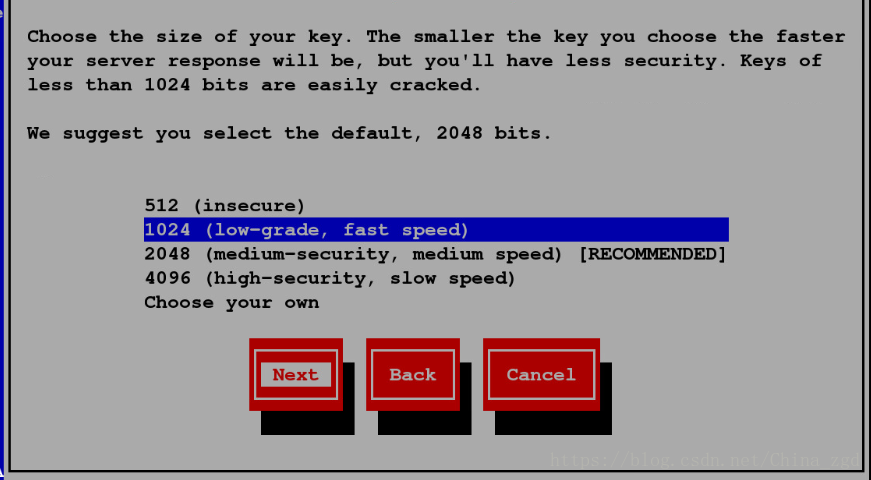
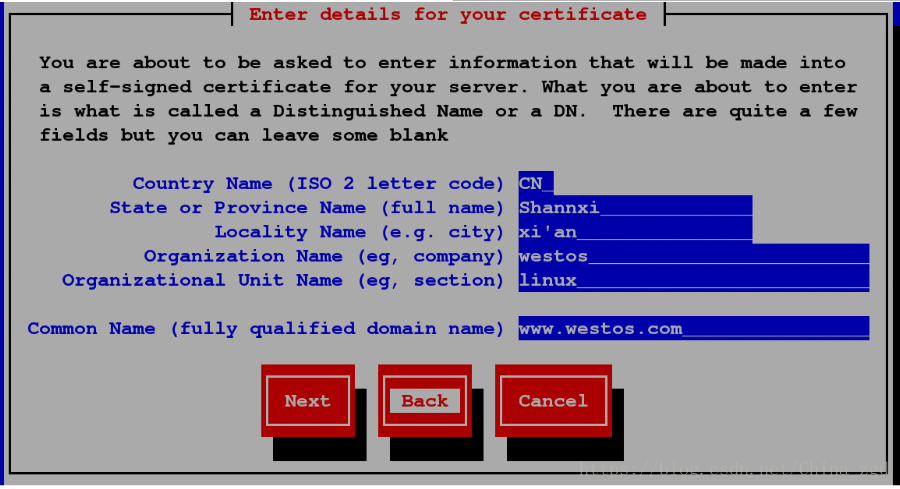
6.自定义自签名证书:
[root@localhost ~]# cd /etc/httpd/conf.d           ##移动路径
[root@localhost conf.d]# yum install mod_ssl crypto-utils -y         ##安装服务
[root@localhost conf.d]# systemctl restart httpd             ##重启服务
[root@localhost conf.d]# genkey www.westos.com  ##生成证书
   output will be written to /etc/pki/tls/certs/www.westos.com.crt
   output key written to /etc/pki/tls/private/www.westos.com.key
[root@localhost conf.d]# vim /etc/httpd/conf.d/ssl.conf   ##安装证书及其私钥
   100 #SSLCertificateFile /etc/pki/tls/certs/localhost.crt
   101 SSLCertificateFile /etc/pki/tls/certs/www.westos.com.crt
   108 #SSLCertificateKeyFile /etc/pki/tls/private/localhost.key
   109 SSLCertificateKeyFile /etc/pki/tls/private/www.westos.com.key
[root@localhost conf.d]# systemctl restart httpd             ##重启服务
安装证书步骤:

7.Apache证书网页重写:
[root@localhost conf.d]# ls               ##查看
autoindex.conf  index.html  news.conf  ssl.conf      welcome.conf
default.conf    music.conf  README     userdir.conf
[root@localhost conf.d]# cp news.conf login.conf         ##文件内容复制过来
[root@localhost conf.d]# vim login.conf         ##编辑配置文件
%%编辑内容:
 <VirtualHost *:443>
           ServerName login.westos.com
           DocumentRoot "/var/www/virtual/westos.com/login/"
           CustomLog "logs/login.log" combined
           SSLEngine on
           SSLCertificateFile /etc/pki/tls/certs/www.westos.com.crt
           SSLCertificateKeyFile /etc/pki/tls/private/www.westos.com.key
</VirtualHost>
<Directory "/var/www/virtual/westos.com/login/">
           Require all granted
</Directory>
<VirtualHost *:80>
               ServerName login.westos.com
               RewriteEngine on
               RewriteRule ^(/.*)$ https://%{HTTP_HOST}$1 [redirect=301]
</VirtualHost>
[root@localhost conf.d]# mkdir -p /var/www/virtual/westos.com/login/   ##建立读取目录
[root@localhost conf.d]# systemctl restart httpd          ##重启服务
8.php语言支持:
[root@localhost conf.d]# yum install php -y            ##安装php服务
[root@localhost conf.d]# vim /var/www/html/index.php  ##在默认发布目录下建立文件
<?php
        phpinfo();
?>
[root@localhost conf.d]# systemctl restart httpd  ##重启http服务后,会生成/etc/httpd/conf.d/php.conf文件
[root@localhost html]# vim /etc/httpd/conf/httpd.conf
177     DirectoryIndex index.php
[root@localhost conf.d]# systemctl restart httpd
网页浏览:172.25.254.120
9.通用网关接口(CGI):
通用网关接口 (CGI) 是网站上放置动态内容的最简单的方
法。 CGI 脚本可用于许多目的 , 但是谨慎控制使用哪个 CGI 脚
本以及允许谁添加和运行这些脚本十分重要。编写质量差的 CGI
脚本可能为外部攻击者提供了破坏网站及其内容安全性的途径。
因此 , 在 Web 服务器级别和 SELinux 策略级别 , 都存在用于限
制 CGI 脚本使用的设置
root@localhost html]# mkdir cgi        :建立cgi目录
[root@localhost html]# ls            ##查看
cgi  index.html  index.php  test.html  westos
[root@localhost html]# vim cgi/index.cgi   ##编辑文件
#!/usr/bin/perl
print "Content-type: text/html\n\n";
print `date`;
[root@localhost html]# chmod +x cgi/index.cgi   ##给cgi可执行的权限
[root@localhost html]# ./cgi/index.cgi    ##查看运行的结果
Content-type: text/html

Sun May 27 02:05:56 EDT 2018
[root@localhost html]# cd /etc/httpd/conf.d        ##移动路径
[root@localhost conf.d]# vim default.conf
编辑写入:  <Directory "/var/www/html/cgi">
         Options +ExecCGI
         ADDHandler cgi-script .cgi
         DirectoryIndex index.cgi
       </Directory>
[root@localhost conf.d]# systemctl restart httpd           ##重启服务
在真机网页浏览:172.25.254.128/cgi/index.cgi------->可看到刚才执行的结果
四.squid代理:
Squid cache(简称为Squid)是一个流行的自由软件(GNU通用公共许可证)的代理服务器和Web缓存服务器。Squid有广泛的用途,从作为网页服务器的前置cache服务器缓存相关请求来提高Web服务器的速度,到为一组人共享网络资源而缓存万维网,域名系统和其他网络搜索,到通过过滤流量帮助网络安全,到局域网通过代理上网。Squid主要设计用于在Linux一类系统运行。 [1]
Squid是一种在Linux系统下使用的优秀的代理服务器软件。
squid不仅可用在Linux系统上,还可以用在AIX、Digital Unix、FreeBSD、HP-UX、Irix、NetBSD、Nextstep、SCO和Solaris等系统上。
Squid与Linux下其它的代理软件如Apache、Socks、TIS FWTK和delegate相比,下载安装简单,配置简单灵活,支持缓存和多种协议。用ipchains+Squid的解决方案,就可以获得通过缓存高性能的同时能够无缝的访问Internet。
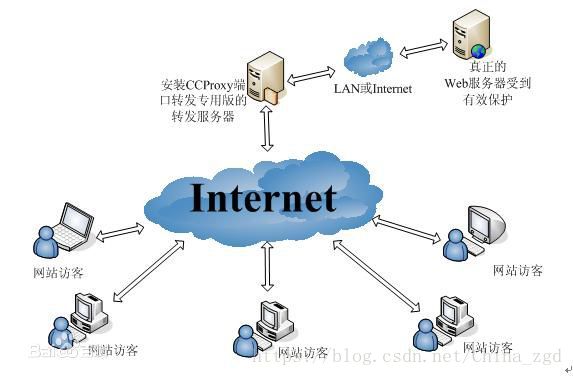
Squid是一个缓存internet数据的一个软件,它接收用户的下载申请,并自动处理所下载的数据。也就是说,当一个用户想要下载一个主页时,它向Squid发出一个申请,要Squid替它下载,然后Squid 连接所申请网站并请求该主页,接着把该主页传给用户同时保留一个备份,当别的用户申请同样的页面时,Squid把保存的备份立即传给用户,使用户觉得速度相当快。
1.squid正向代理:
(1)在一个保证可以上网的主机上(desktop虚拟机)建立squid服务
[root@localhost html]# cd /etc/sysconfig/network-scripts/
[root@localhost network-scripts]# yum install squid -y        ##安装squid
[root@localhost network-scripts]# vim /etc/squid/squid.conf
56 httpd_access allow all
62 cache_dir ufs /var/spool/squid  100 16  256
[root@localhost network-scripts]# systemctl start squid           ##开启服务
[root@localhost network-scripts]# route -n  查看网关
Kernel IP routing table
Destination     Gateway         Genmask         Flags Metric Ref    Use Iface
172.25.0.0      0.0.0.0         255.255.0.0     U     0      0        0 eth0
[root@localhost network-scripts]# ping www.baidu.com   ##查看网络是否连通
(2)在server虚拟机中:
在网页中设置添加代理机ip:172.25.254.120
然后打开百度可以进行浏览
1.squid反向代理:
(1)在server虚拟机中:
[root@localhost ~]# yum install squid -y        ##安装squid服务
[root@localhost ~]# systemctl stop firewalld        ##关闭火墙
[root@localhost ~]# vim /etc/squid/squid.conf        ##编辑配置文件
http_access allow all

# Squid normally listens to port 3128
http_port 80 vhost vport
cache_peer 172.25.254.120 parent 80 0 proxy-only
# Uncomment and adjust the following to add a disk cache directory.
cache_dir ufs /var/spool/squid 100 16 256

[root@localhost ~]# systemctl start squid       ##开启服务
(2)在desktop虚拟机中:
[root@localhost ~]# cd /var/www/html   ##移动路径
[root@localhost html]#vim index.html        ##编辑查看内容
   <h1>172.25.254.120</h1>
[root@localhost html]# systemctl restart httpd      ##重启服务
[root@localhost html]# vim /etc/httpd/conf/httpd.conf
    DirectoryIndex  index.html
[root@localhost html]#systemctl restart httpd
在网页浏览:http://172.25.254.220/    注意:首先要先在网页里关闭代理
然后就可以看到刚才编辑的内容,而且速度较快。