一个MIS中,可能多多少少会跟报表扯上关系,对于Java开发中,可能用的比较多的报表设计就是POI构造Excel了吧。前些时间专门把这部分拿出来又回头看了看,品味一下当初的那套设计。
需求:多行复合表头设计

分析:
观察这个表头结构,需要设计的部分有:
- 表名的多行多列合并单元格
- 某一列的多行单列的合并
- 某一组复合单元中需要设计单行多列合并、多行单列合并的复杂结构
对于单列的设计,其实就是创建单元格,简单存值,合并,并没有什么难度。
但对于4D-6F的复杂单元设计,需要用一种特殊的方式来实现。
开始设计
1. 基础表架构
先刨除复杂部分,先把普通表构建出来:
import java.io.File;

import org.apache.poi.hssf.usermodel.HSSFCell;
import org.apache.poi.hssf.usermodel.HSSFCellStyle;
import org.apache.poi.hssf.usermodel.HSSFFont;
import org.apache.poi.hssf.usermodel.HSSFRow;
import org.apache.poi.hssf.usermodel.HSSFSheet;
import org.apache.poi.hssf.usermodel.HSSFWorkbook;
import org.apache.poi.ss.usermodel.HorizontalAlignment;
import org.apache.poi.ss.usermodel.VerticalAlignment;
import org.apache.poi.ss.util.CellRangeAddress;

public class ExcelUtil {
    public static void main(String[] args) throws Exception {
        File file = new File("D:/temp/test.xls");
        file.createNewFile();
        //1. 创建excel文件
        HSSFWorkbook workbook = new HSSFWorkbook();

        //1.1 创建单元格样式
        HSSFCellStyle alignCenterStyle = workbook.createCellStyle();
        alignCenterStyle.setAlignment(HorizontalAlignment.CENTER);
        //表名样式:水平、垂直居中
        HSSFCellStyle font24Style = workbook.createCellStyle();
        font24Style.setAlignment(HorizontalAlignment.CENTER);
        font24Style.setVerticalAlignment(VerticalAlignment.CENTER);
        //24号字体
        HSSFFont font24 = workbook.createFont();
        font24.setFontHeightInPoints((short) 24);
        font24Style.setFont(font24);


        //2. 创建一个工作表Sheet
        HSSFSheet sheet = workbook.createSheet("新工作表");
        //2.1 设置列宽 -- 列宽是属于一个工作表的特征
        sheet.setColumnWidth(0, 6 * 2 * 256);
        sheet.setColumnWidth(1, 6 * 2 * 256);
        sheet.setColumnWidth(2, 6 * 2 * 256);
        sheet.setColumnWidth(3, 6 * 2 * 256);
        sheet.setColumnWidth(4, 6 * 2 * 256);
        sheet.setColumnWidth(5, 6 * 2 * 256);
        sheet.setColumnWidth(6, 6 * 2 * 256);

        //3.1 创建一个行
        int row = 0;
        HSSFRow tableHeadRow = sheet.createRow(row++);
        //3.2 在这个行中,创建一行单元格
        for (int i = 0; i < 7; i++) {
            tableHeadRow.createCell(i);
        }
        tableHeadRow.setRowStyle(font24Style);
        //再创建两个行
        sheet.createRow(row++);
        sheet.createRow(row++);
        //3.3 设置该单元格的内容
        HSSFCell tableHeadCell = tableHeadRow.getCell(0);
        tableHeadCell.setCellValue("表名");
        tableHeadCell.setCellStyle(font24Style);
        //表头的数据应该是很多单元格的合并、居中
        //四个参数:开始行,结束行,开始列,结束列
        sheet.addMergedRegion(new CellRangeAddress(0, row - 1, 0, 6));

        //4. 写表头
        HSSFRow headRow = sheet.createRow(row);
        headRow.setHeightInPoints(20);
        headRow.createCell(0).setCellValue("第0列");
        headRow.createCell(1).setCellValue("第1列");
        headRow.createCell(2).setCellValue("第2列");
        headRow.createCell(3).setCellValue("第3列");

        sheet.addMergedRegion(new CellRangeAddress(3, 3, 4, 6));

        //Workbook写入file中
        workbook.write(file);
        workbook.close();
    }
}
运行之后创建的表如下:

之后使用配置文件,可以实现表头的动态文字、列宽等,改动如下:
配置文件中设置:
第0列=6
第1列=4
第2列=8
第3列=10
修改后的源代码:
import java.io.BufferedReader;
import java.io.File;
import java.io.FileInputStream;
import java.io.InputStreamReader;
import java.util.LinkedHashMap;
import java.util.Map;

import org.apache.poi.hssf.usermodel.HSSFCell;
import org.apache.poi.hssf.usermodel.HSSFCellStyle;
import org.apache.poi.hssf.usermodel.HSSFFont;
import org.apache.poi.hssf.usermodel.HSSFRow;
import org.apache.poi.hssf.usermodel.HSSFSheet;
import org.apache.poi.hssf.usermodel.HSSFWorkbook;
import org.apache.poi.ss.usermodel.HorizontalAlignment;
import org.apache.poi.ss.usermodel.VerticalAlignment;
import org.apache.poi.ss.util.CellRangeAddress;

public class ExcelUtil {
    public static final int COLUMN_SIZE = 8;

    public static void main(String[] args) throws Exception {
        //选用LinkedHashMap,保证迭代顺序的一致性
        Map<String, Integer> map = new LinkedHashMap<>();
        //加载配置文件(不用Properties读,在配置文件中的表头顺序即为创建Excel表格的顺序)
        InputStreamReader reader = new InputStreamReader(new FileInputStream("table.properties"), "UTF-8");
        BufferedReader br = new BufferedReader(reader);
        String readLine;
        while ((readLine = br.readLine()) != null) {
            String[] arr = readLine.split("=");
            map.put(arr[0], Integer.parseInt(arr[1]));
        }
        br.close();

        File file = new File("D:/temp/test.xls");
        file.createNewFile();
        //1. 创建excel文件
        HSSFWorkbook workbook = new HSSFWorkbook();

        //1.1 创建单元格样式
        HSSFCellStyle alignCenterStyle = workbook.createCellStyle();
        alignCenterStyle.setAlignment(HorizontalAlignment.CENTER);
        //表名样式:水平、垂直居中
        HSSFCellStyle font24Style = workbook.createCellStyle();
        font24Style.setAlignment(HorizontalAlignment.CENTER);
        font24Style.setVerticalAlignment(VerticalAlignment.CENTER);
        //24号字体
        HSSFFont font24 = workbook.createFont();
        font24.setFontHeightInPoints((short) 24);
        font24Style.setFont(font24);


        //2. 创建一个工作表Sheet
        HSSFSheet sheet = workbook.createSheet("新工作表");

        //3.1 创建一个行
        int row = 0;
        HSSFRow tableHeadRow = sheet.createRow(row++);
        //3.2 在这个行中,创建一行单元格
        for (int i = 0; i < COLUMN_SIZE; i++) {
            tableHeadRow.createCell(i);
        }
        tableHeadRow.setRowStyle(font24Style);
        //再创建两个行
        sheet.createRow(row++);
        sheet.createRow(row++);
        //3.3 设置该单元格的内容
        HSSFCell tableHeadCell = tableHeadRow.getCell(0);
        tableHeadCell.setCellValue("表名");
        tableHeadCell.setCellStyle(font24Style);
        //表头的数据应该是很多单元格的合并、居中
        //四个参数:开始行,结束行,开始列,结束列
        sheet.addMergedRegion(new CellRangeAddress(0, row - 1, 0, COLUMN_SIZE - 1));

        //4. 写表头
        HSSFRow headRow = sheet.createRow(row);
        headRow.setHeightInPoints(20);
        int index = 0;
        for (Map.Entry<String, Integer> entry : map.entrySet()) {
            headRow.createCell(index).setCellValue(entry.getKey());
            //设置列宽
            sheet.setColumnWidth(index++, entry.getValue() * 2 * 256);
        }

        sheet.addMergedRegion(new CellRangeAddress(3, 3, 4, 6));

        //Workbook写入file中
        workbook.write(file);
        workbook.close();
    }
}
运行效果:

2. 设计复合表头的存储方式
仔细观察复杂表头,发现所有的子项都有同一个父单元格(单行多列),而每个跨列的单元格又有多个子单元格,这很像资源管理器的文件夹结构!
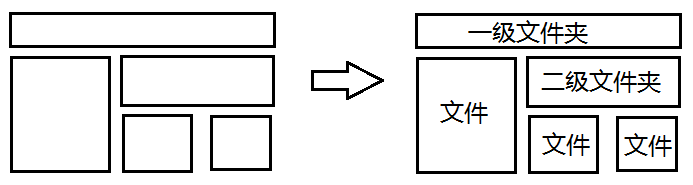
每个文件夹都有一个文件夹名称,有一个存储空间,这块存储空间里要么存文件,要么存文件夹。
把这种结构转换成数据结构,最相近的设计方式应该是这样的:
public class Node {
    private String text;
    private Integer width; //这个单元格应该在Excel中占有的宽度
    private Map<String, Node> map;
}
text代表文件夹名称,width代表文件夹的容量,map代表该文件夹内的所有文件/文件夹的“名称-引用”映射!
这样就可以表达复合表头的复杂关系了。
3. 设计复合表头的表达方式
数据结构的选型确定好后,要选择一种方式能把需要的内容转换成能表达清楚层次关系的结点进而组合成一棵树。
这样的解决方案其实有很多,这里提供的解决方案是类似于OGNL的一套表达式:
一级结点.二级结点.三级结点 = text
好像跟包名神似。。。(手动滑稽)
修改配置文件后:
第0列=6
第1列=4
第2列=8
第3列=10
第4列.子1=8
第4列.子2.孙1=4
第4列.子2.孙2=4
第5列=5
注意表达式配置文件的编写规则:
同一个父结点的所有子结点需按照顺序从上到下编写,如果顺序不合理,会出现异常情况。。。
4. 解析表达式
对于“一级结点.二级结点.三级结点”这样的表达式,可以很明确的知道层级关系。
之前写好的代码里,是相当于所有结点都当做一级结点来解析的:
public class ExcelUtil {
    public static final int COLUMN_SIZE = 8;

    public static void main(String[] args) throws Exception {
        //选用LinkedHashMap,保证迭代顺序的一致性
        Map<String, Integer> map = new LinkedHashMap<>();
        //加载配置文件(不用Properties读,在配置文件中的表头顺序即为创建Excel表格的顺序)
        InputStreamReader reader = new InputStreamReader(new FileInputStream("table.properties"), "UTF-8");
        BufferedReader br = new BufferedReader(reader);
        String readLine;
        while ((readLine = br.readLine()) != null) {
            String[] arr = readLine.split("=");
            map.put(arr[0], Integer.parseInt(arr[1]));
        }
        br.close();
    }
}
最后解析出来后是一个map集合
现在的任务,无非是把这个map集合转换成一系列具有层级关系的结点序列。
明确了任务之后,接下来要对map的内容进行迭代,解析其中的key。
我们把这种操作看作是存文件,一个一个的存入“根目录”
import java.util.LinkedHashMap;
import java.util.Map;
public class Node {
private String text = null;
private Integer width = 0;
private Map<String, Node> map = new LinkedHashMap<>();
/**
* 根据表达式,解析出该表达式对应的Node结点,并存入
* @author LinkedBear
* @param text
*/
public void addNodeByStringExpressionAndWidth(String text, Integer width) {
//从根目录开始
Map<String, Node> rootMap = map;
String[] arr = text.split("\\.");
//读到叶子结点的前一个结点处
for (int i = 0; i < arr.length - 1; i++) {
//逐层目录读取,如果没有get到,就创建一个新的目录
Node node = rootMap.get(arr[i]);
if (node == null) {
node = new Node(arr[i]);
rootMap.put(arr[i], node);
}
//新目录的大小要同步上
node.setWidth(node.getWidth() + width);
rootMap = node.getMap();
}
//此时的rootMap就是叶子结点所在的目录
rootMap.put(arr[arr.length - 1], new Node(arr[arr.length - 1], width));
}
public Node(String text, Integer width) {
this.text = text;
this.width = width;
}
public Node(String text) {
this.text = text;
}
public Node() {
}
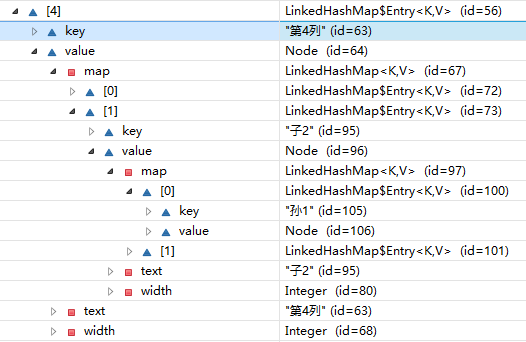
}从调试结果来看,数据已经正确的存储到了root中:
剩下的,就是要考虑怎么把这种层级关系整合成一组数据,可以直接在poi里使用:
/**
 * 遍历自己的存储空间,将所有结点按顺序整理成List
 * @author LinkedBear
 * @return
 */
public List<Node> parseToSeqNodes() {
    List<Node> list = new ArrayList<>();
    for (Map.Entry<String, Node> entry : map.entrySet()) {
        //先把自己保存进去
        list.add(entry.getValue());
        //如果该节点的map不是空集合,证明这是一个“文件夹”(根节点)
        //需要把自己add进去的同时,把它的孩子也全部add进去
        if (entry.getValue().getMap() != null && entry.getValue().getMap().size() > 0) {
            List<Node> nodes = entry.getValue().parseToSeqNodes();//递归调用
            list.addAll(nodes);
        }
    }
    return list;
}
这样客户端只需要几句话就可以获取到所有的结点了:
//迭代Map集合,并重构一套“根目录”
Node root = new Node();
for (Map.Entry<String, Integer> entry : map.entrySet()) {
    root.addNodeByStringExpressionAndWidth(entry.getKey(), entry.getValue());
}

//遍历“根目录”
List<Node> nodes = root.parseToSeqNodes();
但这样我们还不知道这棵文件树的深度!
需要在Node中调整一下逻辑,计算深度。
/**
 * 计算深度
 * @author LinkedBear
 * @return
 */
public int getDeep() {
    if (map.isEmpty()) {
        return 0;
    }
    List<Integer> list = new ArrayList<>();
    for (Map.Entry<String, Node> entry : map.entrySet()) {
        list.add(entry.getValue().getDeep());
    }
    Collections.sort(list);
    return list.get(list.size() - 1) + 1;
}
深度的作用:合并单元格,将表头制作的更美观。
5. 重新构造表头
重构之后,列数也是动态的了,由刚才整理的数据得来
先不考虑合并单元格的问题,直接遍历、创建(其他代码忽略):
//4.1 创建多个行,并用数组存储
HSSFRow[] rows = new HSSFRow[rootDeep];
for (int i = 0; i < rows.length; i++) {
    rows[i] = sheet.createRow(row + i);
}
row += rows.length;

int columnIndex = 0;
//4.2 遍历所有结点
for (Node node : nodes) {
    //获取该节点的深度
    int deep = node.getDeep();
    System.out.println(deep);
    //从下往上取行,向右创建
    int topRowIndex = rows.length - deep - 1;//计算这个结点的控制范围上限
    for (int i = rows.length - 1; i >= 0; i--) {
        rows[i].createCell(columnIndex);
    }
    rows[topRowIndex].getCell(columnIndex).setCellValue(node.getText());
    columnIndex++;
}
运行结果:

基本已见雏形了!
剩下的:将线性表头转换成复合表头
如果只从上面的运行结果来看,无法判断谁是隶属于谁的(虽然文字出卖了他们。。。)
所以需要通过一种方法来判断哪个结点下有多少个子结点,多少叶子结点(因为叶子结点的宽度和是整个父结点的宽度)。
在Node类中继续添加如下方法:
/**
 * 获取该结点下的所有叶子节点的数量
 * @author LinkedBear
 * @return
 */
public int getChildrenCount() {
    if (map.isEmpty()) {
        return 1; //就自己一个
    }
    int count = 0;
    for (Map.Entry<String, Node> entry : map.entrySet()) {
        count += entry.getValue().getChildrenCount();
    }
    return count;
}
通过这个方法,也可以知道该结点是否为叶子节点,同时还可以判断该结点拥有的叶子节点数量,从而可以控制合并单元格的相关。
另外,注意到这些行的构建不应该是串行构建,而应该是并行构建!
所以要跟上面的Row一样,用数组记录每一行的单元格都构建到哪里了:
int[] columnIndexArr = new int[rootDeepLength];之后,修改客户端方法如下(全文):
import java.io.BufferedReader;
import java.io.File;
import java.io.FileInputStream;
import java.io.InputStreamReader;
import java.util.LinkedHashMap;
import java.util.List;
import java.util.Map;

import org.apache.poi.hssf.usermodel.HSSFCell;
import org.apache.poi.hssf.usermodel.HSSFCellStyle;
import org.apache.poi.hssf.usermodel.HSSFFont;
import org.apache.poi.hssf.usermodel.HSSFRow;
import org.apache.poi.hssf.usermodel.HSSFSheet;
import org.apache.poi.hssf.usermodel.HSSFWorkbook;
import org.apache.poi.ss.usermodel.HorizontalAlignment;
import org.apache.poi.ss.usermodel.VerticalAlignment;
import org.apache.poi.ss.util.CellRangeAddress;

public class ExcelUtil {
    public static void main(String[] args) throws Exception {
        //选用LinkedHashMap,保证迭代顺序的一致性
        Map<String, Integer> map = new LinkedHashMap<>();
        //加载配置文件(不用Properties读,在配置文件中的表头顺序即为创建Excel表格的顺序)
        InputStreamReader reader = new InputStreamReader(new FileInputStream("table.properties"), "UTF-8");
        BufferedReader br = new BufferedReader(reader);
        String readLine;
        while ((readLine = br.readLine()) != null) {
            String[] arr = readLine.split("=");
            map.put(arr[0], Integer.parseInt(arr[1]));
        }
        br.close();

        //迭代Map集合,并重构一套“根目录”
        Node root = new Node();
        for (Map.Entry<String, Integer> entry : map.entrySet()) {
            root.addNodeByStringExpressionAndWidth(entry.getKey(), entry.getValue());
        }

        //遍历“根目录”
        List<Node> nodes = root.parseToSeqNodes();
        //获取树的深度
        Integer rootDeepLength = root.getDeepLength();


        File file = new File("D:/temp/test.xls");
        file.createNewFile();
        //1. 创建excel文件
        HSSFWorkbook workbook = new HSSFWorkbook();

        //1.1 创建单元格样式
        HSSFCellStyle alignCenterStyle = workbook.createCellStyle();
        alignCenterStyle.setAlignment(HorizontalAlignment.CENTER);
        //表名样式:水平、垂直居中
        HSSFCellStyle font24Style = workbook.createCellStyle();
        font24Style.setAlignment(HorizontalAlignment.CENTER);
        font24Style.setVerticalAlignment(VerticalAlignment.CENTER);
        //24号字体
        HSSFFont font24 = workbook.createFont();
        font24.setFontHeightInPoints((short) 24);
        font24Style.setFont(font24);


        //2. 创建一个工作表Sheet
        HSSFSheet sheet = workbook.createSheet("新工作表");

        //3.1 创建一个行
        int row = 0;
        //3.2 在这个行中,创建一行单元格
        HSSFRow tableHeadRow = sheet.createRow(row);
        HSSFCell tableHeadCell = tableHeadRow.createCell(row);
        tableHeadRow.setRowStyle(font24Style);
        //3.3 设置该单元格的内容
        tableHeadCell.setCellValue("表名");
        tableHeadCell.setCellStyle(font24Style);
        row++;
        //表名的合并单元格无法在写表头之前计算(没有确定出有多少叶子结点)

        //row = 1

        //4. 写表头
        //4.1 创建多个行,并用数组存储
        HSSFRow[] rows = new HSSFRow[rootDeepLength];
        for (int i = 0; i < rows.length; i++) {
            rows[i] = sheet.createRow(row + i);
        }
        int[] columnIndexArr = new int[rootDeepLength];

        //4.2 遍历所有结点
        for (Node node : nodes) {
            //获取该节点的深度
            int deep = node.getDeepLength();
            //深度为0,这是普通一级结点
            if (deep == 0) {
                //从下往上取行,向右创建
                int topRowIndex = node.getDeep();//获取这个结点的控制范围上限
                int bottomRowIndex = rows.length - deep - 1;//计算这个结点的控制范围下限
                for (int i = rows.length - 1; i >= 0; i--) {
                    rows[i].createCell(columnIndexArr[i]);
                }
                rows[topRowIndex].getCell(columnIndexArr[topRowIndex]).setCellValue(node.getText());
                //一列多行,但如果只有一行,就没有必要合并了
                if (topRowIndex != bottomRowIndex) {
                    sheet.addMergedRegion(new CellRangeAddress(row + topRowIndex, row + bottomRowIndex, columnIndexArr[topRowIndex], columnIndexArr[topRowIndex]));
                }
                //涉及到的列的下标数组统一往后推一格
                for (int i = topRowIndex; i <= bottomRowIndex; i++) {
                    columnIndexArr[i] += 1;
                }
                //最后一行一定全是叶子结点,要控制列宽
                sheet.setColumnWidth(columnIndexArr[columnIndexArr.length - 1], node.getWidth() * 2 * 256);
            }else {
                //深度不为0,复合结点,需要复杂构建
                //从下往上取行,向右创建
                int topRowIndex = node.getDeep();//获取这个结点的控制范围上限
                int bottomRowIndex = rows.length - deep - 1;//计算这个结点的控制范围下限
                int childrenCount = node.getChildrenCount();
                //并行创建,能控制到的每一行都要创建足够的容量使得下面的叶子结点能放得下
                for (int i = bottomRowIndex; i >= topRowIndex; i--) {
                    for (int j = 0; j < childrenCount; j++) {
                        rows[i].createCell(columnIndexArr[i] + j);
                    }
                    columnIndexArr[i] += childrenCount;
                }
                //填充值,合并单元格(不需要判定是否为一个单元格)
                rows[bottomRowIndex].getCell(columnIndexArr[bottomRowIndex] - childrenCount).setCellValue(node.getText());
                sheet.addMergedRegion(new CellRangeAddress(row + topRowIndex, row + bottomRowIndex, columnIndexArr[topRowIndex] - childrenCount, columnIndexArr[topRowIndex] - 1));
            }
        }
        row += rows.length;

        //表头的数据应该是很多单元格的合并、居中
        //四个参数:开始行,结束行,开始列,结束列
        //因为上面加了1,这里还要抵消掉
        sheet.addMergedRegion(new CellRangeAddress(0, 0, 0, columnIndexArr[columnIndexArr.length - 1] - 1));

        //Workbook写入file中
        workbook.write(file);
        workbook.close();
    }
}
Node.java全文:
package com.linkedbear.ssms.report;

import java.util.ArrayList;
import java.util.Collections;
import java.util.LinkedHashMap;
import java.util.List;
import java.util.Map;

public class Node {
    private String text = null;
    private Integer width = 0;
    private Integer deep = 0;
    private Map<String, Node> map = new LinkedHashMap<>();

    /**
     * 根据表达式,解析出该表达式对应的Node结点,并存入
     * @author LinkedBear
     * @param text
     */
    public void addNodeByStringExpressionAndWidth(String text, Integer width) {
        //从根目录开始
        Map<String, Node> rootMap = map;
        String[] arr = text.split("\\.");

        Node node = null;
        //读到叶子结点的前一个结点处
        for (int i = 0; i < arr.length - 1; i++) {
            //逐层目录读取,如果没有get到,就创建一个新的目录
            node = rootMap.get(arr[i]);
            if (node == null) {
                node = new Node(arr[i]);
                rootMap.put(arr[i], node);
            }
            //新目录的大小要同步上
            node.setWidth(node.getWidth() + width);
            rootMap = node.getMap();
        }
        //此时的rootMap就是叶子结点所在的目录
        rootMap.put(arr[arr.length - 1], new Node(arr[arr.length - 1], width, arr.length - 1));
        //还要给这个文件的父文件夹设置deep
        if (node != null) {
            node.setDeep(arr.length - 2);
        }
    }

    /**
     * 遍历自己的存储空间,将所有结点按顺序整理成List
     * @author LinkedBear
     * @Time 2018年3月26日 下午2:50:05
     * @return
     */
    public List<Node> parseToSeqNodes() {
        List<Node> list = new ArrayList<>();
        for (Map.Entry<String, Node> entry : map.entrySet()) {
            //先把自己保存进去
            list.add(entry.getValue());
            //如果该节点的map不是空集合,证明这是一个“文件夹”(根节点)
            //需要把自己add进去的同时,把它的孩子也全部add进去
            if (entry.getValue().getMap() != null && entry.getValue().getMap().size() > 0) {
                List<Node> nodes = entry.getValue().parseToSeqNodes();//递归调用
                list.addAll(nodes);
            }
        }
        return list;
    }

    /**
     * 计算深度
     * @author LinkedBear
     * @return
     */
    public int getDeepLength() {
        if (map.isEmpty()) {
            return 0;
        }
        List<Integer> list = new ArrayList<>();
        for (Map.Entry<String, Node> entry : map.entrySet()) {
            list.add(entry.getValue().getDeepLength());
        }
        Collections.sort(list);
        return list.get(list.size() - 1) + 1;
    }

    /**
     * 获取该结点下的所有叶子节点的数量
     * @author LinkedBear
     * @return
     */
    public int getChildrenCount() {
        //如果map为空,证明是叶子结点,要计数
        if (map.isEmpty()) {
            return 1;
        }
        //由于不是叶子结点,所以不能计当前的数,这里的基数为0
        int count = 0;
        for (Map.Entry<String, Node> entry : map.entrySet()) {
            count += entry.getValue().getChildrenCount();
        }
        return count;
    }

    public Node(String text, Integer width, Integer deep) {
        this.text = text;
        this.width = width;
        this.deep = deep;
    }
    public Node(String text, Integer width) {
        this.text = text;
        this.width = width;
    }
    public Node(String text) {
        this.text = text;
    }
    public Node() {
    }
    //get,set
}
最终的运行结果:

至于后续的调样式,那就很简单了,百度一搜一大堆 ̄へ ̄
转载请注明原文出处:https://my.oschina.net/u/LinkedBear/blog/1785242