一.配置数据源
SpringBoot默认是用org.apache.tomcat.jdbc.pool.DataSource作为数据源,数据源的相关配置都在DataSourceProperties里面。
1.官方文档中关于DataSource的配置【application.properties】
# DATASOURCE (DataSourceAutoConfiguration & DataSourceProperties)
spring.datasource.continue-on-error=false # Whether to stop if an error occurs while initializing the database.
spring.datasource.data= # Data (DML) script resource references.
spring.datasource.data-username= # Username of the database to execute DML scripts (if different).
spring.datasource.data-password= # Password of the database to execute DML scripts (if different).
spring.datasource.dbcp2.*= # Commons DBCP2 specific settings
spring.datasource.driver-class-name= # Fully qualified name of the JDBC driver. Auto-detected based on the URL by default.
spring.datasource.generate-unique-name=false # Whether to generate a random datasource name.
spring.datasource.hikari.*= # Hikari specific settings
spring.datasource.initialization-mode=embedded # Initialize the datasource with available DDL and DML scripts.
spring.datasource.jmx-enabled=false # Whether to enable JMX support (if provided by the underlying pool).
spring.datasource.jndi-name= # JNDI location of the datasource. Class, url, username & password are ignored when set.
spring.datasource.name= # Name of the datasource. Default to "testdb" when using an embedded database.
spring.datasource.password= # Login password of the database.
spring.datasource.platform=all # Platform to use in the DDL or DML scripts (such as schema-${platform}.sql or data-${platform}.sql).
spring.datasource.schema= # Schema (DDL) script resource references.
spring.datasource.schema-username= # Username of the database to execute DDL scripts (if different).
spring.datasource.schema-password= # Password of the database to execute DDL scripts (if different).
spring.datasource.separator=; # Statement separator in SQL initialization scripts.
spring.datasource.sql-script-encoding= # SQL scripts encoding.
spring.datasource.tomcat.*= # Tomcat datasource specific settings
spring.datasource.type= # Fully qualified name of the connection pool implementation to use. By default, it is auto-detected from the classpath.
spring.datasource.url= # JDBC URL of the database.
spring.datasource.username= # Login username of the database.
spring.datasource.xa.data-source-class-name= # XA datasource fully qualified name.
spring.datasource.xa.properties= # Properties to pass to the XA data source.| 属性 | 功能 |
|---|---|
| spring.datasource.continue-on-error=false | 初始化数据库时是否发生错误时停止 |
| spring.datasource.data= | Data(DML)脚本资源引用 |
| spring.datasource.url= | JDBC URL |
| spring.datasource.username= | 数据库用户名 |
| spring.datasource.password= | 数据库密码 |
| spring.datasource.data-username= | 用于执行DML脚本的数据库的用户名 |
| spring.datasource.data-password= | 执行DML脚本的数据库的密码 |
| spring.datasource.dbcp2.*= | DBCP2具体设置 |
| spring.datasource.driver-class-name= | JDBC驱动类 |
| spring.datasource.generate-unique-name=false | 是否生成随机数据源名称 |
| spring.datasource.hikari.*= | Hikari具体设置 |
| spring.datasource.initialization-mode=embedded | 使用可用的DDL和DML脚本初始化数据源。 |
| spring.datasource.jmx-enabled=false | 是否启用JMX支持(如果由基础池提供)。 |
| spring.datasource.jndi-name= | 数据源的JNDI位置。, 设置时将忽略类,URL,用户名和密码。 |
| spring.datasource.name= | 数据源的名称。使用嵌入式数据库时默认为“testdb” |
| spring.datasource.platform=all | 在DDL或DML脚本中使用的平台 (例如 schema- {platform}.sql). |
| spring.datasource.schema= | 架构(DDL)脚本资源引用 |
| spring.datasource.schema-username= | 用于执行DDL脚本的数据库的用户名 |
| spring.datasource.schema-password= | 执行DDL脚本的数据库的密码 |
| spring.datasource.separator=; | SQL初始化脚本中的语句分隔符 |
| spring.datasource.sql-script-encoding= | SQL脚本编码 |
| spring.datasource.tomcat.*= | Tomcat数据源特定设置 |
| spring.datasource.type= | 要使用的连接池实现的完全限定名称。默认情况下,它是从类路径中自动检测到的。 |
| spring.datasource.xa.data-source-class-name= | XA数据源完全限定名称 |
| spring.datasource.xa.properties= | 要传递给XA数据源的属性 |
官方配置例子:
查看29.1.2
application.properties
spring.datasource.url=jdbc:mysql://localhost/test //配置数据库访问链接
spring.datasource.username=dbuser //配置数据库用户名
spring.datasource.password=dbpass //配置数据库密码
spring.datasource.driver-class-name=com.mysql.jdbc.Driver //配置数据库驱动
2.使用默认数据源
例子:
application.properties
spring.datasource.username=root
spring.datasource.password=root
spring.datasource.url=jdbc:mysql://localhost/springboot_data
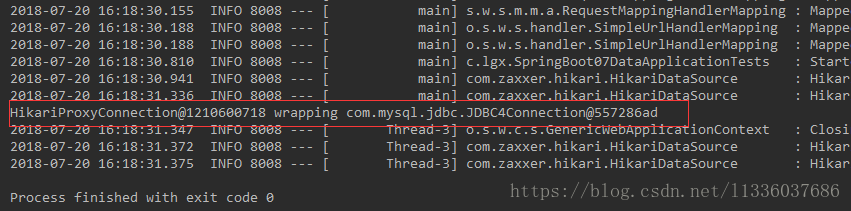
spring.datasource.driver-class-name=com.mysql.jdbc.Driver测试:
@RunWith(SpringRunner.class)
@SpringBootTest
public class SpringBoot07DataApplicationTests {

    @Autowired
    DataSource dataSource;

    @Test
    public void contextLoads() throws SQLException {
        System.out.println(dataSource.getConnection());
    }

}
结果:
3.整合其他数据源
使用Druid数据源
步骤
1)在pom.xml中添加Druid的依赖
        <!-- https://mvnrepository.com/artifact/com.alibaba/druid -->
        <dependency>
            <groupId>com.alibaba</groupId>
            <artifactId>druid</artifactId>
            <version>1.1.10</version>
        </dependency>
2)配置外部数据源
配置文件application.properties
# 设置访问数据库配置
spring.datasource.username=root
spring.datasource.password=root
spring.datasource.url=jdbc:mysql://localhost/springboot_data
spring.datasource.driver-class-name=com.mysql.jdbc.Driver

# 配置Druid数据源
spring.datasource.type=com.alibaba.druid.pool.DruidDataSource
spring.datasource.druid.initialSize=5
spring.datasource.druid.minIdle=5
spring.datasource.druid.maxActive=20
spring.datasource.druid.maxWait=60000
spring.datasource.druid.minEvictableIdleTimeMillis=300000
spring.datasource.druid.validationQuery=SELECT 1 FROM DUAL
spring.datasource.druid.testWhileIdle=true
spring.datasource.druid.testOnBorrow=false
spring.datasource.druid.testOnReturn=false
spring.datasource.druid.poolPreparedStatements=true

# 配置监控统计拦截的filters,去掉后监控界面sql无法统计,'wall'用于防火墙
spring.datasource.druid.filters=stat,wall,slf4j
spring.datasource.druid.maxPoolPreparedStatementPerConnectionSize=20
spring.datasource.druid.useGlobalDataSourceStat=true
spring.datasource.druid.stat.mergeSql=true;
spring.datasource.druid.stat.slowSqlMillis=500
编写配置类
@Configuration
public class DruidConf {

    @Bean
    public DataSource druidDataSource(Environment environment) throws SQLException {
        DruidDataSource dataSource = new DruidDataSource();

        //配置访问数据库的基本信息
        dataSource.setDriverClassName(environment.getProperty("spring.datasource.driver-class-name"));
        dataSource.setPassword(environment.getProperty("spring.datasource.password"));
        dataSource.setUsername(environment.getProperty("spring.datasource.username"));
        dataSource.setUrl(environment.getProperty("spring.datasource.url"));

        //配置Druid数据源
        dataSource.setInitialSize(Integer.parseInt(environment.getProperty("spring.datasource.druid.initialSize")));
        dataSource.setMinIdle(Integer.parseInt(environment.getProperty("spring.datasource.druid.minIdle")));
        dataSource.setMaxActive(Integer.parseInt(environment.getProperty("spring.datasource.druid.maxActive")));
        dataSource.setMaxWait(Long.parseLong(environment.getProperty("spring.datasource.druid.maxWait")));
        dataSource.setMinEvictableIdleTimeMillis(Long.parseLong(environment.getProperty("spring.datasource.druid.minEvictableIdleTimeMillis")));
        dataSource.setValidationQuery(environment.getProperty("spring.datasource.druid.validationQuery"));
        dataSource.setTestWhileIdle(Boolean.parseBoolean(environment.getProperty("spring.datasource.druid.testWhileIdle")));
        dataSource.setTestOnBorrow(Boolean.parseBoolean(environment.getProperty("spring.datasource.druid.testOnBorrow")));
        dataSource.setTestOnReturn(Boolean.parseBoolean(environment.getProperty("spring.datasource.druid.testOnReturn")));
        dataSource.setPoolPreparedStatements(Boolean.parseBoolean(environment.getProperty("spring.datasource.druid.poolPreparedStatements")));

        //配置监控统计拦截的filters,去掉后监控界面sql无法统计,'wall'用于防火墙
        dataSource.setFilters(environment.getProperty("spring.datasource.druid.filters"));
        dataSource.setMaxPoolPreparedStatementPerConnectionSize(Integer.parseInt(environment.getProperty("spring.datasource.druid.maxPoolPreparedStatementPerConnectionSize")));
        dataSource.setUseGlobalDataSourceStat(Boolean.parseBoolean(environment.getProperty("spring.datasource.druid.useGlobalDataSourceStat")));
        Properties properties = new Properties();
        properties.setProperty("druid.stat.mergeSql",environment.getProperty("spring.datasource.druid.stat.mergeSql"));
        properties.setProperty("druid.stat.slowSqlMillis",environment.getProperty("spring.datasource.druid.stat.slowSqlMillis"));
        dataSource.setConnectProperties(properties);

        return dataSource;
    }


    //配置Druid的监控
    //1、配置一个管理后台的Servlet
    @Bean
    public ServletRegistrationBean statViewServlet(){
        ServletRegistrationBean bean = new ServletRegistrationBean(new StatViewServlet(), "/druid/*");
        Map<String,String> initParams = new HashMap<>();
        initParams.put("loginUsername","admin");
        initParams.put("loginPassword","123456");
        //默认就是允许所有访问
        initParams.put("allow","");
        //initParams.put("deny","192.168.15.21");//拒绝xxx的访问
        bean.setInitParameters(initParams);
        return bean;
    }

    //2、配置一个web监控的filter
    @Bean
    public FilterRegistrationBean webStatFilter(){
        FilterRegistrationBean bean = new FilterRegistrationBean();
        bean.setFilter(new WebStatFilter());
        Map<String,String> initParams = new HashMap<>();
        initParams.put("exclusions","*.js,*.css,/druid/*");
        bean.setInitParameters(initParams);
        bean.setUrlPatterns(Arrays.asList("/*"));
        return bean;
    }
}
完整可见 文章末尾配置外部数据源
3)测试
1.
@Autowired
DataSource dataSource;
@Test
public void contextLoads() throws SQLException {
System.out.println(dataSource.getConnection());
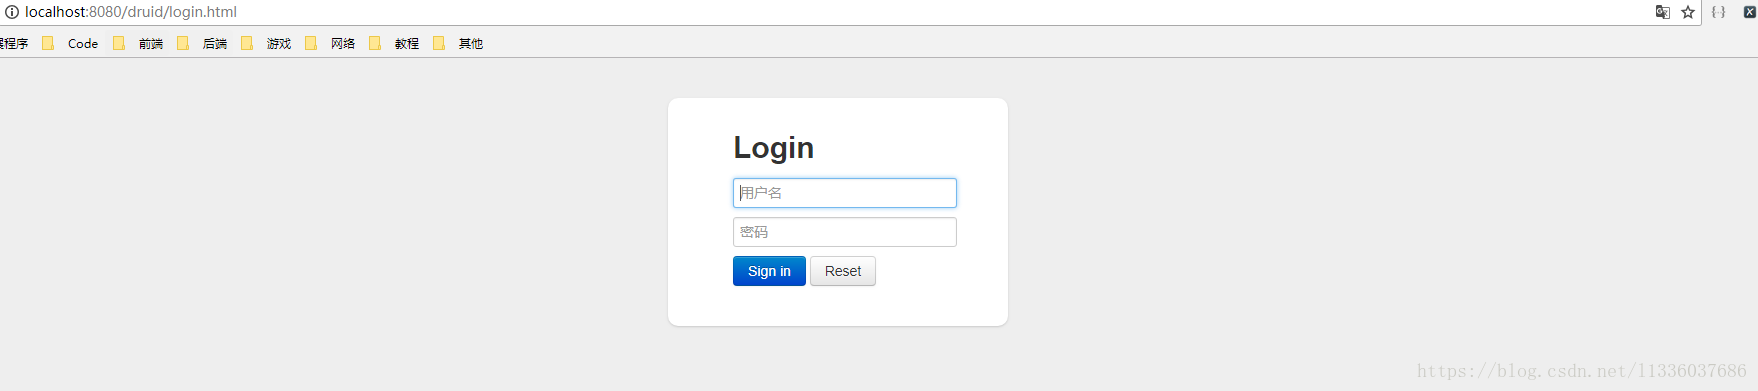
}2.访问 http://localhost:8080/druid/login.html
4)结果
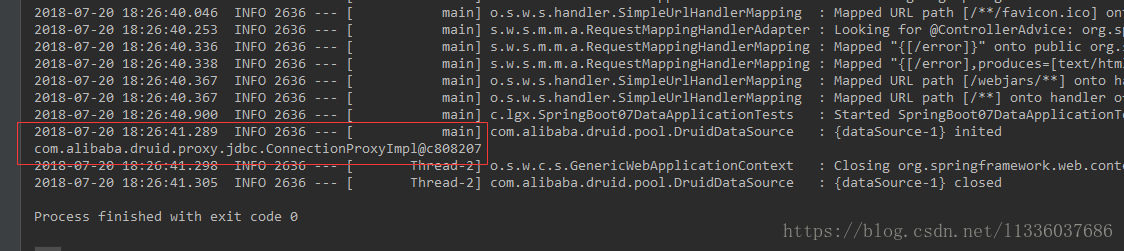
web监控
二.整合JDBC
添加jdbc和mysql连接依赖
<dependency>
   <groupId>org.springframework.boot</groupId>
   <artifactId>spring-boot-starter-jdbc</artifactId>
</dependency>
<dependency>
   <groupId>mysql</groupId>
   <artifactId>mysql-connector-java</artifactId>
   <scope>runtime</scope>
</dependency>
Spring提供了JdbcTemplate对JDBC进行了一定的封装,简单查询对象映射成Java对象,复杂对象则通过RowMapper接口映射到Java对象
在SpringBoot中,只要配置好DataSource就可以自动使用JdbcTemplate
例子:
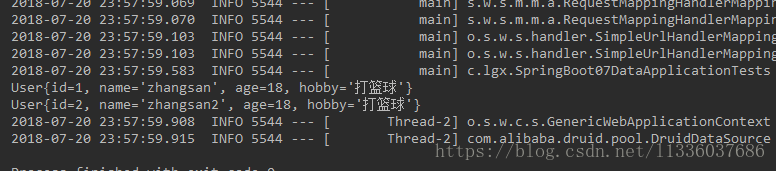
1.查询所有的User对象
    @Test
    public void testJDBC01(){
        String sql = "select * from user";

        //查询User对象,复杂对象使用RowMapper进行映射
        List<User> query = jdbcTemplate.query(sql, new RowMapper<User>() {
            @Override
            public User mapRow(ResultSet rs, int rowNum) throws SQLException {
                User user = new User();
                user.setId(rs.getInt("id"));
                user.setName(rs.getString("name"));
                user.setAge(rs.getInt("age"));
                user.setHobby(rs.getString("hobby"));
                return user;
            }
        });

        for (User user : query) {
            System.out.println(user);
        }
    }
2.查询总数
    @Test
    public void testJdbcFindCount(){
        Integer integer = jdbcTemplate.queryForObject("select count(*) from user", Integer.class);
        System.out.println(integer);
    }
3.增加数据
    @Test
    public void testJdbcInsert(){
        jdbcTemplate.execute("insert into user values (2,'zhangsan2',18,'打篮球');");
    }
三.整合Mybatis
Mybatis文档 http://www.mybatis.org/mybatis-3/getting-started.html
在pom文件中添加Mybatis的依赖
<dependency>
    <groupId>org.mybatis.spring.boot</groupId>
    <artifactId>mybatis-spring-boot-starter</artifactId>
    <version>1.3.2</version>
</dependency>
使用:
注解版
步骤:
1.添加Mapper扫描
2.配置Mapper
例子:
程序入口SpringBoot07DataApplication
@MapperScan("com.lgx.mapper") //添加Mapper扫描注解
@SpringBootApplication
public class SpringBoot07DataApplication {
    public static void main(String[] args) {
        SpringApplication.run(SpringBoot07DataApplication.class, args);
    }
}
UserMapper
@Mapper
public interface UserMapper {
    @Select("select * from user")
    public List<User> getAllUser();
}
测试:
    @Test
    public void testMybatis(){
        List<User> allUser = userMapper.getAllUser();
        for (User user : allUser) {
            System.out.println(user);
        }

    }
结果:
配置文件版
结构:
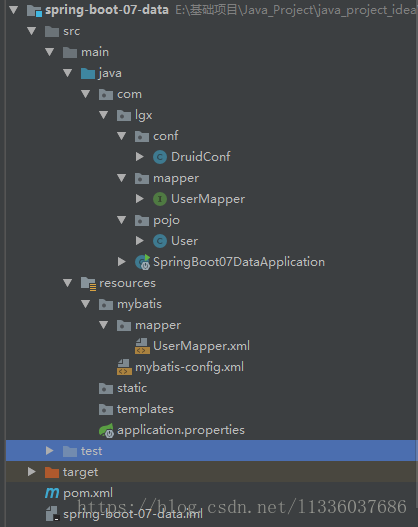
配置文件application.properties
# 指定全局配置文件的位置
mybatis.config-location=classpath:mybatis/mybatis-config.xml
# 指定sql映射文件的位置
mybatis.mapper-locations=classpath:mybatis/mapper/*.xml
SpringBoot07DataApplication
@MapperScan("com.lgx.mapper") //添加Mapper扫描注解
@SpringBootApplication
public class SpringBoot07DataApplication {

    public static void main(String[] args) {
        SpringApplication.run(SpringBoot07DataApplication.class, args);
    }
}
UserMapper
@Mapper
public interface UserMapper {
    public List<User> getAllUser();
}
mybatis-config.xml mybatis全局配置文件
<?xml version="1.0" encoding="UTF-8" ?>
<!DOCTYPE configuration
        PUBLIC "-//mybatis.org//DTD Config 3.0//EN"
        "http://mybatis.org/dtd/mybatis-3-config.dtd">
<configuration>

</configuration>
UserMapper.xml
<?xml version="1.0" encoding="UTF-8" ?>
<!DOCTYPE mapper
        PUBLIC "-//mybatis.org//DTD Mapper 3.0//EN"
        "http://mybatis.org/dtd/mybatis-3-mapper.dtd">
<mapper namespace="com.lgx.mapper.UserMapper">
    <select id="getAllUser" resultType="com.lgx.pojo.User">select * from user</select>
</mapper>
测试:
    @Test
    public void testMybatis(){
        List<User> allUser = userMapper.getAllUser();
        for (User user : allUser) {
            System.out.println(user);
        }

    }
结果:

更多使用
http://www.mybatis.org/spring-boot-starter/mybatis-spring-boot-autoconfigure/
四.整合JPA
待完善…
SpringBoot整合案例
https://github.com/spring-projects/spring-boot/tree/master/spring-boot-samples