简介
在无纸化越来越盛行的今天,现在纸质文档的电子化也成为一种趋势。与些同时,很多行业如医院,银行等在流程上依然需要先打印文档再做文档的电子化。如此一来,由于不同操作的时间差,很有可能会出现大量纸质文档堆积等待扫描的情况。或者在同一个流程中多个文档一次性扫描需要分类或者做文件切割。诚然,这些工作人工都能完成,然而采用电脑的自动化来实现才能省时省力。本文中笔者将分享一下如何在浏览器中通过barcode直接实现大量文档一次性扫描后的自动切割分类归档。
开发测试环境
Windows
测试用本地server
步骤
1. 新建一个文件夹,命名 DocumentsSeparation,在里面创建一个空网页index.html
<!DOCTYPE html>
  <html>
    <head>
      <meta http-equiv="Content-Type" content="text/html; charset=utf-8" />
      <title>Documents Separation</title>
    </head>
  <body>
  </body>
</html>
2. 引用核心 JavaScript库
<head>
    <meta http-equiv="Content-Type" content="text/html; charset=utf-8" />
    <title>Documents Separation</title>
    <script src="https://tst.dynamsoft.com/libs/dwt/14.0/dynamsoft.webtwain.config.js"></script>
    <script src="https://tst.dynamsoft.com/libs/dwt/14.0//dynamsoft.webtwain.initiate.js"></script>
    <script src="https://tst.dynamsoft.com/libs/dbr/5.2/js/dynamsoft.barcodereader.config.js"> </script>
    <script src="https://tst.dynamsoft.com/libs/dbr/5.2/js/dynamsoft.barcodereader.initiate.js"></script>
</head>
3. 加入一个DIV和几个按钮
<body>
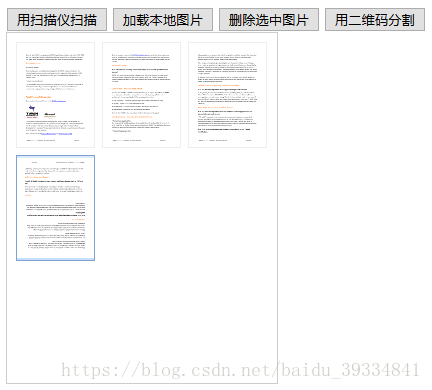
<input type="button" value="用扫描仪扫描" onclick="AcquireImage();" />
<input type="button" value="加载本地图片" onclick="LoadImages();" />
<input type="button" value="删除选中图片" onclick="RemoveImages();" />
<input type="button" value="用二维码分割" onclick="UploadFiles();" />
<br />
<br />
<div id="dwtcontrolContainer" style="float: left"></div>
</body>4. 加入初始化的JS代码
    <script type="text/javascript">
        var dbrObject, DWObject;
        window.onload = function () {
            if (Dynamsoft && (!Dynamsoft.Lib.env.bWin || !Dynamsoft.Lib.product.bChromeEdition)) {
                var ObjString = [];
                ObjString.push('<div class="p15">');
                ObjString.push("当前浏览器不支持. 请使用Chrome, Firefox, Edge 或者 IE 11");
                ObjString.push('</div>');
                Dynamsoft.WebTwainEnv.ShowDialog(400, 180, ObjString.join(''));
                if (document.getElementsByClassName("dynamsoft-dialog-close"))
                    document.getElementsByClassName("dynamsoft-dialog-close")[0].style.display = "none";
            } else {
                Dynamsoft.WebTwainEnv.Load();
            }
        };

        Dynamsoft.WebTwainEnv.AutoLoad = false;
        Dynamsoft.WebTwainEnv.RegisterEvent('OnWebTwainReady', Dynamsoft_OnReady);

        function onInitSuccess() {
            dbrObject = new dynamsoft.dbrEnv.BarcodeReader();
        }

        function onInitFailure(errorCode, errorString) {
            console.log('二维码识别控件初始化失败,错误为: ' + errorString);
        }

        function Dynamsoft_OnReady() {
            // 初始化网络扫描控件
            DWObject = Dynamsoft.WebTwainEnv.GetWebTwain('dwtcontrolContainer');
            if (DWObject) {
                DWObject.SetViewMode(3, 3);
                // 初始化二维码识别控件
                dynamsoft.dbrEnv.init(onInitSuccess, onInitFailure);
            }
        }
    </script>
5. 在浏览器中打开index.html,并按照页面上的提示安装对应的扫描与二维码识别控件。这个安装过程在每台电脑上只需要做一次

正常情况下,安装的文件可以在 C:\Windows\SysWOW64\Dynamsoft\DynamsoftService 目录中找到。核心文件主要是
DynamsoftService.exe
DynamsoftBarcodeReaderx86_5.2.dll
dwt_trial_14.0.0.0618.dll
dbr_5.2.0.0829.dll
6. 增加键钮对应的代码,先写导入和删除图片的代码
function AcquireImage() {
    if (DWObject) {
        DWObject.SelectSource(function () {
            var OnAcquireImageSuccess, OnAcquireImageFailure;
            OnAcquireImageSuccess = OnAcquireImageFailure = function () {
                DWObject.CloseSource();
            };
            DWObject.OpenSource();
            DWObject.IfDisableSourceAfterAcquire = true;
            DWObject.AcquireImage(OnAcquireImageSuccess, OnAcquireImageFailure);
        }, function () {
            console.log('扫描仪选择失败!');
        });
    }
}

function LoadImages() {
    if (DWObject) {
        DWObject.LoadImageEx('', 5,
            function () {
            },
            function (errorCode, errorString) {
                console.log('加载文件失败,错误为:' + errorString);
            }
        );
    }
}
function RemoveImages() {
    if (DWObject)
        DWObject.RemoveAllSelectedImages();
}
7. 刷新页面,此时已经可以调用本地扫描仪或者加载本地图片,也可以删除选中的图片。你甚至可以直接拖动本地图片直接加载

8. 接下来,我们要增加二维码识别的代码,由于二维码有很多类型,我们先增加一个选择框,对应的代码如下
HTML
<select size="1" id="barcodeformat"></select>JavaScript (写到前面提到的初始化函数Dynamsoft_OnReady中)
var BarcodeInfo =
[
{ desc: "All", val: 0 },
{ desc: "1D Barcodes", val: 1023 },
{ desc: "QR Code", val: 67108864 },
{ desc: "PDF417", val: 33554432 },
{ desc: "DATAMATRIX", val: 134217728 },
{ desc: "CODE_39", val: 1 },
{ desc: "CODE_128", val: 2 },
{ desc: "CODE_93", val: 4 },
{ desc: "CODABAR", val: 8 },
{ desc: "EAN_13", val: 32 },
{ desc: "EAN_8", val: 64 },
{ desc: "UPC_A", val: 128 },
{ desc: "UPC_E", val: 256 },
{ desc: "Interleaved 2 of 5", val: 16 },
{ desc: "Industrial 2 of 5", val: 512 }
];
// 下面这段写到Dynamsoft_OnReady中
for (var index = 0; index < BarcodeInfo.length; index++)
document.getElementById("barcodeformat").options.add(new Option(BarcodeInfo[index].desc, index));
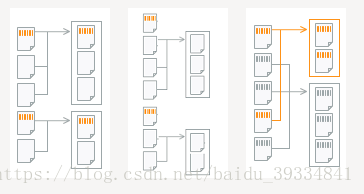
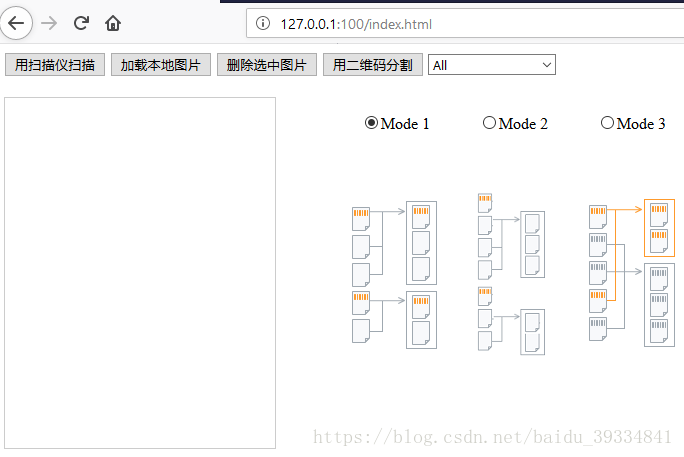
document.getElementById("barcodeformat").options.selectedIndex = 0;9. 文档的分类或者分割有三种可能
- 二维码作为每个文档的首页
- 二维码仅作分隔用,不是文档的一部分
- 每个页面上都有二维码,含有相同二维码的图片同属一个文件
对应的三个模式为
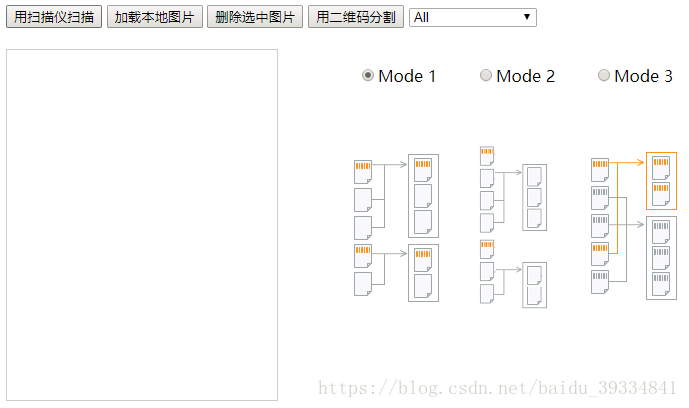
在本示例中,我们将三种模式都实现,先将三种模式写到页面上
<div style="float: left; margin-left: 20px;">
<ul style="list-style: none; min-height: 20px;">
<li style="width:118px; float: left; text-align: center;">
<label for="mode1">
<input type="radio" name="UploadModes" checked="checked" value="mode1">Mode 1</label>
</li>
<li style="width:118px; float: left; text-align: center;">
<label for="mode2">
<input type="radio" name="UploadModes" value="mode2" id="mode2">Mode 2</label>
</li>
<li style="width:118px; float: left; text-align: center;">
<label for="mode3">
<input type="radio" name="UploadModes" value="mode3" id="mode3">Mode 3</label>
</li>
</ul>
<br />
<ul style="list-style: none; min-height: 180px;">
<li style="width:118px; height:176px; float: left; background: url('https://tst.dynamsoft.com/libs/dbr/modes/Mode1.png') center no-repeat">
</li>
<li style="width:118px; height:176px; float: left; background: url('https://tst.dynamsoft.com/libs/dbr/modes/Mode2.png') center no-repeat">
</li>
<li style="width:118px; height:176px; float: left; background: url('https://tst.dynamsoft.com/libs/dbr/modes/Mode3.png') center no-repeat">
</li>
</ul>
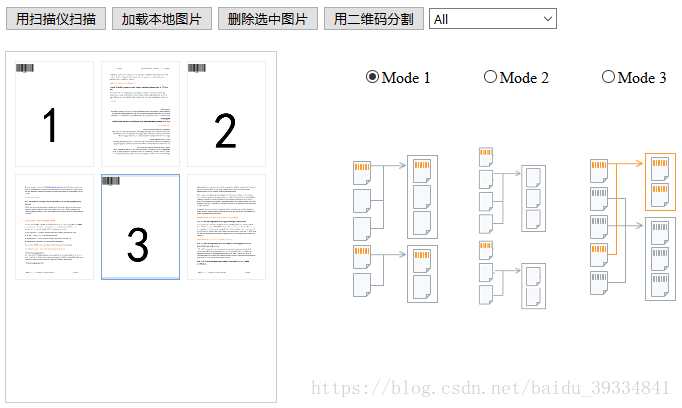
</div>再看一下目前的页面布局情况
10. 加入二维码的识别代码
function UploadFiles() {
    DWObject.IfShowProgressBar = false;
    ProcssedImagesCount = 0;
    imageArrays = [];
    aryIndicesMode1 = [];
    aryIndicesMode2 = [];
    aryIndicesMode3 = { 'noBarcode': [] };
    Dynamsoft.Lib.showMask();
    ReadBarcode(0);
}

function ReadBarcode(i) {
    var j, index = i, bBarcodeFound = false,
        strSelectedMode = document.getElementsByName('UploadModes');
    for (j = 0; j < strSelectedMode.length; j++) {
        if (strSelectedMode.item(j).checked == true) {
            strSelectedMode = strSelectedMode.item(j).value;
            break;
        }
    }
    if (index == DWObject.HowManyImagesInBuffer)
        return;
    if (dbrObject) {
        dbrObject.barcodeFormats = BarcodeInfo[document.getElementById("barcodeformat").selectedIndex].val;
        DWObject.CurrentImageIndexInBuffer = index;
        var barcodeImage = DWObject.GetImageURL(index, -1, -1);

        dbrObject.readURLAsync(barcodeImage,
            index,
            function (sImageIndex, result) {
                ProcssedImagesCount++;
                var count = result.getCount();
                if (count == 0) {
                    console.log("在第" + (sImageIndex + 1) + "张图上未发现二维码");
                    if (bBarcodeFound == true) {
                        bBarcodeFound = false;
                        aryIndicesMode1[aryIndicesMode1.length - 1].push(sImageIndex);
                        if (aryIndicesMode2.length == 0)
                            aryIndicesMode2.push([sImageIndex]);
                        else
                            aryIndicesMode2[aryIndicesMode2.length - 1].push(sImageIndex);
                    } else {
                        if (aryIndicesMode1.length == 0)
                            aryIndicesMode1.push([sImageIndex]);
                        else
                            aryIndicesMode1[aryIndicesMode1.length - 1].push(sImageIndex);
                        if (aryIndicesMode2.length == 0)
                            aryIndicesMode2.push([sImageIndex]);
                        else
                            aryIndicesMode2[aryIndicesMode2.length - 1].push(sImageIndex);
                    }
                    aryIndicesMode3.noBarcode.push(sImageIndex);
                }
                else {
                    bBarcodeFound = true;
                    console.log("在第" + (sImageIndex + 1) + "张图上发现二维码");

                    aryIndicesMode1.push([sImageIndex]);
                    if (aryIndicesMode2.length == 0)
                        aryIndicesMode2.push([]);
                    else if (aryIndicesMode2[aryIndicesMode2.length - 1].length != 0)
                        aryIndicesMode2.push([]);
                    var barcodeOnThisImage = [], allKeys = [];
                    for (j = 0; j < count; j++) {
                        var barcodeText = result.get(j).text;
                        if (barcodeOnThisImage.indexOf(barcodeText) == -1)
                            barcodeOnThisImage.push(barcodeText);
                        console.log("第" + (j + 1) + "个二维码的内容为: " + barcodeText);
                        var imageArray = {
                            index: sImageIndex,
                            text: barcodeText
                        };
                        imageArrays.push(imageArray);
                    }

                    Dynamsoft.Lib.each(aryIndicesMode3, function (value, key) {
                        allKeys.push(key);
                    });

                    for (j = 0; j < allKeys.length; j++) {
                        var oKey = allKeys[j];
                        if (barcodeOnThisImage.indexOf(oKey) != -1) {
                            barcodeOnThisImage.splice(barcodeOnThisImage.indexOf(oKey), 1);
                            var _value = aryIndicesMode3[oKey];
                            if (_value.indexOf(sImageIndex) == -1) {
                                _value.push(sImageIndex);
                                aryIndicesMode3[oKey] = _value;
                            }
                        }
                    }
                    for (j = 0; j < barcodeOnThisImage.length; j++) {
                        aryIndicesMode3[barcodeOnThisImage[j]] = [sImageIndex];
                    }
                }
                if (ProcssedImagesCount == DWObject.HowManyImagesInBuffer) {
                    ProcssedImagesCount = 0;
                    var aryTemp = [];
                    Dynamsoft.Lib.each(aryIndicesMode3, function (value, key) {
                        aryTemp.push(value);
                    });
                    aryIndicesMode3 = aryTemp;
                    Dynamsoft.Lib.hideMask();
                    switch (strSelectedMode) {
                        case 'mode1': console.log(aryIndicesMode1); break;
                        case 'mode2': console.log(aryIndicesMode2); break;
                        case 'mode3': console.log(aryIndicesMode3); break;
                    }
                }
                /*
                * Read the next image
                */
                ReadBarcode(sImageIndex + 1);
            }, function (sImageIndex, errorCode, errorString) {
                console.log("二维码识别出错:" + errorString);
            });
    }
}
加载数张图片后,点击“用二维码分割”并查看浏览器console (F12)
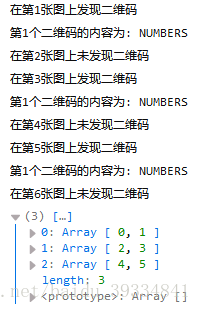
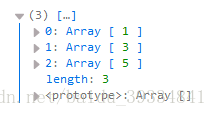
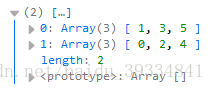
以上是模式1的结果,模式2,3如下
11. 在知道了文档的分割分类情况后,下一步就是将对应的文件一一上传。这要求我们先将代码部署到server上,这里我们用的是IIS。部署后 URL 为
http://127.0.0.1:100/index.html
12. 加上上传代码及用C#写的Server端接收代码
JS:
function UploadImagesSeparatedByBarcode(ary) {
    var i, Digital, uploadfilename, CurrentPathName = unescape(location.pathname),
        CurrentPath = CurrentPathName.substring(0, CurrentPathName.lastIndexOf("/") + 1),
        strActionPage = CurrentPath + "SaveToFile.aspx";
    DWObject.IfSSL = Dynamsoft.Lib.detect.ssl;
    var _strPort = location.port == "" ? 80 : location.port;
    if (Dynamsoft.Lib.detect.ssl == true)
        _strPort = location.port == "" ? 443 : location.port;
    DWObject.HTTPPort = _strPort;
    strFullActionPagePath = location.protocol + "//" + location.hostname + ":" + DWObject.HTTPPort + strActionPage;
    for (i = 0; i < ary.length; i++) {
        if (ary[i].length == 0) {
            ary.splice(i, 1);
            i--;
            continue;
        }
        Digital = new Date();
        uploadfilename = 'Doc_' + i + '_' + Digital.getMilliseconds() + '_' + (Math.floor(Math.random() * 1000 + 1)).toString() + '.pdf';
        DWObject.HTTPUpload(strFullActionPagePath, ary[i], EnumDWT_ImageType.IT_PDF, EnumDWT_UploadDataFormat.Binary, uploadfilename, function () { }, function () { });
    }
}
HttpFileCollection files = HttpContext.Current.Request.Files;
HttpPostedFile uploadfile = files["RemoteFile"];
String Path = System.Web.HttpContext.Current.Request.MapPath(".") + "/ImageScanned/";
if (!Directory.Exists(Path))
{
Directory.CreateDirectory(Path);
}
uploadfile.SaveAs(Path + uploadfile.FileName);13. 将以下代码
switch (strSelectedMode) {
    case 'mode1': console.log(aryIndicesMode1); break;
    case 'mode2': console.log(aryIndicesMode2); break;
    case 'mode3': console.log(aryIndicesMode3); break;
}
改为
switch (strSelectedMode) {
case 'mode1': UploadImagesSeparatedByBarcode(aryIndicesMode1); break;
case 'mode2': UploadImagesSeparatedByBarcode(aryIndicesMode2); break;
case 'mode3': UploadImagesSeparatedByBarcode(aryIndicesMode3); break;
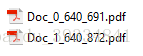
}14. 刷新页面,再次加载图片并点击“用二维码分割”。则在页面同一目录中可以看到新的目录 ImageScanned ,内部有上传来的文件。这里是模式1

我们也可以试试模式2,3

好了,是时候你也试试了!
完整原代码可以从这里下载到。
备注
如果你看到以下提示则表示你用的授权过期了。
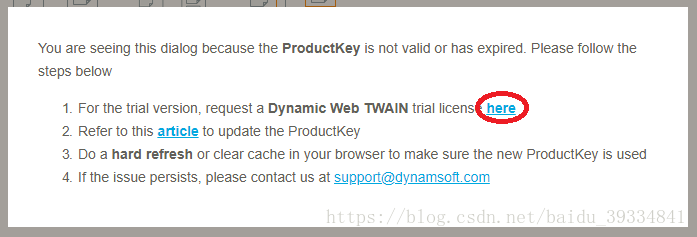
解决方案为点击上图中标红的链接,获取一个新的授权并加上下面的代码中的第一句(在window.onload回调函数中)
...
Dynamsoft.WebTwainEnv.ProductKey = "<新的授权>";
Dynamsoft.WebTwainEnv.Load();
...
有问题?联系免费快速的技术支持