1、自动化部署脚本如下:
init.sh脚本
#获取当前脚本所在的目录并赋值给变量bin,/opt/xxx/xxx
bin=`dirname "${BASH_SOURCE-$0}"`
bin=`cd "$bin"; pwd`
PORT=3222
STEP=1
ENDSTEP=9
SSH='/usr/bin/ssh'
#SSHID=`netstat -ntlp | grep sshd | grep -w "tcp" | awk '{print $4}' | cut -d: -f2`
SSH_KEYGEN='/usr/bin/ssh-keygen'
SSH_COPY_ID='/usr/bin/ssh-copy-id'
SCP='/usr/bin/scp'
function print_usage(){
echo -e "Usage: ./first.sh [-step stepNUM] [-endstep endstepnum] [-port sshPort] COMMAND"
}
#整个脚本执行的顺序,从哪传的参数,什么时候执行这个代码的。相当于重新获取 port值,step值和endstep值
((NUM=$#%2))
if [ $NUM != 0 ];then
print_usage
exit
fi
# ./frist.sh -step 2 -endstep 6 -port
until [ $# -eq 0 ]
do
case $1 in
-port)
PORT=$2
;;
-step)
STEP=$2
;;
-endstep)
ENDSTEP=$2
;;
*)
print_usage
exit
;;
esac
shift 2
done
#####################public function############################
#1 步骤输出 紫色
#2 正确输出 绿色
#3 错误输出 红色
#4 提示输出 蓝色
#5 警告输出 黄色
function echo_fun(){
if [ $# -ge 2 ];then
params_num=$1
shift 1
params_mes=$@
else
echo_fun 3 请至少输入两个参数 echo_fun ...
exit
fi
case $params_num in
1)
echo -e "\033[35;40;1m ***************************** ${params_mes} *****************************\033[0m\r\n"
;;
2)
echo -e "\033[32;40;1m ${params_mes}\033[0m\r\n"
;;
3)
echo -e "\033[31;40;1m ${params_mes}\033[0m\r\n"
;;
4)
echo -e "\033[36;40;1m ${params_mes}\033[0m\r\n"
;;
5)
echo -e "\033[33;40;1m ${params_mes} \033[0m\r\n"
;;
*)
echo_fun 3 参数异常第一个参数应为1,2,3,4,5
;;
esac
}
# 公共函数 遍历hosts
function list_hosts(){
OLD_IS="$IFS"
IFS=" "
while read LINE
do
arr=($LINE)
HOSTNAME=${arr[0]}
USERNAME=${arr[1]}
PASSWD=${arr[2]}
$1 $USERNAME $HOSTNAME $PASSWD
RES=$?
if [ $RES != "0" ];then
return "$RES"
break
fi
done < $bin/hosts
}
#获取秘钥 ###
function ssh_keygen(){
res=`ssh_keygen_fun $1 $2 $3` #$1,$2,$3分别为 $USERNAME $HOSTNAME $PASSWD
RESULT=$?
MESSAGE="keygen-->$1@$2"
show_result $RESULT $MESSAGE # 公共函数 数据结果
}
#获取秘钥的实际操作步骤 ###
function ssh_keygen_fun(){
expect -c"
spawn $SSH -p$PORT $1@$2 $SSH_KEYGEN
set timeout 30
expect {
\"*Permission denied, please try again*\" {puts \"fail\";exit 9 }
\"*Connection refused*\" {puts \"fail\";exit 7 }
\"*continue connecting (yes/no)*\" {send \"yes\r\";exp_continue}
\"*password*\" {send \"$3\r\";exp_continue}
\"Enter file in which to save the key*\" {send \"\r\";exp_continue}
\"Enter passphrase*\" {send \"\r\";exp_continue}
\"Enter same passphrase again*\" {send \"\r\";puts \"success\";exit 1}
\"Overwrite (y/n)*\" {send \"n\r\";puts \"success\";exit 2}
\"*No route to host*\" {puts \"fail\";exit 8}
\"*Connection timed out*\" {puts \"fail\";exit 6}
}
"
}
# 公共函数 数据结果 ###
#下面的数字是根据上面的函数执行后的结果所返回的
# 9 --> 密码错误
# 8 --> ip/hostname 错误
# 7 --> passwd
# 6 --> Connection timed out
# 2 --> 已经做过的ssh-keygen 不在做了
# 1 --> 新做的ssh-keygen
function show_result(){
if [ $# -ge 2 ];then
params_num=$1
shift 1
params_mes=$@
else
echo_fun 3 请至少输入两个参数 show_result ..
exit
fi
case $params_num in
0)
echo_fun 2 "${params_mes[*]} [ success ]"
;;
1)
echo_fun 2 "${params_mes[*]} [ success ]"
;;
2)
echo_fun 2 "${params_mes[*]} [ success ]"
;;
6)
echo_fun 3 "${params_mes[*]} [ failed ] : Connection timed out"
return 6
;;
7)
echo_fun 3 "${params_mes[*]} [ failed ] : Connection refused(ssh 端口是否正确)"
return 7
;;
8)
echo_fun 3 "${params_mes[*]} [ failed ] : No route to host(ip地址是否正确)"
return 8
;;
9)
echo_fun 3 "${params_mes[*]} [ failed ] : Permission denied(密码错误)"
return 9
;;
*)
echo_fun 3 "${params_mes[*]} [ failed ] : 未知的错误"
return 9
;;
esac
}
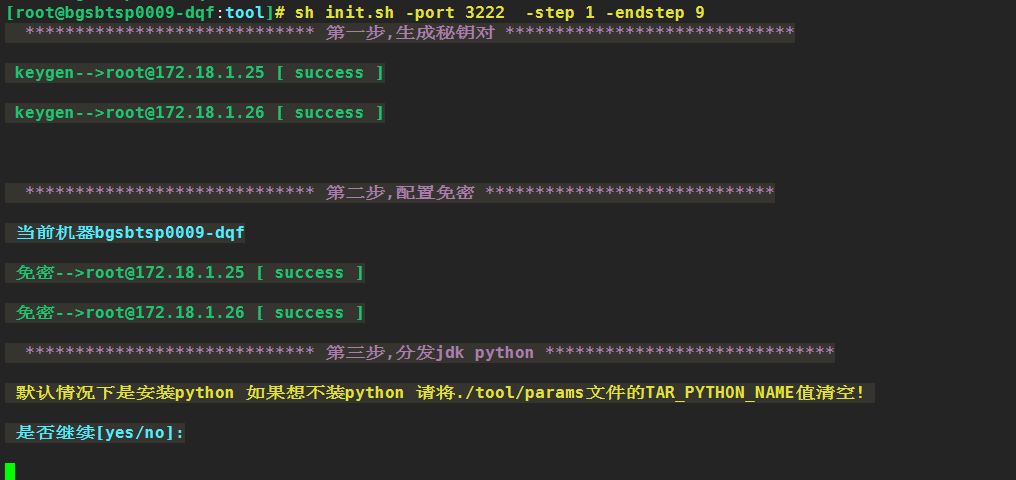
#################第一步 读取hosts文本内容,对每台机器生成秘钥对#########################
function step_fun_1(){
echo_fun 1 第一步,生成秘钥对
if [ "`rpm -qa |grep expect`" = "" ];then
echo_fun 4 下载expect...
yum install expect -y >/dev/null 2>&1
if [ `echo $?` != 0 ];then
echo_fun 5 expect下载失败请检查yum源
exit
fi
fi
list_hosts ssh_keygen # 公共函数 遍历hosts
RES=$?
if [ $RES != 0 ];then
echo -e "\033[33;40;1m>>Please check '${bin}/hosts' file<< Retry(yes/no)?\033[0m"
read name
if [ $name = "no" ];then
echo_fun 5 "当前执行第 1 步,如果继续执行请输入 ./frist.sh -step 1 -port portnum "
exit
elif [ $name = "yes" ];then
step_fun_1
else
step_fun_1
fi
fi
echo -e "\r\n"
}
#-----------------------------------第二步 配置单项免密----------------------------
function step_fun_2(){
echo_fun 1 第二步,配置免密
echo_fun 4 "当前机器`hostname`"
ssh_copyid_fun
}
###########循环遍历 做单项免密###############
function ssh_copyid_fun(){
OLD_IS="$IFS"
IFS=" "
while read LINE
do
arr=($LINE)
HOSTNAME=${arr[0]}
USERNAME=${arr[1]}
PASSWD=${arr[2]}
# 免秘钥 ~/.ssh/id_rsa.pub
abc=`expect -c "
spawn $SSH_COPY_ID -p $PORT $USERNAME@$HOSTNAME
expect {
\"*continue connecting (yes/no)*\" {send \"yes\r\";exp_continue}
\"*Permission denied*\" {puts \"fail\";exit 9 }
\"*password*\" {send \"$PASSWD\r\";exp_continue}
\"*No route to host*\" {puts \"fail\r\";exit 8}
\"*Connection timed out*\" {puts \"fail\r\";exit 6}
}
"`
RESULT=$?
MESSAGE="免密-->$USERNAME@$HOSTNAME"
show_result $RESULT $MESSAGE
if [ $RESULT -ne 0 ];then
echo_fun 5 "当前执行第 2 步,如果继续执行请输入 ./frist.sh -step 2 -port portnum "
exit
fi
done < $bin/hosts
}
#opt目录
ENV_PARENT_PATH="/opt"
TAR_JDK_PATH="" #后期的值为jdk包的全路径以及包的名字/opt/software/jdk1.7.0_67.tar.gz
TAR_PYTHON_PATH=""
MYSQL_JDBC_DRIVER="" #后期的值为mysqljar包的全路径以及包的名字
#TAG_MYSQL_JDBC_DRIVER="/usr/share/java/$mysql_jdbc_name"
TAG_MYSQL_JDBC_DRIVER=""
PARENT_PACAKGE="/opt/software"
LN_MYSQL_JDBC_DRIVER=/usr/share/java/mysql-connector-java.jar
function is_opt_exsit(){
$SSH -n -p $PORT $1@$2 "if [ ! -d ${ENV_PARENT_PATH} ];then exit 2; fi"
}
function is_opt_java(){
$SSH -n -p $PORT $1@$2 "if [ -d ${ENV_PARENT_PATH}/java ] ;then exit 2; fi"
}
function is_opt_python(){
$SSH -n -p $PORT $1@$2 "if [ -d ${ENV_PARENT_PATH}/python ];then exit 2; fi"
}
function distri_jdk_fun(){
#TAR_JDK_PATH java的安装包
$SCP -P $PORT $TAR_JDK_PATH $1@$2:${ENV_PARENT_PATH}
}
function distri_py_fun(){
$SCP -P $PORT $TAR_PYTHON_PATH $1@$2:${ENV_PARENT_PATH}
}
function distri_mysql_jdbc(){
$SSH -n -p $PORT $1@$2 "mkdir -p /usr/share/java"
$SCP -P $PORT $MYSQL_JDBC_DRIVER $1@$2:/usr/share/java/
$SSH -n -p $PORT $1@$2 "if [ -f $LN_MYSQL_JDBC_DRIVER ];then rm -r $LN_MYSQL_JDBC_DRIVER; fi"
$SSH -n -p $PORT $1@$2 "ln -s $TAG_MYSQL_JDBC_DRIVER $LN_MYSQL_JDBC_DRIVER"
}
function get_params_value() {
if [ $# -ne 1 ];then
echo_fun 3 参数输入有误 get_params_value
fi
k=$1
value=`awk -F= -v key=${k} '{if ($1 == key ) print $2}' $bin/params`
echo $value
}
#将jdk的包分发到其他机器上
function distri_jdk_fun(){
#TAR_JDK_PATH java的安装包的路径加包名
$SCP -P $PORT $TAR_JDK_PATH $1@$2:${ENV_PARENT_PATH}
}
function loop_hosts(){
i=1
l=$(wc -l $bin/hosts| sed 's/^[ \t]*//g' | cut -d ' ' -f1)
CMD=$1
MESSAGE_3=$2
STEP_3=$3
OLD_IS="$IFS"
IFS=" "
while read LINE
do
arr=($LINE)
HOSTNAME=${arr[0]}
USERNAME=${arr[1]}
PASSWD=${arr[2]}
$CMD $USERNAME $HOSTNAME $PASSWD
RES=$?
if [ $RES != "0" ];then
echo -e "\r\n\033[31;40;1mERROR: $HOSTNAME $MESSAGE_3 \033[0m \r\n"
echo -e "\033[33;40;1m 当前执行第 $STEP_3 步,如果继续执行请输入 ./frist.sh -step $STEP_3 -port portnum \033[0m\r\n"
exit
fi
if [ "`rpm -qa |grep "^bc"`" = "" ];then
echo_fun 4 下载bc...
yum install bc -y >/dev/null 2>&1
if [ `echo $?` != 0 ];then
echo_fun 5 bc下载失败请检查yum源
exit
fi
fi
echo -en "\b\b\b\b" `echo $i*100/$l | bc `'%'
done < $bin/hosts
echo -en '\033[32;40;1m\b\b\b\bOK\033[0m \r\n'
}
function step_fun_3(){
echo_fun 1 第三步,分发jdk python
echo_fun 5 默认情况下是安装python 如果想不装python 请将./tool/params文件的'TAR_PYTHON_NAME'值清空!
echo_fun 4 是否继续[yes/no]:
read value
case $value in
yes)
echo -e "\n"
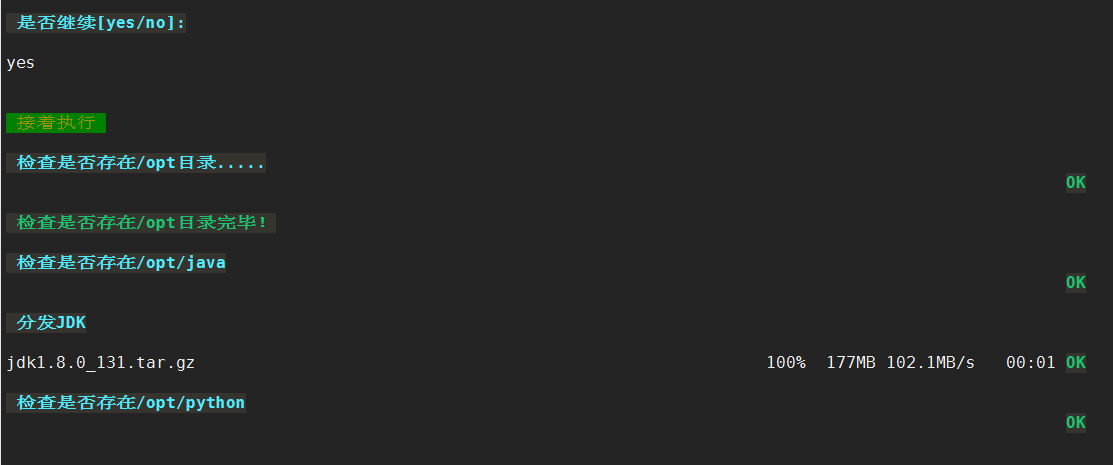
echo -e "\033[42;33m 接着执行 \033[0m\n"
;;
no)
echo_fun 5 当前执行第 3 步,如果继续执行请输入 ./frist.sh -step 3 -port portnum
exit
;;
*)
step_fun_3
;;
esac
#获取jdk包的名字 TAR_JDK_NAME参数k=v 这里相当于k ,params中的TAR_JDK_NAME=jdk1.7.0_67.tar.gz的key
#tar_jdk_name的值为jdk1.7.0_67.tar.gz
tar_jdk_name=`get_params_value TAR_JDK_NAME`
#获取python包的名字
tar_python_name=`get_params_value TAR_PYTHON_NAME`
#获取mysql的数据库连接jar包名字
mysql_jdbc_name=`get_params_value MYSQL_JDBC_DRIVER`
# 检测是否存在 /opt 目录
CHECK_OPT_MESSAGE="经检查该机器上不存在${ENV_PARENT_PATH}目录"
echo_fun 4 "检查是否存在${ENV_PARENT_PATH}目录....."
loop_hosts is_opt_exsit $CHECK_OPT_MESSAGE "3"
echo_fun 2 "检查是否存在${ENV_PARENT_PATH}目录完毕!"
if [ "$tar_jdk_name" = "" ];then
echo_fun 5 ./tool/params文件中TAR_JDK_NAME值为空,再安装jdk
else
#检测 /opt/java 目录是否存在
echo_fun 4 "检查是否存在${ENV_PARENT_PATH}/java"
CHECK_JAVA_HOME="的机器上已存在${ENV_PARENT_PATH}/java目录,请检查手动清理一下!"
loop_hosts is_opt_java $CHECK_JAVA_HOME 3
TAR_JDK_PATH="${PARENT_PACAKGE}/${tar_jdk_name}"
if [ -f $TAR_JDK_PATH ];then
echo_fun 4 分发JDK
loop_hosts distri_jdk_fun
else
echo_fun 3 $TAR_JDK_PATH 文件不存在 请检查文件的完整性
echo_fun 5 当前执行第 3 步,如果继续执行请输入 ./frist.sh -step 3 -port portnum
exit 9
fi
fi
if [ "$tar_python_name" = "" ];then
echo_fun 5 ./tool/params文件中TAR_PYTHON_NAME值为空 不在安装python
else
TAR_PYTHON_PATH=$PARENT_PACAKGE/$tar_python_name
#检测 /opt/python 目录是否存在
echo_fun 4 "检查是否存在${ENV_PARENT_PATH}/python"
CHECK_PYTHON_HOME="的机器上已存在${ENV_PARENT_PATH}/python目录,请检查手动清理一下一下!"
loop_hosts is_opt_python $CHECK_PYTHON_HOME 3
if [ ! -f $TAR_PYTHON_PATH ];then
echo_fun 3 $TAR_PYTHON_PATH 文件不存在 请检查包的完整性
echo_fun 5 当前执行第 3 步,如果继续执行请输入 ./frist.sh -step 3 -port portnum
exit 9
fi
fi
if [ "$tar_python_name" != "" ];then
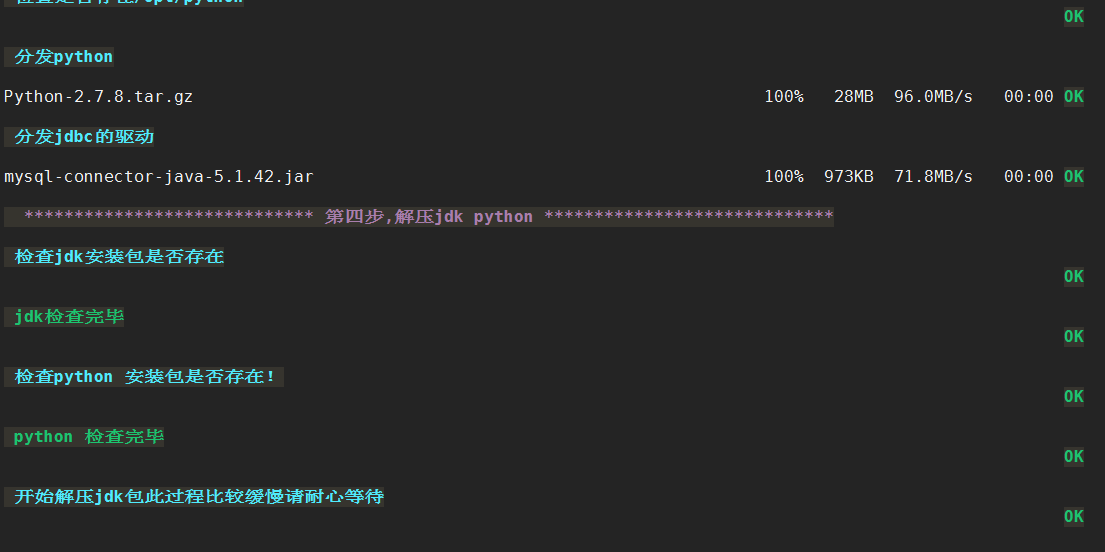
echo_fun 4 分发python
loop_hosts distri_py_fun
fi
if [ "$mysql_jdbc_name" = "" ];then
echo_fun 5 ./tool/params文件中MYSQL_JDBC_DRIVER值为空 不在分发mysql驱动
else
MYSQL_JDBC_DRIVER=$PARENT_PACAKGE/$mysql_jdbc_name
TAG_MYSQL_JDBC_DRIVER="/usr/share/java/$mysql_jdbc_name"
if [ -f $MYSQL_JDBC_DRIVER ];then
echo_fun 4 分发jdbc的驱动
loop_hosts distri_mysql_jdbc
else
echo 3 $MYSQL_JDBC_DRIVER 文件不存在
exit
fi
fi
}
#---------------------------------------第四步 安装jdk、python-------------------------------------------------
#检查 是否存在/jdk python 安装包。
function is_exist_java(){
ssh -n -p $PORT $1@$2 "if [ ! -f $TAG_JDK_PATH ];then exit 2; fi"
}
function is_exist_python(){
ssh -n -p $PORT $1@$2 "if [ ! -f $TAG_PYTHON_PATH ];then exit 2; fi"
}
function is_exist_path_java(){
ssh -n -p $PORT $1@$2 "if [ -d ${DECOM_JDK_PATH} ] ;then exit 2; fi"
}
function is_exist_path_python(){
ssh -n -p $PORT $1@$2 "if [ -d ${DECOM_PYTHON_PATH} ];then exit 2; fi"
}
function decom_jdk(){
ssh -n -p $PORT $1@$2 "tar -zxvf $TAG_JDK_PATH -C ${ENV_PARENT_PATH} >/dev/null 2>&1; ln -s ${DECOM_JDK_PATH} ${ENV_PARENT_PATH}/java >/dev/null 2>&1; "
}
function decom_python(){
ssh -n -p $PORT $1@$2 " tar -xvf $TAG_PYTHON_PATH -C ${ENV_PARENT_PATH} >/dev/null 2>&1; ln -s ${DECOM_PYTHON_PATH} ${ENV_PARENT_PATH}/python >/dev/null 2>&1; "
}
TAG_JDK_PATH="" # /opt/jdk1.7.0_67.tar.gz包
TAG_PYTHON_PATH=""
DECOM_JDK_PATH=""
DECOM_PYTHON_PATH=""
#"################################安装jdk,python######################################"
function step_fun_4(){
echo_fun 1 第四步,解压jdk python
tar_jdk_name=`get_params_value TAR_JDK_NAME`
tar_python_name=`get_params_value TAR_PYTHON_NAME`
if [ "$tar_jdk_name" != "" ];then
TAR_JDK_PATH="${PARENT_PACAKGE}/${tar_jdk_name}"
# /opt/jdk1.7.0_67.tar.gz包
TAG_JDK_PATH="${ENV_PARENT_PATH}/${tar_jdk_name}"
#检查各个机器上jdk的安装包是否存在
echo_fun 4 "检查jdk安装包是否存在"
CHECK_JAVA_MESSAGE="的机器上不存在${TAG_JDK_PATH}请检查一下"
loop_hosts is_exist_java $CHECK_JAVA_MESSAGE 4
echo_fun 2 "jdk检查完毕"
after_jdk_decom_path=`tar -tvf $TAG_JDK_PATH |head -n 1 |awk -F ' ' '{print $6}' |awk -F '/' '{print $1}'`
if [ "$after_jdk_decom_path" = "" ];then
echo_fun 3 after_decom_path is null at $LINENO line
exit
fi
DECOM_JDK_PATH="${ENV_PARENT_PATH}/${after_jdk_decom_path}"
#"检查是否存在已经解压好的 jdk python的目录"
CHECK_JAVA_PATH_MESSAGE="的机器上已存在${DECOM_JDK_PATH}请检查一下"
loop_hosts is_exist_path_java ${CHECK_JAVA_PATH_MESSAGE} 4
fi
if [ "$tar_python_name" != "" ];then
TAR_PYTHON_PATH="${PARENT_PACAKGE}/${tar_python_name}"
TAG_PYTHON_PATH="${ENV_PARENT_PATH}/${tar_python_name}"
echo_fun 4 "检查python 安装包是否存在!"
#检查各个机器上python的安装包是否存在
CHECK_PYTHON_MESSAGE="的机器上不存存在${TAG_PYTHON_PATH}请检查一下"
loop_hosts is_exist_python ${CHECK_PYTHON_MESSAGE} 4
echo_fun 2 "python 检查完毕"
after_python_decom_path=`tar -tvf ${TAG_PYTHON_PATH} |head -n 1 |awk -F ' ' '{print $6}' |awk -F '/' '{print $1}'`
if [ "$after_python_decom_path" = "" ];then
echo_fun 3 after_python_decom_path is null at $LINENO line
exit
fi
DECOM_PYTHON_PATH="${ENV_PARENT_PATH}/${after_python_decom_path}"
#"检查是否存在已经解压好的 jdk python的目录"
CHECK_PYTHON_PATH_MESSAGE="的机器上已存在${DECOM_PYTHON_PATH}请检查一下"
loop_hosts is_exist_path_python ${CHECK_PYTHON_PATH_MESSAGE} 4
fi
if [ "$tar_jdk_name" != "" ];then
echo_fun 4 "开始解压jdk包此过程比较缓慢请耐心等待"
loop_hosts decom_jdk "的机器上jdk解压失败" 4
fi
if [ "$tar_python_name" != "" ];then
echo_fun 4 "开始解压python包此过程比较缓慢请耐心等待"
loop_hosts decom_python "的机器上python解压失败" 4
fi
}
#-------------------------------第五步、生成环境变量--------------------------------------------------
function gen_pro_env_fun(){
> /etc/profile.d/bfd_env.sh >/dev/null
if [ -d ${ENV_PARENT_PATH}/python ];then
cat << EOF >> /etc/profile.d/bfd_env.sh
export JAVA_HOME=${ENV_PARENT_PATH}/java
export PATH=\$JAVA_HOME/bin:\$PATH
export CLASSPATH=.:$JAVA_HOME/lib/dt.jar:$JAVA_HOME/lib/tools.jar
export PYTHON_HOME=${ENV_PARENT_PATH}/python
export PATH=\$PYTHON_HOME/bin:\$PATH
EOF
else
cat << EOF >> /etc/profile.d/bfd_env.sh
export JAVA_HOME=${ENV_PARENT_PATH}/java
export PATH=\$JAVA_HOME/bin:\$PATH
export CLASSPATH=.:$JAVA_HOME/lib/dt.jar:$JAVA_HOME/lib/tools.jar
EOF
fi
}
function gen_ld_env_fun(){
ssh -n -p $PORT $1@$2 "
/bin/cat << EOF >> /etc/ld.so.conf
${ENV_PARENT_PATH}/python/lib
EOF
"
}
function scp_pro_env_fun(){
scp -P $PORT /etc/profile.d/bfd_env.sh $1@$2:/etc/profile.d/
}
function exe_env_fun(){
#ssh -n -p $PORT $1@$2 "/sbin/ldconfig;/bin/sh /etc/profile"
ssh -n -p $PORT $1@$2 "/sbin/ldconfig;source /etc/profile.d/bfd_env.sh"
}
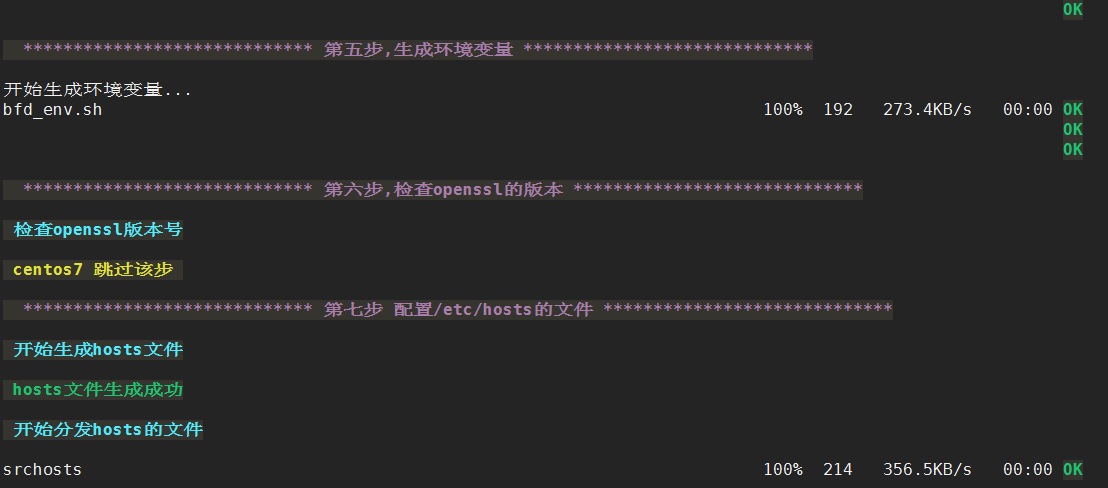
function step_fun_5(){
echo_fun 1 第五步,生成环境变量
echo "开始生成环境变量..."
gen_pro_env_fun
loop_hosts scp_pro_env_fun
tar_python_name=`get_params_value TAR_PYTHON_NAME`
if [ "$tar_python_name" != "" ];then
loop_hosts gen_ld_env_fun
loop_hosts exe_env_fun
fi
}
#--------------------------第六步,检查openssl的版本号----------------------
function check_openssl_fun(){
ssh -n -p $PORT $1@$2 "if [ `rpm -qa |grep openssl-1 |awk -F '-' '{print $3}' |awk -F '.' '{print $1}'` -lt 15 ];then exit 3;fi"
}
if [ "`rpm -qa |grep "^redhat-lsb"`" = "" ];then
echo_fun 4 下载redhat-lsb...
yum install redhat-lsb -y >/dev/null 2>&1
if [ `echo $?` != 0 ];then
echo_fun 5 redhat-lsb下载失请检查yum源
exit
fi
fi
function get_centos_verison(){
cen_version=`lsb_release -a |awk -F ' ' '{print $2}' |head -n 4 |tail -n 1 |awk -F '.' '{print $1}'`
echo $cen_version
}
function step_fun_6(){
echo_fun 1 "第六步,检查openssl的版本"
echo_fun 4 检查openssl版本号
centos_version=`get_centos_verison`
case $centos_version in
6)
CHECK_OPENSSL_MESSAGE="该机器上的openssl小于15版本"
loop_hosts check_openssl_fun $CHECK_OPENSSL_MESSAGE 6
echo_fun 2 openssl检查成功
;;
7)
echo_fun 5 "centos7 跳过该步"
;;
*)
echo_fun 3 操作系统版本获取失败
exit
;;
esac
}
#------------------------------第七步,配置ect/hosts------------------------------
function dishosts(){
scp -P $PORT $bin/srchosts $1@$2:/etc/hosts
}
function step_fun_7(){
echo_fun 1 第七步 配置/etc/hosts的文件
echo_fun 4 开始生成hosts文件
sh $bin/genAllHostname.sh $PORT
echo_fun 2 hosts文件生成成功
echo_fun 4 开始分发hosts的文件
if [ ! -f $bin/srchosts ];then
echo_fun 5 $bin/srchosts文件不存在 $LI
echo -e "\033[33;40;1m 当前执行第 7 步,如果继续执行请输入 ./frist.sh -step 7 -port portnum \033[0m\r\n"
exit 9
fi
ERROR_MESSAGE="hosts文件分发失败,请检查原因"
loop_hosts dishosts $ERROR_MESSAGE 8
echo_fun 2 hosts文件分发成功
}
#-------------------第八步,搭建时间同步服务器-------------------------------
function ntp_client_ins(){
host_ip=`hostname -i`
if [ "$host_ip" = "" ];then
echo_fun 5 不能获取到当前机器ip"hostname -i"
exit 9
fi
echo "host_ip $host_ip"
if [ "$host_ip" != "$2" ];then
ssh -n -p $PORT $1@$2 "yum install ntp -y >/dev/null 2 >&1"
if [ `echo $?` != 0 ];then
echo_fun 5 ntp客户端安装失败
echo_fun 4 失败机器hostname$2
exit 9
fi
ssh -n -p $PORT $1@$2 "/usr/sbin/ntpdate $host_ip >/dev/null 2 >&1 "
if [ `echo $?` != 0 ];then
echo_fun 5 ntpdate 更新失败
echo_fun 4 失败机器hostname$2
exit 9
fi
scp -P $PORT $bin/genCrontab.sh $1@$2:/tmp
if [ `echo $?` != 0 ];then
echo_fun 5 "$bin/genCrontab.sh文件分发失败"
echo_fun 4 失败机器hostname$2
exit 9
fi
ssh -n -p $PORT $1@$2 "sh /tmp/genCrontab.sh $host_ip ; /usr/bin/crontab -l"
if [ `echo $?` != 0 ];then
echo_fun 5 配置crontab失败
echo_fun 4 失败机器hostname$2
exit 9
fi
fi
}
function step_fun_8(){
echo_fun 1 "第八步,搭建时间同步服务器"
centos_version=`get_centos_verison`
echo_fun 4 安装ntp服务器
if [ "`rpm -qa|grep ntp- |head -n 1`" = "" ];then
yum install ntp -y >/dev/null 2>&1
if [ `echo $?` != 0 ];then
echo_fun 5 ntp服务器安装失败!
exit 9
fi
fi
echo_fun 2 ntp服务器安装成功
#先注释掉,然后在追加
sed -i '/restrict default/s/^/#/g' /etc/ntp.conf
sed -i '6a\restrict default nomodify\n' /etc/ntp.conf
sed -i '7a\server 127.127.1.0\n' /etc/ntp.conf
echo_fun 4 启动ntp服务器
case $centos_version in
6)
chkconfig ntpd on
service ntpd restart
if [ `echo $?` != 0 ];then
echo_fun 5 ntp服务启动失败
exit 9
fi
;;
7)
systemctl enable ntpd
systemctl restart ntpd
if [ `echo $?` != 0 ];then
echo_fun 5 ntp服务启动失败
exit 9
fi
;;
*)
echo_fun 3 操作系统版本获取失败
exit 9
;;
esac
echo_fun 2 ntp服务器启动成功
echo_fun 4 配置ntp客户端
loop_hosts ntp_client_ins ntp客户端安装失败 "8"
}
#-----------------------------第九步,优化系统参数--------------------------------------
function scp_in_fun6(){
scp -P $PORT $bin/in6.sh $1@$2:/tmp/
}
function ssh_in_fun6(){
ssh -n -p $PORT $1@$2 "/bin/sh /tmp/in6.sh"
}
function scp_in_fun7(){
scp -P $PORT $bin/in7.sh $1@$2:/tmp/
}
function ssh_in_fun7(){
ssh -n -p $PORT $1@$2 "/bin/sh /tmp/in7.sh"
}
function step_fun_9(){
centos_version=`get_centos_verison`
echo_fun 1 "第九步,优化系统参数"
echo_fun 4 开始优化系统参数
case $centos_version in
6)
loop_hosts scp_in_fun6
loop_hosts ssh_in_fun6 > /dev/null 2>&1
;;
7)
loop_hosts scp_in_fun7
loop_hosts ssh_in_fun7 > /dev/null 2>&1
;;
*)
echo_fun 3 获取版本失败
exit
;;
esac
echo_fun 2 优化系统参数完成
}
while (($STEP <= $ENDSTEP))
do
step_fun_$STEP
((STEP++))
done
genAllHostname.sh 脚本
#!/bin/sh

bin=`dirname "${BASH_SOURCE-$0}"`
bin=`cd "$bin"; pwd`


PORT=22
if [ "$1" != "" ];then
 PORT=$1
fi
function loop_hosts(){
  OLD_IS="$IFS"
  IFS=" "
  while read LINE
    do
      arr=($LINE)
      HOSTNAME=${arr[0]}
      USERNAME=${arr[1]}
      PASSWD=${arr[2]}
      tag_hostname=`ssh -n -p$PORT $USERNAME@$HOSTNAME "hostname"`
      RES=$?
      echo "$HOSTNAME $tag_hostname" >> $bin/srchosts
      if [ $RES != "0" ];then
        echo -e "\r\n\033[31;40;1mERROR: $HOSTNAME 机器主机名获取失败\033[0m \r\n"
        exit 9
      fi
    done < $bin/hosts
}

if [ ! -d $bin/../tmp ];then
  mkdir $bin/../tmp
fi
cat > $bin/srchosts << EOF
127.0.0.1   localhost localhost.localdomain localhost4 localhost4.localdomain4
::1         localhost localhost.localdomain localhost6 localhost6.localdomain6
EOF
loop_hosts
genCrontab.sh 脚本
#!/bin/sh
hostname=$1
echo "*/15 * * * * /usr/sbin/ntpdate $hostname" >> /var/spool/cron/root
hosts和params 文件
172.18.1.25 root bfd123
172.18.1.26 root bfd123


TAR_JDK_NAME=jdk1.8.0_131.tar.gz
TAR_PYTHON_NAME=Python-2.7.8.tar.gz
MYSQL_JDBC_DRIVER=mysql-connector-java-5.1.42.jar
in7.sh脚本
#关闭防火墙
if [ "`rpm -qa|grep firewalld- |head -n 1`" = "" ];then
    yum install firewalld -y >/dev/null 2>&1
    if [ `echo $?` != 0 ];then
      echo_fun 5 firewalld安装失败!
      exit 9
    fi
  fi
systemctl  stop firewalld
#关闭开启自启
systemctl  disable firewalld

#关闭 seliunx
if [ `getenforce` != "Disabled" ];then
  setenforce 0
fi
#优化ulimit
cat >> /etc/security/limits.conf << EOF
*           soft   nofile       655350
*           hard   nofile       655350
*           soft   nproc        655350
*           hard   nproc        655350
EOF
sed -i 's#4096#65535#g'   /etc/security/limits.d/20-nproc.conf


#设置ssh
sed -i -e 's/SELINUX=enforcing/SELINUX=disabled/' /etc/selinux/config
sed -i 's/GSSAPIAuthentication yes/GSSAPIAuthentication no/' /etc/ssh/sshd_config
sed -i 's/#UseDNS yes/UseDNS no/' /etc/ssh/sshd_config
sed -i 's/#PermitEmptyPasswords no/PermitEmptyPasswords no/' /etc/ssh/sshd_config
#优化内核参数####
cat > /etc/sysctl.conf << EOF
net.ipv4.ip_forward = 0
net.ipv4.conf.default.rp_filter = 1
net.ipv4.conf.default.accept_source_route = 0
kernel.sysrq = 0
kernel.core_uses_pid = 1
net.ipv4.tcp_syncookies = 1
kernel.msgmnb = 65536
kernel.msgmax = 65536
kernel.shmmax = 68719476736
kernel.shmall = 4294967296
net.ipv4.tcp_max_tw_buckets = 60000
net.ipv4.tcp_sack = 1
net.ipv4.tcp_window_scaling = 1
net.ipv4.tcp_rmem = 4096 87380 4194304
net.ipv4.tcp_wmem = 4096 16384 4194304
net.core.wmem_default = 8388608
net.core.rmem_default = 8388608
net.core.rmem_max = 16777216
net.core.wmem_max = 16777216
net.core.netdev_max_backlog = 262144
net.core.somaxconn = 262144
net.ipv4.tcp_max_orphans = 3276800
net.ipv4.tcp_max_syn_backlog = 262144
net.ipv4.tcp_timestamps = 0
net.ipv4.tcp_synack_retries = 1
net.ipv4.tcp_syn_retries = 1
net.ipv4.tcp_tw_recycle = 1
net.ipv4.tcp_tw_reuse = 1
net.ipv4.tcp_mem = 94500000 915000000 927000000
net.ipv4.tcp_fin_timeout = 1
net.ipv4.tcp_keepalive_time = 1200
net.ipv4.ip_local_port_range = 1024 65535
EOF
sysctl -p >/dev/null 2>&1
in6.sh脚本
#!/bin/bash

#close servers
for i in `chkconfig --list |awk '{print $1}'`
do
chkconfig $i off;
done

#open servers
for i in crond network haldaemon messagebus udev-post ntpd sshd rsyslog sysstat
do
chkconfig $i on;
done

#close iptables
chkconfig iptables off
chkconfig ip6tables off
/etc/init.d/ip6tables stop
/etc/init.d/iptables stop

#close seliunx
if [ `getenforce` != "Disabled" ];then
  setenforce 0
fi

#about ssh
#sed -i 's/#Port 22/Port 3222/' /etc/ssh/sshd_config
sed -i -e 's/SELINUX=enforcing/SELINUX=disabled/' /etc/selinux/config
sed -i 's/GSSAPIAuthentication yes/GSSAPIAuthentication no/' /etc/ssh/sshd_config
sed -i 's/#UseDNS yes/UseDNS no/' /etc/ssh/sshd_config
#sed -i 's/X11Forwarding yes/X11Forwarding no/' /etc/ssh/sshd_config
sed -i 's/#PermitEmptyPasswords no/PermitEmptyPasswords no/' /etc/ssh/sshd_config

#modify max openfile and max process
cat >> /etc/security/limits.conf << EOF
*           soft   nofile       655350
*           hard   nofile       655350
*           soft   nproc        655350
*           hard   nproc        655350
EOF

cat >> /etc/security/limits.d/90-nproc.conf << EOF
*           soft   nproc        655350
*           hard   nproc        655350
root        soft    nproc     unlimited
EOF
sed -i 's#exec /sbin/shutdown -r now#\#exec /sbin/shutdown -r now#' /etc/init/control-alt-delete.conf

#modify kernel parameters
cat > /etc/sysctl.conf << EOF
#net.bridge.bridge-nf-call-ip6tables = 0
#net.bridge.bridge-nf-call-iptables = 0
#net.bridge.bridge-nf-call-arptables = 0
net.ipv4.ip_forward = 0
net.ipv4.conf.default.rp_filter = 1
net.ipv4.conf.default.accept_source_route = 0
kernel.sysrq = 0
kernel.core_uses_pid = 1
net.ipv4.tcp_syncookies = 1
kernel.msgmnb = 65536
kernel.msgmax = 65536
kernel.shmmax = 68719476736
kernel.shmall = 4294967296
net.ipv4.tcp_max_tw_buckets = 60000
net.ipv4.tcp_sack = 1
net.ipv4.tcp_window_scaling = 1
net.ipv4.tcp_rmem = 4096 87380 4194304
net.ipv4.tcp_wmem = 4096 16384 4194304
net.core.wmem_default = 8388608
net.core.rmem_default = 8388608
net.core.rmem_max = 16777216
net.core.wmem_max = 16777216
net.core.netdev_max_backlog = 262144
net.core.somaxconn = 262144
net.ipv4.tcp_max_orphans = 3276800
net.ipv4.tcp_max_syn_backlog = 262144
net.ipv4.tcp_timestamps = 0
net.ipv4.tcp_synack_retries = 1
net.ipv4.tcp_syn_retries = 1
net.ipv4.tcp_tw_recycle = 1
net.ipv4.tcp_tw_reuse = 1
net.ipv4.tcp_mem = 94500000 915000000 927000000
net.ipv4.tcp_fin_timeout = 1
net.ipv4.tcp_keepalive_time = 1200
net.ipv4.ip_local_port_range = 1024 65535
EOF
sysctl -p >/dev/null 2>&1

#echo "nameserver 219.141.140.10" >> /etc/resolv.conf


#yum install vim ntpdate lsof -y
#yum install R -y

#/usr/sbin/ntpdate ntp.api.bz
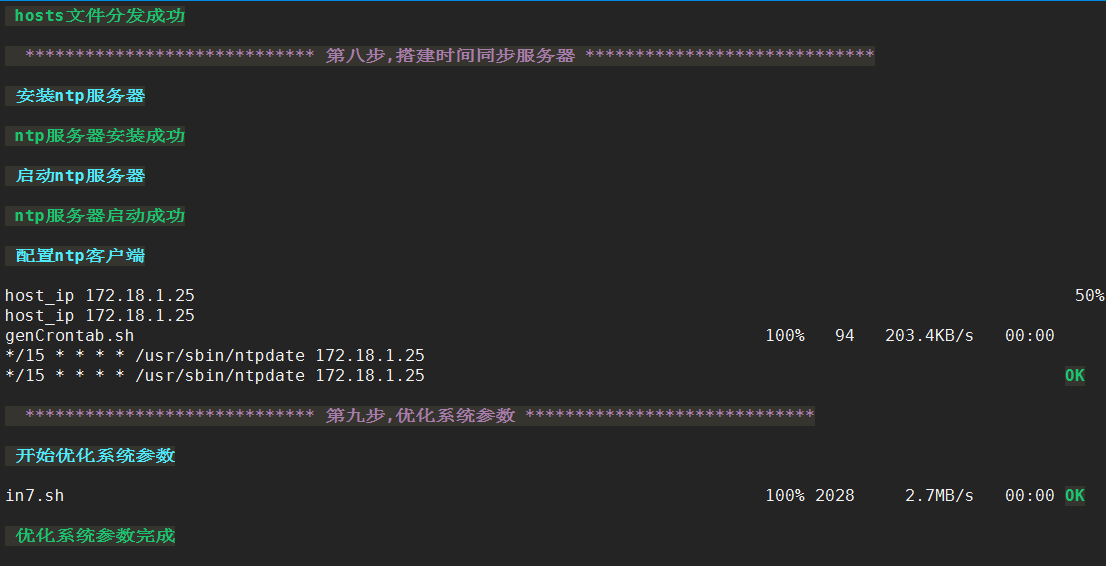
2、执行后的结果如下所示: