Java数据结构
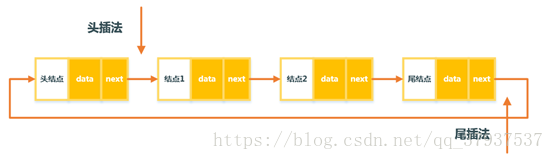
1. 循环单链表
对于单链表来说,尾节点的next为空,而循环链表的尾节点的next指向头节点
1. 首先定义内部结点类Entry,包括data和next。
class Entry{
int data;
Entry next;
public Entry(){
this.data = -1;
next = null;
}
public Entry(int data){
this.data = data;
next = null;
}
}
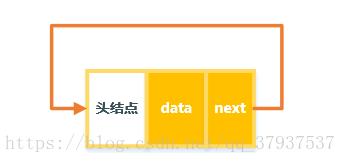
2. 初始化链表,创建一个头节点,next指向自己
public  TestClink(){
    head = new Entry();
    this.head.next = this.head;
}
3. 头插法插入结点
public void headinsert(int val){
    Entry tmp = new Entry(val);
    tmp.next = head.next;
    head.next = tmp;
}
4. 尾插法插入结点
public void tailinsert(int val){
    Entry entry = new Entry(val);
    Entry tmp = head;
    while(tmp.next != head){
        tmp = tmp.next;
    }
    tmp.next = entry;
    entry.next = head;
}
5. 删除一个结点
public void delete(int val){
    Entry cur;
    Entry prev;
    cur = head.next;
    prev = head;

    while(cur != head){
        if(cur.data == val){
            prev.next = cur.next;
            cur = prev.next;
        }
        cur = cur.next;
        prev = prev.next;
    }
}
6. 获取链表的长度
public int getlength(){
    int len = 0;
    Entry tmp = head.next;
    while(tmp != head){
        len++;
        tmp = tmp.next;
    }
    return len;
}
7. 判断链表是否为空,即判断头节点的next是否为头节点
public boolean isEmpty(){
    Entry cur = head;
    if(cur.next != head){
        return false;
    }
    return true;
}
8. 测试链表,使用尾插法插入十个节点,并获取链表长度。
public class Test17 {
    public static void main(String[] args) {
        TestClink tc = new TestClink();
        for(int i = 0;i < 10;i++){
            tc.tailinsert(i);
        }
        System.out.println(tc.getlength());
    }
}
2. 双向链表
和单链表不同的是,每个数据结点中都有两个指针,分别指向直接后继和直接前驱。单链表只能从头结点开始访问链表中的数据元素,如果需要逆序访问单链表中的数据元素将非常低效。

1. 首先首先定义内部结点类Entry,包括数据域data,指向前一个结点的引用prio和指向下一个结点的引用next。
class Entry{
    int data;
    Entry next;
    Entry prio;

    public Entry(){
        this.data = -1;
        this.next = null;
        this.prio = null;
    }

    public Entry(int val){
        this.data = val;
        this.next = null;
        this.prio = null;
    }
}
2. 初始化头结点
DoubleLink(){
    head = new Entry();
}
3. 头插法插入结点
public void inserthead(int val){
    Entry entry = new Entry(val);
    entry.next = head.next;
    entry.prio = head;
    head.next = entry;
    if(entry.next != null){
        entry.next.prio = entry;
    }
}
4. 尾插法插入结点
public void inserttail(int val){
    Entry entry = new Entry(val);
    Entry tmp = head;
    while(tmp.next != null){
        tmp = tmp.next;
    }
    entry.prio = tmp;
    entry.next = null;
    tmp.next = entry;
}
5. 删除一个结点
public void deleteEntry(int val){
    Entry cur = head.next;
    while(cur != null){
        if(cur.data == val){
            cur.prio.next = cur.next;
            if(cur.next != null){
                cur.next.prio = cur.prio;
            }
        }
        cur = cur.next;

    }
}
6. 测试链表,插入10个结点
public class Test18 {
    public static void main(String[] args) {
        DoubleLink dl = new DoubleLink();
        for(int i = 0;i < 10;i++){
            dl.inserttail(i);
        }
    }
}
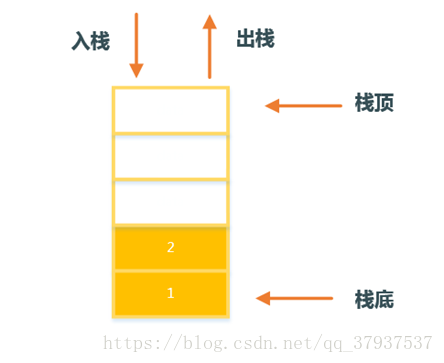
3. 顺序栈
1. 初始化栈
public Stack(){
    this(10);
}
public Stack(int size){
    this.elem = new int[size];
    this.top = 0;
}
2. 判断栈是否满
//栈是否为满
public boolean isFull(){
    if(this.top == this.elem.length){
        return true;
    }
    return flase;
}
3. 入栈操作
//入栈
public boolean push(int val){
    //判断栈满
    if(isFull()){
        return false;
    }
    this.elem[this.top++] = val;
    return true;
}
4. 判断栈是否为空
//栈是否为空
public boolean isEmpty(){
    return this.top == 0;
}
5. 出栈操作
//出栈
public boolean pop(){
    if(isEmpty()){
        return false;
    }
    --top;
    return true;
}
6. 获取栈顶元素
//得到栈顶元素
public int gettop(){
    if(isEmpty()){
        return -1;
    }
    return this.elem[this.top-1];
}
7. 打印栈内元素
//打印栈内元素
public void show(){
    for(int i = 0;i < this.top;i++){
        System.out.print(this.elem[i]+" ");
    }
    System.out.println();
}
8. 测试栈的基本操作
public class test19 {
    public static void main(String[] args) {
        Stack s1 = new Stack();
        for(int i = 0;i < 10;i++){
            s1.push(i);
        }
        s1.show();
        s1.pop();
        s1.show();
    }
}