前言
内容主要参考自《Spring源码深度解析》一书,算是读书笔记或是原书的补充。进入正文后可能会引来各种不适,毕竟阅读源码是件极其痛苦的事情。
本文主要涉及书中第二章的部分,依照书中内容以及个人理解对Spring进行了注释,详见Github仓库:https://github.com/MrSorrow/spring-framework
I. 容器基本用法
测试工程
在上一篇文章中,已经搭建了IDEA的源码工程并创建了一个自己的Module。我们可以利用自己的Module来编写自己的测试代码,需要什么spring-framwork的模块利用gradle来添加依赖即可。本文主要研究spring-beans模块,需要在自己的spring-mytest模块的 build.gradle 中添加依赖:
dependencies {
    compile(project(":spring-beans")) # 添加依赖
    testCompile group: 'junit', name: 'junit', version: '4.12'
}
Spring容器会装载管理bean,容器类似一个管家,管理所有的bean的一生。bean就是我们常用的JavaBean,比如新建 MyTestBean.java :
public class MyTestBean {

    private String testStr = "testStr";

    public String getTestStr() {
        return testStr;
    }

    public void setTestStr(String testStr) {
        this.testStr = testStr;
    }
}
使用Spring还需一个配置XML文件 beanFactoryTest.xml :
<?xml version='1.0' encoding='UTF-8' ?>
<beans xmlns="http://www.springframework.org/schema/beans"
       xmlns:xsi="http://www.w3.org/2001/XMLSchema-instance"
       xsi:schemaLocation="http://www.springframework.org/schema/beans    http://www.springframework.org/schema/beans/spring-beans.xsd">

    <bean id="myTestBean" class="guo.ping.ioc.bean.MyTestBean" >
        <property name="testStr" value="haha" />
    </bean>
</beans>
在测试包下,新建测试类 BeanFactoryTest.java :
@SuppressWarnings("deprecation")
public class BeanFactoryTest {
    @Test
    public void testSimpleLoad() {
        Resource resource = new ClassPathResource("beanFactoryTest.xml");
        BeanFactory beanFactory = new XmlBeanFactory(resource);
        MyTestBean myTestBean = (MyTestBean) beanFactory.getBean("myTestBean");
        System.out.println(myTestBean.getTestStr());
    }
}
最后,spring-mytest目录如下:
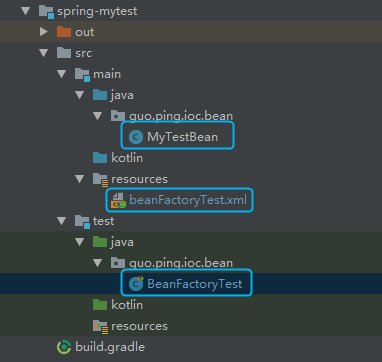
运行 testSimpleLoad 测试方法,输出haha。
功能分析
上面代码主要完成Spring容器配置管理bean的功能,Spring背后帮我们做的操作大致为:
- 读取配置文件
- 根据配置文件的配置找到对应的类并实例化
- 调用实例化后的实例
当然,可想而知,前两步的实现在Spring中一定是极其繁琐的,想要理清源码头绪还是要好好利用IDEA工具进行阅读的。
- 使用
Ctrl+H快捷键调出Hierarchy窗口 - 使用
Alt+7调出Structure面板 - 使用
Ctrl+Shift+Alt+U生成UML类图
II. Spring的结构组成
beans包的层级结构
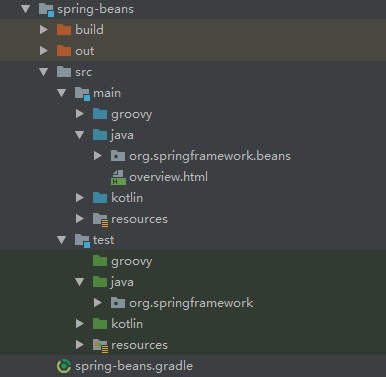
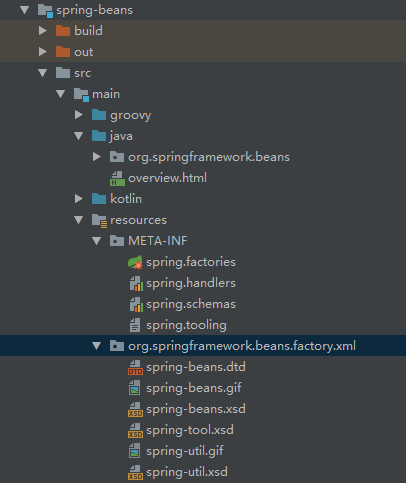
如下图所示为 spring-beans 模块的源码结构,各个源码包的主要功能为:
- src/main/java:存放java代码
- src/main/resources:存放配置文件
- src/test/java:存放测试代码
- src/test/resources:存放测试需要的配置文件
核心类介绍
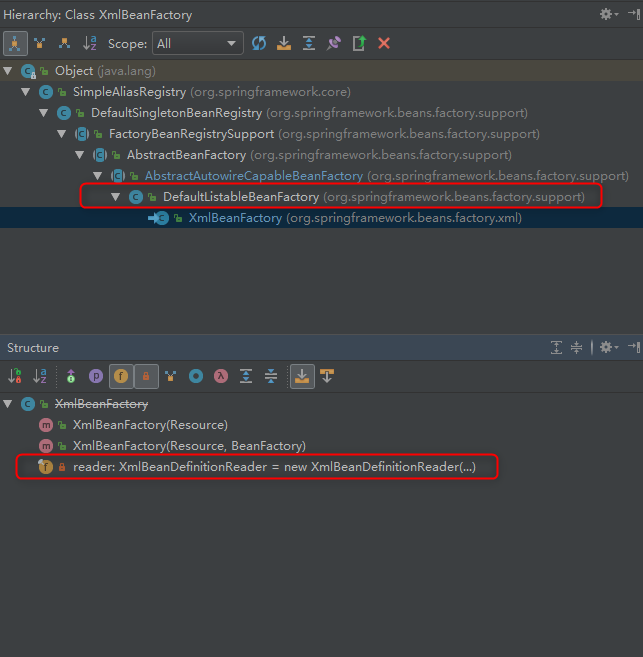
通过Debug我们的测试代码,去一步步细致的查看源码是如何实现其功能的。在测试代码中,我们利用XmlBeanFactory 类的实例去注册加载bean。通过查看 XmlBeanFactory 的继承结构以及属性方法,我们会发现两个重要的核心类,一个是它继承的 DefaultListableBeanFactory 父类和依赖的 XmlBeanDefinitionReader 。
DefaultListableBeanFactory
XmlBeanFactory 继承自 DefaultListableBeanFactory ,DefaultListableBeanFactory 是整个bean加载的核心部分,是Spring注册和加载bean的默认实现。XmlBeanFactory 和 DefaultListableBeanFactory 区别在于前者使用了自定义的XML配置文件读取器 XmlBeanDefinitionReader 。
DefaultListableBeanFactory 继承自 AbstractAutowireCapableBeanFactory 实现了 ConfigurableListableBeanFactory 、BeanDefinitionRegistry 和 Serializable 接口。
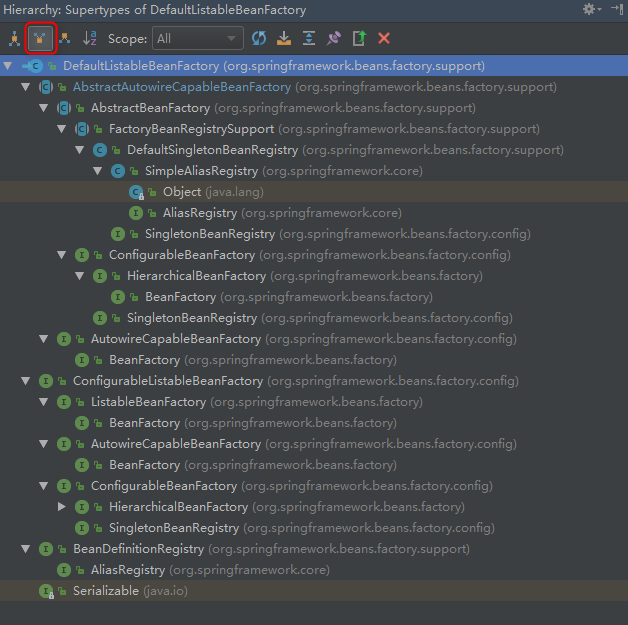
对 DefaultListableBeanFactory 使用生成UML的快捷键,得到容器加载的相关类如下:
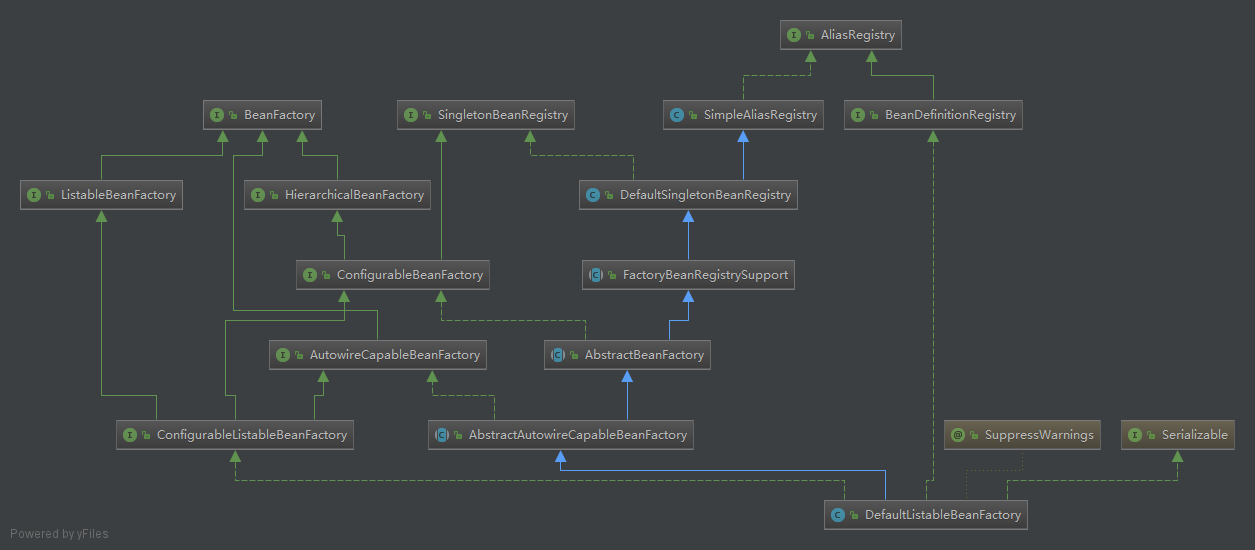
我们从上至下、由父到子进行简单了解每一个类或接口的功能:
AliasRegistry:定义对alias的简单增删查等操作SimpleAliasRegistry:主要使用map作为alias的缓存,并对接口AliasRegistry进行实现SingletonBeanRegistry:定义接口对单例bean的注册及获取等BeanFactory:定义接口用于获取bean及bean的各种属性等DefaultSingletonBeanRegistry:对接口SingletonBeanRegistry的实现HierarchicalBeanFactory:继承自BeanFactory接口,在其基础上增加对 parentFactory 支持BeanDefinitionRegistry:定义对 BeanDefinition 的各种增删查操作FactoryBeanRegistrySupport:在DefaultSingletonBeanRegistry的基础上增加对 FactoryBean 的特殊处理功能ConfigurableBeanFactory:继承自HierarchicalBeanFactory和SingletonBeanRegistry,提供配置 Factory 的各种方法ListableBeanFactory:根据各种条件获取bean的配置清单AbstractBeanFactory:抽象类,综合FactoryBeanRegistrySupport和ConfigurableBeanFactory的功能AutowireCapableBeanFactory:继承BeanFactory接口,提供创建bean、自动注入、初始化以及应用bean的后处理器AbstractAutowireCapableBeanFactory:综合AbstractBeanFactory并对接口AutowireCapableBeanFactory进行实现ConfigurableListableBeanFactory:BeanFactory配置清单,指定忽略类型及接口等DefaultListableBeanFactory:综合上面所有功能,主要是对 Bean 注册后的处理XmlBeanFactory:用于从XML文档中读取 BeanDefinition,主要添加利用 reader 属性读取注册资源文件
OK,这么多类确实很心累,我也很懵比,不过书上说后面会越来越熟的,就先了解一下吧!
XmlBeanDefinitionReader
Spring通常使用注解和XML配置文件的方式来实现其功能,其大部分功能都是以配置作为切入点的,XmlBeanDefinitionReader 中包含了配置文件的读取、解析以及注册的大致流程。同样,来个UML图。
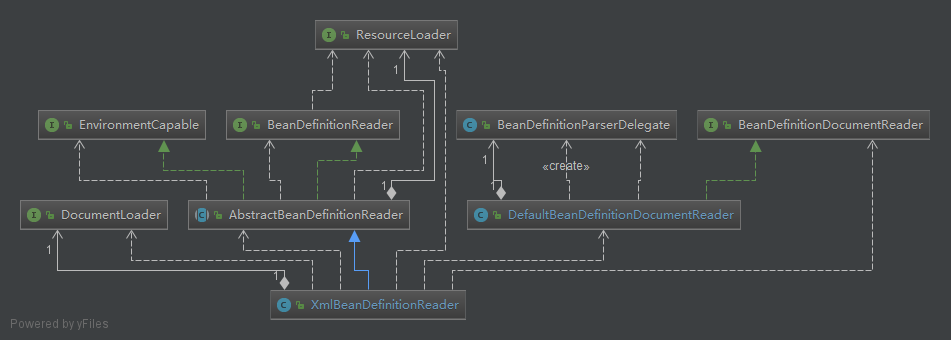
同样,从上至下依次了解各个类的功能:
ResourceLoader:定义资源加载器,主要用于根据给定的资源文件地址返回对应的ResourceBeanDefinitionReader:主要定义资源文件读取并转换为 BeanDefinition 的各个功能EnvironmentCapable:定义获取Environment的方法DocumentLoader:定义从资源文件加载到转换为Document的功能AbstractBeanDefinitionReader:对EnvironmentCapable和BeanDefinitionReader定义的功能进行实现BeanDefinitionDocumentReader:定义读取 Document 并注册 BeanDefinition 功能BeanDefinitionParserDelegate:定义解析 Element 的各种方法
Spring读取XML配置文件的大致流程主要为:
XmlBeanDefinitionReader通过继承AbstractBeanDefinitionReader中的方法,使用ResourceLoader将资源路径转换为对应的 Resource 文件;- 通过
DocumentLoader对 Resource 文件进行转换,将 Resource 文件转换为 Document 文件; - 通过实现
BeanDefinitionDocumentReader接口的DefaultBeanDefinitionDocumentReader类对 Document 进行解析,并使用BeanDefinitionParserDelegate对 Element 进行解析。
III. 容器的基础XmlBeanFactory
上面说的这些就像和Spring交朋友,知道个名字,混个脸熟,想真正了解还是得好好相处一番的。好好相处当然还是要跟着我们的测试代码一步步debug进去。
我们回过头来看看我们的测试代码:
Resource resource = new ClassPathResource("beanFactoryTest.xml");
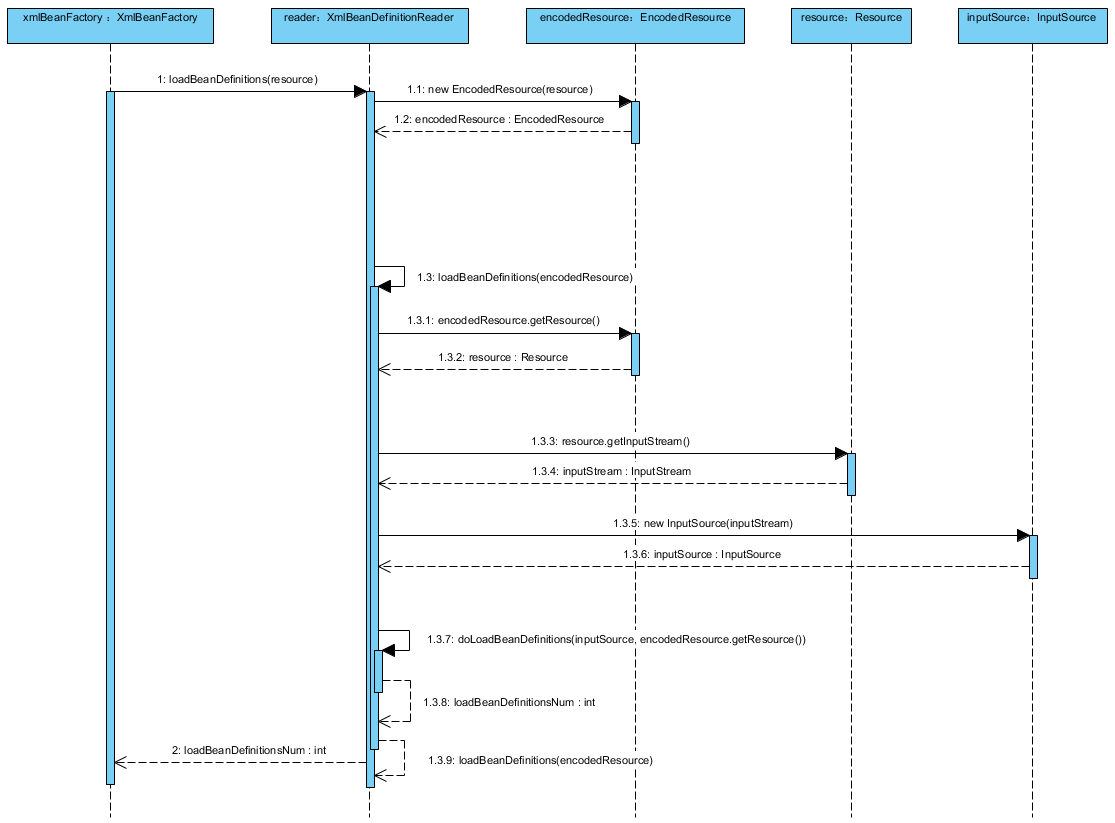
BeanFactory beanFactory = new XmlBeanFactory(resource);观察 XmlBeanFactory 初始化的时序图来整体把握代码执行流程:
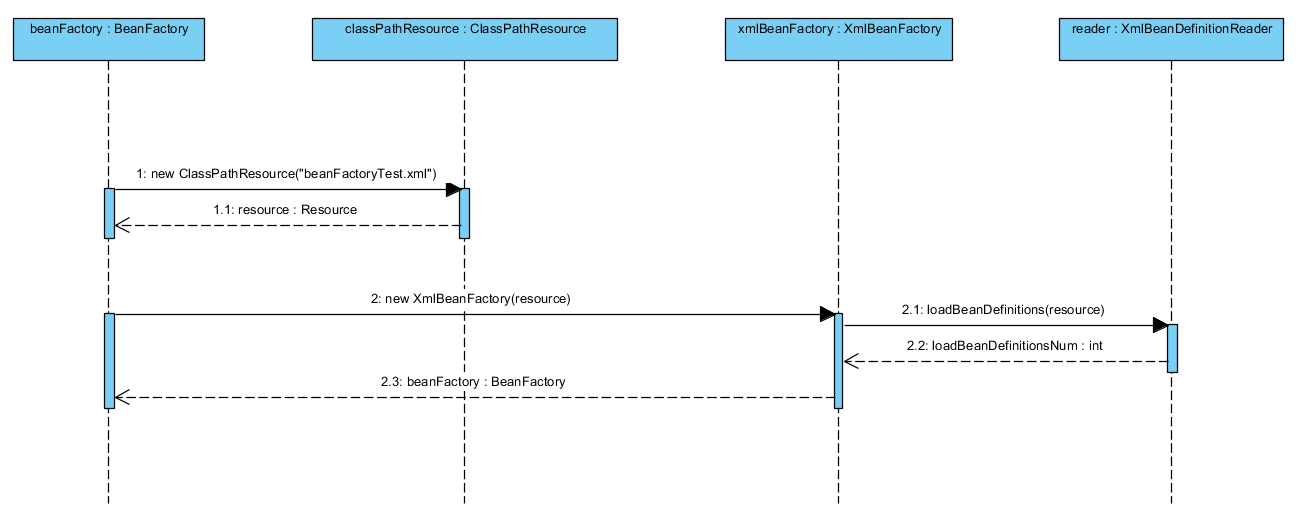
整个时序图较为简单,也没有过多深入。在 XmlBeanFactory 的构造函数中定义了资源加载的真正实现方法:
/**
  * Create a new XmlBeanFactory with the given input stream,
  * which must be parsable using DOM.
  * @param resource the XML resource to load bean definitions from
  * @param parentBeanFactory 为父类BeanFactory用于factory合并,可以为空
  * @throws BeansException in case of loading or parsing errors
  */
public XmlBeanFactory(Resource resource, BeanFactory parentBeanFactory) throws BeansException {
    super(parentBeanFactory);
    // 资源加载的真正实现
    this.reader.loadBeanDefinitions(resource);
}
配置文件封装
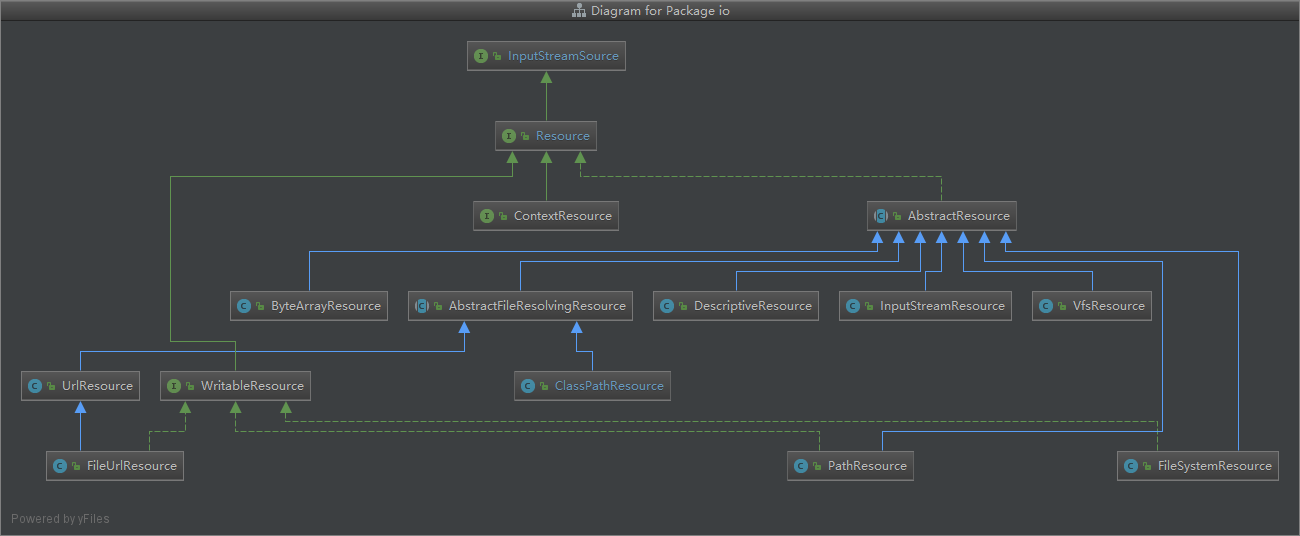
Spring利用 ClassPathResource 读取配置文件,查看 ClassPathResource 的类继承结构,可以看到它实现了一个重要的接口 Resource。
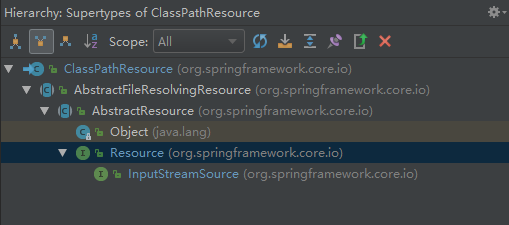
Spring对其内部使用到的资源实现了自己的抽象结构:Resource 接口用于封装底层资源。Resource 继承了 InputStreamSource 接口,定义了一些和当前资源相关的方法。
/**
 * 封装任何能够返回InputStream的类,比如File、Classpath下的资源和Byte Array等
 */
public interface InputStreamSource {
    InputStream getInputStream() throws IOException;
}
/**
* 该接口抽象了所以Spring内部使用的底层资源:File、URL、Classpath...
*/
public interface Resource extends InputStreamSource {
boolean exists();
default boolean isReadable() {
return exists();
}
default boolean isOpen() {
return false;
}
default boolean isFile() {
return false;
}
URL getURL() throws IOException;
URI getURI() throws IOException;
File getFile() throws IOException;
default ReadableByteChannel readableChannel() throws IOException {
return Channels.newChannel(getInputStream());
}
long contentLength() throws IOException;
long lastModified() throws IOException;
Resource createRelative(String relativePath) throws IOException;
@Nullable
String getFilename();
String getDescription();
}对不同来源的资源文件都有相应的 Resource 实现:文件 (FileSystemResource)、Classpath资源 (ClassPathResource)、URL资源 (UrlResource)、InputStream资源 (InputStreamResource)、Byte数组 (ByteArrayResource) 等。
有了 Resource 接口的各种实现类便能够轻松的对所有类型的资源文件进行统一处理,至于实现类的实现方式这里以 ClassPathResource 为例。其 getInputStream() 方法本质是通过class或者classLoader提供的底层方法进行调用实现的。
/**
  * 实现InputStreamSource接口的方法
  * 通过class或者classLoader提供的底层方法进行调用
  * This implementation opens an InputStream for the given class path resource.
  * @see java.lang.ClassLoader#getResourceAsStream(String)
  * @see java.lang.Class#getResourceAsStream(String)
  */
@Override
public InputStream getInputStream() throws IOException {
    InputStream is;
    if (this.clazz != null) {
        is = this.clazz.getResourceAsStream(this.path);
    }
    else if (this.classLoader != null) {
        is = this.classLoader.getResourceAsStream(this.path);
    }
    else {
        is = ClassLoader.getSystemResourceAsStream(this.path);
    }
    if (is == null) {
        throw new FileNotFoundException(getDescription() + " cannot be opened because it does not exist");
    }
    return is;
}
ClassPathResource 接口只是对资源文件进行了封装,真正的读取还是依靠 XmlBeanDefinitionReader 去实现的。XmlBeanFactory 定义了两个构造函数来进行初始化,贴上部分源码:
public XmlBeanFactory(Resource resource) throws BeansException {
    this(resource, null);
}

public XmlBeanFactory(Resource resource, BeanFactory parentBeanFactory) throws BeansException {
    super(parentBeanFactory);
    // 资源加载的真正实现
    this.reader.loadBeanDefinitions(resource);
}
loadBeanDefinitions(resource) 才是实现资源加载的代码。从上面的时序图可以看出,XmlBeanDefinitionReader 加载数据就是在这里完成的。这样上一个时序图就分析的差不多了。
题外话:ignoreDependencyInterface
在调用 loadBeanDefinitions(resource) 方法前,还调用了父类的构造函数:super(parentBeanFactory) 。再次进入父类 AbstractAutowireCapableBeanFactory 的构造函数中:
/**
  * Create a new AbstractAutowireCapableBeanFactory.
  */
public AbstractAutowireCapableBeanFactory() {
    super();
    ignoreDependencyInterface(BeanNameAware.class);
    ignoreDependencyInterface(BeanFactoryAware.class);
    ignoreDependencyInterface(BeanClassLoaderAware.class);
}

/**
  * Create a new AbstractAutowireCapableBeanFactory with the given parent.
  * @param parentBeanFactory parent bean factory, or {@code null} if none
  */
public AbstractAutowireCapableBeanFactory(@Nullable BeanFactory parentBeanFactory) {
    this();
    setParentBeanFactory(parentBeanFactory);
}

/**
  * 忽略
  */
public void ignoreDependencyInterface(Class<?> ifc) {
    this.ignoredDependencyInterfaces.add(ifc);
}
中间会执行 ignoreDependencyInterface 方法,关于这个函数的功能和Spring的自动装配功能有关。书中关于这部分的解释本人有些不太理解,所以尝试从这三个接口干嘛的说起,主要参考文章在最后都有列出。
Spring容器可以管理配置bean,对于bean来说是意识不到Spring这个容器的存在的。普通bean根本不知道BeanFactory工厂也不知道自己的name信息。当然,Spring如此设计使得bean是和Spring解耦的,缺陷就是bean无法获得Spring容器的任何信息。当然,Spring提供了解决方法,就是让bean去实现一些额外的接口,就是这里的 BeanNameAware、BeanFactoryAware 和 BeanClassLoaderAware。关于具体怎么使用,文末参考阅读部分也提供了例子。
现在已经知道如果是Spring容器正常创建 (new) 出的bean,肯定是无法感知到Spring容器的。而如果想要创建出能够获取Spring容器信息的特殊bean,肯定需要容器进行特殊的操作,把特殊bean需要知道的容器信息装载到特殊bean中。总之,二者Spring创建bean的方式不同,所以需要有所区分,那么正常new出来的bean则需要忽略实现了xxxAware接口的特殊bean,忽略就是这里的 ignoreDependencyInterface 方法。至于这里为什么只忽略 BeanNameAware、BeanFactoryAware 和 BeanClassLoaderAware 三种类型的bean,我们继续查看 AbstractAutowireCapableBeanFactory 类中的初始化bean实例的方法:
protected Object initializeBean(final String beanName, final Object bean, @Nullable RootBeanDefinition mbd) {
    if (System.getSecurityManager() != null) {
        AccessController.doPrivileged((PrivilegedAction<Object>) () -> {
            invokeAwareMethods(beanName, bean);
            return null;
        }, getAccessControlContext());
    } else {
        invokeAwareMethods(beanName, bean);
    }

    Object wrappedBean = bean;
    if (mbd == null || !mbd.isSynthetic()) {
        wrappedBean = applyBeanPostProcessorsBeforeInitialization(wrappedBean, beanName);
    }

    try {
        invokeInitMethods(beanName, wrappedBean, mbd);
    }
    catch (Throwable ex) {
        throw new BeanCreationException(
            (mbd != null ? mbd.getResourceDescription() : null),
            beanName, "Invocation of init method failed", ex);
    }
    if (mbd == null || !mbd.isSynthetic()) {
        wrappedBean = applyBeanPostProcessorsAfterInitialization(wrappedBean, beanName);
    }

    return wrappedBean;
}

private void invokeAwareMethods(final String beanName, final Object bean) {
    if (bean instanceof Aware) {
        if (bean instanceof BeanNameAware) {
            ((BeanNameAware) bean).setBeanName(beanName);
        }
        if (bean instanceof BeanClassLoaderAware) {
            ClassLoader bcl = getBeanClassLoader();
            if (bcl != null) {
                ((BeanClassLoaderAware) bean).setBeanClassLoader(bcl);
            }
        }
        if (bean instanceof BeanFactoryAware) {
            ((BeanFactoryAware) bean).setBeanFactory(AbstractAutowireCapableBeanFactory.this);
        }
    }
}从AbstractAutowireCapableBeanFactory 的定义方法中我们可以看到其调用了 invokeAwareMethods 方法,这个方法的中处理了实现了BeanNameAware、BeanFactoryAware 和 BeanClassLoaderAware 这三个接口的类,所以前面才只忽略了这三个接口,至于其他几个Aware类型的接口为什么没有忽略,在后面看 ApplicationContext 的时候会再遇到。
加载Bean
上一部分已经说到 XmlBeanDefinitionReader 中加载资源是依靠 loadBeanDefinitions(resource) 实现的。现在着重继续分析 loadBeanDefinitions(resource) 的执行逻辑。首先先看看它的时序图:
观察时序图,可以得到它的大致流程为:
- 封装资源文件。当进入
XmlBeanDefinitionReader后首先对参数Resource使用EncodingResource类进行封装; - 获取输入流。从
Resource中获取对应的InputStream并构造InputSource; - 通过构造的
InputSource实例和Resource实例继续调用函数doLoadBeanDefinitions。
loadBeanDefinitions(resource) 函数的具体实现为:
/**
  * 从指定XML配置文件装载bean 返回bean的数量
  */
@Override
public int loadBeanDefinitions(Resource resource) throws BeanDefinitionStoreException {
    // 利用EncodedResource包装resource
    return loadBeanDefinitions(new EncodedResource(resource));
}
可以看到真正实现功能的还是在 loadBeanDefinitions(EncodedResource encodedResource) 方法里实现的,EncodedResource 对 Resource 实现包装,用于对资源文件编码处理。主要逻辑体现在其 getReader() 方法中,当设置了编码属性进行编码时Spring会使用相应的编码作为输入流的编码,构造一个有编码 (encoding) 的 InputStreamReader。
/**
  * 当设置了编码属性时Spring会使用相应的编码作为输入流的编码
  */
public Reader getReader() throws IOException {
    if (this.charset != null) {
        return new InputStreamReader(this.resource.getInputStream(), this.charset);
    }
    else if (this.encoding != null) {
        return new InputStreamReader(this.resource.getInputStream(), this.encoding);
    }
    else {
        return new InputStreamReader(this.resource.getInputStream());
    }
}
loadBeanDefinitions(EncodedResource encodedResource) 方法才是真正的数据准备阶段,也就是时序图所描述的逻辑。
public int loadBeanDefinitions(EncodedResource encodedResource) throws BeanDefinitionStoreException {
    Assert.notNull(encodedResource, "EncodedResource must not be null");
    if (logger.isDebugEnabled()) {
        logger.debug("Loading XML bean definitions from " + encodedResource.getResource());
    }

    // 通过属性来记录已加载的资源
    Set<EncodedResource> currentResources = this.resourcesCurrentlyBeingLoaded.get();
    if (currentResources == null) {
        currentResources = new HashSet<>(4);
        this.resourcesCurrentlyBeingLoaded.set(currentResources);
    }
    if (!currentResources.add(encodedResource)) {
        throw new BeanDefinitionStoreException(
            "Detected cyclic loading of " + encodedResource + " - check your import definitions!");
    }
    try {
        // 从Resource中获取对应的InputStream
        InputStream inputStream = encodedResource.getResource().getInputStream();
        try {
            // 利用输入流构造InputSource, InputSource是第三方org.xml.sax包下的,利用SAX读取XML文件方式准备InputSource
            InputSource inputSource = new InputSource(inputStream);
            if (encodedResource.getEncoding() != null) {
                inputSource.setEncoding(encodedResource.getEncoding());
            }
            // 再次进入核心实现部分:)
            return doLoadBeanDefinitions(inputSource, encodedResource.getResource());
        }
        finally {
            inputStream.close();
        }
    }
    catch (IOException ex) {
        throw new BeanDefinitionStoreException(
            "IOException parsing XML document from " + encodedResource.getResource(), ex);
    }
    finally {
        currentResources.remove(encodedResource);
        if (currentResources.isEmpty()) {
            this.resourcesCurrentlyBeingLoaded.remove();
        }
    }
}
首先对传入的resource参数做封装,目的是考虑到Resource可能存在编码要求。然后,利用SAX第三方的包来解析XML文件,包装 InputStream 成为 InputSource 。我们再去所谓的核心实现方法 doLoadBeanDefinitions 瞅一瞅。
/**
  * 真正实现根据指定的XML文件加载bean
  */
protected int doLoadBeanDefinitions(InputSource inputSource, Resource resource)
    throws BeanDefinitionStoreException {
    try {
        // 获取Document
        Document doc = doLoadDocument(inputSource, resource);
        // 对配置文件进行解析,根据返回的Document注册Bean信息
        return registerBeanDefinitions(doc, resource);
    }
    catch (BeanDefinitionStoreException ex) {
        throw ex;
    }
    catch (SAXParseException ex) {
        throw new XmlBeanDefinitionStoreException(resource.getDescription(),
                                                  "Line " + ex.getLineNumber() + " in XML document from " + resource + " is invalid", ex);
    }
    catch (SAXException ex) {
        throw new XmlBeanDefinitionStoreException(resource.getDescription(),
                                                  "XML document from " + resource + " is invalid", ex);
    }
    catch (ParserConfigurationException ex) {
        throw new BeanDefinitionStoreException(resource.getDescription(),
                                               "Parser configuration exception parsing XML from " + resource, ex);
    }
    catch (IOException ex) {
        throw new BeanDefinitionStoreException(resource.getDescription(),
                                               "IOException parsing XML document from " + resource, ex);
    }
    catch (Throwable ex) {
        throw new BeanDefinitionStoreException(resource.getDescription(),
                                               "Unexpected exception parsing XML document from " + resource, ex);
    }
}
除去一大堆try…catch…可以看到 doLoadDocument() 和 registerBeanDefinitions() 才是需要关注的。 doLoadDocument() 的源码如下:
/**
  * 加载XML文件,并得到对应的Document
  */
protected Document doLoadDocument(InputSource inputSource, Resource resource) throws Exception {
    // 委托DocumentLoader对象的loadDocument方法获取Document
    return this.documentLoader.loadDocument(inputSource, getEntityResolver(), this.errorHandler, getValidationModeForResource(resource), isNamespaceAware());
}
其实上面繁杂的代码主要完成了三件事:
getValidationModeForResource(resource)获取对XML文件的验证模式;DocumentLoader.loadDocument()加载XML文件,获得对应的Document;registerBeanDefinitions(doc, resource)根据返回的Document注册Bean信息。
IV. 获取XML验证模式
上一部分已经说到Spring根据指定的XML文件加载bean,第一步需要判断XML文件的验证模式。XML常用的验证模式有两种:XSD和DTD。
DTD和XSD区别
考虑篇幅和精力,可以参考网上很多的资料:XML中DTD,XSD的区别与应用
使用DTD声明方式的配置文件:
<?xml version='1.0' encoding='UTF-8' ?>
<!DOCTYPE beans PUBLIC "-//SPRING//DTD BEAN 2.0//EN"
            "http://www.springframework.org/dtd/spring-beans-2.0.dtd">
<beans>
    ...
</beans>
使用XSD声明方式的配置文件:
<?xml version='1.0' encoding='UTF-8' ?>
<beans xmlns="http://www.springframework.org/schema/beans"
       xmlns:xsi="http://www.w3.org/2001/XMLSchema-instance"
       xsi:schemaLocation="http://www.springframework.org/schema/beans    http://www.springframework.org/schema/beans/spring-beans.xsd">
    ...
</beans>
在spring-beans模块的resource文件夹下包含了dtd和xsd的文件,Spring会对应去该目录下寻找相关文件对XML进行验证。
验证模式的读取
上面仅是对XML文件的两种验证模式做一个了解,具体Spring如何判断采用哪一种验证模式需要我们查看相应的 getValidationModeForResource(resource) 方法。
/**
  * 获取对XML配置文件的对应的验证模式(两种模式:xsd, dtd)
  */
protected int getValidationModeForResource(Resource resource) {
    int validationModeToUse = getValidationMode();
    // 如果手动指定了验证模式则使用指定的
    if (validationModeToUse != VALIDATION_AUTO) {
        return validationModeToUse;
    }
    // 没有手动指定则使用自动检测
    int detectedMode = detectValidationMode(resource);
    if (detectedMode != VALIDATION_AUTO) {
        return detectedMode;
    }
    // Hmm, we didn't get a clear indication... Let's assume XSD,
    // since apparently no DTD declaration has been found up until
    // detection stopped (before finding the document's root tag).
    return VALIDATION_XSD;
}
果然不出所料,其中还有另一个方法 detectValidationMode(resource)。另外提一下,这里的手动指定验证模式可以通过 XmlBeanDefinitionReader 的 setValidationMode(resource) 方法设定。
/**
  * 自动检测验证模式
  */
protected int detectValidationMode(Resource resource) {
    if (resource.isOpen()) {
        throw new BeanDefinitionStoreException(
            "Passed-in Resource [" + resource + "] contains an open stream: " +
            "cannot determine validation mode automatically. Either pass in a Resource " +
            "that is able to create fresh streams, or explicitly specify the validationMode " +  "on your XmlBeanDefinitionReader instance.");
    }

    InputStream inputStream;
    try {
        inputStream = resource.getInputStream();
    }
    catch (IOException ex) {
        throw new BeanDefinitionStoreException(
            "Unable to determine validation mode for [" + resource + "]: cannot open InputStream. " +
            "Did you attempt to load directly from a SAX InputSource without specifying the " +
            "validationMode on your XmlBeanDefinitionReader instance?", ex);
    }

    try {
        // 委托XmlValidationModeDetector的detectValidationMode方法检测
        return this.validationModeDetector.detectValidationMode(inputStream);
    }
    catch (IOException ex) {
        throw new BeanDefinitionStoreException("Unable to determine validation mode for [" +
                                               resource + "]: an error occurred whilst reading from the InputStream.", ex);
    }
}
好吧,除去一些异常处理的代码,很容易发现Spring专门委托 XmlValidationModeDetector 类的 detectValidationMode 方法检测验证模式。
/**
  * 真正实现检测XML资源文件的验证模式
  * 通过查看xml文件是否含有'DOCTYPE'判断是否是DTD模式
  */
public int detectValidationMode(InputStream inputStream) throws IOException {
    // Peek into the file to look for DOCTYPE.
    BufferedReader reader = new BufferedReader(new InputStreamReader(inputStream));
    try {
        boolean isDtdValidated = false;
        String content;
        while ((content = reader.readLine()) != null) {
            content = consumeCommentTokens(content);
            // 处理xml注释,如果是空行或注释则略过
            if (this.inComment || !StringUtils.hasText(content)) {
                continue;
            }
            if (hasDoctype(content)) {
                isDtdValidated = true;
                break;
            }
            // 检测一行是否拥有开始标签,例如<beans>, <bean>...DTD则是<?DOCTYPE>, 区别在于<后的是否是字母
            // 如果已经检测到是正式定义<beans>说明验证模式已经确定,无需继续读下去进行判断
            if (hasOpeningTag(content)) {
                // End of meaningful data...
                break;
            }
        }
        return (isDtdValidated ? VALIDATION_DTD : VALIDATION_XSD);
    }
    catch (CharConversionException ex) {
        // Choked on some character encoding...
        // Leave the decision up to the caller.
        return VALIDATION_AUTO;
    }
    finally {
        reader.close();
    }
}
简而言之,就是检测XML开头部分是否含有 <?DOCTYPE 字符串,如果有表示是DTD验证模式,没有则是XSD。
V. 获取Document
第一步判断XML配置文件的验证模式完成后,紧接着利用DocumentLoader.loadDocument() 方法将XML资源文件转换为 Document 对象。同样,获取 Document 也不是 XmlValidationModeDetector 亲力亲为,而是交给了 DocumentLoader 去执行,DocumentLoader 是一个接口,真正调用的方法是在 DefaultDocumentLoader 实现类中实现的。
/**
  * 根据包含Xml资源的InputSource获取Document
  */
@Override
public Document loadDocument(InputSource inputSource, EntityResolver entityResolver,
                             ErrorHandler errorHandler, int validationMode, boolean namespaceAware) throws Exception {

    DocumentBuilderFactory factory = createDocumentBuilderFactory(validationMode, namespaceAware);
    if (logger.isDebugEnabled()) {
        logger.debug("Using JAXP provider [" + factory.getClass().getName() + "]");
    }
    DocumentBuilder builder = createDocumentBuilder(factory, entityResolver, errorHandler);
    return builder.parse(inputSource);
}
对XML文件的解析,主要是依靠JAXP (Java API for XMLProcessing) 实现的。同样来个链接:JAXP。有必要额外提及的是,这里利用 DocumentBuilderFactory 创建 DocumentBuilder 时,额外传入了一个 entityResolver 的对象。下面一部分具体谈谈 EntityResolver 是干嘛的。
protected DocumentBuilder createDocumentBuilder(DocumentBuilderFactory factory,
                                                @Nullable EntityResolver entityResolver, @Nullable ErrorHandler errorHandler)
    throws ParserConfigurationException {

    DocumentBuilder docBuilder = factory.newDocumentBuilder();
    if (entityResolver != null) {
        docBuilder.setEntityResolver(entityResolver);
    }
    if (errorHandler != null) {
        docBuilder.setErrorHandler(errorHandler);
    }
    return docBuilder;
}
EntityResolver用法
EntityResolver entityResolver 参数是从 XmlBeanDefinitionReader 中传过来的,它是其中的一个属性,通过setter和getter方法可以设置与获取。和 InputSource 一样,EntityResolver 也是属于 org.xml.sax 包下的。SAX程序想要实现自定义处理外部实体必须实现 EntityResolver 接口并使用 setEntityResolver 方法向SAX驱动器注册一个实例。也就是说,对于解析一个XML,SAX首先读取该XML文档上的声明,根据声明寻找相应的DTD定义,以便对文档进行验证。它默认寻找规则是通过声明的DTD的URI地址去网络下载DTD。这样可能引来一些问题,比如下载较慢,没有网络等。利用 EntityResolver 则可以通过读取本地DTD文件返回给SAX的方式来解决这一问题。
总结起来,EntityResolver 能够帮助我们通过程序来实现从本地自定义目录寻找dtd或者xsd验证文件而无需下载。
EntityResolver 本身是一个接口,内部定义了一个 resolveEntity 方法,接收两个参数 publicId和 systemId,返回 inputSource 对象。
public interface EntityResolver {
    public abstract InputSource resolveEntity (String publicId, String systemId) throws SAXException, IOException;
}
对于不同的验证方式,其 publicId 和 systemId 是不同的。如果解析验证模式为XSD的配置文件,那么参数为:
publicId:nullsystemId:http://www.springframework.org/schema/beans/spring-beans.xsd
如果是DTD验证模式的配置文件,则参数为:
publicId:-//SPRING//DTD BEAN 2.0//ENsystemId:http://www.springframework.org/dtd/spring-beans-2.0.dtd
同样,Spring也将需要的验证文件保存在本地项目中,没错,就是之前在spring-beans模块的resource文件夹下的那些。
我们来深入看一看Spring如何找到文件的。前面已经分析 entityResolver 是通过getter方法获取的,本身 EntityResolver 也只是一个接口,需要一个实现类实现其定义的接口。我们具体从getter方法看起:
protected EntityResolver getEntityResolver() {
    if (this.entityResolver == null) {
        // Determine default EntityResolver to use.
        ResourceLoader resourceLoader = getResourceLoader();
        if (resourceLoader != null) {
            this.entityResolver = new ResourceEntityResolver(resourceLoader);
        }
        else {
            this.entityResolver = new DelegatingEntityResolver(getBeanClassLoader());
        }
    }
    return this.entityResolver;
}可以看到,entityResolver 通过实例化 ResourceEntityResolver 或者 DelegatingEntityResolver 来获得,其中 ResourceEntityResolver 是 DelegatingEntityResolver 的子类,我们先了解 DelegatingEntityResolver 中 resolveEntity() 方法的实现。
@Override
@Nullable
public InputSource resolveEntity(String publicId, @Nullable String systemId) throws SAXException, IOException {
    if (systemId != null) {
        if (systemId.endsWith(DTD_SUFFIX)) {
            // 截取systemId最后的xxx.dtd然后去当前路径下搜索
            return this.dtdResolver.resolveEntity(publicId, systemId);
        }
        else if (systemId.endsWith(XSD_SUFFIX)) {
            // 如果是xsd,调用META-INF/Spring.schemas解析
            return this.schemaResolver.resolveEntity(publicId, systemId);
        }
    }
    return null;
}
具体的实现可以自行查看源码,还是较为清晰的。
VI. 解析注册BeanDefinitions
Spring根据指定的XML文件加载bean的三步我们已经走完了两步,最后一步是根据返回的Document注册Bean信息,这一部分也是真正的重头戏。进入 registerBeanDefinitions(doc, resource) 方法:
/**
  * 通过Document对象提取注册所有的bean
  */
public int registerBeanDefinitions(Document doc, Resource resource) throws BeanDefinitionStoreException {
    // 利用DefaultBeanDefinitionDocumentReader实例化BeanDefinitionDocumentReader
    BeanDefinitionDocumentReader documentReader = createBeanDefinitionDocumentReader();
    // 记录统计前BeanDefinition的个数
    int countBefore = getRegistry().getBeanDefinitionCount();
    // 加载注册bean,所以这个就是真正实现的方法了...吗?
    documentReader.registerBeanDefinitions(doc, createReaderContext(resource));
    // 记录本次加载的BeanDefinition个数
    return getRegistry().getBeanDefinitionCount() - countBefore;
}
可以看到注册bean的工作最终交给了 BeanDefinitionDocumentReader 类来专门处理,典型的单一职责原则。该对象的实例化则是通过 createBeanDefinitionDocumentReader() 完成,在该方法中实例化的对象其实是 DefaultBeanDefinitionDocumentReader 类型,进入该类查看其 registerBeanDefinitions 方法:
/**
  * 注册加载bean
  */
@Override
public void registerBeanDefinitions(Document doc, XmlReaderContext readerContext) {
    this.readerContext = readerContext;
    logger.debug("Loading bean definitions");
    // 提取Document的root,也就是<beans>...</beans>
    Element root = doc.getDocumentElement();
    // 将root内容进行解析 所以这才是真正开始注册加载bean的实现了:)
    doRegisterBeanDefinitions(root);
}
可以看到之前一系列的准备工作,读取XML,获得Document,再提取root的Element,最终对root内容进行解析,调用 doRegisterBeanDefinitions(root) 方法注册加载bean。我们兴奋的搓搓小手,进入该方法:
/**
  * 根据<bean>...</bean>注册所有的bean,核心之处
  */
@SuppressWarnings("deprecation")  // for Environment.acceptsProfiles(String...)
protected void doRegisterBeanDefinitions(Element root) {
    // Any nested <beans> elements will cause recursion in this method. In
    // order to propagate and preserve <beans> default-* attributes correctly,
    // keep track of the current (parent) delegate, which may be null. Create
    // the new (child) delegate with a reference to the parent for fallback purposes,
    // then ultimately reset this.delegate back to its original (parent) reference.
    // this behavior emulates a stack of delegates without actually necessitating one.

    // 专门用于处理解析
    BeanDefinitionParserDelegate parent = this.delegate;
    this.delegate = createDelegate(getReaderContext(), root, parent);

    if (this.delegate.isDefaultNamespace(root)) {
        // 处理profile属性,profile属性是配置部署环境的(生产、开发),方便切换环境
        String profileSpec = root.getAttribute(PROFILE_ATTRIBUTE);
        if (StringUtils.hasText(profileSpec)) {
            // profile可以同时指定多个,需要进行拆分,并解析每个profile都是符合环境变量定义的,没定义则不解析
            String[] specifiedProfiles = StringUtils.tokenizeToStringArray(
                profileSpec, BeanDefinitionParserDelegate.MULTI_VALUE_ATTRIBUTE_DELIMITERS);
            // We cannot use Profiles.of(...) since profile expressions are not supported
            // in XML config. See SPR-12458 for details.
            if (!getReaderContext().getEnvironment().acceptsProfiles(specifiedProfiles)) {
                if (logger.isDebugEnabled()) {
                    logger.debug("Skipped XML bean definition file due to specified profiles [" + profileSpec +
                                 "] not matching: " + getReaderContext().getResource());
                }
                return;
            }
        }
    }

    // 解析前处理,留给子类实现
    preProcessXml(root);
    // 解析.... 你懂的,继续前进:)
    parseBeanDefinitions(root, this.delegate);
    // 解析后处理,留给子类实现
    postProcessXml(root);

    this.delegate = parent;
}
这一长串代码的逻辑,首先是对 profile 的处理,然后开始解析。至于 profile 属性是什么,可以查看最后参考阅读中的推荐文章。在正式进行解析xml注册bean的前后,各有一个方法用来做一些准备工作和收尾工作,分别是 preProcessXml(root) 和 postProcessXml(root) 方法。这两个方法采用了模板方法设计模式,同样文末给了相关文章进行解释。如果继承了 DefaultBeanDefinitionDocumentReader 的子类想要实现自己的准备和收尾工作,只需要重写这两个方法即可。
Profile属性使用
关于XML中如何配置使用 Profile 属性不再赘述,因为不同环境Spring需要合理的进行解XML配置bean,所以在之前先对XML中 Profile 属性先进行相关处理。首先会通过 root.getAttribute(PROFILE_ATTRIBUTE) 判断 <beans> 标签是否含有 profile 属性,如果有则会需要到环境变量中寻找,getReaderContext().getEnvironment() 获得环境变量。profile是可以同时指定多个,需要进行拆分,并解析每个profile都是符合环境变量定义的,没定义则不解析。
解析注册BeanDefinition
不说了,直接点进 parseBeanDefinitions(root, this.delegate) 方法:
/**
  * 解析注册每一个<bean>...</bean>,默认的或者自定义的如:<tx: .../>
  * Parse the elements at the root level in the document:
  * "import", "alias", "bean".
  * @param root the DOM root element of the document
  */
protected void parseBeanDefinitions(Element root, BeanDefinitionParserDelegate delegate) {
    // 对beans的处理
    // 判断是否是自定义bean声明
    if (delegate.isDefaultNamespace(root)) {
        NodeList nl = root.getChildNodes();
        for (int i = 0; i < nl.getLength(); i++) {
            Node node = nl.item(i);
            if (node instanceof Element) {
                Element ele = (Element) node;
                // 判断是否是自定义bean声明
                if (delegate.isDefaultNamespace(ele)) {
                    // 对bean的处理
                    parseDefaultElement(ele, delegate);
                } else {
                    delegate.parseCustomElement(ele);
                }
            }
        }
    } else {
        delegate.parseCustomElement(root);
    }
}
因为Spring的XML配置文件中允许我们使用自定义的标签,所以Spring对 Element 处理时需要区分情况。默认的Bean声明比如:
<bean id="myTestBean" class="guo.ping.ioc.bean.MyTestBean" />典型的自定义比如配置事务的标签 tx:
<tx:annotation-driven/>如果根节点或者子节点采用自带的标签,Spring完全知道如何进行解析,使用 parseDefaultElement 方法即可,否则需要使用 delegate.parseCustomElement(root) 来进行解析。至于Spring如何判断是否是自定义标签,采用 delegate.isDefaultNamespace(ele) 来判断,进入源码最终发现如下代码:
public boolean isDefaultNamespace(Node node) {
    return isDefaultNamespace(getNamespaceURI(node));
}

public boolean isDefaultNamespace(@Nullable String namespaceUri) {
    return (!StringUtils.hasLength(namespaceUri) || BEANS_NAMESPACE_URI.equals(namespaceUri));
}
命名空间 BEANS_NAMESPACE_URI 是http://www.springframework.org/schema/beans,如果获取节点的命名空间也是这个则认为是默认标签,否则就是自定义标签。至于Spring如何解析默认标签和自定义标签下一篇再继续。
VII. 总结
看到这,你一定无fuck说,因为我们兜了一大圈,竟然根本没有看到Spring如何依据XML配置bean的实现细节,不知道Spring是如何构造出我们的 MyTestBean 的,我们看了一大堆准备工作,还不甚了解。
只希望下一章我们能看到自己想要的…