遥控灯早已不是什么稀奇之物了,但可以接入到社交网络的彩灯听起来是不是很吸引人呢?当你收到一封电子邮件,彩灯会显示柔和的绿色来提醒你;当你在创客集结号平台发布的作品又被好友评论了,彩灯用忽明忽暗的橘黄色来告知你;当户外的空气PM2.5值报表时,彩灯会变成红色来警告你,出门记得戴口罩!是不是很想赶快拥有这样一个有趣的彩灯,跟着创客集结号xk100达人来用ARDUINO AIR 来实现吧!
一、准备材料
a) ARDUINO AIR一块;
b)RGB3色LED一个(这里的例子采用共阳4脚的3W灯珠模块);
c)导线若干;
d)220VAC转5VDC电源一个;
二、连接ARDUINO AIR和灯珠
RGB3色灯珠包含红、绿、蓝三个颜色的发光二极管,通过这三种光的颜色强弱,可以组合出各种颜色。常见的LED驱动电路如下图所示:xk100com
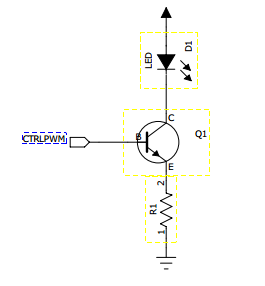
当控制信号CTRLPWM为高时,三极管Q1导通,发光二极管D1就会被点亮。想要控制D1的亮度,只要调整控制信号CTRLPWM的占空比就可以了。
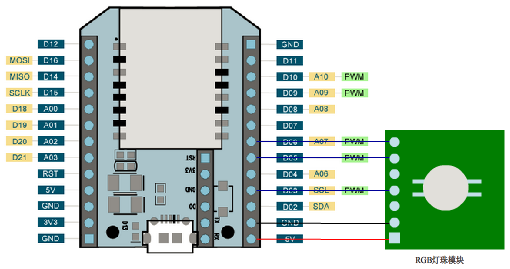
既然是三个发光二极管,就需要有三路PWM信号来控制,在加上电源和地线,只需要连接5根线就可以了,如下图所示:

彩灯的应用源码如下:
<head>
<meta charset="utf-8">
<title>RGB color picker</title>
<script src="/js/jquery-2.1.3.min.js" type="text/javascript"></script>
<script src="/js/jq-ui.js"></script>
<script src="/js/mqttws31.js" type="text/javascript"></script>
<script src="/js/osair.js" type="text/javascript"></script>
<script>
$(document).ready(function(){
OSA.Init(null, null, null);
OSA.SetReconnect(true);
OSA.on('dev_connect', function(m){
$('#devst').html('<font color="green">已连接</font>');
}).on('dev_disconnect', function(m){
$('#devst').html('<font color="red">未连接</font>');
}).on('serial', function(str){
msgcnt ++;
$('#msg').text("[" + msgcnt + "] " + str);
$('#devst').html('<font color="blue">收到数据</font>');
}).on('msg', function(p){
});
OSA.Connect();
});
</script>
<style>
#red, #green, #blue {
width: 300px;
margin: 20px auto;
}
#swatch {
width: 300px;
height: 300px;
margin: 20px auto;
border-radius:50%;
border:#ccc 1px solid;
}
#red .ui-slider-range { background: #ef2929; }
#green .ui-slider-range { background: #8ae234; }
#blue .ui-slider-range { background:#00CCFF; }
}
.kk-center{
text-align:center;
margin:auto;
}
.kk-body{
width:auto;
background-color:#165373;
text-align:center;
}
h3{
color:#fff;
font-family:Arial,"Microsoft Yahei", Helvetica, sans-serif;
font-size:24px;
font-weight:200;
line-height:1.87em;
}
.ui-corner-all, .ui-corner-bottom, .ui-corner-right, .ui-corner-br {
border-bottom-right-radius: 15px;
}
.ui-corner-all, .ui-corner-bottom, .ui-corner-left, .ui-corner-bl {
border-bottom-left-radius: 15px;
}
.ui-corner-all, .ui-corner-top, .ui-corner-right, .ui-corner-tr {
border-top-right-radius: 15px;
}
.ui-corner-all, .ui-corner-top, .ui-corner-left, .ui-corner-tl {
border-top-left-radius: 15px;
}
.ui-widget-content {
border: 1px solid #444;
background: #555;
box-shadow: inset 0 1px 0 0 #0d0e0f, inset 0 -1px 0 0 #3a3d42;
-webkit-box-shadow: inset 0 1px 0 0 #0d0e0f, inset 0 -1px 0 0 #3a3d42;
}
.ui-widget {
font-family: Verdana,Arial,sans-serif;
font-size: 1.1em;
}
.ui-slider-horizontal {
height: 0.8em;
}
.ui-slider {
position: relative;
text-align: left;
}
#red .ui-slider-range {
background: #ef2929;
}
.ui-slider-horizontal .ui-slider-range-min {
left: 0;
}
.ui-slider-horizontal .ui-slider-range {
top: 0;
height: 100%;
}
.ui-slider .ui-slider-range {
position: absolute;
z-index: 1;
font-size: .7em;
display: block;
border: 0;
background-position: 0 0;
}
.ui-widget-header {
border: 1px solid #aaaaaa;
color: #222222;
font-weight: bold;
}
.ui-slider .ui-slider-handle {
position: absolute;
z-index: 2;
width: 1.2em;
height: 1.2em;
cursor: default;
-ms-touch-action: none;
touch-action: none;
}
#green .ui-slider-handle {
border:5px solid #666;
outline:none;
background-color:#8ae234;
}
#red .ui-slider-handle {
border:5px solid #666;
outline:none;
background-color:#ef2929;
}
#blue .ui-slider-handle {
border:5px solid #666;
outline:none;
background-color:#00ccff;
}
.ui-state-hover, .ui-widget-content .ui-state-hover, .ui-widget-header .ui-state-hover, .ui-state-focus, .ui-widget-content .ui-state-focus, .ui-widget-header .ui-state-focus {
border: 1px solid #999999;
font-weight: normal;
color: #212121;
}
.ui-state-default, .ui-widget-content .ui-state-default, .ui-widget-header .ui-state-default {
border: 1px solid #d3d3d3;
font-weight: normal;
color: #555555;
}
.ui-slider-horizontal .ui-slider-handle {
top: -.3em;
margin-left: -.6em;
}
.ui-slider .ui-slider-handle {
position: absolute;
z-index: 2;
width: 14px;
height: 14px;
cursor: default;
-ms-touch-action: none;
touch-action: none;
}
hr{
margin:15px 0;
border:0;
border-top:#041927 1px solid;
border-bottom:#3491a6 1px solid;
}
</style>
<script type="text/javascript">
function hexFromRGB(r, g, b) {
var hex = [
r.toString( 16 ),
g.toString( 16 ),
b.toString( 16 )
];
$.each( hex, function( nr, val ) {
if ( val.length === 1 ) {
hex[ nr ] = "0" + val;
}
});
return hex.join( "" ).toUpperCase();
}
function refreshSwatch() {
var red = $( "#red" ).slider( "value" ),
green = $( "#green" ).slider( "value" ),
blue = $( "#blue" ).slider( "value" ),
hex = hexFromRGB( red, green, blue );
$( "#swatch" ).css( "background-color", "#" + hex );
OSA.analogWrite(3,red);
OSA.analogWrite(5,green);
OSA.analogWrite(6,blue);
}
$(function() {
$( "#red, #green, #blue" ).slider({
orientation: "horizontal",
range: "min",
max: 255,
value: 127,
slide: refreshSwatch,
change: refreshSwatch
});
$( "#red" ).slider( "value", 255 );
$( "#green" ).slider( "value", 140 );
$( "#blue" ).slider( "value", 60 );
});
</script>
</head>
<body class="kk-body">
<h3>可调色LED演示</h3>
<div class="kk-center">
<div id="swatch" ></div>
<hr>
<div id="red"></div>
<div id="green"></div>
<div id="blue"></div>
<hr>
</div>
</body>
</html>
实物图如下: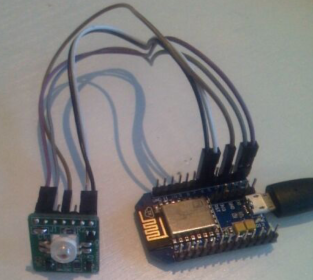
xk100com
三、上电调试
用MicroUSB电缆通过充电器或者电脑USB口给模块供电。进入开发者页面,选择对应设备,进入ARDUINO AIR调试界面,滑动调整IO(D03)的PWM值,LED将呈现红色,随着PWM值得增大而增大,再由最大值调整为最小值,LED逐渐变暗,最后熄灭;同样,滑动调整IO(D05)的PWM值,LED将呈现绿色;滑动调整IO(D06)的PWM值,LED将呈现蓝色。
四、集成智能彩灯
将220VAC转5VDC模块和ARDUINO AIR相连,然后连同灯珠模块一起放在灯泡里(或者其他透光的空间里)就完成了一个智能彩灯的制作!若想查找更多的Arduino项目和免费教程,可以搜索创客集结号/wwwxk100com。