1,解压内核源码
tar -xvf linux-3.0.8.tar.bz2
2,内核的编译步骤:
a,设置交叉工具链--目标文件运行在arm处理上, 修改Makefile
195 ARCH ?= arm
196 CROSS_COMPILE ?= arm-none-linux-gnueabi-
b,选择当前开发的soc:内核源码兼容性比较强:s3c2410, s3c6410, s5pv210
make s5pv210_defconfig // 原理: arch/arm/configs/s5pv210_defconfig ==》拷贝到当前目录: .config (控制源码编译)
c, 进一步选择内核模块(裁剪) //如果出现编译报错,需要安装'make menuconfig' requires the ncurses libraries.
//解决: sudo apt-get install libncurses5-dev
make menuconfig //产生一个图形界面,选择自己需要的东西
d, make zImage -j2 //编译内核. -j2表示双线程编译
最原始的内核是不能直接运行成功, 需要做移植:
D:\Linux驱动课程-fs210_1804\驱动参考代码和资料\1st_搭建环境\实验\系统环境搭建移植文档.doc
编译完成之后:自动生成
arch/arm/boot/zImage
3, 启动内核:
cp arch/arm/boot/zImage /tftpboot
uboot设置:
FS210 # set bootcmd tftp 0x40008000 zImage \; bootm 0x40008000
// bootcmd变量作用: uboot倒计时自动要做的事情
FS210 # save
4, 挂载根文件系统
D:\Linux驱动课程-fs210_1804\source\rootfs_fs210.tgz ==》 /opt
Ubuntu中配置
sudo tar -xvf rootfs_fs210.tgz ==> /opt/rootfs
配置nfs服务器:
sudo vim /etc/exports
/opt/rootfs *(subtree_check,rw,no_root_squash,async)
重启nfs服务器:
sudo service nfs-kernel-server restart
uboot配置:bootargs: uboot传递给内核的参数,告诉内核挂载哪里的根文件系统
FS210 # set bootargs root=/dev/nfs nfsroot=192.168.7.108:/opt/rootfs_fs210 ip=192.168.7.168 console=ttySAC0,115200 init=/linuxrc
FS210 # save
// root=/dev/nfs /dev/nfs只是一个字符串,内核需要通过nfs挂载根系统
// nfsroot=192.168.7.3:/opt/rootfs : 指定挂载机器的ip和路径, 路径一定要和/etc/exports中的路径保持一致
//console=ttySAC0,115200 : 指定串口com1,波特率
//init=/linuxrc :指定祖先进程--init进程
====================================================================================================
编写驱动代码
// 1, 添加头文件
#include <linux/init.h>
#include <linux/module.h>
// 3,实现驱动模块加载/卸载入口函数
static int hello_drv_init(void)
{
printk("--------^_* %s-------\n", __FUNCTION__);
return 0;
}
static void hello_drv_exit(void)
{
printk("--------^_* %s-------\n", __FUCNTION__);
}
// 2,声明驱动模块加载/卸载入口函数
module_init(hello_drv_init);
module_exit(hello_drv_exit);
// 4, 添加gpl认证
MODULE_LICENSE("GPL");
============================================================================
Makefile的写法:
#指定内核所在路径
KERNEL_DIR = /home/farsight/s5pv210/kernel/linux-3.0.8
#获取当前路径
CURRENT_DIR = $(shell pwd)
all:
#进入到内核源码中,执行内核Makefile, 告诉内核将当前目录中的源码编译成模块
make -C $(KERNEL_DIR) M=$(CURRENT_DIR) modules
clean :
make -C $(KERNEL_DIR) M=$(CURRENT_DIR) clean
install:
cp -raf *.ko /opt/rootfs/drv_module
#指定编译哪个模块
obj-m += hello_drv.o
============================================================================
运行:
[root@farsight /drv_module]# insmod hello_drv.ko
--------^_* hello_drv_init-------
[root@farsight /drv_module]# lsmod
hello_drv 877 0 - Live 0x7f004000
[root@farsight /drv_module]# rmmod hello_drv
--------^_* hello_drv_exit-------
=====================================================
编写驱动代码的时候,不会用vim去编写, 一般都是用source insight
1, 解压内核源码--windows某个位置
2, 将D:\Linux驱动课程-fs210_1804\source\si_linux308-ori.tgz,解压到内核linux3.0.8源码目录下
3,打开linux308-ori.PR
申请设备号:
// 参数1---指定的主设备号--就是一个整数,选255以上
//参数2--设备的描述--自定义的字符串
//参数3--设备驱动的文件操作对象
//返回值: 错误为负数,正确为0
ret = register_chrdev(dev_major, "hello_device", &hello_fops);
注销设备号:
// 参数1---指定的主设备号--就是一个整数,选255以上
//参数2--设备的描述--自定义的字符串
unregister_chrdev(dev_major, "hello_device");
[root@farsight /drv_module]# cat /proc/devices
Character devices:
1 mem
2 pty
3 ttyp
4 /dev/vc/0
4 tty
4 ttyS
5 /dev/tty
5 /dev/console
5 /dev/ptmx
7 vcs
10 misc
265 hello_device
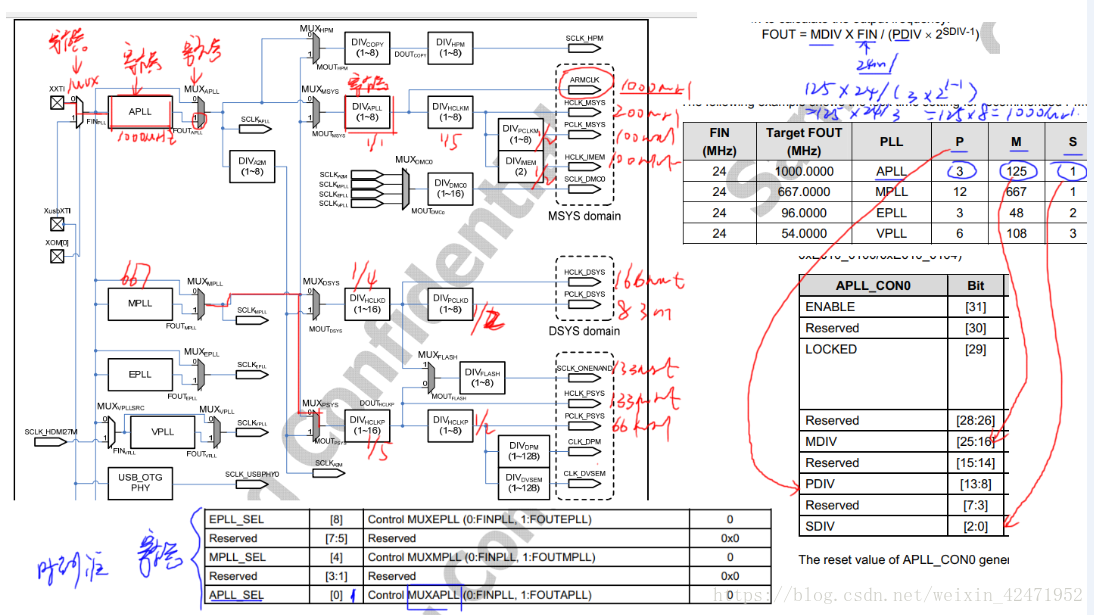
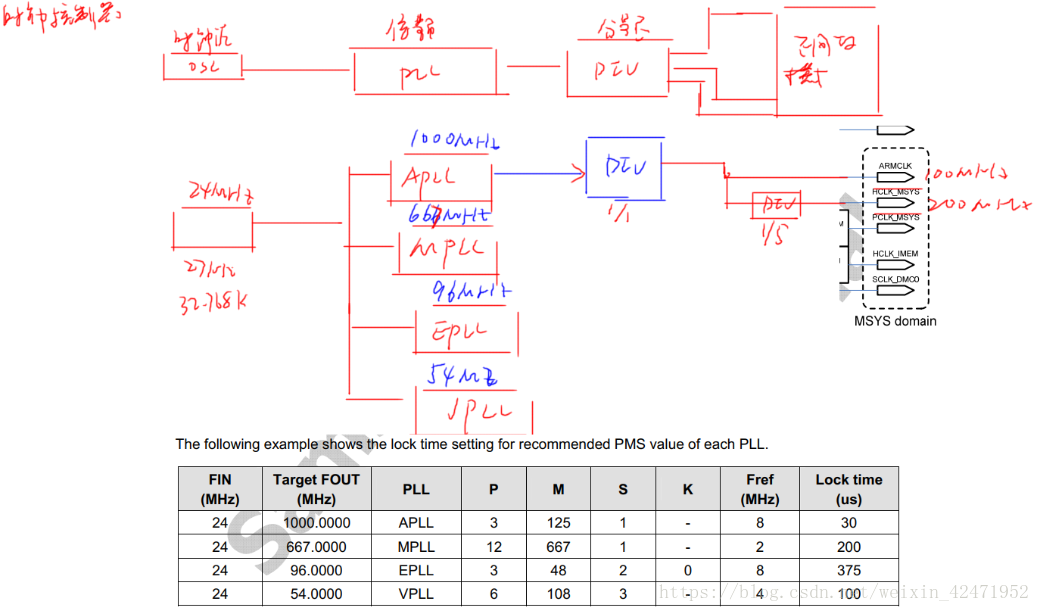
ARM时钟
 c语言与汇编交叉代码
.text
.global _start

_start:

    @ init sp c函数中有栈的概念,汇编代码在调用c中的函数时,需要初始化栈才能使用,栈指针是从上往下走的,bl led_main
    ldr sp, =0x30008000

    @ pass args
    ldr r0, =0x100000

    bl led_main

loop:
    b loop
#define GPC0CON *((volatile unsigned long *)0xE0200060)
#define GPC0DAT *((volatile unsigned long *)0xE0200064)
int led_main(int delay)
{
// c程序中对led进行控制
// 配置 输出功能
GPC0CON &= ~(0xff<<12);
GPC0CON |= (0x11<<12);
int i;
while(1)
{
GPC0DAT |= (0x3<<3);
for(i=delay; i>0; i--);
GPC0DAT &= ~(0x3<<3);
for(i=delay; i>0; i--);
}
return 0;
}
ledasm.bin : start.S
	arm-none-linux-gnueabi-gcc -c start.S -o start.o
	arm-none-linux-gnueabi-gcc -c main.c -o main.o
	arm-none-linux-gnueabi-ld -Ttext 0x40008000   start.o main.o -o led_asm.elf
	arm-none-linux-gnueabi-objcopy -O binary led_asm.elf  ledasm.bin
	arm-none-linux-gnueabi-objdump -D led_asm.elf  > led.dis

clean:
	rm -rf *.o *.elf *.dis *.bin


install:
	cp -raf *.bin /tftpboot