上两节前端入门之(vuex源码解析二)我们把vuex的源码大概的撸了一遍,还剩下(插件、getters跟module),我们继续哈~
插件童鞋们可以去看看vuex在各个浏览器的状态显示插件,小伙伴可以直接看官网然后集成哈,我这边网连github太慢了,就不带着一起安装了,附上vue-devtools插件地址:
https://github.com/vuejs/vue-devtools
我们简单看一下插件怎么运行的哈,看Store的构造函数中有这么几行代码:
// apply plugins
  plugins.forEach(function (plugin) { return plugin(this$1); });

  if (Vue.config.devtools) {
    devtoolPlugin(this);
  }
可以看到,很简单,就是循环遍历所有插件,然后执行插件方法 把store对象传递进去:
plugin(this$1);我们可以看到底下有一个自带的插件:
if (Vue.config.devtools) {
    devtoolPlugin(this);
  }
function devtoolPlugin (store) {
if (!devtoolHook) { return }
store._devtoolHook = devtoolHook;
devtoolHook.emit('vuex:init', store);
devtoolHook.on('vuex:travel-to-state', function (targetState) {
store.replaceState(targetState);
});
store.subscribe(function (mutation, state) {
devtoolHook.emit('vuex:mutation', mutation, state);
});
}可以看到,devtoolPlugin其实就是注册了一个钩子函数,让vuex的state发送变换的时候,监听state的变换,最后回调devtoolHook的emit方法,那么devtoolHook又是什么呢?对的! 就是针对各个浏览器做的vuex插件,也就是文章开始我跟大家说的vue浏览器调试插件.
插件会根据state的变换,然后用可视化的形式列出state的各个层级:
var devtoolHook =
  typeof window !== 'undefined' &&
  window.__VUE_DEVTOOLS_GLOBAL_HOOK__;
小伙伴感兴趣可以直接去玩玩哈~~
好啦,说完插件,我们说一下getters,getters也算是vuex里面的一个大模块,那么getters是干嘛的呢? 可以把getters看作是vue里面的computed:
var vm = new Vue({
  computed: {
    // 计算属性的 getter
    reversedMessage: function () {
      // `this` 指向 vm 实例
      return this.message.split('').reverse().join('')
    }
  }
})
至于什么是computed,小伙伴不懂的可以去看官网哈
https://cn.vuejs.org/v2/guide/computed.html
对的!! 因为在vuex的内部,getters其实就是computed的另外一种表现形式,底层就是通过vue的computed实现的,我们可以看源码:
function resetStoreVM (store, state, hot) {
  var oldVm = store._vm;

  // bind store public getters
  store.getters = {};
  var wrappedGetters = store._wrappedGetters;
  var computed = {};
  forEachValue(wrappedGetters, function (fn, key) {
    // use computed to leverage its lazy-caching mechanism
    computed[key] = function () { return fn(store); };
    Object.defineProperty(store.getters, key, {
      get: function () { return store._vm[key]; },
      enumerable: true // for local getters
    });
  });

  // use a Vue instance to store the state tree
  // suppress warnings just in case the user has added
  // some funky global mixins
  var silent = Vue.config.silent;
  Vue.config.silent = true;
  store._vm = new Vue({
    data: {
      $$state: state
    },
    computed: computed
  });
    ....
这里的computed就是我们在store定义的getters~~这样说有点抽象哈,我们结合demo一起看看用法
我们的store:
/**
 * @author YASIN
 * @version [React-Native Ocj V01, 2018/7/22]
 * @date 17/2/23
 * @description index
 */
import Vue from 'vue';
import Vuex from 'vuex';
import moduleA from './a';
// window.Vue=Vue
Vue.use(Vuex)
let state = {
  count: 0
};
const actions = {
  increase({commit}) {
    commit('increase');
  },
  decrease({commit}) {
    commit('decrease');
  }
};
const mutations = {
  increase(state) {
    state.count++;
  },
  decrease(state) {
    state.count--;
  }
};
export default new Vuex.Store({
  state,
  actions,
  mutations,
  modules: {
    a: moduleA
  },
  getters: {
    doneTodos: state => {
      return state.count
    }
  }
});
可以看到我们给了一个:
 getters: {
    doneTodos: state => {
      return state.count
    }
  }
然后直接返回了count,因为我前面说了,getters其实就是computed计算属性,所以当state.count发生变换的时候,我们的doneTodos的值应该也会改变,我们试试哈.
首先在我们的组件中获取getters中的doneTodos:
computed: {
      count() {
        return this.$store.state.count
      },
      doneTodos(){
        return this.$store.getters.doneTodos
      },
      ...mapState('a',{
        aCount: 'count'
      })
    },
然后渲染出doneTodos:
<div class="hello">
    {{doneTodos}}
    <div class="opt-container">
demo全部代码:
<template>
  <div class="hello">
    {{doneTodos}}
    <div class="opt-container">
      <div class="opt opt-increase" @click="increase">+</div>
      <span class="opt">{{count}}</span>
      <div class="opt opt-decrease" @click="decrease">-</div>
    </div>
    <div class="opt-container">
      <div class="opt opt-increase" @click="increaseA">+</div>
      <span class="opt">{{aCount}}</span>
      <div class="opt opt-decrease" @click="increaseA">-</div>
    </div>
  </div>
</template>

<script>
  import {mapState,mapActions} from 'vuex'
  export default {
    name: 'HelloWorld',
    computed: {
      count() {
        return this.$store.state.count
      },
      doneTodos(){
        return this.$store.getters.doneTodos
      },
      ...mapState('a',{
        aCount: 'count'
      })
    },
    methods: {
      increase() {
        this.$store.dispatch({type:'increase'}).then(()=>{
          alert('执行了一次加法');
        });
      },
      decrease() {
        this.$store.dispatch({type:'decrease'});
      },
      ...mapActions('a',{
        increaseA: {type:'increase'}
      }),
//      increaseA(){
//        this.$store.dispatch({type:'a/increase'});
//      },
//      decreaseA() {
//        this.$store.dispatch({type:'a/decrease'});
//      },
    },
    mounted(){
      this.$store.subscribeAction((action,state)=>{
        alert('你正在操作action,type为:'+action.type);
      })
    }
  }
</script>

<!-- Add "scoped" attribute to limit CSS to this component only -->
<style scoped>
  .opt-container {
    font-size: 0px;
  }

  .opt {
    display: inline-block;
    text-align: center;
    height: 40px;
    width: 40px;
    border-radius: 20px;
    background-color: #efefef;
    line-height: 40px;
    user-select: none;
    font-size: 20px;
    margin: 0 10px;
    vertical-align: middle;
  }
</style>
然后运行项目:
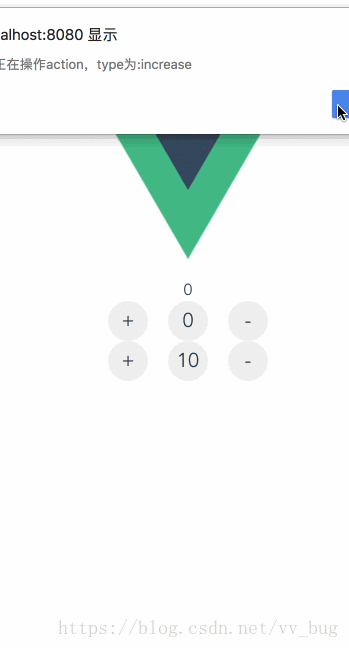
可以看到,当我们点击+的时候,除了中间的count加了外,上面的doneTodos也跟着变换了,所以了解computed的童鞋应该知道,当写在计算属性方法里面的数据发生变化的时候,computed的值就会变化.
好啦!! 最后还剩下一个module模块化, 当我们项目中有很多模块的时候,我们为了区分每个模块的功能,让rootstore不那么臃肿,于是出来了一个叫模块的东西,我们怎么用呢?
我们只需要在我们的store里面添加modules即可:
export default new Vuex.Store({
  state,
  actions,
  mutations,
  modules: {
    a: moduleA
  },
  getters: {
    doneTodos: state => {
      return state.count
    }
  }
});
moduleA:
/**
 * @author YASIN
 * @version [React-Native Ocj V01, 2018/7/31]
 * @date 17/2/23
 * @description index
 */
let state = {
  count: 10
};
const actions = {
  increase({commit}) {
    commit('increase');
  },
  decrease({commit}) {
    commit('decrease');
  }
};
const mutations = {
  increase(state) {
    state.count++;
  },
  decrease(state) {
    state.count--;
  }
};
export default {
  namespaced: true,
  state,
  actions,
  mutations,
}
怎么用呢? 我们获取a模块里面的count,叫aCount:
computed: {
      count() {
        return this.$store.state.count
      },
      doneTodos(){
        return this.$store.getters.doneTodos
      },
      ...mapState('a',{
        aCount: 'count'
      })
},我直接使用了命名空间,看起来有点怪哈,命名空间小伙伴自己去看官网哈,代码很简单,我就不一行一行去解析了https://vuex.vuejs.org/zh/guide/modules.html
 <div class="opt-container">
      <div class="opt opt-increase" @click="increaseA">+</div>
      <span class="opt">{{aCount}}</span>
      <div class="opt opt-decrease" @click="increaseA">-</div>
    </div>
a模块的action怎么调用呢?
 ...mapActions('a',{
        increaseA: {type:'increase'},
        decreaseA: {type:'decrease'}
      }),
当然也是加了命名空间的~~~
效果我就不展示了,我们简单看一下源码实现~~
首先是Store的构造函数中:
this._modules = new ModuleCollection(options);options是我们传进去的参数,包含了modules,ModuleCollection是什么呢?
var ModuleCollection = function ModuleCollection (rawRootModule) {
  // register root module (Vuex.Store options)
  this.register([], rawRootModule, false);
};
继续走:
ModuleCollection.prototype.register = function register (path, rawModule, runtime) {
    var this$1 = this;
    if ( runtime === void 0 ) runtime = true;

  if (process.env.NODE_ENV !== 'production') {
    assertRawModule(path, rawModule);
  }

  var newModule = new Module(rawModule, runtime);
  if (path.length === 0) {
    this.root = newModule;
  } else {
    var parent = this.get(path.slice(0, -1));
    parent.addChild(path[path.length - 1], newModule);
  }

  // register nested modules
  if (rawModule.modules) {
    forEachValue(rawModule.modules, function (rawChildModule, key) {
      this$1.register(path.concat(key), rawChildModule, runtime);
    });
  }
};
可以看到,最后递归调用
this$1.register(path.concat(key), rawChildModule, runtime);那么当我们传入的Store为:
export default new Vuex.Store({
  state,
  actions,
  mutations,
  modules: {
    a: moduleA
  },
  getters: {
    doneTodos: state => {
      return state.count
    }
  }
});
这样的时候,我们的 this._modules = new ModuleCollection(options);最后的层级就是:
root(Module){child: a(Module)}好啦!! vuex算是告一段落了,接下来就是研究一下vue-router了,加油!!! 欢迎入群,一起学习~~