- pytorch实现yolo-v3 (源码阅读和复现) – 001
- pytorch实现yolo-v3 (源码阅读和复现) – 002
- pytorch实现yolo-v3 (源码阅读和复现) – 003算法分析
- pytorch实现yolo-v3 (源码阅读和复现) – 004算法分析
- pytorch实现yolo-v3 (源码阅读和复现) – 005
前面已经搭建了YOLO V3的网络, 只需要在此基础上提供输入,并对预测结果过滤,就可以输出了,完整工程代码已分享.
所有代码: https://github.com/wanghao00/pytorch-yolo-v3/blob/master/002
1. 图像预处理部分preprocess.py
给定图像路径以及期望的尺寸, 进行整体缩放后, 居中放置在画布上,并返回,
返回值值包括 : 处理后图像, 原图, 原图尺寸
def letterbox_image(img, input_dim):
    """
    调整图像尺寸
    将图像按照比例进行缩放,此时 某个边正好可以等于目标长度,另一边小于等于目标长度
    将缩放后的数据拷贝到画布中心,返回完成缩放
    """
    ori_w, ori_h = img.shape[1], img.shape[0]
    dst_w, dst_h = input_dim
    new_w = int(ori_w * min(dst_w/ori_w, dst_h/ori_h)) # 保证较长的边缩放后正好等于目标长度
    new_h = int(ori_h * min(dst_w/ori_w, dst_h/ori_h))
    resized_image = cv2.resize(src=img, dsize=(new_w, new_h), interpolation=cv2.INTER_CUBIC) # 双三次插值

    # 创建一个画布, 将resized_image数据 拷贝到画布中心
    canvas = np.full(shape=(dst_w, dst_h, 3), fill_value=128)
    canvas[(dst_h-new_h)//2: (dst_h-new_h)//2 + new_h, (dst_w-new_w)//2: (dst_w-new_w)//2 + new_w, :] = resized_image

    return canvas

# 参数:原图路径,目标大小
# 将原图resize到  inp_dim*inp_dim大小
# 即 (3,416,416)
# 返回值 (处理后图像,原图,原图尺寸)

def preprocess_image(img, input_dim):
    """
    为神经网络准备输入图像数据
    返回值: 处理后图像, 原图, 原图尺寸
    """
    ori_img = cv2.imread(img)
    dim = ori_img.shape[1], ori_img.shape[0] # h,w, c
    img = letterbox_image(ori_img, (input_dim, input_dim))
    # img = letterbox_image_(ori_img, (input_dim, input_dim))
    img_ = img[:, :, ::-1].transpose((2,0,1)).copy()
    img_ = torch.from_numpy(img_).float().div(255.0).unsqueeze(0)
    return img_, ori_img, dim
2. 检测脚本
detect.py
from __future__ import division
import time
import torch
from torch.autograd import Variable
import cv2
from util import *
import argparse
import os
import os.path as osp
from darknet import Darknet
from preprocess import preprocess_image, inp_to_image
import random
import pickle as pkl

def arg_parse():
    """
    检测模块的参数转换
    """
    # 格式: 参数名, 目标参数(dest是字典的key),帮助信息,类型, 默认值
    parser = argparse.ArgumentParser(description="Yolo v3 检测模型")
    parser.add_argument("--images", dest="images", help="待检测图像目录", type=str, default="imgs")
    parser.add_argument("--dets", dest="dets", help="检测结果保存目录", type=str, default="det")
    parser.add_argument("--bs", dest="bs", help="Batch 大小, 默认为 1", default=1)
    parser.add_argument("--confidence", dest="confidence", help="目标检测结果置信度阈值", default=0.5)
    parser.add_argument("--nms_thresh", dest="nms_thresh", help="NMS非极大值抑制阈值", default=0.4)

    parser.add_argument("--cfg", dest="cfg", help="配置文件", default="cfg/yolov3.cfg", type=str)
    parser.add_argument("--weights", dest="weights", help="模型权重", default="yolov3.weights", type=str)

    parser.add_argument("--resize", dest="resize", help="网络输入分辨率. 分辨率越高,则准确率越高; 反之亦然.", \
                        default="416", type=str)
    parser.add_argument("--scales", dest="scales", help="缩放尺度用于检测", default="1,2,3", type=str)

    # 返回转换好的结果
    return parser.parse_args()

if __name__ == '__main__':
    args = arg_parse() # 类型: argparse.Namespace, 可以像easydict一样使用
    print(args)

    scales = args.scales
    images = args.images
    batch_size = args.bs
    confidence = args.confidence
    nms_thresh = args.nms_thresh

    # GPU环境是否可用
    CUDA = torch.cuda.is_available()

    # coco 数据集
    num_class, classes = load_classes("data/coco.names")

    # 建立神经网络
    print("载入神经网络...")
    model = Darknet(args.cfg)
    model.load_weights(args.weights)
    print("模型加载成功.")

    # 网络输入数据大小
    model.net_info["height"] = int(args.resize)
    input_dim = model.net_info["height"]
    assert input_dim > 0 and input_dim % 32 == 0

    # 如果GPU可用, 模型切换到cuda中运行
    if CUDA:
        model.cuda()
    # 评估模式
    model.eval()

    # 加载待检测图像列表
    try:
        imlist = [os.path.join(images, img) for img in os.listdir(images) if os.path.splitext(img)[1] in [".png", ".jpg", ".jpeg"]]
    except NotADirectoryError:
        imlist = []
        imlist.append(os.path.join(images))
    except FileNotFoundError:
        print("%s 不是有效的目录或者文件" % (images,))
        exit()

    # 存储结果目录
    if not os.path.exists(args.dets):
        os.mkdir(args.dets)

    load_batch = time.time()
    # 加载全部待检测图像
    # map: 转换函数prep_image, 两个数组 imlist [input_dim for x in imlist] 为其提供参数
    batches = list(map(preprocess_image, imlist, [input_dim for x in imlist]))
    ptt_images = [x[0] for x in batches] # ptt: pytorch_tensor
    ori_images = [x[1] for x in batches]
    ori_images_dim_list = [x[2] for x in batches]
    # repeat(*size), 沿着指定维度复制数据
    # 注: size维度必须和数据本身维度要一致
    ori_images_dim_list = torch.FloatTensor(ori_images_dim_list).repeat(1, 2) # (11,4) 原始图像尺寸

    if CUDA:
        ori_images_dim_list = ori_images_dim_list.cuda()

    # 所有检测结果
    # objs = []
    # 第i个图像批次
    i = 0
    #  批处理 ...
    write = False
    # batch >1 支持实现
    if batch_size>1:
        num_batches = int(len(imlist)/batch_size + 0.5)
        ptt_images = [torch.cat(
                        (ptt_images[ i * batch_size: min((i + 1) * batch_size, len(ptt_images)) ]) )
                      for i in range(num_batches)]

    # 暂未支持batch>1
    for batch in ptt_images:
        start = time.time()
        if CUDA:
            batch = batch.cuda()

        with torch.no_grad():
            predictions = model(Variable(batch), CUDA)
        # 结果过滤
        predictions = write_results(predictions, confidence, num_class, nms=True, nms_thresh=nms_thresh)

        if type(predictions) == int:
            i += 1
            continue
        end = time.time()

        print(end - start, predictions.shape) # 单位 秒

        predictions[:, 0] += i * batch_size # [0]表示图像索引

        if  not write:
            output = predictions
            write = True
        else:
            output = torch.cat((output, predictions))

        for im_num, image in enumerate(imlist[i*batch_size: min((i+1)*batch_size, len(imlist))]):
            im_ind =  i*batch_size + im_num # 图像编号
            objs = [ classes[int(x[-1])] for x in output if int(x[0]) == im_ind] # 输出第im_ind图像结果
            print("{0:20s} predicted in {1:6.3f} seconds".format(osp.split(image)[-1], (end-start)/batch_size))
            print("{0:20s} {1:s}".format("Objects detected", " ".join(objs)))
            print("----------------------------------------------------------")
        i += 1


    # 对所有的输入的检测结果
    try:
        output
    except:
        print("没有检测到任何目标")
        exit()

    # 0: 图像索引 1-4: 坐标(在缩放后图像中的位置) 5:score 6: ??? 7(-1):类别
    # print(output)

    # 对output结果按照dim=0维度分组?
    ori_images_dim_list = torch.index_select(ori_images_dim_list, 0, output[:, 0].long()) # pytorch 切片torch.index_select(data, dim, indices)
    scaling_factor = torch.min(input_dim/ori_images_dim_list, 1)[0].view(-1, 1)

    # 坐标换算,将居中的位置坐标转换为以(0,0)为起点的坐标 x-x'soffset, y-y'soffset
    output[:, [1,3]] -= (input_dim - scaling_factor*ori_images_dim_list[:, 0].view(-1,1))/2 # x416 - (缩放后x<=416长度/2 )
    output[:, [2,4]] -= (input_dim - scaling_factor*ori_images_dim_list[:, 1].view(-1,1))/2

    output[:, 1:5] /= scaling_factor # 缩放至原图大小尺寸

    # 绘图
    colors = pkl.load(open("pallete", "rb"))
    def draw(x, batch, results):
        # batch 转换后的图像, 没用到这里
        c1 = tuple(x[1:3].int()) # x1,y1
        c2 = tuple(x[3:5].int()) # x2,y2
        img = results[int(x[0])] # 图像索引
        cls = int(x[-1])
        label = "%s" % classes[cls]
        color = random.choice(colors) # 随机选择颜色
        # 绘图(绘制一条结果)
        cv2.rectangle(img, c1, c2, color, 1)
        t_size = cv2.getTextSize(label, cv2.FONT_HERSHEY_PLAIN, 1, 1)[0]
        c2 = c1[0] + t_size[0] + 3, c1[1] + t_size[1] + 4
        cv2.rectangle(img, c1, c2, color, -1)
        cv2.putText(img, label, (c1[0], c1[1] + t_size[1] + 4), cv2.FONT_HERSHEY_PLAIN, 1, [225, 255, 255], 1)
        return img
    # 开始逐条绘制output中结果
    list(map(lambda x: draw(x, ptt_images, ori_images), output))
    # 保存文件路径
    det_names = ["{}/det_{}".format(args.dets, osp.split(x)[-1]) for x in imlist]
    list(map(cv2.imwrite, det_names, ori_images))
主时钟对代码已经做了很细致的解释, 下面只陈述下主要过程:
搭建网络,并初始化权重
预处理输入图像,并依据batch size参数调整, 预处理函数的输出是batch为1的tensor
分批次进行预测, 将预测结果进行nms过滤, 并剔除掉置信度不够的区域, 打印最终的检测结果到控制台
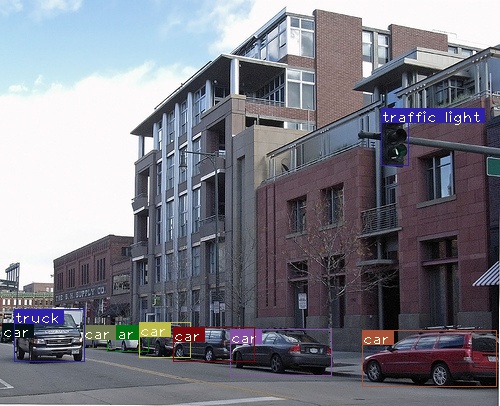
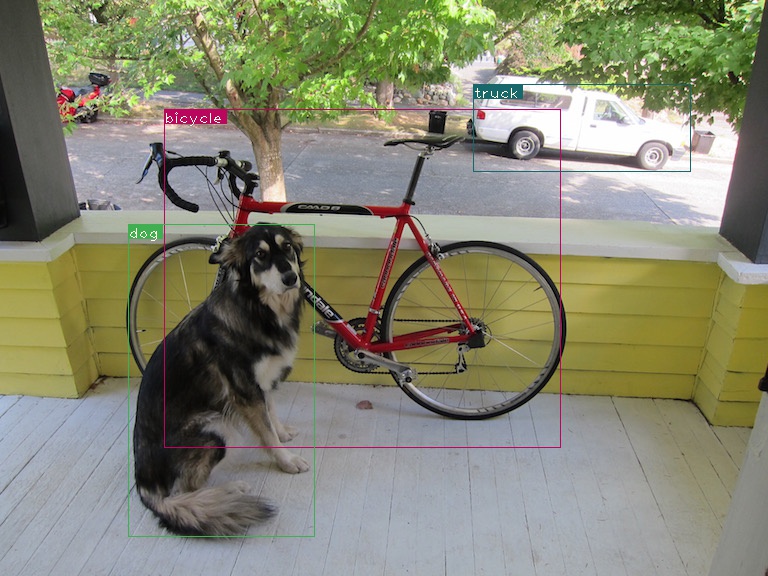
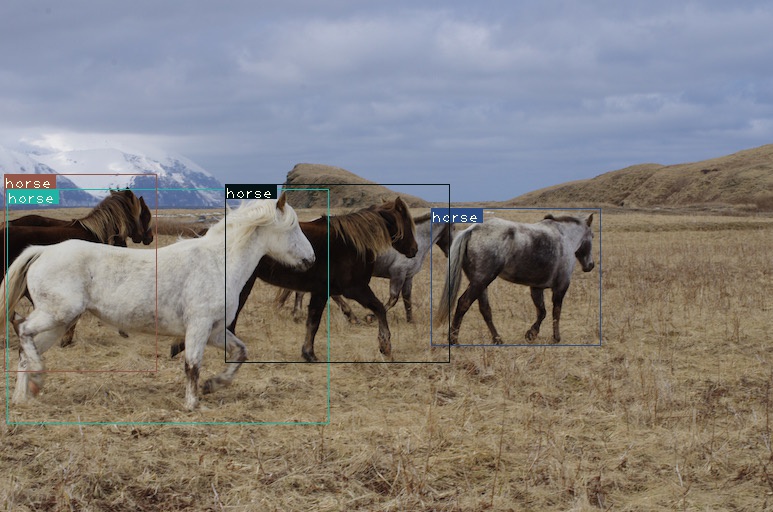
output中存储所有的检测结果, 利用其中信息,展开可视化,将结果保存在了det目录下.
检测结果示例如图: