根据现在的开发模式和网上的一些资料,SpringBoot需要对业务和操作进行分层,通常分为controller、entity、service、respository等结构。下面以Kotlin官网的例子,讲解在分层的时候,需要做什么配置。
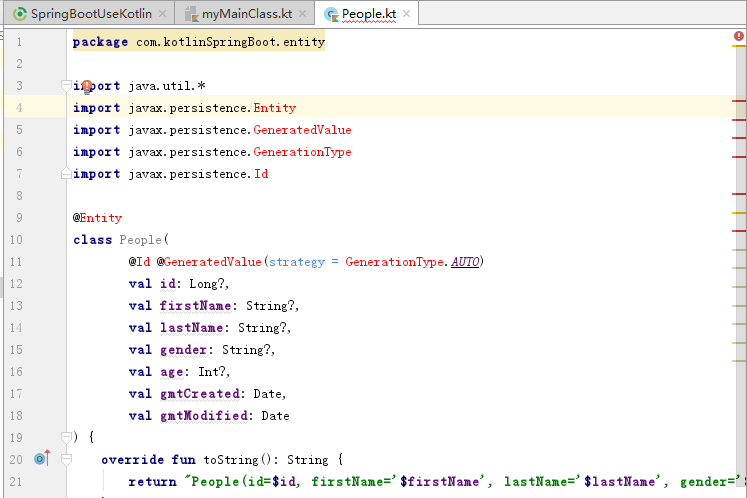
1、在包com.SpringBootUseKotlin中新建包entity,添加新的class,命名为People
package com.kotlinSpringBoot.entity

import java.util.*
import javax.persistence.Entity
import javax.persistence.GeneratedValue
import javax.persistence.GenerationType
import javax.persistence.Id

@Entity
class People(
        @Id @GeneratedValue(strategy = GenerationType.AUTO)
        val id: Long?,
        val firstName: String?,
        val lastName: String?,
        val gender: String?,
        val age: Int?,
        val gmtCreated: Date,
        val gmtModified: Date
) {
    override fun toString(): String {
        return "People(id=$id, firstName='$firstName', lastName='$lastName', gender='$gender', age=$age, gmtCreated=$gmtCreated, gmtModified=$gmtModified)"
    }
}
根据官网写的代码,结果却标红了:
因为上面的代码使用了JPA,但是没有引入相关的文件,在build.gradle中的dependencies添加相应的依赖即可解决该错误:
compile 'org.springframework.boot:spring-boot-starter-data-jpa:1.3.3.RELEASE'
2、在包com.SpringBootUseKotlin中新建包respository,新增class,命名为:PeopleRepository
package com.kotlinSpringBoot.repository

import com.kotlinSpringBoot.entity.People
import org.springframework.data.repository.CrudRepository

interface PeopleRepository : CrudRepository<People, Long> {
    fun findByLastName(lastName: String): List<People>?
}
3、在包com.SpringBootUseKotlin中新建包service,新增class,命名为:PeopleService
package com.kotlinSpringBoot.service

import com.kotlinSpringBoot.entity.People
import com.kotlinSpringBoot.repository.PeopleRepository
import org.springframework.beans.factory.annotation.Autowired
import org.springframework.stereotype.Service

class PeopleService {
    @Autowired
    val peopleRepository: PeopleRepository? = null


    fun findByLastName(lastName: String): List<People>? {
        return peopleRepository?.findByLastName(lastName)
    }

    fun <S : People?> save(entity: S): S? {
        return peopleRepository?.save(entity)
    }

    fun <S : People?> save(entities: MutableIterable<S>?): MutableIterable<S>? {
        return peopleRepository?.save(entities)
    }

    fun delete(entities: MutableIterable<People>?) {
    }

    fun delete(entity: People?) {
    }

    fun delete(id: Long?) {
    }

    fun findAll(ids: MutableIterable<Long>?): MutableIterable<People>? {
        return peopleRepository?.findAll(ids)
    }

    fun findAll(): MutableIterable<People>? {
        return peopleRepository?.findAll()
    }

    fun exists(id: Long?): Boolean {
        return peopleRepository?.exists(id)!!
    }

    fun count(): Long {
        return peopleRepository?.count()!!
    }

    fun findOne(id: Long?): People? {
        return peopleRepository?.findOne(id)
    }

    fun deleteAll() {
    }
}
4、在包com.SpringBootUseKotlin中新建包controller,新增class,命名为:PeopleController
package com.kotlinSpringBoot.controller

import com.kotlinSpringBoot.service.PeopleService
import org.springframework.beans.factory.annotation.Autowired
import org.springframework.stereotype.Controller
import org.springframework.web.bind.annotation.GetMapping
import org.springframework.web.bind.annotation.RequestParam
import org.springframework.web.bind.annotation.ResponseBody

@Controller
class PeopleController {
    @Autowired
    val peopleService: PeopleService? = null

    @GetMapping(value = "/hello")
    @ResponseBody
    fun hello(@RequestParam(value = "lastName") lastName: String): Any {
        val peoples = peopleService?.findByLastName(lastName)
        val map = HashMap<Any, Any>()
        map.put("hello", peoples!!)
        return map
    }
}
在controller包内新增类HelloWorldController
package com.kotlinSpringBoot.controller

import org.springframework.web.bind.annotation.GetMapping
import org.springframework.web.bind.annotation.RestController

@RestController
class HelloWorldController {
    @GetMapping(value = *arrayOf("/helloworld", "/"))
    fun helloworld(): Any {
        return "Hello,World!"
    }
}
分层结束,下面说一下执行主类的另一种方法

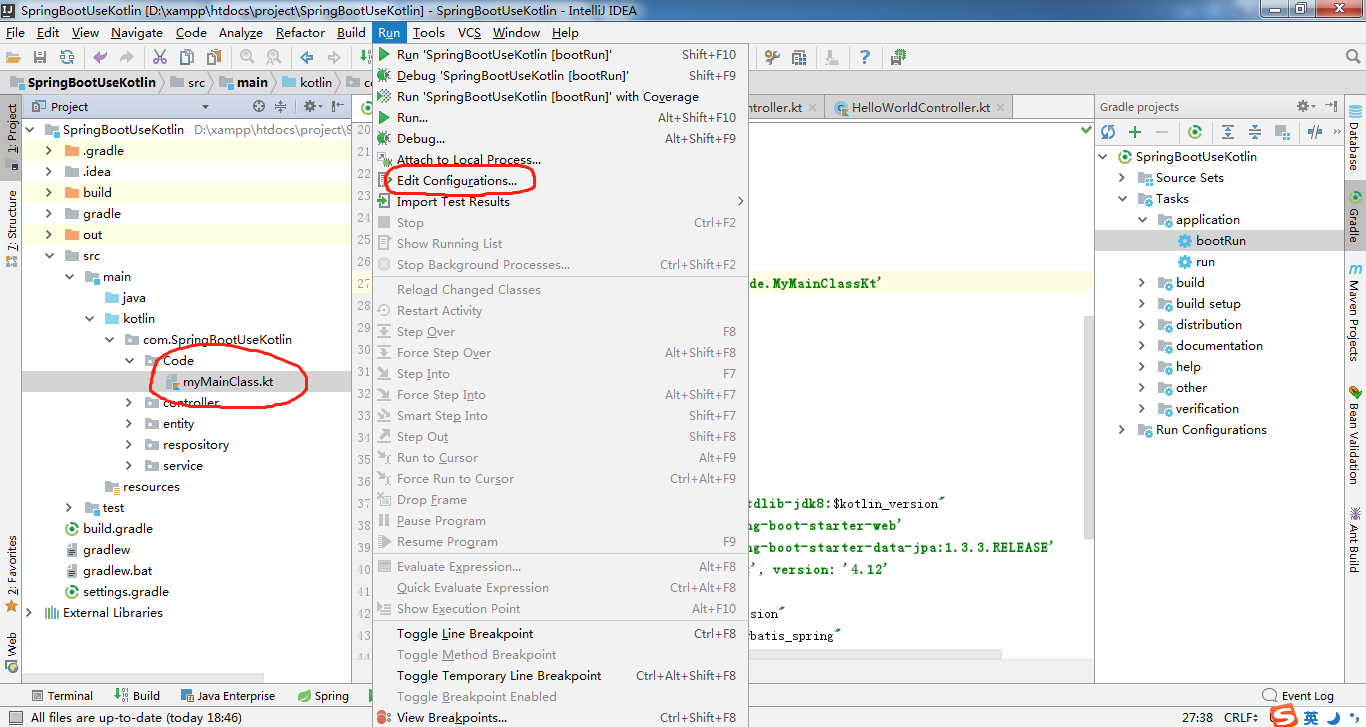
点击图中的bootrun运行程序,报错:没有指定的主类myMainClass。上一节中我们建立了主类,如下:
package com.SpringBootUseKotlin.Code

import org.springframework.boot.SpringApplication
import org.springframework.boot.autoconfigure.SpringBootApplication

@SpringBootApplication
open class myMainClass{

}

fun main(args:Array<String>){
    SpringApplication.run(myMainClass::class.java, *args)
}
我们在build.gradle里加上mainClassName属性。注意,mainClassName依赖于插件application,如果报错说该属性未定义,则在build.gradle中添加:
apply plugin: 'application'
那么这个属性的值是多少呢?这个类名是myMainClass,那么mainClassName的值是否为:com.SpringBootUseKotlin.Code.MyMainClass ?其实并不是。
我们可以通过下面的操作查看到类的名称(点击主类,在Run的菜单中选择设置):
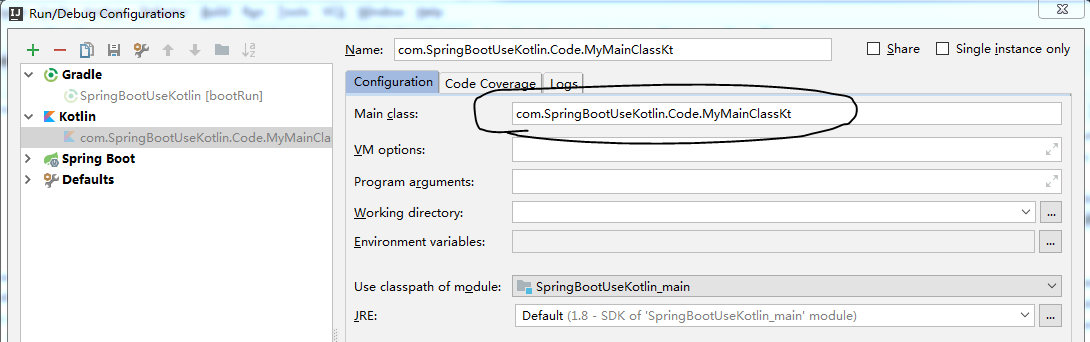
所以真正的mainClassName应该设置为com.SpringBootUseKotlin.Code.MyMainClassKt,注意,后面多了个Kt。
设了类名之后,需要在主类中加上注解:
package com.kotlinSpringBoot

import org.springframework.boot.SpringApplication
import org.springframework.boot.autoconfigure.SpringBootApplication

//注解MapperScan需要import该jar包
import org.mybatis.spring.annotation.MapperScan;

@SpringBootApplication @MapperScan("com.kotlinSpringBoot.mapper") //这个是刚加的注解,以便主类可以被扫描到
open class Application {

 }
fun main(args: Array<String>) {
    SpringApplication.run(Application::class.java, *args)
 }
上面的代码中,需要引入org.mybatis.spring.annotation.MapperScan,因此需要在build.gradle的配置文件中增加下面的配置:
buildscript {
    ext.mybatisVersion = '3.3.1'
    ext.mybatis_spring = '1.2.5'
}

dependencies {
    compile "org.mybatis:mybatis:$mybatisVersion"
    compile "org.mybatis:mybatis-spring:$mybatis_spring"
}
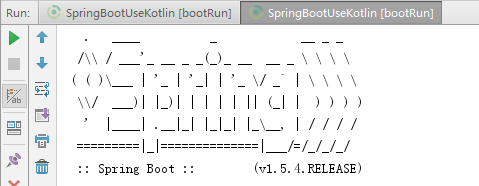
配置完成后再点击一次gradle的bootrun,则可以看到下面的输出了: