gitee 搭建个人网站
2018年07月01日 18:46:28
阅读数:173
gitee 搭建个人网站
查看是否已生成密钥
ls ~/.ssh- 1
没有则需要生成密钥
ssh-keygen -t rsa -C "[email protected]"- 1
添加密钥到ssh-agent(ssh-agent是控制用来保存公钥身份验证所使用的私钥的程序,优点是不用重复输入密码和重复部署私钥)
eval "$(ssh-agent -s)"
ssh-add ~/.ssh/id_rsa- 1
- 2
Identity added: /home/wang/.ssh/id_rsa (/home/wang/.ssh/id_rsa)
添加公钥到gitee上

测试是否添加成功
ssh -T [email protected]- 1
在gitee上创建项目

获取下载的地址,一般用的是https的,然后将项目下载到本地
git clone https://gitee.com/bottomheater/demo4js.git- 1
在将代码添加到项目上后(此处是将demo直接复制粘贴到该项目中),然后提交到gitee上。
#添加文件
git add .
#提交到本地上
git commit -m "add face-api demo"
#上传到gitee上
git push -u origin master- 1
- 2
- 3
- 4
- 5
- 6
注意,提交前需要先配置身份信息
git config --global user.email "[email protected]"
git config --global user.name "cceking"- 1
- 2
假如没有下载到本地,则需要关联远程库
git remote add origin https://gitee.com/bottomheater/demo4js.git
#或者是
git remote add origin [email protected]:bottomheater/demo4js.git- 1
- 2
- 3
开启Pages,过程和github差不多,点击服务下的gitee pages
设置分支和部署目录(root地址)后点击启动,等待一段时间即可。

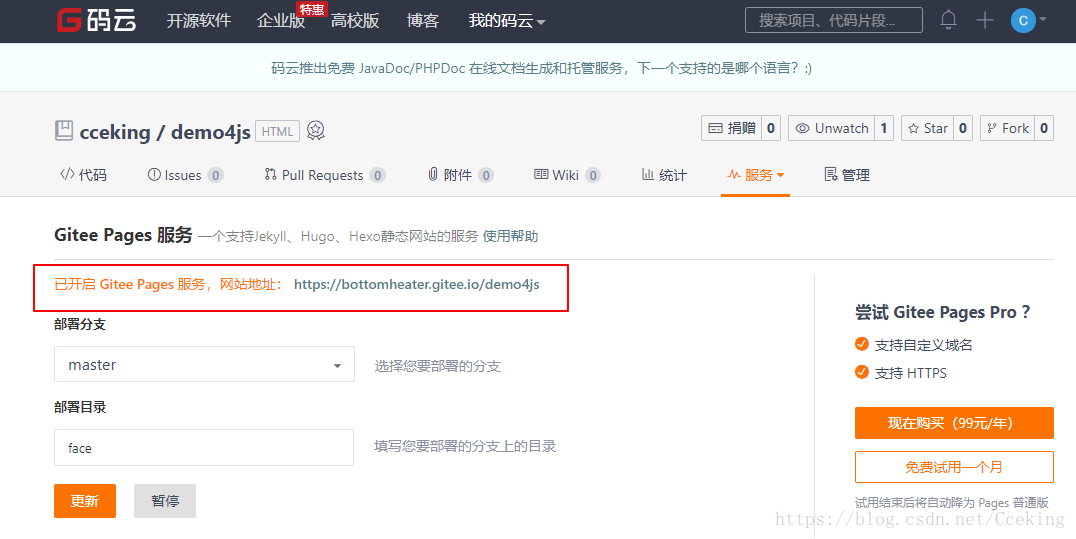
这样访问https://bottomheater.gitee.io/demo4js/face-api/即可(这是使用face-api.js进行人脸检测的demo)。
搭配hexo
顺便整理下网上的教程,mark。
初始化hexo项目
npm install hexo -g
hexo init
npm install
npm install hexo-deployer-git --save
#生成静态文件
hexo g
#启动服务器
hexo s- 1
- 2
- 3
- 4
- 5
- 6
- 7
- 8
新建文件,此时已经新建了hello_world.md并保存在_posts目录下
hexo new post "hello_world"- 1
修改_config.yml,添加远程库
# Deployment
## Docs: https://hexo.io/docs/deployment.html
deploy:
  type: git
  repository: [email protected]:bottomheater/demo4js.git
branch: master- 1
- 2
- 3
- 4
- 5
- 6
生成并部署到远程库
hexo d -g- 1
不过gitee好像会自动根据项目编译,具体的有空再试。
Jekyll、Hugo、Hexo 编译判断依据
- 编译 Hugo 依据:项目编译目录下存在
config.toml|json|yaml文件和content目录的时候,会使用hugo生成静态文件。- 编译 Hexo 依据:项目编译目录下存在
package.json,_config.yml文件和scaffolds目录的,会使用hexo generate生成静态文件,由于每次部署编译需要重新克隆编译并进行npm install,所以使用 Hexo 的时间相对 Hugo 和 Jekyll 会长一些。- 当不符合上述1和2条件的时候,就默认使用Jekyll编译。