简介
worker也是多路处理模块(MPM),使网络服务器支持混合的多线程多进程,由于使用线程来处理请求,所以可以处理海量请求,而系统资源的开销小于基于进程的MPM,但是也使用了多进程,每个进程又有多个线程,以获得基于进程的MPM的稳定性
工作方式
每个进程能够拥有的线程数量是固定的,服务器会根据负载情况增加或减少进程数量,一个单独的控制进程(父进程)负责子进程的建立。每个子进程能够建立ThreadsPerChild数量的服务线程和一个监听线程,监听线程监听接入请求并将其传递给服务线程处理和应答,同时Apache总是会维持个备用(spare)或是空闲的服务线程池,客户端无须等待新线程或新进程的建立即可得到服务,一般父进程都是以root身份启动,以绑定80端口;随后,Apache以较低权限的用户建立子进程和线程,而User和Group指令用于配置Apache进程的运行用户。子进程要对网页内容拥有读权限,但应该尽可能限制权限
实验环境
- 系统环境:centos6.5
- 服务器IP地址:192.168.100.103
- yum挂载目录:/mnt/sr0
- 相关源码包下载地址:百度云下载 密码:pko3
搭建步骤
一、准备工作
1、关闭防火墙及selinux
[root@Init5 ~]# chkconfig iptables off #随开机关闭iptables
[root@Init5 ~]# vim /etc/sysconfig/selinux
[root@Init5 ~]# reboot #重启生效
2、卸载以RPM方式安装httpd相关包
[root@Init5 ~]# rpm -qa | grep "httpd"
[root@Init5 ~]# yum remove httpd #卸载httpd相关包
3、搭建DNS服务器
如果没有搭建以上两个服务的朋友,请查看我的其他帖子有详细介绍
http://blog.51cto.com/11905606/2156944
二、搭建httpd服务
1、安装gcc、gcc-c++、make、arp、arp-util、pcre等工具包
[root@localhost ~]# yum -y install gcc gcc-c++ make zlib-devel #安装C语言编译器以及make
[root@localhost ~]# tar -zxvf apr-1.4.6.tar.gz -C /usr/src/
[root@localhost ~]# cd /usr/src/apr-1.4.6/
[root@localhost apr-1.4.6]# ./configure prefix=/usr/local/apr && make && make install
[root@localhost ~]# tar -zxvf apr-util-1.4.1.tar.gz -C /usr/src/
[root@localhost ~]# cd /usr/src/apr-util-1.4.1/
[root@localhost apr-util-1.4.1]# ./configure prefix=/usr/local/apr-util --with-apr=/usr/local/apr && make && make install
[root@localhost ~]# tar -zxvf pcre-8.10.tar.gz -C /usr/src #支持正则
[root@localhost ~]# cd /usr/src/pcre-8.10/
[root@localhost pcre-8.10]# ./configure prefix=/usr/local/pcre && make && make install
2、配置编译安装apache
[root@Init5 ~]# tar zxvf httpd-2.4.2.tar.gz -C /usr/src/
[root@Init5 ~]# cd /usr/src/httpd-2.4.2/
[root@Init5 httpd-2.4.2]# ./configure \
--prefix=/usr/local/httpd \
--with-apr=/usr/local/apr \
--with-pcre=/usr/local/pcre \
--enable-expires \
--with-mpm=prefork \
--enable-rewrite \
--enable-charset-lite \
--enable-cgi
参数解析:
prefix:指定安装目录
enable-expire:启用mod_expires模块(网页缓存)
with-mpm=prefork:指定prefork工作模式
enable-so:启用动态加载模块支持,需要什么功能可以动态加载
enable-rewrite:启用网页地址重写功能,实现伪静态
enable-charset-lite:默认字符集
enable-cgid:启用CGID
[root@Init5 httpd-2.4.2]# make && make install #编译及编译安装
3、添加系统服务
[root@Init5 ~]# cp /usr/local/httpd/bin/apachectl /etc/init.d/httpd
[root@Init5 ~]# vim /etc/init.d/httpd
第2、3两行添加以下参数:
# chkconfig:2345 85 15
# description:Apache is a World Wide Web server.
[root@Init5 init.d]# chmod +x /etc/init.d/httpd
[root@Init5 init.d]# chkconfig --add httpd
4、建立软链接,方便管理
[root@Init5 ~]# mkdir -p /etc/httpd
[root@Init5 ~]# ln -s /usr/local/httpd/conf/ /etc/httpd/ #优化配置文件路径
[root@Init5 ~]# ln -s /usr/local/httpd/bin/* /usr/local/bin/ #优化命令路径
5、修改配置文件
[root@Init5 ~]# vim /etc/httpd/conf/httpd.conf
修改以下参数:
ServerName www.bt.com:80 #填写完全主机名
Listen 192.168.100.103:80 #监听本地IP
6、启动httpd服务
[root@Init5 ~]# service httpd start
[root@Init5 ~]# netstat -anpt | grep ':80'
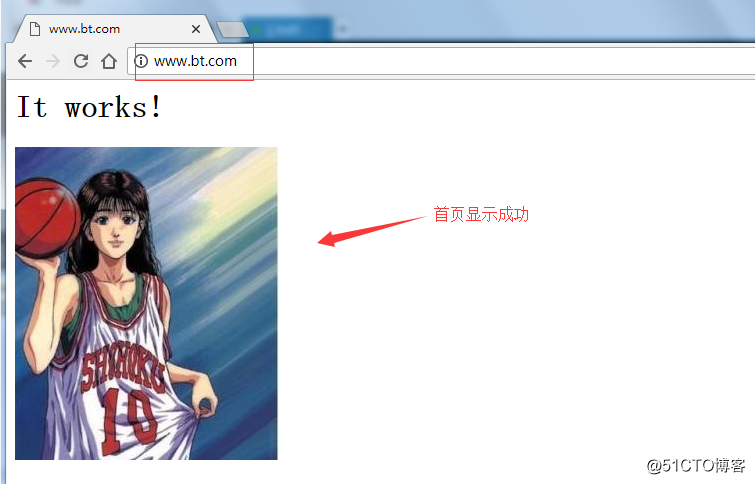
7、编辑默认首页
[root@Init5 ~]# cp qingzi.jpg /usr/local/httpd/htdocs/ #将图片拷贝到站点目录下
[root@Init5 ~]# cd /usr/local/httpd/htdocs/ #进入站点目录
[root@Init5 htdocs]# vim index.html
<html>
<body>
<h1>It works!</h1>
<img src='qingzi.jpg' /> #首页添加图片
</body>
</html>
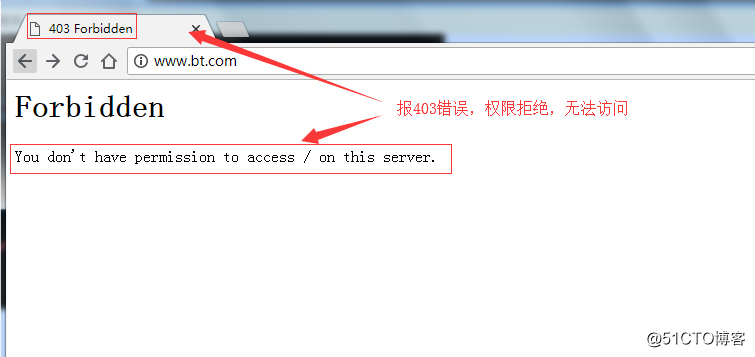
8、测试首页
三、配置woker工作模式
1、查看工作模式
[root@Init5 ~]# httpd -l
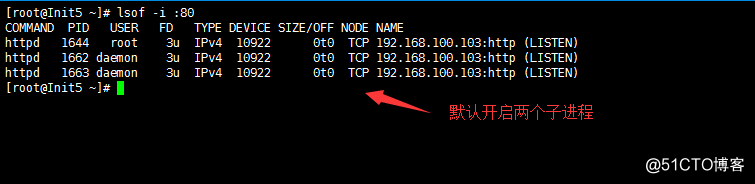
2、查看进程数
[root@Init5 ~]# lsof -i :80
lsof是一个列出当前系统打开文件的工具,可显示系统打开的文件,因为lsof需要访问核心内存和各种文件。
-i:列出端口或者协议的连接信息
3、使用ab工具进行压力测试
[root@Init5 ~]# ab -n2000 -c1000 www.bt.com/index.html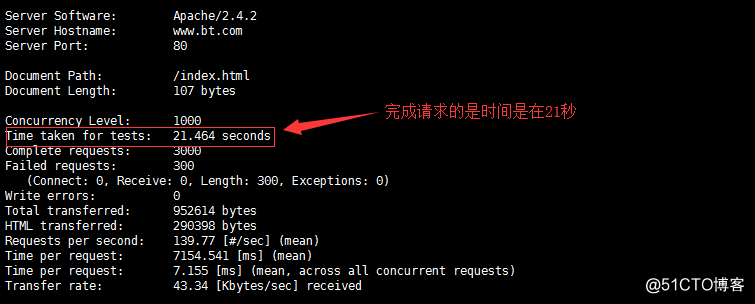
4、编辑主配置文件
[root@Init5 ~]# vim /etc/httpd/conf/httpd.conf 
5、编辑MPM配置文件
[root@Init5 ~]# vim /etc/httpd/conf/extra/httpd-mpm.conf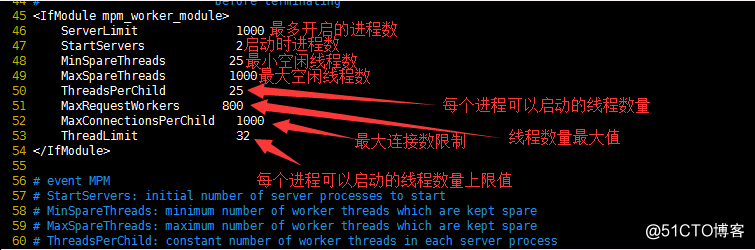
6、再次使用ab工具进行压力测试
[root@Init5 ~]# ab -n2000 -c1000 www.bt.com/index.html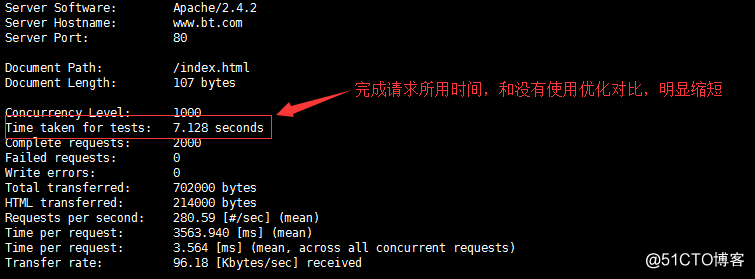
7、再次查看进程数
[root@Init5 ~]# lsof -i :80
四、目录属性优化
1、查看主配置文件
[root@Init5 ~]# vim /etc/httpd/conf/httpd.conf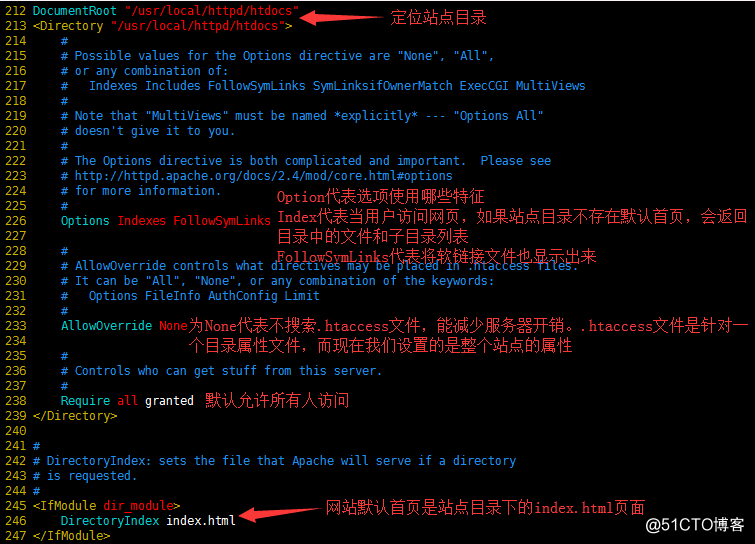
2、进入站点目录,编辑测试文件
[root@Init5 ~]# cd /usr/local/httpd/htdocs/ #进入站点目录
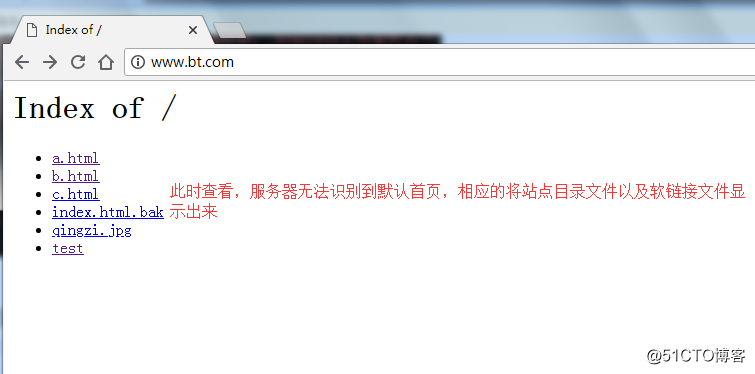
[root@Init5 htdocs]# mv index.html index.html.bak #将默认首页进行改名,达到服务器无法识别默认首页的目的
[root@Init5 htdocs]# echo "<h1>123</h1>" > a.html #添加相应测试文件
[root@Init5 htdocs]# echo "<h1>456</h1>" > b.html
[root@Init5 htdocs]# echo "<h1>789</h1>" > c.html
[root@Init5 htdocs]# ln -s /etc/services test #添加一条软链接
3、测试网页
4、编辑主配置文件
[root@Init5 ~]# vim /etc/httpd/conf/httpd.conf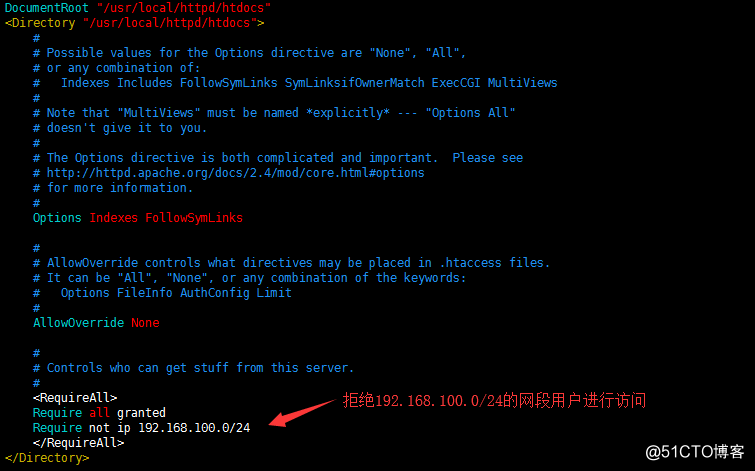
5、再次测试网页