学习vuex文档稍微了解了一下vuex,这个练习用于应用一下vuex。构建一个简单的单页笔记本应用,加深对vuex的理解。
Demo:https://ccessl.github.io/test/
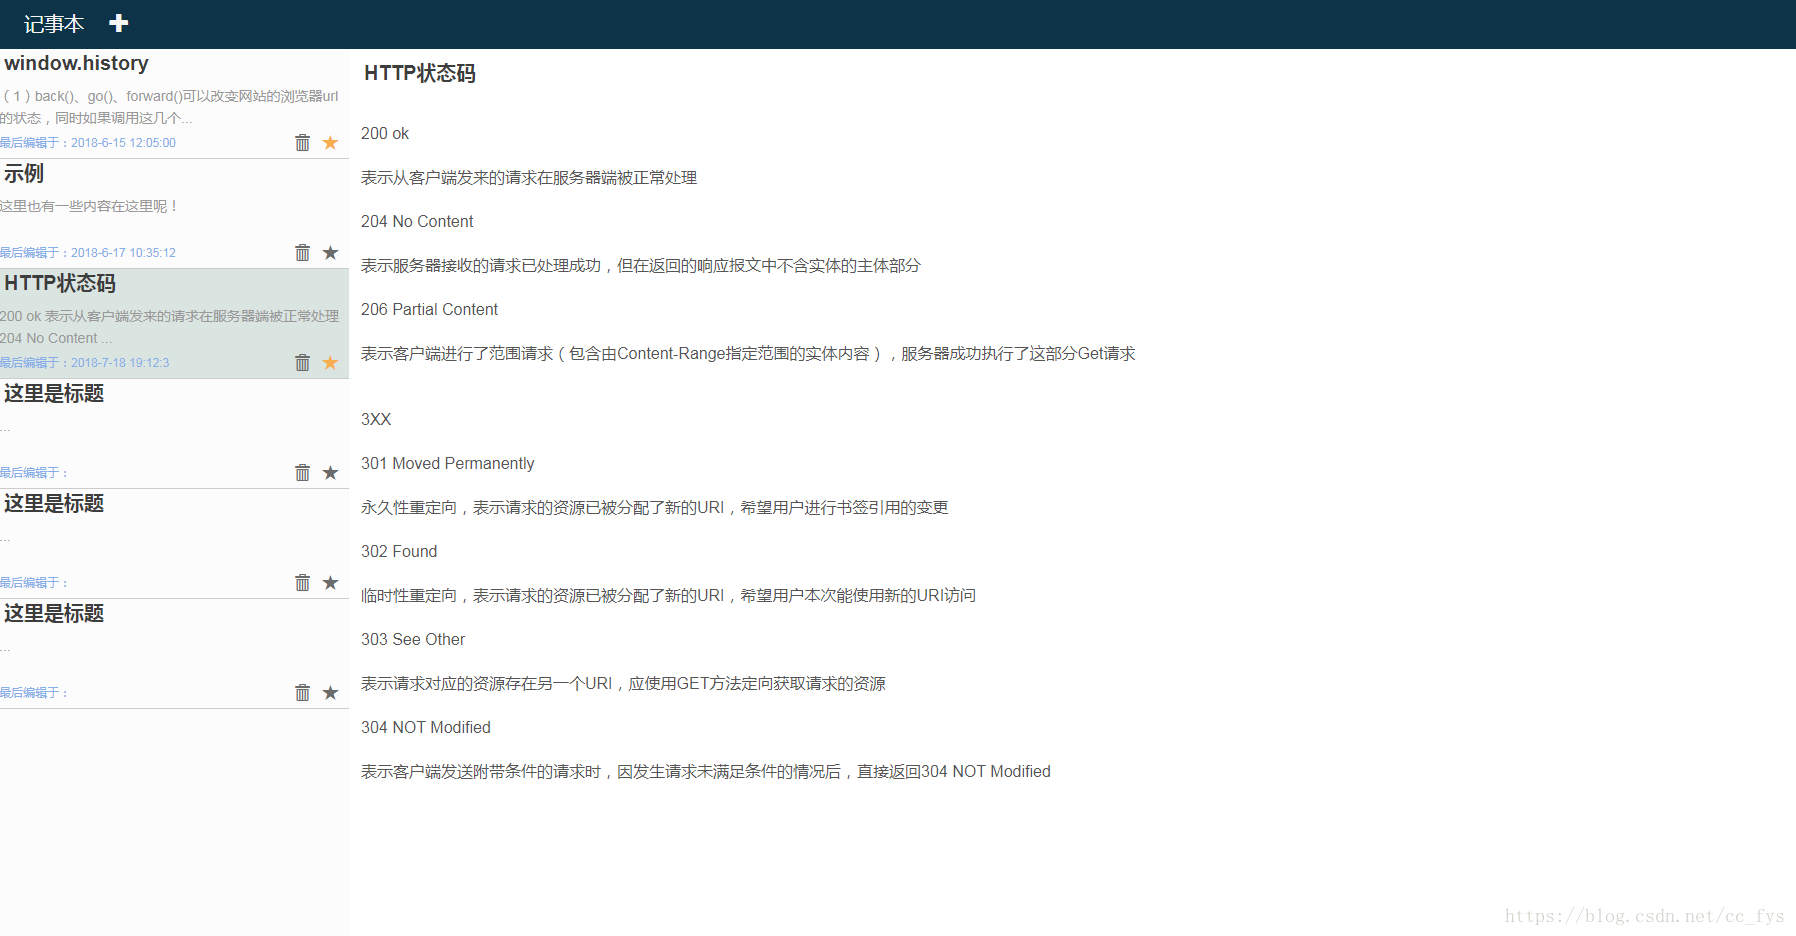
实现效果:
安装npm和vue-cli这里就略过了,首先创建一个webpack模板项目
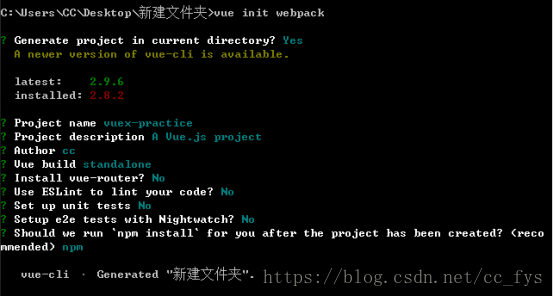
在命令提示符终端输入: npm init webpack
之后输入项目名称、描述等信息。因为没有用到vue-rounter 、ESLint、unit test都选择No就可以了,npm inatall自动运行安装项目依赖。
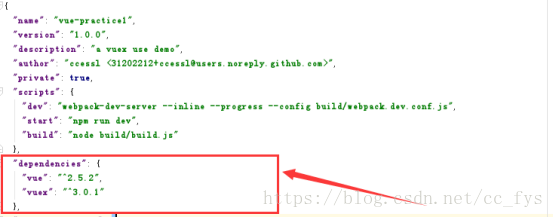
安装vuex,在命令提示符终端输入:npm install vuex --save
完成之后可以看到package.json中的dependencies依赖中增加了vuex,这里的版本为3.0.1
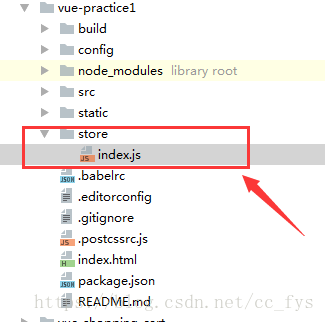
为了方便编辑,将文件夹移动到WebStrom中打开。新建一个store文件夹,并添加一个index.js文件。项目结构如下:
strore/index.js中的内容如下:
import Vue from 'vue'
import Vuex from 'vuex'

Vue.use(Vuex)

var listArr = [{
  title: 'window.history',
  edit: '2018-6-15 12:05:00',
  text: '(1)back()、go()、forward()可以改变网站的浏览器url的状态,同时如果调用这几个方法的话会触发事件popState,子啊浏览器中点击相关的按钮也会触发该事件window.history.length可以返回历史浏览列表中的url的个数。' +
  '(2)H5中新增的方法:' +
  'pushState(state,title,url),将某个浏览的url保存到history中,但是不会触发事件popstate' +
  'replaceState(state,title,url),将指定的url替换当前的url但是也不会触发popstate事件',
  mark: true
},
  {
    title: '示例',
    edit: '2018-6-17 10:35:12',
    text: '这里也有一些内容在这里呢!',
    mark: false
  }
];

export default new Vuex.Store({
  state: {
    listArr: listArr,
    nowEdit: listArr[0]
  },
  mutations: {
    //添加一个笔记
    add_file: function (state) {
      var temp = {
        title: '这里是标题',
        edit: '',
        text: '',
        mark: false
      };
      state.listArr.push(temp);
      state.nowEdit = temp;
    },
    //设置为active
    set_active (state, note)
    {
      state.nowEdit = note;
    },
    //设置笔记内容
    set_text(state, text)
    {
      state.nowEdit.text = text;
    },
    //设置编辑时间
    set_time(state, time)
    {
      state.nowEdit.edit = time;
    },
    //删除一个笔记
    delete_file: function (state, item) {
      for (var i = 0, len = state.listArr.length; i < len; i++) {
        if (state.listArr[i] == item) {
          if (state.listArr[i] == state.nowEdit) {
            state.nowEdit = state.listArr[0];
          }
          state.listArr.splice(i, 1);
          break;
        }

      }
    },
    //标记一个笔记
    mark_file: function (state, item) {
      item.mark = !item.mark;

    },
    //设置笔记标题
    set_title: function (state, text) {
      state.nowEdit.title = text;

    }
  }
})
里面的状态对象会包含所有应用级别的状态,也就是各个组件需要共享的状态。其中state中的listArr数组用于记录每一篇笔记。一个笔记定义了四个属性:
- title:标题
- edit:最后编辑的时间
- text:文本内容
- mark:是否标记
State中的nowEdit数组用于记录正在编辑的笔记,设置nowEdit:listArr[0]表示默认打开第一篇笔记。我们知道更改 Vuex 的 store 中的状态的唯一方法是提交 mutation,根据需要在mutations中定义了一些方法用于更改state中的状态。
src文件夹下面的main.js是应用的入口文件,里面有根实例,我们要把 Vuex store 加到到这个根实例里面,进而注入到它所有的子组件里面。
main.js:
// The Vue build version to load with the `import` command
// (runtime-only or standalone) has been set in webpack.base.conf with an alias.
import Vue from 'vue'
import App from './App'
import store from '../store/index'

Vue.config.productionTip = false

/* eslint-disable no-new */
new Vue({
  store,
  el: '#app',
  components: { App },
  template: '<App/>'
})
用vue构建的模板很周到了,该有的基本文件都有了。因为要用到bootstrap中的glyphicon图标,在index.html的导入外部样式文件,其中main.css用于页面基本初始化布局。
index.html:
<!DOCTYPE html>
<html>
  <head>
    <meta charset="utf-8">
    <meta name="viewport" content="width=device-width,initial-scale=1.0">
    <link rel="stylesheet" href="https://maxcdn.bootstrapcdn.com/bootstrap/3.3.6/css/bootstrap.min.css">
    <link rel="stylesheet" href="static/css/main.css">
    <title>vue-practice1</title>
  </head>
  <body>
    <div id="app"></div>
    <!-- built files will be auto injected -->
  </body>
</html>
main.css :(放在static/css文件夹下)
/**
 * Created by CC on 2018/7/17.
 */
html, #app {
  height: 100%;
  overflow: hidden;
}

body {
  margin: 0;
  padding: 0;
  border: 0;
  height: 100%;
  max-height: 100%;
  position: relative;
}
这里将页面划分成了三个组件HeadPart,EditTool,LeftTool。在scr/components目录下新建这三个组件,组件在页面中对应的位置如下:

在根组件App.vue中import这三个组件,并放在components中。
App.vue:
<template>
  <div id="app">
    <HeadPart></HeadPart>
    <div>
        <LeftTool></LeftTool>
        <EditTool></EditTool>
    </div>
  </div>
</template>

<script>
import HeadPart from './components/HeadPart.vue';
import EditTool from './components/EditTool.vue';
import LeftTool from './components/LeftTool.vue';

export default {
  name: 'App',
  components: {
    HeadPart,
    EditTool,
    LeftTool
  }
}
</script>
HeadPart.vue很简单,头部提供了一个+的标价。在点击的时候使用store.commit 方法触发一个类型为 add_file的 mutation 。进而更改Vuex.Store中的state.listArr,Vuex.Store中的状态改变,用到这些状态的子组件也会同步更新,非常方便。
HeadPart.vue
<template>
  <div id="ccHead">
    记事本
    <i class="glyphicon glyphicon-plus"  style="margin-left: 20px" @click="addFile"></i>
  </div>
</template>

<script>
  export default {
    methods: {
      addFile:function(){
        this.$store.commit('add_file');
      }
    }
  }
</script>

<style>
   #ccHead{
     background-color: #0d3349;
     color:whitesmoke;
     height:50px;
     font-size:20px;
     line-height:50px;
     padding-left:25px;
   }
  #addFile
  {
    height:50px;
    line-height:50px;
    float:right;
    margin-right:100px;
  }
</style>
LeftTool组件用于展示所有笔记的列表,使用v-for指令基于源数据重复渲染元素。可以在computed计算属性中返回store中的状态。注意text的内容过多的话LeftTool组件不会显示笔记的所有信息,使用filters过滤器,返回过滤器处理的数据结果。当text长度大于50的话就截取前50的字符加上省略号返回。
LeftTool.vue:
<template>
  <div id="myLeft">
     <ul>
       <li class="myli" v-for="item in dataList" :class="{'myactive':nowEdit===item}">
         <div class="myitem">
           <div @click="setNowActive(item)">
             <div  class="ccTitle">{{item.title}}</div>
             <p class="content">
               {{item.text | subInfor}}
             </p>
           </div>
           <div class="myinfor">
              <span style="color: #86aee8;">最后编辑于:</span><span style="color: #86aee8;" class="date">{{item.edit}}</span>
             <div style="float:right">
               <i class="glyphicon glyphicon glyphicon-trash myicon"
                  @click="deleteFile(item)"></i>
               <i class="glyphicon glyphicon-star myicon"
                  :class="{mystart:item.mark}"
                  @click="markFile(item)"></i>
             </div>

           </div>
         </div>
       </li>
     </ul>
  </div>
</template>

<script>
  export default {
    computed: {
    // 返回store中的值
      dataList () {
          return this.$store.state.listArr;
      },
      nowEdit(){
          return this.$store.state.nowEdit;
      },

    },
    methods: {
      setNowActive:function(item){
        this.$store.commit('set_active',item);
      },
      deleteFile:function(item){
        this.$store.commit('delete_file',item);
      },
      markFile:function(item){
        this.$store.commit('mark_file',item);
      }
    },
    filters: {
      subInfor: function (value) {
          if(value.length&&value.length<50)
              return value;
          else
              return value.substring(0,50)+'...';
      }
    },
  }
</script>

<style>
  #myLeft
  {
    left: 0px;
    width: 350px;
    position: absolute;
    top: 50px;
    bottom: 0px;
    background-color: #fcfcfc;
    overflow-y: auto;
  }
  ul
  {
   list-style: none;
    padding:0;
  }
  .myitem
  {
    height:110px;
    border-bottom: 1px solid #cccccc;
  }
  .mystart
  {
    color:#F7AE4F;
    font-size:20px;
  }
  .content
  {
    font-size: 14px;
    line-height: 1.57142857;
    color: #999;
    height:40px;
    overflow: hidden;
  }
  .myinfor
  {
    font-size: 12px;
    color: #6b6b6b;
  }
  .myli:hover
  {
    background-color: antiquewhite;
  }
  .ccTitle
  {
    margin-bottom: 8px;
    font-size: 20px;
    line-height: 28px;
    color: #3d3d3d;
    font-weight: bold;
    padding-left:5px;
  }
  .myli.myactive
  {
    color: #fff;
    background-color: #dae4e1;

  }
  .myicon
  {
    font-size:16px;
    margin-right:10px;
  }
  .myicon:hover
  {
    color:#428bca;
  }


</style>
最后是EditTool组件,用于展示和编辑标题和笔记内容。使用v-on指令监听DOM事件。在<textarea>触发input事件时,注意同时要更新最后编辑时间和文本内容。
Edit.vue
<template>
  <div id="ccContainer">
    <div class="mytitle">
      <input type="text" class="ccTitle"
      :value="activeNoteText.title"
      @input="editTitle"/>
    </div>
    <textarea id="ccEdit"
    :value="activeNoteText.text"
    @input="editNote">
    </textarea>
  </div>
</template>

<script>
  function getTime()
  {
    var date=new Date();
    var year=date.getFullYear(); //获取当前年份
    var mon=date.getMonth()+1; //获取当前月份
    var da=date.getDate(); //获取当前日
    var day=date.getDay(); //获取当前星期几
    var h=date.getHours(); //获取小时
    var m=date.getMinutes(); //获取分钟
    var s=date.getSeconds(); //获取秒
    return year+'-'+mon+'-'+da+' '+h+':'+m+':'+s;
  }
  export default {
    computed: {
      // 返回store中的值
      activeNoteText () {
        return this.$store.state.nowEdit;
      }
    },
    methods: {
      editNote: function (e) {
        var text=e.target.value;
        this.$store.commit('set_text',text);
        var time=getTime();
        this.$store.commit('set_time',time);
      },
      editTitle:function(e){
        var text=e.target.value;
        this.$store.commit('set_title',text);
      }
    }
  }
</script>

<style>
  #ccContainer{
    left:350px;
    position: absolute;
    top: 50px;
    bottom: 0px;
    right:0px;
  }
  #ccEdit
  {
    width: 100%;
    height:100%;
    border: none;
    outline: none;
    border-radius: 0;
    padding: 6px 12px;
    font-size: 16px;
    line-height: 1.42857143;
    color: #555;
    padding-top:5px;
  }
  .mytitle
  {
    padding-left:10px;
    font-size: 1.8em;
    line-height: 1.8em;
    color: #0d3349;
  }
  .ccTitle
  {
    width: auto;
    border: none;
    outline: none;
  }
</style>
最后在命令提示符终端输入:npm run dev
启动项目