转载请注明链接: https://blog.csdn.net/feather_wch/article/details/82086146
本文进行OkHttp源码详细解析。包括异步请求、同步请求、复用连接池、失败重连、底层路由、路由选择器等内容。
如果有帮助的话,请点个赞!万分感谢!
OkHttp源码详解
版本:2018/8/26-1(23:20)
Call(13题)
1、Call的创建源码
  //1、创建Call
  Call call = okHttpClient.newCall(request);
  //2、OkHttpClient.java
  @Override public Call newCall(Request request) {
    return new RealCall(this, request);
  }
  //3、RealCall.java
  protected RealCall(OkHttpClient client, Request originalRequest) {
    this.client = client;
    this.originalRequest = originalRequest;
  }
2、Call是如何创建的?
- 本质是通过
RealCall进行创建。- 在
RealCall中将OkHttpClient和request进行了保存。
异步请求
enqueue
3、异步请求源码分析
1-异步请求主体流程
    //RealCall.java
    void enqueue(Callback responseCallback, boolean forWebSocket) {
        //1. 转交给Dispatcher执行enqueue
        client.dispatcher().enqueue(new RealCall.AsyncCall(responseCallback, forWebSocket));
    }
    //Dispatcher.java
    synchronized void enqueue(RealCall.AsyncCall call) {
        //1. 正在运行的异步请求数 < 64 并且 同一个Host的请求数 < 5时
        if (runningAsyncCalls.size() < maxRequests && runningCallsForHost(call) < maxRequestsPerHost) {
            //2. 将call放到正在运行的异步队列中
            runningAsyncCalls.add(call);
            //3. 线程池执行该任务
            executorService().execute(call);
        } else {
            //4. 已满,就添加到待运行的异步任务队列中
            readyAsyncCalls.add(call);
        }
    }
    //Dispatcher.java---将call的host(域名)和运行异步任务队列中的host进行比对,返回相同的任务数
    private int runningCallsForHost(RealCall.AsyncCall call) {
        int result = 0;
        for (RealCall.AsyncCall c : runningAsyncCalls) {
            if (c.host().equals(call.host())) result++;
        }
        return result;
    }
    /**
     * //RealCall.java-内部类AsyncCall
     * 1. AsyncCall的父类NamedRunnable继承自Runnable
     * 2. 在Runnable的run()方法中会执行execute()
     * 3. execute()中完成了异步任务的执行
     */
    final class AsyncCall extends NamedRunnable {
        @Override protected void execute() {
            boolean signalledCallback = false;
            try {
                // 1. 请求网络
                Response response = getResponseWithInterceptorChain(forWebSocket);
                // 2. 成功: 回调Callback的onResponse
                responseCallback.onResponse(RealCall.this, response);
            } catch (IOException e) {
                ...
                // 3. 失败:回调Callback的onFailure
                responseCallback.onFailure(RealCall.this, e);
            } finally {
                // 4. Dispatcher将执行完的任务进行移除,并将待执行任务添加到运行中队列内部,并且开启任务的执行
                client.dispatcher().finished(this);
            }
        }
    }

    //RealCall.java
    private Response getResponseWithInterceptorChain(boolean forWebSocket) throws IOException {
        //1. 创建拦截器链
        Interceptor.Chain chain = new RealCall.ApplicationInterceptorChain(0, originalRequest, forWebSocket);
        //2. 执行拦截器链的proceed
        return chain.proceed(originalRequest);
    }
    //RealCall.java内部类: ApplicationInterceptorChain
    @Override
    public Response proceed(Request request) throws IOException {
        //1. 从拦截器列表中取出拦截器,迭代执行器拦截前动作。
        if (index < client.interceptors().size()) {
            Interceptor.Chain chain = new RealCall.ApplicationInterceptorChain(index + 1, request, forWebSocket);
            // 取出拦截器
            Interceptor interceptor = client.interceptors().get(index);
            /**========================================================
             * 存在多个拦截器时,会递归调用所有拦截器的intercept方法
             *  1. 调用到自定义拦截器的intercept()---MyInterceptor implements Interceptor
             *  2. 内部执行chain.proceed(request)方法
             *  3. 执行ApplicationInterceptorChain的proceed(),回到该方法,也就是递归调用
             *========================================================*/
            Response interceptedResponse = interceptor.intercept(chain);
            //返回的其实是最后拦截器执行getResponse的返回值
            return interceptedResponse;
        }

        //2. 网络请求---在最后一个拦截器的intercept()->proceed()中执行该处
        return getResponse(request, forWebSocket);
    }

    //RealCall.java---执行request请求,并且返回响应结果
    Response getResponse(Request request, boolean forWebSocket) throws IOException {
        ...
        // 1. 创建HttpEngine
        engine = new HttpEngine(client, request, ...);
        while (true) {
            try {
                // 2. 发送Request请求
                engine.sendRequest();
                // 3. 获取Response响应
                engine.readResponse();
            }  catch (RouteException e / IOException e) {
                // 4. 失败重连,重新获取HttpEngine并且continue重新进行请求
                HttpEngine retryEngine = engine.recover(e, null);
                ...
                continue;
            } finally {
                // 5. 遭遇异常情况下,需要释放掉资源
                if (releaseConnection) {
                    StreamAllocation streamAllocation = engine.close();
                    streamAllocation.release();
                }
            }
            // 返回Response
            Response response = engine.getResponse();
            Request followUp = engine.followUpRequest();
            if (followUp == null) {
              if (!forWebSocket) {
                engine.releaseStreamAllocation();
              }
              return response;
            }
            ...
            // 6. 其他异常情况,也是进行失败重连
            engine = new HttpEngine(client, request, ...);
        }
    }
4、OkHttp发起异步请求时,调用的call.enqueue方法做了哪些事情?
- 在Call创建的时候,在内部创建了RealCall,并且将OkHttpClient和request保存到了内部。
- 执行Call.enqueue(),内部是执行的RealCall.enqueue()
- RealCall.enqueue()内部直接转交给Dispatcher执行enqueue()方法
- Dsipatcher内部做了会去判断是否达到了最大并发任务数64,以及同一个主机的请求数是否达到了5。
- 都没有达到:加入到正在执行的异步请求队列。然后调用线程池去执行这个任务。
- 达到:加入到待执行的异步请求队列
5、OkHttp是如何发起实际的网络请求的?OkHttp是如何处理拦截器/拦截器链的?
- RealCall的getResponseWithInterceptorCahin()发起了实际的网络请求。
- 会创建ApplicationInterceptorChain对象,并执行其proceed()方法
- proceed方法会从request对应的拦截器列表中取出第一个拦截器,执行其intercept方法
- intercept()内部会去执行ApplicationInterceptorChain.proceed()方法,然后取出第二个拦截器。依次层层递归调用。
- 最终在最后一个拦截器之后,执行了ApplicationInterceptorChain.proceed()中的最后一行代码:
getResponse(request, forWebSocket)- getResponse真正发起了请求,并且获取到了Reponse。
6、RealCall的getResponse是如何进行网络请求的?
- 通过HttpEngine进行网络请求
- 内部有一个While循环
- engine.sendRequest():发送Request请求
- engine.readResponse(): 获取Response响应
- 如果出现异常,会通过engine.recover()进行失败重连。
流程图
7、OkHttp异步请求的流程图和要点
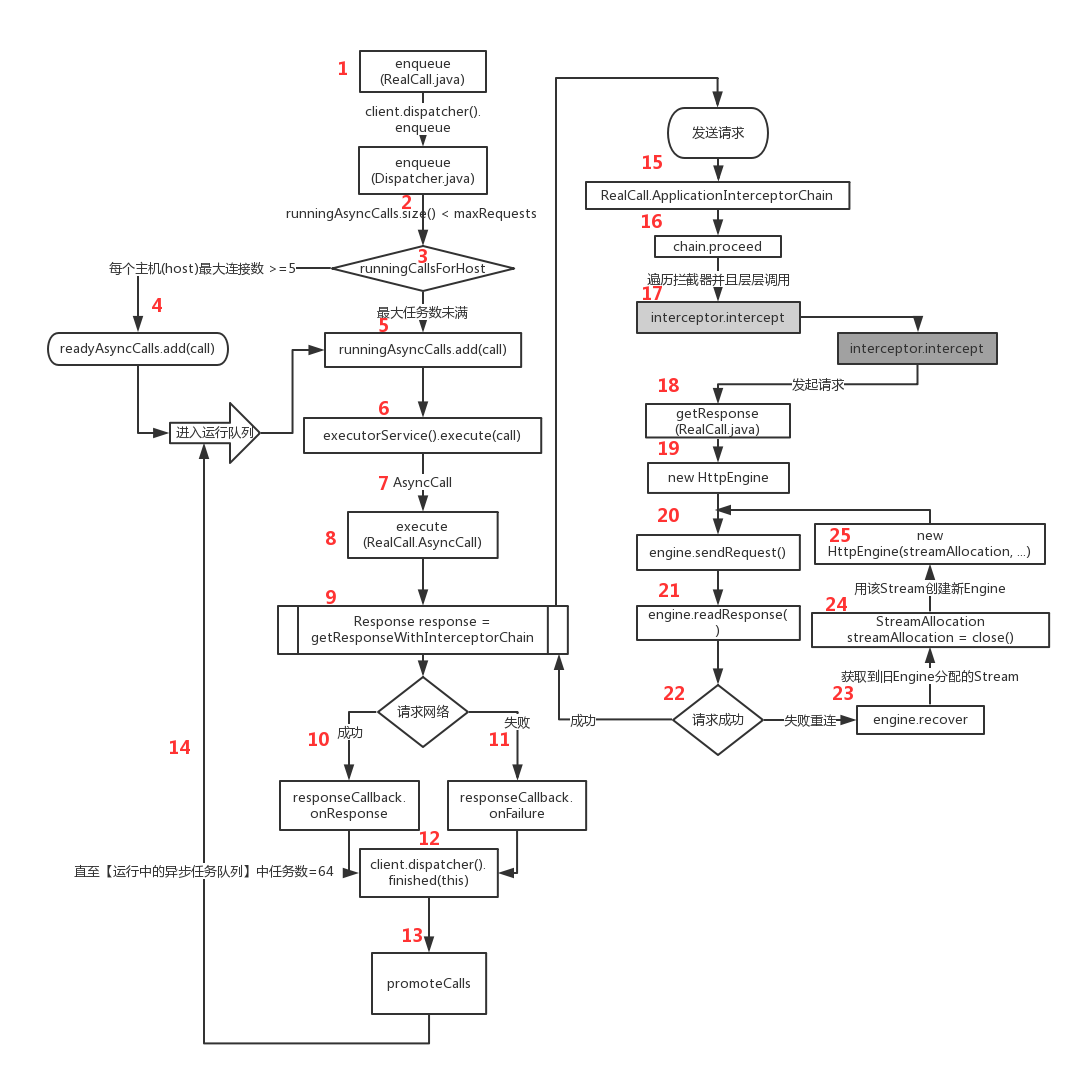
- 调用到
RealCall的enqueue- Dispatcher.enqueue: 会判断当前异步任务数是否<64
- runningCallsForHost:遍历运行中任务,比较和这次请求的Host(域名)一样的有多少,是否 < 5
- (2)(3)任何一个条件不满足,就直接添加到【待运行的异步任务队列】
- runningAsyncCalls.add(call): 将任务添加到【运行中的异步任务队列】
- executorService().execute(call): 线程池中执行该任务
- AsyncCall: 本质是Runnable,run()中执行execute()
- AsyncCall.execute(): 进行网络请求、请求成功/失败都会回调对应方法、 进行任务提升
- getResponseWithInterceptorChain(): 进行网络请求
- responseCallback.onResponse(): 请求成功的回调
- responseCallback.onFailure(): 请求失败的回调
- client.dispatcher().finished(this): 将任务从【正在运行的异步任务队列】中移除
- promoteCalls(): 继续进行(2)(3)的条件判断,满足条件就将待运行任务提升至运行中的任务。
- 1、从【待运行队列】中移除任务 2、将任务添加到【运行中任务队列】 3、线程池执行任务
- RealCall.ApplicationInterceptorChain(): 创建Interceptor.Chain
- chain.proceed(): 调用拦截器链的proceed进行后续请求工作。
- 层层调用interceptor的intercept方法。
- getResponse(): 在最内存拦截器处调用该方法,进行网络请求。
- new HttpEngine(): 创建HttpEngine
- engine.sendRequest(): 发送请求
- engine.readResponse(): 接受响应信息
- 请求成功直接返回;不成功需要进行失败重连。
- engine.recover(): 进行Stream的复用
- 获取到请求失败的旧Engine分配的Stream
- 使用该Stream创建新的HttpEngine
- 重复(20)(21)(22)的任务
8、如何进行失败重连?
- HttpEngine里面通过sendRequest和readResponse进行网络请求
- 如果出现了RouteException或者IOException,会通过HttpEngine.recover进行恢复且返回新的HttpEngine。
- 因为是While循环,continue后会继续进行网络请求。
同步请求
9、同步请求源码分析
call.execute(xxx);
    //RealCall.java
    @Override public Response execute() throws IOException {
        ...
        try {
            // 1. 添加到【运行中的同步队列】
            client.dispatcher().executed(this);
            // 2. 请求网路
            Response result = getResponseWithInterceptorChain(false);
            return result;
        } finally {
            // 3. 从【运行中的同步队列】中移除该任务
            client.dispatcher().finished(this);
        }
    }

    //Dispatcher.java---添加到【运行中的同步队列】
    synchronized void executed(RealCall call) {
        runningSyncCalls.add(call);
    }

    //Dispatcher.java---从【运行中的同步队列】中移除该任务
    synchronized void finished(Call call) {
        if (!runningSyncCalls.remove(call)) throw new AssertionError("Call wasn't in-flight!");
    }
- 添加到【运行中的同步队列】
- getResponseWithInterceptorChain()进行网络请求
- 从【运行中的同步队列】中移除该任务
Dispatcher
10、Dispatcher是什么?
- 用于控制并发的请求。
- 定义了最大并发数:64
- 定义了每个主机的最大请求数:5
- 内部具有消费者线程池,可以构造时指定。默认的线程池类似于CachedThreadPool,适合大量且耗时较少的任务。
- 内部具有3个队列(正在运行的异步请求队列、即将运行的异步请求队列、正在运行的同步请求队列)
public final class Dispatcher {
  private int maxRequests = 64;
  private int maxRequestsPerHost = 5;
  // 线程池
  private ExecutorService executorService;
  // 将要运行的异步请求队列
  private final Deque<AsyncCall> readyAsyncCalls = new ArrayDeque<>();
  // 正在运行的异步请求队列
  private final Deque<AsyncCall> runningAsyncCalls = new ArrayDeque<>();
  // 正在运行的同步请求队列
  private final Deque<RealCall> runningSyncCalls = new ArrayDeque<>();

  public Dispatcher(ExecutorService executorService) {
    this.executorService = executorService;
  }

  public Dispatcher() {
  }
  // 用默认线程池进行构造。
  public synchronized ExecutorService executorService() {
    if (executorService == null) {
      executorService = new ThreadPoolExecutor(0, Integer.MAX_VALUE, 60, TimeUnit.SECONDS,
          new SynchronousQueue<Runnable>(), Util.threadFactory("OkHttp Dispatcher", false));
    }
    return executorService;
  }
}
11、Dispatcher在请求任务完成后,如何进行的清理工作?
- getResponseWithInterceptorChain()进行网络请求后,会调用Dispatcher.finished()进行清理工作。
- 会将任务从正在运行的异步任务队列中移除
- 在满足最大并发数和主机最大请求数的情况下,将待执行的异步任务进行提升到正在运行的异步任务队列,并且通过线程池执行该任务。
    //Dispatcher.java
    synchronized void finished(RealCall.AsyncCall call) {
        //1. 将任务从[正在运行的异步任务队列]中移除
        if (!runningAsyncCalls.remove(call)) throw new AssertionError("AsyncCall wasn't running!");
        /**============================================
         * 2. 取出一个[待运行的异步任务]并且添加到[正在运行的异步任务队列中]
         * 3. 通过线程池执行新任务
         *==================================*/
        promoteCalls();
    }
    //Dispatcher.java
    private void promoteCalls() {
        //1. 判断是否超过最大的并发任务数
        if (runningAsyncCalls.size() >= maxRequests) return;
        //2. 判断是否存在待执行的异步任务
        if (readyAsyncCalls.isEmpty()) return;
        //3. 取出待执行的异步任务,执行任务,直到已经达到最大并发任务数
        for (Iterator<RealCall.AsyncCall> i = readyAsyncCalls.iterator(); i.hasNext(); ) {
            RealCall.AsyncCall call = i.next();
            if (runningCallsForHost(call) < maxRequestsPerHost) {
                // 取出待执行的异步任务
                i.remove();
                // 添加到正在执行的队列中
                runningAsyncCalls.add(call);
                // 线程池运行任务
                executorService().execute(call);
            }
            // 判断是否超过最大的并发任务数
            if (runningAsyncCalls.size() >= maxRequests) return; // Reached max capacity.
        }
    }
AsyncCall
12、AsyncCall是什么?
- RealCall的内部类
- 继承自
NamedRunnable,间接继承Runnable- 在run()中会执行execute():完成了异步任务的执行
- 用于Dispatcher内部的待运行/运行中的异步任务队列
13、AysncCall的execute方法中做了哪些工作?(4个)
1-请求网络
Response response = getResponseWithInterceptorChain(forWebSocket);2-请求成功: 回调Callback的onResponse
responseCallback.onResponse(RealCall.this, response);3-请求失败: 回调Callback的onFailure
responseCallback.onFailure(RealCall.this, e);4-Dispatcher将执行完的任务进行移除,并将待执行任务添加到运行中队列内部,并且开启任务的执行。(finally中一定执行)
client.dispatcher().finished(this);HttpEngine(12题)
1、HttpEngine是什么?
- 处理单个Http的请求和响应
构造
2、HttpEngine的构造
- 主要是将OkHttpClient、request、streamAllocation等保存到了内部。
- StreamAllocation的构造:将address、connectionPool、RouteSelector保存在内部。
- RouteSelector:用于选择合适的Route去访问服务器。
//HttpEngine.java-构造HttpEngine
public HttpEngine(OkHttpClient client, okhttp3.Request request, boolean bufferRequestBody,
                      boolean callerWritesRequestBody, boolean forWebSocket, StreamAllocation streamAllocation,
                      RetryableSink requestBodyOut, Response priorResponse) {
    // 1、OkHttpClient
    this.client = client;
    // 2、request
    this.userRequest = request;

    //...所有参数都作为成员变量保存...

    // 3、创建streamAllocation
    this.streamAllocation = streamAllocation != null? streamAllocation
                : new StreamAllocation(client.connectionPool(), //返回OkHttpClient中的ConnectionPool
                                        createAddress(client, request));
}
sendRequest
3、HttpEngine.sendRequest()发送请求的源码分析
- sendRequest(): 并不会真正的发送请求,而是找到合适的Socket封装到了HttpStream中。
- Internal.instance.internalCache(client):获取到客户端中的Cache,Cache在初始化时会读取缓存目录中曾经请求过的所有信息。
- responseCache.get(request):获取到上次与服务器交互时缓存的Response。
- new CacheStrategy.Factory: 获取到缓存策略
- if (networkRequest == null && cacheResponse == null): 如果既没有使用网络,也没有缓存(或过期)。直接新建并且返回报504错误的Response
- 如果仅仅是没有网络,会获取到缓存的Response,进行Gzip解压后返回。
- 如果有网络,就会调用connect进行连接,并且获取到httpstream。
    //HttpEngine.java
    public void sendRequest() throws RequestException, RouteException, IOException {
       /**===========================================================================
         * 0. request加上header
         *   1- Host:www.wanandroid.com
         *   2- Connection:Keep-Alive
         *   3- Accept-Encoding: gzip
         *   4- Cookie: cookieJar().loadForRequest()获取到cookie列表, 转换为String,添加到header
         *   5- User-Agent:okhttp/3.2.0
         *===========================================================================*/
        Request request = networkRequest(userRequest);
        /**===========================================================================
         * 1. 获取Client中的Cache,Cache在初始化时会读取缓存目录中曾经请求过的所有信息。
         *   1- Internal.instance.internalCache实现就是OkHttpClient的internalCache()方法
         *   2- responseCache:就是Cache内部的internalCache
         *===========================================================================*/
        InternalCache responseCache = Internal.instance.internalCache(client);
        // 2. responseCache.get(request): 获取到上次与服务器交互时缓存的Response。从中可以读取到Header
        Response cacheCandidate = responseCache != null
                ? responseCache.get(request) //
                : null;
        // 3. 获取到缓存策略
        cacheStrategy = new CacheStrategy.Factory(now, request, cacheCandidate).get();
        // 4. 网络Request请求;如果为null则表示这次调用没有使用网络
        networkRequest = cacheStrategy.networkRequest;
        // 5. 缓存的Response或者过期失效;如果为null则表示不使用缓存
        cacheResponse = cacheStrategy.cacheResponse;
        // 6. 如果没有网络request,并且缓存不存在或者过期。直接新建并返回报504错误的Response(网关超时)。
        if (networkRequest == null && cacheResponse == null) {
            userResponse = new Response.Builder().request(userRequest)
                    .code(504)
                    .body(EMPTY_BODY)
                    .build();
            return;
        }
        // 7. 网络Request不存在,就直接返回缓存的Response
        if (networkRequest == null) {
            userResponse = cacheResponse.newBuilder().request(userRequest).build();
            // 8. Gzip解压缩
            userResponse = unzip(userResponse);
            return;
        }
        // 9. 网络存在的情况下,会进行连接(找到合适的Socket封装到了HttpStream中)
        httpStream = connect();
        httpStream.setHttpEngine(this);
        // 10. 返回并且保存request Body可以写入的output stream
        requestBodyOut = httpStream.createRequestBody(networkRequest, contentLength);
        ...
    }
readResponse
4、HttpEngine.readResponse()获取响应信息的源码分析
    /**====================================================
     * // HttpEngine.java
     * 1. 刷新剩下的request header和request body
     * 2. 解析Http response header
     * 3. 开始读取Http response body
     *==============================================*/
    public void readResponse() throws IOException {
        // 1、第一次请求是null,不会执行。
        if (userResponse != null) {
            return; // Already ready.
        }
        // 2、没有网络,但是有缓存的Response。会要求需要先调用sendRequest
        if (networkRequest == null && cacheResponse == null) {
            throw new IllegalStateException("call sendRequest() first!");
        }
        // 3、没有网络
        if (networkRequest == null) {
            return; // No network response to read.
        }
        Response networkResponse;
        // 4、从Call.enqueue->RealCall.enqueue中,设置forWebSocket = false
        if (forWebSocket) {
            httpStream.writeRequestHeaders(networkRequest);
            networkResponse = readNetworkResponse();
        }
        // 5、默认callerWritesRequestBody = false,一定会进入该代码块
        else if (!callerWritesRequestBody) {
            // 6、调用NetworkInterceptorChain的proceed()进行网络请求,并且返回Response
            networkResponse = new HttpEngine.NetworkInterceptorChain(0, networkRequest).proceed(networkRequest);
        } else {
            //xxx
        }
        // 7、回调cookieJar.saveFromResponse()方法
        receiveHeaders(networkResponse.headers());

        // 8、存在缓存的Response
        if (cacheResponse != null) {
            // 9、判断是使用缓存Response还是网络Response
            if (validate(cacheResponse, networkResponse)) {
                // 10、继续使用缓存的Response
                userResponse = cacheResponse.newBuilder()
                        .request(userRequest)
                        .priorResponse(stripBody(priorResponse))
                        .headers(combine(cacheResponse.headers(), networkResponse.headers()))
                        .cacheResponse(stripBody(cacheResponse))
                        .networkResponse(stripBody(networkResponse))
                        .build();
                // 11、关闭网络Response的连接
                networkResponse.body().close();
                releaseStreamAllocation();
                // 12、更新缓存
                InternalCache responseCache = Internal.instance.internalCache(client);
                responseCache.update(cacheResponse, stripBody(userResponse));
                // 13、Gzip解压后,返回该Response
                userResponse = unzip(userResponse);
                return;
            }
        }
        // 14、没有缓存或者缓存已经过期
        userResponse = networkResponse.newBuilder()
                .request(userRequest)
                .priorResponse(stripBody(priorResponse))
                .cacheResponse(stripBody(cacheResponse))
                .networkResponse(stripBody(networkResponse))
                .build();
        // 15、Response有Body,缓存,并且读取到userResponse
        if (hasBody(userResponse)) {
            maybeCache();
            userResponse = unzip(cacheWritingResponse(storeRequest, userResponse));
        }
    }

    // 网络拦截器链
    class NetworkInterceptorChain implements Interceptor.Chain {
        private final Request request;
        NetworkInterceptorChain(int index, Request request) {
            this.index = index;
            this.request = request;
        }
        @Override public Response proceed(Request request) throws IOException {
            // 1、层层递归调用拦截器的intercept
            if (index < client.networkInterceptors().size()) {
                HttpEngine.NetworkInterceptorChain chain = new HttpEngine.NetworkInterceptorChain(index + 1, request);
                Interceptor interceptor = client.networkInterceptors().get(index);
                Response interceptedResponse = interceptor.intercept(chain);
                return interceptedResponse;
            }
            /**===============================
             * 2、最后一个拦截器才会执行到这部分
             *   1. 会向请求中写入Header
             *   2. 并将Stream中写入Request Body
             *===================================*/
            // 1. 向请求中写入Header
            httpStream.writeRequestHeaders(request);
            // 2. 获取到可以写入request Body的outputstream,并通过Okio进行转换
            Sink requestBodyOut = httpStream.createRequestBody(request, request.body().contentLength());
            BufferedSink bufferedRequestBody = Okio.buffer(requestBodyOut);
            // 3. 将request body写入到Stream中
            request.body().writeTo(bufferedRequestBody);
            // 4. 关闭Stream
            bufferedRequestBody.close();

            /**===============================
             * 3、获取到Response,并且返回
             *   1. 获取到Response
             *   2. 处理返回码为204/205的情况
             *===================================*/
            // 1. 获取到Response
            Response response = readNetworkResponse();
            // 2. 处理返回码为204/205的情况
            int code = response.code();
            if ((code == 204 || code == 205) && response.body().contentLength() > 0) {
                throw new ProtocolException("HTTP " + code + " had non-zero Content-Length: " + response.body().contentLength());
            }
            // 3. 返回response
            return response;
        }
    }

    // HttpEngine.java
    private Response readNetworkResponse() throws IOException {
        // 1、真正完成请求:将请求刷新到底层的Scoket中
        httpStream.finishRequest();
        // 2、通过HttpStream(Http1xStream)获取到Reponse的Headers
        Response networkResponse = httpStream.readResponseHeaders()
                .request(networkRequest)
                .handshake(streamAllocation.connection().handshake())
                .header(OkHeaders.SENT_MILLIS, Long.toString(sentRequestMillis))
                .header(OkHeaders.RECEIVED_MILLIS, Long.toString(System.currentTimeMillis()))
                .build();
        // 3、openResponseBody:返回能读取Response Body的stream
        if (!forWebSocket) {
            networkResponse = networkResponse.newBuilder()
                    .body(httpStream.openResponseBody(networkResponse)) // openResponseBody:
                    .build();
        }
        if ("close".equalsIgnoreCase(networkResponse.request().header("Connection"))
                || "close".equalsIgnoreCase(networkResponse.header("Connection"))) {
            streamAllocation.noNewStreams();
        }
        // 4、返回
        return networkResponse;
    }

    // HttpEngine.java-回调CookieJar的saveFromResponse方法
    public void receiveHeaders(Headers headers) throws IOException {
        List<Cookie> cookies = Cookie.parseAll(userRequest.url(), headers);
        if (cookies.isEmpty()) return;
        client.cookieJar().saveFromResponse(userRequest.url(), cookies);
    }

    // HttpEngine.java-如果缓存可用,return true;缓存不可用,需要采用网络,return false;
    private static boolean validate(Response cached, Response network) {
        // 1、304:表示没有更改过,缓存的数据可以继续使用
        if (network.code() == HTTP_NOT_MODIFIED) {
            return true;
        }

        /**=======================================
         * 2、比较缓存和网络的Last-Modified的时间
         *  1. 网络获取的最后修改时间 < 缓存的最后修改时间,return true : 继续用缓存
         *  2. 否则,return false: 会使用网络Response
         * Last-Modified:用于标记资源在服务端最后被修改的时间
         *=====================================*/
        Date lastModified = cached.headers().getDate("Last-Modified");
        if (lastModified != null) {
            Date networkLastModified = network.headers().getDate("Last-Modified");
            if (networkLastModified != null
                    && networkLastModified.getTime() < lastModified.getTime()) {
                return true;
            }
        }
        return false;
    }
recover
5、HttpEngine如何进行失败重连?
- 通过HttpEngine.recover()方法
    /**=================================================
     * // HttpEngine.java
     * 1. 获取到旧Engine分配的Stream
     * 2. 用该Stream创建新Engine
     *=========================================*/
    public HttpEngine recover(IOException e, Sink requestBodyOut) {
        ...
        // 1. 获取到旧Engine分配的Stream
        StreamAllocation streamAllocation = close();
        // 2. 用该Stream创建新Engine
        return new HttpEngine(client, ..., streamAllocation, ...);
    }
6、返回码504
- 获得具有该返回码的Response表示:网关超时
- HttpEngine的sendRequest()中,如果既没有网络,有没有缓存,就会返回具有504的Response。
7、返回码204/205
- 204: 响应报文中包含若干首部和一个状态行,但是没有实体的主体内容。使用场景:对于一些提交到服务器处理的数据,只需要返回是否成功,此时不需要返回数据。可以使用204。
- 205: 告知浏览器清除当前页面中的所有html表单元素,也就是表单重置。
- NetworkInterceptorChain.proceed()中获取到最终的Response时,会处理返回码为204/205的情况。
- 当code=204/205时,Body的Content长度 > 0, 会抛出ProtocolException。
8、返回码304
- 表示资源没有更改过。
- HttpEngine的invalidate()方法用于判断是采用缓存还是网络的Response
- 如果netWork.code = 304,则直接使用缓存数据。
- 如果netWork.code != 304, 会继续去判断缓存和网络的
Last-Modified。- 缓存的最后修改时间更大,就采用缓存。
- 网络的最后修改时间更大,就采用网络数据。
CacheStrategy
9、CacheStrategy是什么?
- 缓存策略
- 返回和request对应的Cached Response。
- 决定了是否使用网络、缓存,还是两者都使用。
1.
10、OkHttp如何缓存的Reponse?
- OkHttpClient中保存了缓存:Cache cache
- 缓存实现于
Cache.java- 采用DiskLruCache进行缓存。
    //OkHttpClient.java
    InternalCache internalCache() {
        return cache != null ? cache.internalCache : internalCache;
    }
    //OkHttpClient.java
    final Cache cache;
    /**=================================
     *  //Cache.java
     *  缓存策略:从DiskLruCache中获取上次请求对应的所有信息
     *=================================*/
    private final DiskLruCache cache;
    Response get(Request request) {
        // 1. key就是请求中url的md5:  return Util.md5Hex(request.url().toString())
        String key = urlToKey(request);
        DiskLruCache.Snapshot snapshot;
        // 2. 根据key获取到快照
        snapshot = cache.get(key);
        // 3. 从快照中获取到Entry(Cache.java的内部类)
        Cache.Entry entry = new Cache.Entry(snapshot.getSource(ENTRY_METADATA));
        // 4. 将快照中的数据作为Response的body,以及其他信息,组合成一个Response
        Response response = entry.response(snapshot);
        // 5. 将Response返回
        return response;
    }

    //Cache.java的内部类:Entry---保存了url、响应的头、请求的方法等。
    public Entry(Response response) {
        this.url = response.request().url().toString();
        this.requestMethod = response.request().method();
        this.protocol = response.protocol();
        this.message = response.message();
        this.responseHeaders = response.headers();
        ...
    }
11、CacheStrategy的构造源码
cacheStrategy = new CacheStrategy.Factory(now, request, cacheCandidate).get();
   // CacheStrategy.java-存储cacheReponse中的通用报头、实体报头
    public Factory(long nowMillis, okhttp3.Request request, Response cacheResponse) {
        // 1. 遍历headers进行本地存储
        if (cacheResponse != null) {
            Headers headers = cacheResponse.headers();
            for (int i = 0, size = headers.size(); i < size; i++) {
                String fieldName = headers.name(i);
                String value = headers.value(i);
                // 2. 通用报头:表示消息产生的日期和时间
                if ("Date".equalsIgnoreCase(fieldName)) {
                    servedDate = HttpDate.parse(value);
                    servedDateString = value;
                    // 3. 实体报头:响应过期的日期和时间
                } else if ("Expires".equalsIgnoreCase(fieldName)) {
                    expires = HttpDate.parse(value);
                    // 4. 实体报头:资源最后修改的日期和时间
                } else if ("Last-Modified".equalsIgnoreCase(fieldName)) {
                    lastModified = HttpDate.parse(value);
                    lastModifiedString = value;
                    /**==============================================================
                     * 5. ETag:帮助服务端进行缓存验证。请求时发送给服务端。
                     *     服务端验证该哈希值和服务端哈希值一致,表明没有变化,返回304表示未修改。
                     *     如果不一致,表明数据发生改变,返回200.
                     *==============================================================*/
                } else if ("ETag".equalsIgnoreCase(fieldName)) {
                    etag = value;
                    // 6. Age:该Reponse从产生那一刻起到现在所经过的时间。
                } else if ("Age".equalsIgnoreCase(fieldName)) {
                    ageSeconds = HeaderParser.parseSeconds(value, -1);
                }
                //xxx
            }
        }
    }
HttpStream
12、sendRequest()中获取到HttpStream的流程
httpStream = connect();
    // HttpEngine.java: 获取到HttpStream
    private HttpStream connect() throws RouteException, RequestException, IOException {
        boolean doExtensiveHealthChecks = !networkRequest.method().equals("GET");
        return streamAllocation.newStream(client.connectTimeoutMillis(),
                client.readTimeoutMillis(), client.writeTimeoutMillis(),
                client.retryOnConnectionFailure(), doExtensiveHealthChecks);
    }

    // StreamAllocation.java
    public HttpStream newStream(int connectTimeout, int readTimeout, int writeTimeout,
                                boolean connectionRetryEnabled, boolean doExtensiveHealthChecks)
            throws RouteException, IOException {
        try {
            // 1、找到健康的Connection
            RealConnection resultConnection = findHealthyConnection(connectTimeout, readTimeout,
                    writeTimeout, connectionRetryEnabled, doExtensiveHealthChecks);

            HttpStream resultStream;
            // 2、framedConnection == null
            if (resultConnection.framedConnection != null) {
                resultStream = new Http2xStream(this, resultConnection.framedConnection);
            } else {
                resultConnection.socket().setSoTimeout(readTimeout);
                resultConnection.source.timeout().timeout(readTimeout, MILLISECONDS);
                resultConnection.sink.timeout().timeout(writeTimeout, MILLISECONDS);
                // 3、创建Http1xStream(Http 1x 版本的Stream)
                resultStream = new Http1xStream(this, resultConnection.source, resultConnection.sink);
            }
            // 4、返回Http1xStream
            synchronized (connectionPool) {
                stream = resultStream;
                return resultStream;
            }
        } catch (IOException e) {
            // IO异常就抛出Route异常
            throw new RouteException(e);
        }
    }
    /**==================================================
     * // StreamAllocation.java
     *  1. 找到healthy connection
     *  2. 如果connection不健康,会一直寻找,直到找到healthy connection。
     *==============================================*/
    private RealConnection findHealthyConnection(int connectTimeout, int readTimeout, int writeTimeout, boolean connectionRetryEnabled, boolean doExtensiveHealthChecks)
            throws IOException, RouteException {
        while (true) {
            // 1、获取到RealConnection(内部的socket已经和服务器建立链接)
            RealConnection candidate = findConnection(connectTimeout, readTimeout, writeTimeout,
                    connectionRetryEnabled);

            // 2、如果是崭新的connection,跳过昂贵的健康检查,直接返回
            synchronized (connectionPool) {
                if (candidate.successCount == 0) {
                    // 直接返回
                    return candidate;
                }
            }
            // 3、不是崭新的connection,经过健康检查后,return
            if (candidate.isHealthy(doExtensiveHealthChecks)) {
                return candidate;
            }
            // 4、连接失败-StreamAllocation.java: routeSelector.connectFailed(route, e);将Route添加到黑名单。
            connectionFailed(new IOException());
        }
    }

    /**======================================================================
     * //StreamAllocation.java
     *   返回一个connection(host a new stream)
     *   1. 这更倾向于已经存在的connection
     *   2. 然后才是connection pool
     *   3. 最后才会新建一个connection
     *========================================================================*/
    private RealConnection findConnection(int connectTimeout, int readTimeout, int writeTimeout,
                                          boolean connectionRetryEnabled) throws IOException, RouteException {
        Route selectedRoute;
        synchronized (connectionPool) {
            // 1、第一次进来StreamAllocation内部的connection = null
            RealConnection allocatedConnection = this.connection;
            if (allocatedConnection != null && !allocatedConnection.noNewStreams) {
                // 不会进入
                return allocatedConnection;
            }
            // 2、尝试从connection pool中获取到connection
            RealConnection pooledConnection = Internal.instance.get(connectionPool, address, this);
            if (pooledConnection != null) {
                // 不会进入
                this.connection = pooledConnection;
                return pooledConnection;
            }
            // 3、选择的route = null
            selectedRoute = route;
        }
        // 4、选择的route = null
        if (selectedRoute == null) {
            // 5、从RouteSelector中获取到有效的Route--next()内部会去寻找到有效的route,没找到会继续递归调用next
            selectedRoute = routeSelector.next();
            synchronized (connectionPool) {
                // 6、StreamAllocation内部存储这个route的引用
                route = selectedRoute;
            }
        }
        // 7、构造RealConnection:内部仅仅是保存该Route
        RealConnection newConnection = new RealConnection(selectedRoute);
        // 8、StreamAllocation内部的allocation列表中,持有这个connection的引用
        acquire(newConnection);

        // 9、将connection添加到连接池中
        Internal.instance.put(connectionPool, newConnection);
        // 10、StreamAllocation内部保存这个connection
        this.connection = newConnection;
        // 11、从Route中获取address和port,创建Socket,并且调用socket的connect去连接address。(socket保存在RealConnection内部)
        newConnection.connect(connectTimeout, readTimeout, writeTimeout, address.connectionSpecs(),
                connectionRetryEnabled);
        // 12、将Route从黑名单中移除
        routeDatabase().connected(newConnection.route());

        return newConnection;
    }

    // RealConnection.java
    public void connect(int connectTimeout, int readTimeout, int writeTimeout,
                        List<ConnectionSpec> connectionSpecs, boolean connectionRetryEnabled) throws RouteException {
        // 0、原来就已经连接上了,抛出状态异常。
        if (protocol != null) throw new IllegalStateException("already connected");
        RouteException routeException = null;
        ConnectionSpecSelector connectionSpecSelector = new ConnectionSpecSelector(connectionSpecs);
        // 1、Route中获取proxy、address
        Proxy proxy = route.proxy();
        Address address = route.address();
        // 2、路由异常,之后再分析。
        if (route.address().sslSocketFactory() == null
                && !connectionSpecs.contains(ConnectionSpec.CLEARTEXT)) {
            throw new RouteException(new UnknownServiceException("CLEARTEXT communication not supported: " + connectionSpecs));
        }
        // 3、while循环,直到连接成功(protocol != null)
        while (protocol == null) {
            try {
                // 4、Direct或者http会调用socketFactory的createSocket
                rawSocket = proxy.type() == Proxy.Type.DIRECT || proxy.type() == Proxy.Type.HTTP
                        ? address.socketFactory().createSocket()
                    //5、其他会调用new Socket(proxy)
                        : new Socket(proxy);
                // 6、socket.connect去连接address
                connectSocket(connectTimeout, readTimeout, writeTimeout, connectionSpecSelector);
            } catch (IOException e) {
                closeQuietly(socket);
                closeQuietly(rawSocket);
                // 抛出Route Exception
                throw new RouteException(e);
            }
        }
    }

        // RealConnection.java-做所有必要工作用于在原始套接字(raw socket)上构建HTTP/HTTPS的连接
    private void connectSocket(int connectTimeout, int readTimeout, int writeTimeout,
                               ConnectionSpecSelector connectionSpecSelector) throws IOException {
        // 1、设置read超时时间
        rawSocket.setSoTimeout(readTimeout);
        try {
            // 2、调用socket的connect去连接address
            Platform.get().connectSocket(rawSocket, route.socketAddress(), connectTimeout);
        } catch (ConnectException e) {
            throw new ConnectException("Failed to connect to " + route.socketAddress());
        }
        // 3、获取到读写Stream
        source = Okio.buffer(Okio.source(rawSocket));
        sink = Okio.buffer(Okio.sink(rawSocket));
        // 4、成员变量socket设置为rawSocket
        protocol = Protocol.HTTP_1_1;
        socket = rawSocket;
    }

    // Platform.java-进行socket的连接
    @Override public void connectSocket(Socket socket, InetSocketAddress address, int connectTimeout) throws IOException {
        // 调用socket的connect方法,去连接address
        socket.connect(address, connectTimeout);
        // xxx
    }
socket的构建:
    // SocketFactory.java:内部类DefaultSocketFactory
    public Socket createSocket() {
        return new Socket();
    }
    // Socket.java
    public Socket() {
        setImpl();
    }
    // Socket.java-Proxy构造Socket(socks socket或者一般的socket)
    public Socket(Proxy proxy) {
        Proxy.Type type = p.type();
        // 1、Proxy类型为Socks
        if (type == Proxy.Type.SOCKS) {
            // xxx
            // 2、构造socks socket
            impl = new SocksSocketImpl(p);
            impl.setSocket(this);
        } else {
            // 3、构造Plain Socket
            if (p == Proxy.NO_PROXY) {
                impl = new PlainSocketImpl();
                impl.setSocket(this);
            }
        }
    }
ConnectionPool(14题)
1、OkHttp的复用连接池
- TCP的三次握手和四次挥手,会导致效率低下。
- HTTP有一种keepalive connection机制
- OkHttp支持5个并发socket连接
- OkHttp默认keppAlive时间为5分钟
2、OkHttp的ConnectionPool
具有五种主要变量:
1. 空闲的最大连接数:默认5
1. keepAlive时间:默认5分钟
1. 线程池:后台用于清理需要清理的线程
1. 双向队列:维护者RealConnections(socket物理连接的包装)
1. routeDatabase-连接失败的路线名单:连接失败时,会将失败的路线添加进去
1. cleanupRunning:表明是否正在进行清理工作
1. cleanupRunnable:清理任务,每隔一定时间间隔就进行下次清理工作。
/**=============================================
 * //ConnectionPool.java-管理HTTP和SPDY连接的复用,用于减少网络延迟。
 * 1. 共享相同Address的Http请求可能会共享同一个Connection。
 * 2. 实现了复用策略:决定哪个连接能为复用而保持open
 *===============================================*/
public final class ConnectionPool {
    // 1、每个address的空闲最大连接数(socket)
    private final int maxIdleConnections;
    // 2、keepAlive时间
    private final long keepAliveDurationNs;
    // 构造方法-最大连接数:5;keepAlive:5分钟
    public ConnectionPool() {
        this(5, 5, TimeUnit.MINUTES);
    }
    public ConnectionPool(int maxIdleConnections, long keepAliveDuration, TimeUnit timeUnit) {
        this.maxIdleConnections = maxIdleConnections;
        this.keepAliveDurationNs = timeUnit.toNanos(keepAliveDuration);
    }

    /**=================================================
     * 3、线程池: 后台线程用于清理需要清理的连接
     *   类似于CachedThreadPool,并且阻塞队列采用没有容量的SynchronousQueue
     *=================================================*/
    private static final Executor executor = new ThreadPoolExecutor(0 /* corePoolSize */,
            Integer.MAX_VALUE /* maximumPoolSize */, 60L /* keepAliveTime */, TimeUnit.SECONDS,
            new SynchronousQueue<Runnable>(), Util.threadFactory("OkHttp ConnectionPool", true));

    // 4、双向队列,同时具有队列和栈的性质,经常在缓存中使用。内部存储着RealConnection,也就是对socket物理连接的包装。
    private final Deque<RealConnection> connections = new ArrayDeque<>();
    // 5、记录连接失败的路线名单。连接失败时就会把失败的路线加进去。
    final RouteDatabase routeDatabase = new RouteDatabase();

    // 6、表明是否正在进行清理工作
    boolean cleanupRunning;
    // 7、清理任务:循环调用cleanup进行清理工作,并且wait一定时间间隔,然后继续进行清理工作
    private final Runnable cleanupRunnable = new Runnable() {
        @Override public void run() {
            //清理工作
        }
    };
}
3、RealConnection的作用?
是对socket物理连接的包装
4、ConnectionPool是什么时候创建的?
在OkHttpClient构造时,创建的ConnectionPool
5、Deque是什么?
- Deque是Queue的子接口
- 既具有stack栈的性质,也具有queue队列的性质。
缓存操作
6、ConnectionPool关于缓存的操作有哪些?
- 也就是对
Deque<RealConnection>双向队列的操作。- 提供了四种操作:放入连接-put;获取连接-get;移除连接-connectionBecameIdle;移除所有连接-evictAll
put: 存放缓存
// ConnectionPool.java
void put(RealConnection connection) {
      // 1、第一次进入时,cleanupRunning = false,会通过executor执行cleanupRunnable进行清理工作。
      if (!cleanupRunning) {
            cleanupRunning = true;
            // 2、 执行完ConnectionPool的cleanup(),并且会继续将cleanupRunning设置为false
            executor.execute(cleanupRunnable);
      }
      // 3、将RealConnection添加到双向队列中
      connections.add(connection);
}
get:获取缓存
    // ConnectionPool.java-返回复用的连接到address的connection,如果不存在连接返回null
    RealConnection get(Address address, StreamAllocation streamAllocation) {
        // 1、遍历双向队列中的RealConnection
        for (RealConnection connection : connections) {
            // 2、连接的allocations的次数小于限制的大小,并且request的address和该连接的地址完全匹配
            if (connection.allocations.size() < connection.allocationLimit
                    && address.equals(connection.route().address)
                    && !connection.noNewStreams) {
                streamAllocation.acquire(connection);
                // 3、直接返回connection,用于复用
                return connection;
            }
        }
        return null;
    }
connectionBecameIdle: 移除连接
    // ConnectionPool.java-移除连接
    boolean connectionBecameIdle(RealConnection connection) {
        // 1、connection进入空闲状态或者最大的空闲连接数=0
        if (connection.noNewStreams || maxIdleConnections == 0) {
            // 2、立即从连接队列中,将该连接移除
            connections.remove(connection);
            return true;
        } else {
            // 3、否则,去通知cleanup线程进行可能的清理工作
            notifyAll();  // 去唤醒cleanupRunnable中对ConnectionPool对象的wait,继续去进行清理任务
            return false;
        }
    }
evictAll: 移除所有连接
    // ConnectionPool.java-移除所有连接
    public void evictAll() {
        List<RealConnection> evictedConnections = new ArrayList<>();
        synchronized (this) {
            // 1、将connection从连接队列中移除,并且加入到待移除的连接队列中
            for (Iterator<RealConnection> i = connections.iterator(); i.hasNext(); ) {
                RealConnection connection = i.next();
                if (connection.allocations.isEmpty()) {
                    connection.noNewStreams = true;
                    // 添加到待移除连接队列中
                    evictedConnections.add(connection);
                    // 从连接队列中移除
                    i.remove();
                }
            }
        }
        // 2、遍历待移除的连接队列,将connection中的socket进行关闭
        for (RealConnection connection : evictedConnections) {
            closeQuietly(connection.socket());
        }
    }
自动回收连接
7、ConnectionPool的自动回收连接
- OkHttp是根据StreamAllocation的引用计数是否为0来实现自动回收连接.
- ConnectionPool具有一个cleanup线程
- ConnectionPool.put()方法缓存connection时,会开启cleanup线程进行清理工作。
    // ConnectionPool.java-清理任务
    private final Runnable cleanupRunnable = new Runnable() {
        @Override public void run() {
            while (true) {
                // 1、cleanup进行清理工作
                long waitNanos = cleanup(System.nanoTime());
                // 2、因为没有使用中、idle中的connection,直接退出cleanup线程
                if (waitNanos == -1) return;
                if (waitNanos > 0) {
                    long waitMillis = waitNanos / 1000000L;
                    waitNanos -= (waitMillis * 1000000L);
                    // 3、多线程同步,等待一定时间
                    synchronized (okhttp3.ConnectionPool.this) {
                        try {
                            okhttp3.ConnectionPool.this.wait(waitMillis, (int) waitNanos);
                        } catch (InterruptedException ignored) {
                        }
                    }
                }
            }
        }
    };

    /**===============================================================
     * // ConnectionPool.java---清理工作
     * 1. 在连接池中进行维护工作,将idle时间最长并且已经超过了keep alive限制,或者idle连接上限的connection进行清除
     * 2. 返回时间:直至下一次执行cleanup需要sleep的时间
     * 3. 返回-1:已经没有进一步的清理工作。
     *==================================================================*/
    long cleanup(long now) {
        // 使用中的connection数据
        int inUseConnectionCount = 0;
        // 空闲的connection数据
        int idleConnectionCount = 0;
        // 空闲时间最长的connection
        RealConnection longestIdleConnection = null;
        // 空闲时间最长的connection的空闲时间
        long longestIdleDurationNs = Long.MIN_VALUE;
        synchronized (this) {
            /**========================================================
             * 1、遍历连接队列connections,获取到idle时间最长的connection
             *==========================================================*/
            for (Iterator<RealConnection> i = connections.iterator(); i.hasNext(); ) {
                RealConnection connection = i.next();
                // 1. 如果该connection正在使用中,继续搜索
                if (pruneAndGetAllocationCount(connection, now) > 0) {
                    // 2. 使用中的连接数 + 1
                    inUseConnectionCount++;
                    continue;
                }
                // 3. 该connection处于idle状态,idle的连接数 + 1
                idleConnectionCount++;

                /**======================================
                 * 2、通过算法获取到idle时间最长的connection
                 *=====================================*/
                // 1. 计算得到该connection空闲了多少时间
                long idleDurationNs = now - connection.idleAtNanos;
                if (idleDurationNs > longestIdleDurationNs) {
                    // 2. 保存空闲最长的时间
                    longestIdleDurationNs = idleDurationNs;
                    // 3. 保存空闲最长的connection
                    longestIdleConnection = connection;
                }
            }

            /**=============================================
             * 3、idle时间超过了keepAlive时间,或者,idle的connection数量想超过最大idle连接数。立即清理。
             *=============================================*/
            if (longestIdleDurationNs >= this.keepAliveDurationNs
                    || idleConnectionCount > this.maxIdleConnections) {
                // 1. 从连接队列中移除该connection
                connections.remove(longestIdleConnection);
                // 2. 立即关闭该connection的socket连接
                closeQuietly(longestIdleConnection.socket());
                // 3. 返回0,表示立即再次进行cleanup
                return 0;
            } else if (idleConnectionCount > 0) {
                /**=============================================
                 * 4、具有idle的connection,计算距离keepAlive还有多少时间,return后进行sleep
                 *=============================================*/
                return keepAliveDurationNs - longestIdleDurationNs;
            } else if (inUseConnectionCount > 0) {
                /**=============================================
                 * 5、所有的connection都处于使用中。return keepAlive。默认是睡眠5分钟。
                 *=============================================*/
                return keepAliveDurationNs;
            } else {
                /**=============================================
                 * 6、没有空闲的connection,也没有使用中的connection。-1会退出cleanup线程。等待之后通过线程池开启。
                 *=============================================*/
                cleanupRunning = false;
                return -1;
            }
        }
    }
8、清理线程的工作流程?以及四种情况的处理办法?
9、ConnectionPool.pruneAndGetAllocationCount()的源码分析
- 用于判断connection是空闲连接还是使用中的连接。
- return 0: idle connection
- return >0: connection处于使用中
    /**=======================================================
     * //ConnectionPool.java
     * 1. 去除任何泄露的allocations(分配),并且返回在connection上存活的allocations数量
     * 2. Allocations会被泄露:如果connection正在追踪它们,但是app代码已经遗弃了它们。
     * 3. 泄露检测是不准确的并且依赖于GC
     *=========================================================*/
    private int pruneAndGetAllocationCount(RealConnection connection, long now) {
        // 1、获取到RealConnection中的StreamAllocation列表
        List<Reference<StreamAllocation>> references = connection.allocations;
        for (int i = 0; i < references.size(); ) {
            // 2、获取到StreamAllocation
            Reference<StreamAllocation> reference = references.get(i);
            // 3、如果已经被应用或者GC清理,会返回null
            if (reference.get() != null) {
                i++;
                continue;
            }
            /**=============================================
             * 4、找到泄露的allocation,并从StreamAllocation列表中移除该allocation
             *  1. 移除该allocation
             *  2. 设置noNewStreams标志
             *=========================================*/
            Internal.logger.warning("A connection to " + connection.route().address().url() + " was leaked. Did you forget to close a response body?");
            // 1. 从StreamAllocation列表中移除该allocation
            references.remove(i);
            // 2. connection没有新的stream。该标志可以用于connectionBecameIdle、evictAll中移除连接。
            connection.noNewStreams = true;

            // 5、当前是最后一个allocation,该connection符合立即释放的条件。
            if (references.isEmpty()) {
                // 设置idle的时间
                connection.idleAtNanos = now - keepAliveDurationNs;
                // 表明该connection是空闲连接
                return 0;
            }
        }
        // 6、返回Allocation的数量
        return references.size();
    }
StreamAllocation
10、StreamAllocation是什么?
- OkHttp中使用了类似于引用计数的方式追踪socket流的调用。
- 该计数对象就是StreamAllocation
- 具有两个重要方法:acquire()、release()—本质是改变RealConnection中StreamAllocation的List的大小。
构造
11、StreamAllocation的构造
将connectionPool、address、routeselector保存到内部
/**===============================================================================
 * // StreamAllocation.java
 *  1、address:createAddress(client, request) 通过OkHttpClient和请求的Request进行构造
 *    1. host: 如www.wanandroid.com
 *    2. scheme:http
 *    3. port:80
 *    4. url:http://www.wanandroid.com/
 *  2、connectionPool: new OkHttpClient()时会在内部创建connectionPool。一个Client一个pool
 *==========================================================================*/
public StreamAllocation(ConnectionPool connectionPool, Address address) {
    this.connectionPool = connectionPool;
    this.address = address;
    this.routeSelector = new RouteSelector(address, //目标Address
            routeDatabase()); //将OkHttpClient的connectionPool中的RouteDatabase保存到RouteSelector内部
}
acquire()、release()
12、StreamAllocation的acquire()和release()源码
    /**======================================================
     * // StreamAllocation.java
     * 1. 使用该allocation去持有connection。
     * 2. 每次调用acquire()方法,都必须要配套的调用release()方法在同一个connection上。
     *===============================================================*/
    public void acquire(RealConnection connection) {
        // 将该StreamAllocation添加到RealConnection内部的allocation列表中
        connection.allocations.add(new WeakReference<>(this));
    }

    // StreamAllocation.java---从RealConnection的allocation列表中删除当前allocation
    private void release(RealConnection connection) {
        // 1、遍历allocations
        for (int i = 0, size = connection.allocations.size(); i < size; i++) {
            Reference<StreamAllocation> reference = connection.allocations.get(i);
            // 2、查找到当前StreamAllocation
            if (reference.get() == this) {
                // 3、从allocations列表中删除这个allocation
                connection.allocations.remove(i);
                return;
            }
        }
        throw new IllegalStateException();
    }
RealConnection
13、RealConnection是什么?有什么用?
- 是socket物理连接的包装
- 维护了
List<Reference<StreamAllocation>> allocations- StreamAllocation的数量也就是socket被引用的次数
- 如果计数 = 0,表明该连接处于idle状态,需要经过算法进行回收。
- 如果计数 != 0, 表明该连接处于使用中,无需关闭。
14、RealConnection的源码和构造方法
public final class RealConnection extends FramedConnection.Listener implements Connection {
  // Route
  private final Route route;
  // 底层的 TCP socket.
  private Socket rawSocket;
  // 应用层socket
  public Socket socket;
  public volatile FramedConnection framedConnection;
  // Allocation队列
  public final List<Reference<StreamAllocation>> allocations = new ArrayList<>();
  // 构造方法
  public RealConnection(Route route) {
    this.route = route;
  }
}
Request(12)
1、Request的作用
- 用于Http的请求
- 使用OkHttp之前都需要对Request进行构造。
2、OkHttp请求的构造
GET:通过Builder去构造Request
//1. 通过Builder构建Request
Request.Builder requestBuilder = new Request.Builder()
                                        .url("https://www.baidu.com/")
                                        .method("GET", null);
POST:通过FormBody去构造requestBody,然后再通过Builder和requestBody构造Request。
//1. 通过FormBody创建RequestBody
RequestBody requestBody = new FormBody.Builder()
                .add("ip", getIPAddress(this)) //本机IP
                .build();
//2. 创建Request(通过Builder和RequestBody)
Request request = new Request.Builder()
                .url("http://ip.taobao.com/service/getIpInfo.php")
                .post(requestBody)
                .build();
3、Request源码
- 具有五个重要的字段。
public final class Request {
    // 请求的url
    private final HttpUrl url;
    // GET、POST
    private final String method;
    // 头部全部存放在里面
    private final Headers headers;
    // request的body,包括MediaType、Charset、ContentType等内容
    private final RequestBody body;
    // tag标签,用于取消请求。
    private final Object tag;

    private Request(okhttp3.Request.Builder builder) {
        this.url = builder.url;
        this.method = builder.method;
        this.headers = builder.headers.build();
        this.body = builder.body;
        this.tag = builder.tag != null ? builder.tag : this;
    }

    public okhttp3.Request.Builder newBuilder() {
        return new okhttp3.Request.Builder(this);
    }

    public static class Builder {
        //buidler相关
    }
}
4、Request有哪些重要的字段?
- url
- method
- headers
- body
- tag
Builder
5、Request.Builder的构造方法
默认构造:默认Get请求
Request构造:将一些字段保存在内部。
// Request.Builder-默认构造方法
public Builder() {
    this.method = "GET";
    this.headers = new Headers.Builder();
}
// Request进行构造
private Builder(okhttp3.Request request) {
    this.url = request.url;
    this.method = request.method;
    this.body = request.body;
    this.tag = request.tag;
    this.headers = request.headers.newBuilder();
}
public okhttp3.Request build() {
    return new okhttp3.Request(this);
}
6、url()
        /**=================================================
         * //Request.Builder: 将String的url转换为HttpUrl
         *   1. HttpUrl具有字段:scheme、host、port等所有Http相关字段
         *==================================================*/
        public okhttp3.Request.Builder url(String url) {
            HttpUrl parsed = HttpUrl.parse(url);
            return url(parsed);
        }
        public okhttp3.Request.Builder url(HttpUrl url) {
            this.url = url;
            return this;
        }
7、method()
        // Request.Builder: 将method,如“GET”直接保存在内部。RequestBody也是保存在内部。
        public okhttp3.Request.Builder method(String method, RequestBody body) {
            this.method = method;
            this.body = body;
            return this;
        }
8、header相关:header()、addHeader()、removeHeader()、headers()
        // Request.Builder:将名为name参数的header的数值替换为value
        public okhttp3.Request.Builder header(String name, String value) {
            // headers的set
            headers.set(name, value);
            return this;
        }

        // Request.Builder:添加一个header,名为name,值为value
        public okhttp3.Request.Builder addHeader(String name, String value) {
            headers.add(name, value);
            return this;
        }

        //  Request.Builder:移除名为name的所有header
        public okhttp3.Request.Builder removeHeader(String name) {
            headers.removeAll(name);
            return this;
        }

        // Request.Builder:移除原来所有headers,将参数的headers全部添加进来
        public okhttp3.Request.Builder headers(Headers headers) {
            this.headers = headers.newBuilder();
            return this;
        }
9、cacheControl(): 设置Http协议中请求和响应的缓存机制
        // Request.Builder:用于设置Http协议中的Cache-Control(请求和响应的缓存机制)
        public okhttp3.Request.Builder cacheControl(CacheControl cacheControl) {
            String value = cacheControl.toString();
            if (value.isEmpty()) return removeHeader("Cache-Control");
            return header("Cache-Control", value);
        }
10、tag():通过tag可以取消请求
        // Request.Builder:给Request设置tag标签,可以用于之后取消请求。方便统一管理OkHttp请求。
        public okhttp3.Request.Builder tag(Object tag) {
            this.tag = tag;
            return this;
        }
11、build(): 构造Request
        // Request.Builder:构造Request
        public okhttp3.Request build() {
            return new okhttp3.Request(this);
        }
12、内部通过method()方法实现的API:get()、head()、post()、delete()、put()、patch()
        /**==================================================================
         * // Request.Builder: 系列方法都是内部通过method()方法将GET、POST和body保存到内部
         *=============================================================*/
        // GET
        public okhttp3.Request.Builder get() {
            return method("GET", null);
        }
        // HEAD
        public okhttp3.Request.Builder head() {
            return method("HEAD", null);
        }
        // POST
        public okhttp3.Request.Builder post(RequestBody body) {
            return method("POST", body);
        }
        // DELETE
        public okhttp3.Request.Builder delete(RequestBody body) {
            return method("DELETE", body);
        }
        // PUT
        public okhttp3.Request.Builder put(RequestBody body) {
            return method("PUT", body);
        }
        // PATCH
        public okhttp3.Request.Builder patch(RequestBody body) {
            return method("PATCH", body);
        }
Address(5)
1、Address的作用
- 连接说明书:用于和源服务器进行连接
- 如果是简单的connections,这就是server的hostname和port。
- 如果是具有明确的proxy请求,这也会包括一些proxy信息。
- 如果是安全性的connections, 也会包含SSL socket factory,hostname verifier, certificate(证书)。
2、Address源码
/**==================================================================
 * 和源服务器的连接说明书(A specification for a connection)
 * 1. 如果是简单的connections,这就是server的hostname和port
 * 2. 如果是具有明确的proxy请求,这也会包括一些proxy信息。
 * 3. 如果是安全性的connections, 也会包含SSL socket factory,hostname verifier, certificate(证书)。
 * *  Http请求如果共享同一个Address,也会共享同一个connection
 *==============================================================*/
public final class Address {
    // 1、 Http所有相关字段:如scheme、host、port
    final HttpUrl url;
    // 2、dns
    final Dns dns;
    final SocketFactory socketFactory;
    final List<Protocol> protocols;
    final Proxy proxy;
    final SSLSocketFactory sslSocketFactory;
    final HostnameVerifier hostnameVerifier;
    final CertificatePinner certificatePinner;
    xxx
}
3、构造Address
用host、port、dns、protocols等内容去构造Address
private static Address createAddress(OkHttpClient client, okhttp3.Request request) {
        SSLSocketFactory sslSocketFactory = null;
        HostnameVerifier hostnameVerifier = null;
        CertificatePinner certificatePinner = null;
        // 1、判断scheme是否是https
        if (request.isHttps()) {
            sslSocketFactory = client.sslSocketFactory();
            hostnameVerifier = client.hostnameVerifier();
            certificatePinner = client.certificatePinner();
        }
        // 1、host、port、dns、protocols等去构造Address
        return new Address(request.url().host(), request.url().port(), client.dns(),
                client.socketFactory(), sslSocketFactory, hostnameVerifier, certificatePinner,
                client.proxyAuthenticator(), client.proxy(), client.protocols(),
                client.connectionSpecs(), client.proxySelector());
}
Proxy
4、Proxy是什么?
- proxy的相关设置
- type: 决定类型(direct、http、socks)
- SocketAddress:socket地址
/**=======================================================
 * // Proxy.java
 * proxy的相关设置,包括type(http代理还是socks代理)、socket地址
 *========================================================*/
public class Proxy {
    // proxy的类型
    private java.net.Proxy.Type type;
    // proxy的socket地址。如果属于直连则返回null(没有代理)
    private SocketAddress sa;
    public enum Type {
        // 直接的连接或者没有proxy
        DIRECT,
        // 应用层协议的代理(HTPP、FTP等)
        HTTP,
        // Socks代理(v4或者v5)
        SOCKS
    };
}
SocketFactory
5、SocketFactory
    /**=================================================
     * // SocketFactory.java
     * 用于创建socket。可以被继承,用于创建特殊的socket子类,
     *     并且提供了一种框架用于增加socket层面的功能。
     *===============================================*/
    public abstract class SocketFactory
    {
        public static void setDefault(javax.net.SocketFactory factory){...}
        //xxx
    }
Route(6)
1、Route的作用
连接到服务器的connection需要使用该Route路由。
/**=============================================================
 * 1、该具体Route被连接到抽象源服务器的connection所使用。
 *
 * 2、当创建connection时,客户端可以由很多选项:
 *   HTTP proxy(Http代理): 一个代理服务器可能为该客户端进行了明确的配置。
 *                         否则会使用ProxySelector,可能会返回多个proxy用于尝试。
 *   IP address(IP地址):无论是直连源服务器还是代理服务器,打开一个socket都需要一个IP地址。
 *                      DNS服务器会返回多个IP地址用于尝试。
 *
 * 3、每个路由对用这些选项都有明确的选择。
 *========================================================*/
public final class Route {
    final Address address;
    final Proxy proxy;
    final InetSocketAddress inetSocketAddress;
}
InetSocketAddress
2、InetSocketAddress是什么?
    /**===========================================
     * // InetSocketAddress.java
     * 用于实现 IP Socket地址(IP地址 + port号)
     * 也可以是hostname + port号
     *==============================================*/
    public class InetSocketAddress extends SocketAddress {
        private static class InetSocketAddressHolder {
            // 1、Socket Address's 主机名
            private String hostname;
            // 2、Socket Address's IP 地址
            private InetAddress addr;
            // 3、Socket Address's 端口号
            private int port;
        }
    }
RouteDatabase
3、RouteDatabase的作用?
- 路由黑名单
- 用于避免使用那些连接失败的Route
/**=================================================================
 * 失败的Route(路由)的黑名单
 * 1. 用于避免创建和目标address有关的connection
 * 2. 如果尝试连接一个指定的IP地址或者proxy server出现了失败,
 *    会进行记录并且优先修改这个路由。
 *============================================================*/
public final class RouteDatabase {
    // LinkedHashSet存储Route
    private final Set<Route> failedRoutes = new LinkedHashSet<>();
    // 将连接失败的route添加到黑名单中
    public synchronized void failed(Route failedRoute) {
        failedRoutes.add(failedRoute);
    }
    // 将成功连接的route从黑名单中移除
    public synchronized void connected(Route route) {
        failedRoutes.remove(route);
    }
    // 如果route最近失败过,return true,需要推迟这个route。
    public synchronized boolean shouldPostpone(Route route) {
        return failedRoutes.contains(route);
    }
    // 失败的route数量
    public synchronized int failedRoutesCount() {
        return failedRoutes.size();
    }
}
RouteSelector
4、RouteSelector
/**
 * // RouteSelector.java
 *  1. 选择routes去连接到源服务器。
 *  2. 每个connection需要在proxy servver、IP address、TLS mode中进行选择。
 *  3. Connections也可能会被回收
 */
public final class RouteSelector {
    // 请求的目标地址信息,如http://www.wanandroid.com/
    private final Address address;
    // Route黑名单
    private final RouteDatabase routeDatabase;
    // 最近使用的Porxy、socketAddress
    private Proxy lastProxy;
    private InetSocketAddress lastInetSocketAddress;

    // Proxy列表
    private List<Proxy> proxies = Collections.emptyList();
    // socket Address列表。
    private List<InetSocketAddress> inetSocketAddresses = Collections.emptyList();
    // index
    private int nextProxyIndex;
    private int nextInetSocketAddressIndex;

    // 失败的Route列表
    private final List<Route> postponedRoutes = new ArrayList<>();

}
构造
5、构造方法
    // RouteSelector.java-构造方法
    // 调用层次关系:
    // HttpEngine.sendRequest() -> new HttpEngine() -> new StreamAllocation() -> new RouteSelector()
    public RouteSelector(okhttp3.Address address, okhttp3.internal.RouteDatabase routeDatabase) {
        // 1、保存address
        this.address = address;
        // 2、保存route黑名单
        this.routeDatabase = routeDatabase;
        // 3、将proxy存储到内部列表中
        resetNextProxy(address.url(), address.proxy());
    }

    // RouteSelector.java-准备proxy server相关的proxy
    private void resetNextProxy(HttpUrl url, java.net.Proxy proxy) {
        if (proxy != null) {
            // 1、Porxy不为null,建立proxy列表
            proxies = Collections.singletonList(proxy);
        }
        nextProxyIndex = 0;
    }
next()
6、next(): 获取有效的Route
    // RouteSelector.java-获取Route,如果该Route失败过,去找下个Route
    public Route next() throws IOException {
        if (!hasNextInetSocketAddress()) {
            // 1、有下一个Proxy: nextProxyIndex = 0 < proxies.size() = 1
            if (!hasNextProxy()) {
                return nextPostponed();
            }
            // 2、获取到Proxy列表中nextProxyIndex下标的proxy
            lastProxy = nextProxy();
        }
        // 3、获取到socket address列表中nextInetSocketAddressIndex下标的socket地址
        lastInetSocketAddress = nextInetSocketAddress();
        // 4、RouteSlector初始化传入的address;最新的proxy,type=Direct;最新的socket address-47.104.74.165
        Route route = new Route(address, lastProxy, lastInetSocketAddress);
        // 5、判断该route最近是否失败过。true-失败过;
        if (routeDatabase.shouldPostpone(route)) {
            postponedRoutes.add(route);
            // 6、如果该Route失败过,会去递归调用next,直到找到不失败的Route
            return next();
        }
        // 7、返回Route
        return route;
    }

    // RouteSelector.java-返回下一个proxy
    private Proxy nextProxy() throws IOException {
        // 1、返回proxy列表中index指向的元素。Result = “DIRECT”
        Proxy result = proxies.get(nextProxyIndex++);
        // 2、重置下一个Internet Socket Address(将dns下所有的address添加到了RouteSelector内部的adress列表中)
        resetNextInetSocketAddress(result);
        return result;
    }


    // RouteSelector.java-为当前的proxy或者主机准备socket address。
    //  通过dns去查找host下所有address和port,并且存入inet socket address列表中
    private void resetNextInetSocketAddress(java.net.Proxy proxy) throws IOException {
        // 1、清除socket address。
        inetSocketAddresses = new ArrayList<>();

        String socketHost;
        int socketPort;
        // 2、proxy的type为Direct(直连),或者为Socks。都是直接将address的主机和端口号,作为socket的主机和端口号。
        if (proxy.type() == Type.DIRECT || proxy.type() == Type.SOCKS) {
            // 直接将address的主机,作为socket的主机
            socketHost = address.url().host();
            // 直接将address的port,作为socket的port
            socketPort = address.url().port();
        }
        // 3、非Direct,非socks,表示采用http、ftp等高层协议的代理
        else {
            // 4、采用proxy的address
            SocketAddress proxyAddress = proxy.address();
            InetSocketAddress proxySocketAddress = (InetSocketAddress) proxyAddress;
            // 5、获取到代理的socket address中的host和port
            socketHost = getHostString(proxySocketAddress);
            socketPort = proxySocketAddress.getPort();
        }
        // 6、1 <= 端口号 <= 65535 才是合法端口
        if (socketPort < 1 || socketPort > 65535) {
            throw new SocketException("No route to " + socketHost + ":" + socketPort + "; port is out of range");
        }
        // 7、proxy type = spcks时,向internet socket address列表中添加unresolved的host和port
        if (proxy.type() == java.net.Proxy.Type.SOCKS) {
            inetSocketAddresses.add(InetSocketAddress.createUnresolved(socketHost, socketPort));
        } else {
            // 8、address的dns去查找addresses。会返回socketHost的所有ip地址,OkHttp会依次尝试,如果一个地址的连接失败,会去尝试连接下一个地址。
            List<InetAddress> addresses = address.dns().lookup(socketHost);
            for (int i = 0, size = addresses.size(); i < size; i++) {
                /**==================================================================
                 * 将InetAddress都添加到RouteSelector内部的inetSocketAddress列表中
                 *  1. InetAddress位于java.net包中。
                 *  2. inetAddress = www.wanandroid.com/47.104.74.169; socketport = 80.
                 *===================================================================*/
                InetAddress inetAddress = addresses.get(i);
                inetSocketAddresses.add(new InetSocketAddress(inetAddress, socketPort));
            }
        }
        nextInetSocketAddressIndex = 0;
    }

    // ReouteSelector.java- 返回SocketAddresses列表中下标为nextInetSocketAddressIndex的socket地址。
    private InetSocketAddress nextInetSocketAddress() throws IOException {
        return inetSocketAddresses.get(nextInetSocketAddressIndex++);
    }
总结题
1、如何使用OkHttp进行异步网络请求,并根据请求结果刷新UI
- 通过构造器创建RequestBody
- 创建Request
- 创建OkHttpClient
- 创建Call
- 发起Call的enqueue异步网络请求
- 在response的回调中根据数据改变UI(OKHTTP3.0中不需要切换线程)
2、可否介绍一下OkHttp的整个异步请求流程
3、OkHttp发起异步请求时,调用的call.enqueue方法做了哪些事情?
- 在Call创建的时候,在内部创建了RealCall,并且将OkHttpClient和request保存到了内部。
- 执行Call.enqueue(),内部是执行的RealCall.enqueue()
- RealCall.enqueue()内部直接转交给Dispatcher执行enqueue()方法
- Dsipatcher内部做了会去判断是否达到了最大并发任务数64,以及同一个主机的请求数是否达到了5。
- 都没有达到:加入到正在执行的异步请求队列。然后调用线程池去执行这个任务。
- 达到:加入到待执行的异步请求队列
4、异步请求队列中的元素AsyncCall是什么?
5、OkHttp对于网络请求都有哪些优化,如何实现的
6、OkHttp框架中都用到了哪些设计模式
7、OkHttp的缓存策略是什么?
8、OkHttp底层是如何实现缓存的?
- HttpClient的sendRequest完成了实际的请求工作。
- 采用DiskLruCache进行缓存
- key = 请求url中的md5 value = Snapshot(存储了所有响应的信息—包括url、响应头、请求的方法、protocol等)
- 在
HttpClient.readResponse()会对数据进行缓存。
9、OkHttp中涉及到的Http返回码
- 504: 网关超时
- 204/205: 在获取到返回Response后,如果code=204/205, 但是Body的Content长度>0,会抛出异常:ProtocolException
- 304:数据没有更改过。比如请求图片,如果图片在上次访问后没有更新过,就不用重新下载,直接返回304,告诉客户端可以直接使用缓存。
10、Http表单是什么
- 本质上是一种HTTP的
Content-Type:application/x-www-form-urlencoded, 数据本质上是通过HTTP body传输。- OkHttp的post通过FormBody.builder去构造RequestBody能进行表单的传输。
11、Http的patch操作是什么?
PATCH方法是新引入的,是对PUT方法的补充,用来对已知资源进行局部更新
12、Http中的Cache-Control是什么?
- 指定了请求和响应遵循的缓存机制。
- 可以减少对网络带宽的占用,可以提高访问速度,提高用户的体验,还可以减轻服务器的负担。
13、代理服务器中的HTTP代理与SOCKS代理有什么区别?
- Http代理:在浏览网页,下载数据等场景下就是http代理。它通常绑定在代理服务器的80、3128、8080等端口上。
- 采用socks协议的代理服务器就是SOCKS服务器,是一种通用的代理服务器。
- Socks不要求应用程序遵循特定的操作系统平台,Socks 代理与应用层代理、 HTTP 层代理不同,Socks 代理只是简单地传递数据包,而不必关心是何种应用协议(比如FTP、HTTP和NNTP请求)。所以,Socks代理比其他应用层代理要快得多。它通常绑定在代理服务器的1080端口上。
14、Http的ETag是什么?
- ETag(Entity Tag), 实体标签
- ETag是Http 1.1中加入的属性,用于帮助服务器控制缓存验证。
- 当客户端请求服务端的资源A时,会通过A计算出Hash值,如
3f80f-1b6-3e1cb03b,就是ETag- 客户端会将
ETag和资源A都保存在本地。- 下次请求资源A时,会通过类似
If-None-Match: "3f80f-1b6-3e1cb03b的请求头,将ETag发给服务器。- 服务端会进行比较,如果一致,返回304表示数据未修改。客户端直接用本地缓存的资源A。
- 如果不一致,表明数据修改过,会将资源A返回给客户端(返回码为200)
15、返回码200的作用?
表示客户端请求成功。
16、Http Age的作用
- 当Reponse是从缓存里获取时,HTTP/1.1协议规定要添加
Ageheader字段。- Age的值是响应报文在源服务器中产生或者过期验证的那一刻起,到现在为止所经过时间的一个估计值。
- 经常和max-age一起来验证缓存是否过期,即如果
Age的值比max-age的值还大,表明缓存已经过期。