声明:本文以同时配置ORACLE数据源、配置MySQL数据源为例。
多数据源的使用
第一步:在pom.xml中引入相关依赖
<!--mybatis-spring-boot-starter -->
<dependency>
	<groupId>org.mybatis.spring.boot</groupId>
	<artifactId>mybatis-spring-boot-starter</artifactId>
	<version>1.3.1</version>
</dependency>

<!-- MYSQL -->
<dependency>
	<groupId>mysql</groupId>
	<artifactId>mysql-connector-java</artifactId>
</dependency>

<!-- Spring Boot JDBC -->
<dependency>
	<groupId>org.springframework.boot</groupId>
	<artifactId>spring-boot-starter-jdbc</artifactId>
</dependency>

<!-- oracle -->
<!-- 注:druid不支持低版本的ojdbc -->
<dependency>
	<groupId>com.oracle</groupId>
	<artifactId>ojdbc</artifactId>
	<version>6</version>
</dependency>

<!--druid -->
<dependency>
	<groupId>com.alibaba</groupId>
	<artifactId>druid</artifactId>
	<version>1.0.18</version>
</dependency>

<!-- configuration-processor -->
<dependency>
	<groupId>org.springframework.boot</groupId>
	<artifactId>spring-boot-configuration-processor</artifactId>
	<optional>true</optional>
</dependency>
第二步:配置系统配置文件application.properties或application.yml文件
# 基本配置
server.port = 9527

# MySQL数据源(基本配置)
# 高版本的SpringBoot需要这里要写为jdbc-url,而不是url
spring.datasource.database-one.jdbc-url = jdbc:mysql://localhost:3306/test?characterEncoding=utf8
spring.datasource.database-one.username = root
spring.datasource.database-one.password = pass
spring.datasource.database-one.type = com.alibaba.druid.pool.DruidDataSource
# 高版本的SpringBoot需要加上hikari
spring.datasource.hikari.database-one.driver-class-name = com.mysql.jdbc.Driver

# Oracle数据源(基本配置)
# 高版本的SpringBoot需要这里要写为jdbc-url,而不是url
spring.datasource.database-two.jdbc-url = jdbc:oracle:thin:@localhost:1521:ORCL
spring.datasource.database-two.username = ds123
spring.datasource.database-two.password = ds123
spring.datasource.database-two.type = com.alibaba.druid.pool.DruidDataSource
# 高版本的SpringBoot需要加上hikari
spring.datasource.database-two.hikari.driver-class-name = oracle.jdbc.driver.OracleDriver
第三步:使用java注解进一步配置数据源
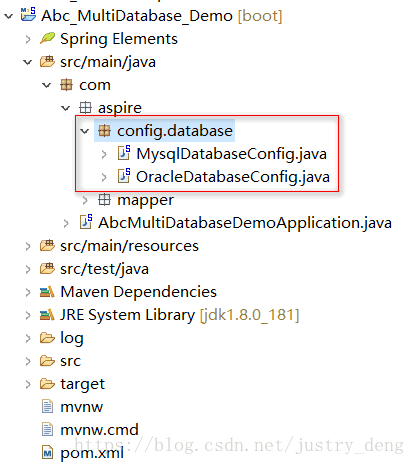
创建一个专门用来放置数据源配置类的package,并分别创建两个配置类。如图所示:
声明:下面的配置中basePackages指定的扫描包,会在下一步时给出。
MysqlDatabaseConfig.java中是这样的:
import javax.sql.DataSource;

import org.apache.ibatis.session.SqlSessionFactory;
import org.mybatis.spring.SqlSessionFactoryBean;
import org.mybatis.spring.SqlSessionTemplate;
import org.mybatis.spring.annotation.MapperScan;
import org.springframework.boot.context.properties.ConfigurationProperties;
import org.springframework.boot.jdbc.DataSourceBuilder;
import org.springframework.context.annotation.Bean;
import org.springframework.context.annotation.Configuration;
import org.springframework.context.annotation.DependsOn;

/**
 * 数据源配置
 * 提示:如果@Bean后面不指定id,那么默认以方法名字为id
 *
 * @author JustryDeng
 * @Date 2018年8月30日 上午7:13:33
 */
@Configuration
@MapperScan(basePackages = "com.aspire.mapper.mysqlmapper", sqlSessionTemplateRef = "mysqlSqlSessionTemplate")
public class MysqlDatabaseConfig {

	@Bean
	// 根据application.properteis系统配置文件中,对应属性的前缀,指明使用其对应的数据
	@ConfigurationProperties(prefix = "spring.datasource.database-one")
	public DataSource mysqlDataSource() {
		return DataSourceBuilder.create().build();
	}

	@Bean
	@DependsOn("mysqlDataSource")
	public SqlSessionFactory mysqlSqlSessionFactory() throws Exception {
		SqlSessionFactoryBean factoryBean = new SqlSessionFactoryBean();
		factoryBean.setDataSource(mysqlDataSource());
		return factoryBean.getObject();
	}

	/**
	 * DefaultSqlSession和SqlSessionTemplate都实现了SqlSession,但我们
	 * 注入线程安全的SqlSessionTemplate,而不使用默认的线程不安全的DefaultSqlSession
	 *
	 * @Date 2018年9月2日 上午10:46:39
	 */
	@Bean
	@DependsOn("mysqlSqlSessionFactory")
	public SqlSessionTemplate mysqlSqlSessionTemplate() throws Exception {
		SqlSessionTemplate template = new SqlSessionTemplate(mysqlSqlSessionFactory());
		return template;
	}

}OracleDatabaseConfig.java中是这样的:
import javax.sql.DataSource;

import org.apache.ibatis.session.SqlSessionFactory;
import org.mybatis.spring.SqlSessionFactoryBean;
import org.mybatis.spring.SqlSessionTemplate;
import org.mybatis.spring.annotation.MapperScan;
import org.springframework.boot.context.properties.ConfigurationProperties;
import org.springframework.boot.jdbc.DataSourceBuilder;
import org.springframework.context.annotation.Bean;
import org.springframework.context.annotation.Configuration;
import org.springframework.context.annotation.DependsOn;
/**
 * 数据源配置
 * 提示:如果@Bean后面不指定id,那么默认以方法名字为id
 *
 * @author JustryDeng
 * @Date 2018年8月30日 上午7:13:33
 */
@Configuration
@MapperScan(basePackages = "com.aspire.mapper.oraclemapper", sqlSessionTemplateRef = "oracleSqlSessionTemplate")
public class OracleDatabaseConfig {

	@Bean
	// 根据application.properteis系统配置文件中,对应属性的前缀,指明使用其对应的数据
	@ConfigurationProperties(prefix = "spring.datasource.database-two")
	public DataSource oracleDataSource() {
		return DataSourceBuilder.create().build();
	}

	@Bean
	@DependsOn("oracleDataSource")
	public SqlSessionFactory oracleSqlSessionFactory() throws Exception {
		SqlSessionFactoryBean factoryBean = new SqlSessionFactoryBean();
		factoryBean.setDataSource(oracleDataSource());
		return factoryBean.getObject();
	}

	/**
	 * DefaultSqlSession和SqlSessionTemplate都实现了SqlSession,但我们
	 * 注入线程安全的SqlSessionTemplate,而不使用默认的线程不安全的DefaultSqlSession
	 *
	 * @Date 2018年9月2日 上午10:46:39
	 */
	@Bean
	@DependsOn("oracleSqlSessionFactory")
	public SqlSessionTemplate oracleSqlSessionTemplate() throws Exception {
		SqlSessionTemplate template = new SqlSessionTemplate(oracleSqlSessionFactory());
		return template;
	}
}
第四步:创建对应的package包,来放置DAO层接口(同时编写两个简单的方法,方便下面的测试)
提示:第三步时basePackages指定的包要和这里的创建对应。
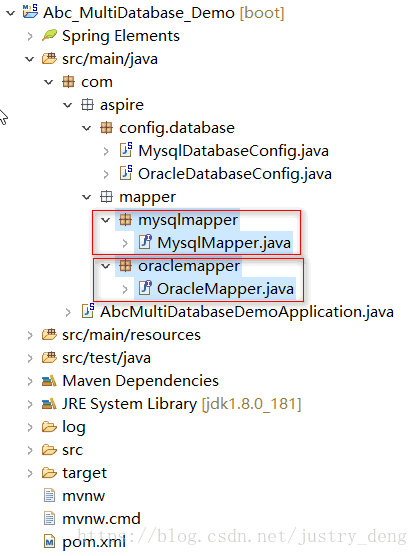
注:不同的数据源我们创建不同的包,来各自放置属于自己的sql语句接口。
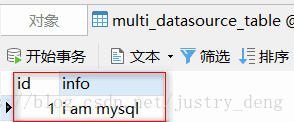
MySQL中的对应表是这样的:
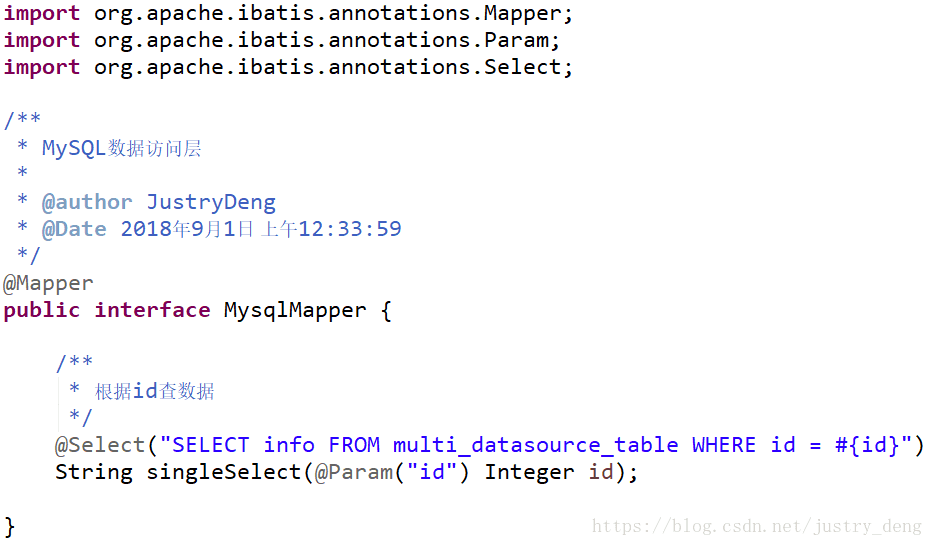
MysqlMapper.java中代码是这样的:
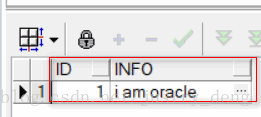
ORACLE中的对应表是这样的:
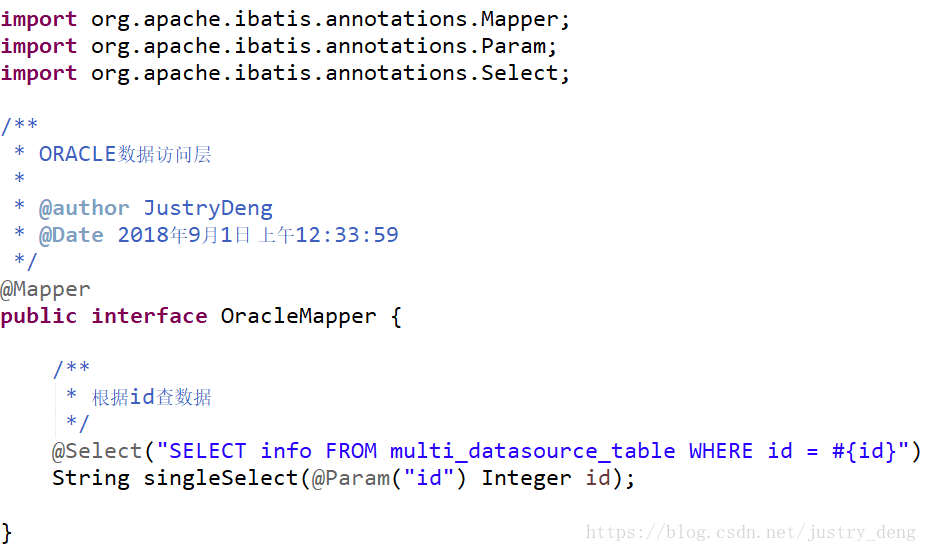
OracleMapper.java中代码是这样的:
第五步:使用单元测试简单测试一下
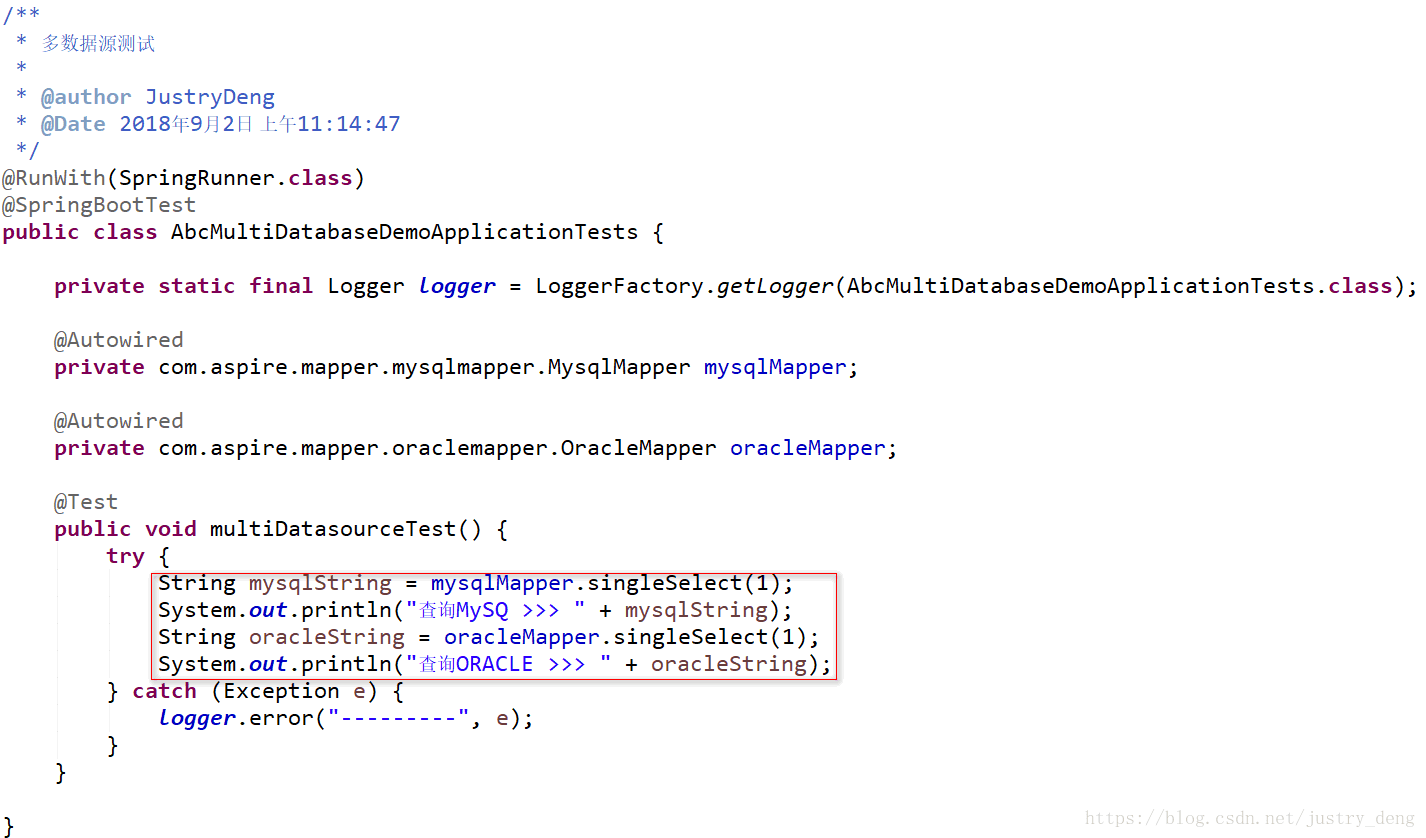
输出结果为:

由此可见:多数据源配置使用成功!
