版权声明:版权没有,盗用不究 https://blog.csdn.net/liman65727/article/details/81912843
前言
spring boot配置信息的读取相比spring来说比较容易,甚至都不需要特意的去写什么配置读取工具类(当然在实际工作中,根据不同需要还是会写不同的工具类)。
自定义属性与加载
1、编写配置文件
server.port = 8080

com.learn.liman.work=coder
com.learn.liman.company=xwbank

com.learn.liman.job=${com.learn.liman.work} in ${com.learn.liman.company}
其中的server.port就是配置的访问端口,这个属性是spring boot中自带的属性。
后面编写的两个属性是测试属性,第三个属性用到了属性之间的读取。
2、properties信息对应的实例对象
package com.learn.component;

import org.springframework.beans.factory.annotation.Value;
import org.springframework.stereotype.Component;

@Component
public class BlogProperties {

	@Value("${com.learn.liman.work}")
	private String work;

	@Value("${com.learn.liman.company}")
	private String company;

	@Value("${com.learn.liman.job}")
	private String job;

	public String getWork() {
		return work;
	}

	public void setWork(String work) {
		this.work = work;
	}

	public String getCompany() {
		return company;
	}

	public void setCompany(String company) {
		this.company = company;
	}

	public String getJob() {
		return job;
	}

	public void setJob(String job) {
		this.job = job;
	}
}
注意打上@Component标签,在每一个属性用@Value上对应相应的属性值
3、测试
package com.learn.springboot;

import static org.hamcrest.Matchers.equalTo;
import static org.springframework.test.web.servlet.result.MockMvcResultMatchers.content;
import static org.springframework.test.web.servlet.result.MockMvcResultMatchers.status;

import org.junit.Assert;
import org.junit.Before;
import org.junit.Test;
import org.junit.runner.RunWith;
import org.springframework.beans.factory.annotation.Autowired;
import org.springframework.boot.test.context.SpringBootTest;
import org.springframework.test.context.junit4.SpringJUnit4ClassRunner;
import org.springframework.test.context.web.WebAppConfiguration;

import com.learn.SpringbootApplication;
import com.learn.component.BlogProperties;


@RunWith(SpringJUnit4ClassRunner.class)
@SpringBootTest(classes = SpringbootApplication.class)
@WebAppConfiguration
public class SpringbootApplicationTests {

	@Autowired
	private BlogProperties blogProperties;

	@Test
	public void getProperties() {
		Assert.assertEquals("xwbank", blogProperties.getCompany());
		Assert.assertEquals("coder",blogProperties.getWork());
		Assert.assertEquals("coder in xwbank",blogProperties.getJob());
	}

}
多环境配置
在实际开发spring boot应用的时候,通常一套程序会安装到几个不同的环境,在一些互联网公司开始采用Apollo来对配置信息进行管理,在spring boot中其实也支持多环境的配置
1、编写多个配置文件
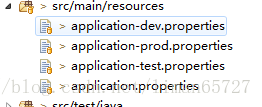
spring boot中针对多个配置文件,命名需要满足application-{profile}.properties的格式,其中的{profile}就是标识的使用环境,例如以下方式:
application-dev.properties
application-test.properties
application-prod.properties
分别对应开发、测试和生产环境。
这里打算通过配置不同环境的端口,来实现不同环境的切换。
application.properties文件中通过如下属性实现配置的切换:(目前指定的是测试环境)
spring.profiles.active=test2、测试
这里的测试非常简单,只需要修改application.properties中的配置,然后在不同端口下访问即可