了解JPA(Spring-data-jpa)
JPA(Java Persistence API)是 Sun 官方提出的 Java 持久化规范。JPA诞生的缘由是为了整合第三方ORM(对象关系映射)框架,建立一种标准的方式,它为 Java 开发人员提供了一种对象/关联映射工具来管理 Java 应用中的关系数据。它的出现主要是为了简化现有的持久化开发工作和整合 ORM 技术。
数据持久化过程中,一般使用一个对象来操作数据库,Hibernate中叫Session,jpa中叫EntityManager,mybatis中叫做SqlSession,通过这个对象对数据库进行操作。Spring-data-jpa的强大之处在于,全方位解决用户需求,以极简的方式轻松实现对数据库的访问和操作。提供基础的CRUD,并且扩展性强。
快速上手
添加依赖
<dependency>
    <groupId>org.Springframework.boot</groupId>
    <artifactId>Spring-boot-starter-data-jpa</artifactId>
</dependency>
 <dependency>
    <groupId>mysql</groupId>
    <artifactId>mysql-connector-java</artifactId>
</dependency>
配置文件application.properties
Spring.datasource.url=jdbc:mysql://localhost:3306/test
Spring.datasource.username=root
Spring.datasource.password=root
Spring.datasource.driver-class-name=com.mysql.jdbc.Driver

Spring.jpa.properties.hibernate.hbm2ddl.auto=update
Spring.jpa.properties.hibernate.dialect=org.hibernate.dialect.MySQL5InnoDBDialect
//打印sql语句
Spring.jpa.show-sql= true
Spring.jpa.properties.hibernate.hbm2ddl.auto 参数作用:自动创建 | 更新 | 验证数据库表结构,有四个值:(常用update)
- create:每次加载 hibernate 时都会删除上一次的生成的表,然后根据 model
类再重新来生成新表,哪怕两次没有任何改变也要这样执行,这就是导致数据库表数据丢失的一个重要原因。 - create-drop:每次加载 hibernate 时根据 model 类生成表,但是 sessionFactory
一关闭,表就自动删除。 - update:最常用的属性,第一次加载 hibernate 时根据 model 类会自动建立起表的结构(前提是先建立好数据库),以后加载hibernate 时根据 model类自动更新表结构,即使表结构改变了,但表中的行仍然存在,不会删除以前的行。要注意的是当部署到服务器后,表结构是不会被马上建立起来的,是要等应用第一次运行起来后才会。
- validate:每次加载 hibernate 时,验证创建数据库表结构,只会和数据库中的表进行比较,不会创建新表,但是会插入新值。
定义映射实体类
实体类添加@Entity注解(@Table)
@Entity//表面这是一个对应数据库表的实体类
public class User implements Serializable {
    private static final long serialVersionUID = 1L;

    @Id//主键id
    @GeneratedValue//自增
    private Long id;
    @Column(nullable = false, unique = true)
    private String userName;
    @Column(nullable = false)
    private String passWord;
    @Column(nullable = false, unique = true)
    private String email;
    @Column(nullable = true, unique = true)
    private String nickName;
    @Column(nullable = false)
    private String regTime;
    //省略 getter settet 方法、构造方法
}
项目启动后,会根据实体类创建相应的表
字段添加@Transient 注解 可以表明不映射成表的列
定义数据访问接口
- 1.数据访问接口需要继承JpaRepository类
public interface UserRepository extends JpaRepository<User, Long> {
    User findByUserName(String userName);
    User findByUserNameOrEmail(String username, String email);
    Long deleteById(Long id);
    @Query("select u from User u")
    Page<User> findList(Pageable pageable);
} - 2.默认实现的方法
当我们继承JpaRepository接口后,默认实现了一些方法,如:
userRepository.findAll();
userRepository.findOne(1l);
userRepository.save(user);
userRepository.delete(user);
userRepository.count();
userRepository.exists(1l);- 3.自定义方法查询
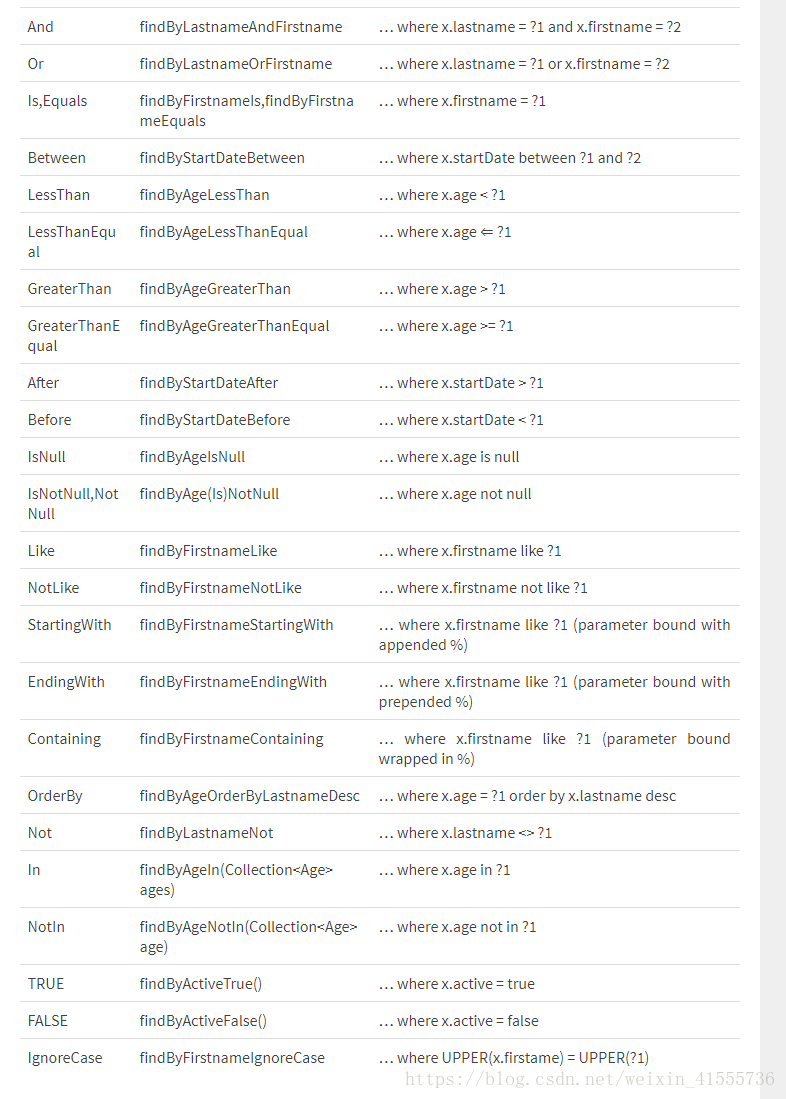
可以根据方法名来自动的生产 SQL,如 findByUserName 会自动生产一个以 userName 为参数的查询方法,并且还可以使用关键字:
sql关键字-方法 例子图解
还可以限制查询:
 List<User> findFirst10ByUserName(String userName);
 User findFirstByOrderByLastnameAsc();
 User findTopByOrderByAgeDesc();
 Page<User> queryFirst10ByLastname(String lastname, Pageable pageable);
 List<User> findFirst10ByLastname(String lastname, Sort sort);
List<User> findTop10ByLastname(String lastname, Pageable pageable);- 4.复杂查询
使用 Spring Data 大部分的 SQL 都可以根据方法名定义的方式来实现,但是由于某些原因我们想使用自定义的 SQL 来查询,Spring Data 也可以完美支持;在 SQL 的查询方法上面使用 @Query 注解,如涉及到删除和修改需要加上 @Modifying,也可以根据需要添加 @Transactional 对事物的支持,查询超时的设置等。
@Transactional(timeout = 10)
@Modifying
@Query("update User set userName = ?1 where id = ?2")
int modifyById(String  userName, Long id);

@Transactional
@Modifying
@Query("delete from User where id = ?1")
void deleteById(Long id);

@Query("select u from User u where u.email = ?1")
User findByEmail(String email);- 5.多表查询(待完善)
多表查询在 Spring Data JPA 中有两种实现方式,第一种是利用 hibernate 的级联查询来实现,第二种是创建一个结果集的接口来接收连表查询后的结果。
多数据源
Spring Data JPA支持多数据源的使用,分三步:
- 配置多数据源
- 不同源的 repository 放入不同包路径
声明不同的包路径下使用不同的数据源、事务支持
1.配置两个数据源
#primary
spring.primary.datasource.url=jdbc:mysql://localhost:3306/test1
spring.primary.datasource.username=root
spring.primary.datasource.password=root
spring.primary.datasource.driver-class-name=com.mysql.jdbc.Driver
#secondary
spring.secondary.datasource.url=jdbc:mysql://localhost:3306/test2
spring.secondary.datasource.username=root
spring.secondary.datasource.password=root
spring.secondary.datasource.driver-class-name=com.mysql.jdbc.Driver
2.读取两个配置源,构建两个数据源:
@Configuration
public class DataSourceConfig {

    @Bean(name = "primaryDataSource")
    @Qualifier("primaryDataSource")
    @ConfigurationProperties(prefix="spring.primary.datasource")
    public DataSource primaryDataSource() {
        return DataSourceBuilder.create().build();
    }

    @Bean(name = "secondaryDataSource")
    @Qualifier("secondaryDataSource")
    @Primary
    @ConfigurationProperties(prefix="spring.secondary.datasource")
    public DataSource secondaryDataSource() {
        return DataSourceBuilder.create().build();
    }

}
3.将数据源注入到 Factory,配置 repository、domian 的位置,需要设置一个默认的数据源,第二个配置和下面类似,具体可以查看示例代码。
@Configuration
@EnableTransactionManagement
@EnableJpaRepositories(
        entityManagerFactoryRef="entityManagerFactoryPrimary",
        transactionManagerRef="transactionManagerPrimary",
        basePackages= { "com.neo.repository.test1" })//设置 dao(repo)所在位置
public class PrimaryConfig {

    @Autowired
    private JpaProperties jpaProperties;

    @Autowired
    @Qualifier("primaryDataSource")
    private DataSource primaryDataSource;

    @Bean(name = "entityManagerPrimary")
    @Primary
    public EntityManager entityManager(EntityManagerFactoryBuilder builder) {
        return entityManagerFactoryPrimary(builder).getObject().createEntityManager();
    }

    @Bean(name = "entityManagerFactoryPrimary")
    @Primary
    public LocalContainerEntityManagerFactoryBean entityManagerFactoryPrimary (EntityManagerFactoryBuilder builder) {
        return builder
                .dataSource(primaryDataSource)
                .properties(getVendorProperties(primaryDataSource))
                .packages("com.neo.domain") //设置实体类所在位置
                .persistenceUnit("primaryPersistenceUnit")
                .build();
    }

    private Map<String, String> getVendorProperties(DataSource dataSource) {
        return jpaProperties.getHibernateProperties(dataSource);
    }

    @Bean(name = "transactionManagerPrimary")
    @Primary
    PlatformTransactionManager transactionManagerPrimary(EntityManagerFactoryBuilder builder) {
        return new JpaTransactionManager(entityManagerFactoryPrimary(builder).getObject());
    }

}
4.测试
@Resource
private UserTest1Repository userTest1Repository;
@Resource
private UserTest2Repository userTest2Repository;

@Test
public void testSave() throws Exception {
    Date date = new Date();
    DateFormat dateFormat = DateFormat.getDateTimeInstance(DateFormat.LONG, DateFormat.LONG);
    String formattedDate = dateFormat.format(date);

    userTest1Repository.save(new User("aa", "aa123456","[email protected]", "aa",  formattedDate));
    userTest1Repository.save(new User("bb", "bb123456","[email protected]", "bb",  formattedDate));
    userTest2Repository.save(new User("cc", "cc123456","[email protected]", "cc",  formattedDate));

}
总结一下
JPA大大简化了开发人员对数据库的操作流程,但是有些复杂查询难以实现,是一个弊端,但是可以满足大部分开发场景。另外JPA是springboot微服务架构推荐使用的技术,还是值得好好学习的。