一,写在前面
二,属性动画的使用
<?xml version="1.0" encoding="utf-8"?>
<set xmlns:android="http://schemas.android.com/apk/res/android"
    android:ordering="sequentially">
    <objectAnimator
        android:propertyName="scaleX"
        android:duration="3000"
        android:valueType="floatType"
        android:valueFrom="1"
        android:valueTo="0.3"
        android:repeatCount="1"
        android:repeatMode="reverse"
        android:startOffset="1000"/>
    <objectAnimator
        android:propertyName="backgroundColor"
        android:duration="3000"
        android:valueFrom="0xFFFF0000"
        android:valueTo="0xFF00FF00"
        android:valueType="colorType"/>
</set> valueType:属性的类型。有"floatType","intType","colorType"可选,分别代表浮点型,整型,颜色类型;
repeatCount:属性动画重复执行的次数;
repeatMode:属性动画重复的模式。有"reverse","restart"可选,分别表示逆向重复,连续重复。在本例中,逆向重复是指属性值从1->0.3,然后0.3->1,如果重复次数很多,依次类推;
startOffset:表示延迟多长时间后再执行动画效果,单位是ms;
2.1.2,接下里,使用AnimatorInflater加载该xml文件,并作用于Button对象,并启动动画,具体Java代码如下:
    private void initAnimatorByXml() {
        Button btn = (Button)findViewById(R.id.btn);

        AnimatorSet animatorSet = (AnimatorSet) AnimatorInflater.loadAnimator(this, R.animator.anim_set);
        animatorSet.setTarget(btn);
        animatorSet.start();
} 上面代码比较好理解,这里不在阐述。实现效果:1s后,在3s内使一个按钮的宽度比例从1缩写到0.3,然后重复一次动画,在3s内从0.3扩大到1;接着,按钮的背景色在3s内,由红色->绿色的变化。
注意:属性名称"scaleX","backgroundColor"是什么,为什么不可以是"abc"呢?后面会给出解释...
2.2,使用Java代码,实现属性动画
与View动画一样,属性动画既可以使用xml文件,也可以使用java代码动态的实现属性动画。直接上代码:
private void initAnimatorByJava() {
Button btn = (Button)findViewById(R.id.btn);
ValueAnimator objectAnimator = ObjectAnimator.ofFloat(btn, "scaleX", 1f, 0.3f);
objectAnimator.setDuration(3000);
objectAnimator.setRepeatCount(1);
objectAnimator.setRepeatMode(ValueAnimator.REVERSE);
objectAnimator.start();
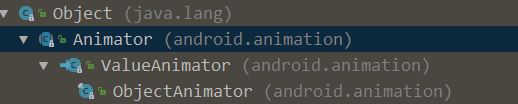
}前面已经讲述过ValueAnimator是ObjectAnimator的父类,两者的区别:ValueAnimator的属性动画不需要作用于具体的对象,也没有属性名称;而ObjectAnimator的属性动画需要作用于具体的对象,有具体的属性名称,完成属性值从初始值到最终值的变化。
上述代码实现的效果:在3s内使一个按钮的宽度比例从1缩写到0.3,然后重复一次动画,在3s内从0.3扩大到1。
上面的一些方法与xml文件中的属性对应,首先是调用ObjectAnimator$ofFloat方法获取一个Animator对象,第一个参数指作用的对象,第二个参数指属性的名称,第三个参数指属性的初始值,第四个指属性的最终值。
并调用方法setDuration设置动画执行时间,setRepeatCount设置动画重复次数,setRepeatMode设置重复模式,最后调用start方法执行动画。
2.2.1,使用Java代码,实现属性动画集合
直接上代码:
    private void initAnimatorByJavaSet() {
        Button btn = (Button)findViewById(R.id.btn);
        AnimatorSet set = new AnimatorSet();
        ObjectAnimator[] items = new ObjectAnimator[]{
                ObjectAnimator.ofFloat(btn, "scaleX", 1f, 0.5f),
                ObjectAnimator.ofArgb(btn, "backgroundColor", 0xFFFF0000, 0xFF00FF00)
        };
        set.playTogether(items);
        set.setStartDelay(3000);
        set.setDuration(3000).start();
} 2,调用AnimatorSet$playTogether(Animator... items)方法,输入参数是一个不定参数类型,表示子动画同时执行;还有一个playSequentially(Animator... items)方法,表示子动画顺序执行。与<set>标签的ordering属性对应;
3,剩余步骤应该比较好理解,这里不再讲解;
上述代码实现效果:3s后,在3s内使一个按钮的宽度比例从1缩写到0.3,同时,按钮的背景色由红色->绿色。
三,属性动画,作用于任意属性
上面提到属性名称"scaleX","backgroundColor"是什么,为什么不可以是"abc"呢?
属性动画作用的对象属性有这样几个要求:若该属性名为"abc",该对象需提供该属性的setAbc方法,以及getAbc方法。setAbc方法用于设置该属性的值从初始值到最终值的变化,且一般是对UI做一些改变,以达到一种动画的效果;getAbc方法提供该属性的初始值。
以属性名称"scaleX"为例,Button对象没有setScaleX方法,但Button从View中继承了setScaleX方法。
setScaleX方法源码如下:
public void setScaleX(float scaleX) {
        if (scaleX != getScaleX()) {
            invalidateViewProperty(true, false);
            mRenderNode.setScaleX(scaleX);
            invalidateViewProperty(false, true);

            invalidateParentIfNeededAndWasQuickRejected();
            notifySubtreeAccessibilityStateChangedIfNeeded();
        }
    }
getScaleX方法源码如下:
public float getScaleX() {
        return mRenderNode.getScaleX();
    }
好了,那为什么属性名称"abc"不可以使用属性动画呢?因为Button没有提供setAbc方法去改变按钮的UI,也没有提供getAbc方法获取属性的初始值。
那如果想使用"abc"属性咋办呢?我们可以创建一个ViewWrapper类,提供setAbc方法,getAbc方法。在setAbc方法中改变Button的UI,在getAbc方法中返回属性的初始值,具体代码如下。
ViewWrapper代码如下:
static class ViewWrapper {
        View v;
        public ViewWrapper(View v) {
            this.v = v;
        }

        public void setAbc(int x) {
            v.getLayoutParams().height = x;
            Log.e("wcc","x = " + x);
            v.requestLayout();
        }

        public int getAbc() {
            int height;
            height = v.getLayoutParams().height;
            Log.e("wcc","height = " + height);
            return height;
        }

    }
setAbc方法对对象v的高度设置值,输入参数x由属性abc的初始值到最终值的一直变化。修改了View的测量和布局,需要调用View$requestLayout方法对界面进行刷新。
getAbc方法返回对象v的高度作为属性的初始值。值得一体的是,如果属性已经设置初始值,该方法不会被调用。
下面看看如何使用ViewWrapper对象的abc属性,代码如下:
private void initAnimatorByAnyAttr() {
        Button btn = (Button)findViewById(R.id.btn);

        ViewWrapper wrapper = new ViewWrapper(btn);
        ObjectAnimator objectAnimator = ObjectAnimator.ofInt(wrapper, "abc",800,1000);
        objectAnimator.setDuration(3000);
        objectAnimator.start();
    }
第5行,ofInt方法第一个参数原本是传入Button对象,现在传入ViewWrapper对象;第二个参数传入ViewWrapper对象的属性"abc",800是初始值,1000是最终值。由于这里设置了属性的初始值,那么getAbc方法不会被调用。
上述代码实现这样一个效果:Button按钮的高度在3秒内,由800->1000的变化。
小结:ViewWrapper类实际上是对Button的封装,对Button的引用可以通过有参构造函数传递,属性动画的效果作用实体仍是Button按钮。上面讲解了属性动画作用于任意属性,相信大家对属性动画作用于某一对象的属性的前置条件,有了答案啦~
三,ValuaAnimator的使用
在使用ValueAnimator之前,需要先了解两个概念:时间插值器,估值器。
时间插值器:根据时间流逝的百分比(输入参数),计算出属性值改变的百分比(返回值)。需要注意的是输入参数范围是0~1,当时间流逝占比为x%时,属性值改变百分比也为x%,那么该时间插值器为线性插值器。
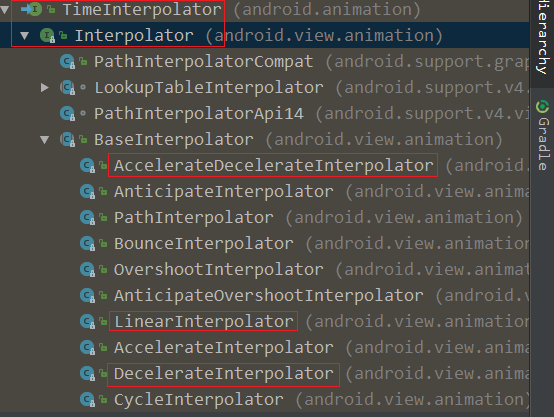
可以看出,时间插值器描述的是属性值改变的速度。若是线性插值器,则动画的改变是一个匀速的过程。Android提供了很多类型的插值器,eg:LinearInterpolator(线性插值器),DecelerateInterpolator(减速插值器),AccelerateDecelerateInterpolator(先加速后减速插值器)等。其中,默认的插值器是AccelerateDecelerateInterpolator(加速减速插值器)。下面以系统默认的插值器为例,从源码角度分析。
如下是TimeInterpolator子类结构图:
查看TimeInterpolator源码,如下:
public interface TimeInterpolator {

    /**
     * Maps a value representing the elapsed fraction of an animation to a value that represents
     * the interpolated fraction. This interpolated value is then multiplied by the change in
     * value of an animation to derive the animated value at the current elapsed animation time.
     *
     * @param input A value between 0 and 1.0 indicating our current point
     *        in the animation where 0 represents the start and 1.0 represents
     *        the end
     * @return The interpolation value. This value can be more than 1.0 for
     *         interpolators which overshoot their targets, or less than 0 for
     *         interpolators that undershoot their targets.
     */
    float getInterpolation(float input);
}
第15行,参数input值范围是0~1,0代表动画开始,1代表动画结束,那么0.5代表时间流逝了一半。返回一个float类型的值,这个值是多少呢?这个方法由子类重写,各个插值器的处理方式都不一样。
以线性插值器为例,查看LinearInterpolator源码,如下:
public class LinearInterpolator extends BaseInterpolator implements NativeInterpolatorFactory {

    public LinearInterpolator() {
    }

    public LinearInterpolator(Context context, AttributeSet attrs) {
    }

    public float getInterpolation(float input) {
        return input;
    }

    /** @hide */
    @Override
    public long createNativeInterpolator() {
        return NativeInterpolatorFactoryHelper.createLinearInterpolator();
    }
}
第10行,getInterpolation方法直接返回intput,也就是说,时间流逝百分比是多少,属性值改变百分比就是多少,这不就是线性插值器的特点么。
以加速减速插值器为例,查看AccelerateDecelerateInterpolator源码,如下:
public class AccelerateDecelerateInterpolator extends BaseInterpolator
        implements NativeInterpolatorFactory {
    public AccelerateDecelerateInterpolator() {
    }

    @SuppressWarnings({"UnusedDeclaration"})
    public AccelerateDecelerateInterpolator(Context context, AttributeSet attrs) {
    }

    public float getInterpolation(float input) {
        return (float)(Math.cos((input + 1) * Math.PI) / 2.0f) + 0.5f;
    }

    /** @hide */
    @Override
    public long createNativeInterpolator() {
        return NativeInterpolatorFactoryHelper.createAccelerateDecelerateInterpolator();
    }
}
第11行,一个三角函数的公式,当input处于0~0.5时,速度是逐渐增减的,动画的变化效果越来越快;当input处于0.5~1,速度是逐渐减小的,动画的变化效果越来越慢。在物理学里面,input就是时间t,返回值就是位移s(这里是指属性值改变的百分比)。那么插值器描述的是速度v,也就是说,插值器描述的是动画在一段时间内变化的快慢,有可能是保持一个速度,有可能先快后慢,有可能先慢后快,也可能是其他效果(自定义插值器)。
在实际开发中如果业务需要,若系统的插值器无法满足需求,可以自定义一个插值器。从上面对线性插值器和加速减速插值器的分析可知,自定义插值器的两个步骤:1,实现接口TimeInterpolator或Interpolator;2,重写getInterpolation方法,并根据业务需求确定返回值。
上面介绍了各类插值器的原理,以及如何自定义插值器,那么如何使用插值器呢?ValueAnimator提供了setInterpolator方法。
ValueAnimator$setInterpolator方法源码,如下:
public void setInterpolator(TimeInterpolator value) {
        if (value != null) {
            mInterpolator = value;
        } else {
            mInterpolator = new LinearInterpolator();
        }
    }
如何获取插值器呢?ValueAnimator提供了getInterpolator方法。
ValueAnimator$getInterpolator方法源码,如下:
public TimeInterpolator getInterpolator() {
        return mInterpolator;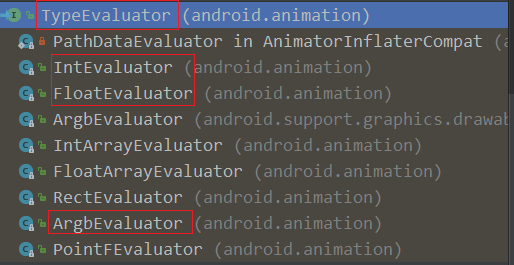
}估值器:根据属性值改变的百分比,来计算属性值改变后的具体数值,在Android中用TypeEvaluator描述估值器。
通过估值器的定义可知:估值器是根据插值器的值,计算出属性值改变后的具体数值。
TypeEvaluator的子类结构图,如下:
查看TypeEvaluator源码,如下:
public interface TypeEvaluator<T> {

    /**
     * This function returns the result of linearly interpolating the start and end values, with
     * <code>fraction</code> representing the proportion between the start and end values. The
     * calculation is a simple parametric calculation: <code>result = x0 + t * (x1 - x0)</code>,
     * where <code>x0</code> is <code>startValue</code>, <code>x1</code> is <code>endValue</code>,
     * and <code>t</code> is <code>fraction</code>.
     *
     * @param fraction   The fraction from the starting to the ending values
     * @param startValue The start value.
     * @param endValue   The end value.
     * @return A linear interpolation between the start and end values, given the
     *         <code>fraction</code> parameter.
     */
    public T evaluate(float fraction, T startValue, T endValue);

}
第16行,fraction参数:插值器getInterpolation方法返回的值,也就是当前属性值改变的百分比;startValue:初始的属性值;endValue:结束的属性值。
系统提供了各种类型的估值器,eg:IntEvaluator(整型估值器),FloatEvaluator(浮点型估值器),ArgbEvaluator(颜色估值器)。下面以IntEvaluator为例,分析估值器的内部实现。
查看IntEvaluator源码,如下:
public class IntEvaluator implements TypeEvaluator<Integer> {

    /**
     * This function returns the result of linearly interpolating the start and end values, with
     * <code>fraction</code> representing the proportion between the start and end values. The
     * calculation is a simple parametric calculation: <code>result = x0 + t * (v1 - v0)</code>,
     * where <code>x0</code> is <code>startValue</code>, <code>x1</code> is <code>endValue</code>,
     * and <code>t</code> is <code>fraction</code>.
     *
     * @param fraction   The fraction from the starting to the ending values
     * @param startValue The start value; should be of type <code>int</code> or
     *                   <code>Integer</code>
     * @param endValue   The end value; should be of type <code>int</code> or <code>Integer</code>
     * @return A linear interpolation between the start and end values, given the
     *         <code>fraction</code> parameter.
     */
    public Integer evaluate(float fraction, Integer startValue, Integer endValue) {
        int startInt = startValue;
        return (int)(startInt + fraction * (endValue - startInt));
    }
}
第17行,类IntEvaluator实现了接口TypeEvaluator,并重写了evaluate方法;
第19行,如果输入参数fraction = 0.5,startValue = 100,endValue = 200,那么返回值结果为100 + (200 - 100)*0.5 = 150。
由上可知,因为业务需求需要自定义估值器时,需要遵循这样三个步骤:1,创建一个类实现TypeEvaluator接口;2,重写evaluate方法;3,根据业务具体需要,通过fraction,startValue ,endValue 计算属性值改变的数值。
那么IntEvaluator,FloatEvaluator,ArgbEvaluator三种常用的估值器类型,如何使用呢?
接下来介绍ValueAnimator在估值器类型为IntEvaluator,ArgbEvaluator,自定义估值器时的使用,由于FloatEvaluator与IntEvaluator用法类似,不再重复阐述。
ValueAnimator.ofInt(...)与InEvaluator的使用:
直接上代码,如下:
private void startValueAnimatorByInt() {
        final Button btn = (Button)findViewById(R.id.btn);

        ValueAnimator animator = ValueAnimator.ofInt(100,300);
        animator.addUpdateListener(new ValueAnimator.AnimatorUpdateListener() {
            @Override
            public void onAnimationUpdate(ValueAnimator animation) {
                int animatedValue = (int) animation.getAnimatedValue();
                btn.getLayoutParams().height = animatedValue;
                btn.requestLayout();
            }
        });
        animator.setStartDelay(2000);
        animator.setDuration(3000).start();
    }
实现效果:一个按钮经过2秒的延迟后,在3秒内按钮的高度由100->300发生变化,动画是先快后慢。
第4行,调用ValueAnimator$ofInt方法创建ValueAnimator对象,该方法内部维护了一个IntEvaluator的整型估值器,且默认是加速减速插值器。100是属性的初始值,300是属性的结束值。
第5行,ValueAnimator$addUpdateListener方法是对属性动画的每一帧进行监听,默认一帧为10ms;
第8行,获取当前时刻的属性值。如果插值器的值为0.5,and使用的是IntEvaluator,那么ValueAnimator$getAnimatedValue方法返回值为200。
第13行,设置2秒延迟后再执行动画;
第14行,启动动画;
第9行,ValueAnimator只能计算出当前时刻属性值的数值,并没有像ObjectAnimator那样去操作UI。因此需要手动设置按钮的布局参数,并刷新界面。
ValueAnimator.ofArgb(...)与ArgbEvaluator的使用
直接上代码,如下:
    private void startValueAnimatorByArgb() {
        final Button btn = (Button)findViewById(R.id.btn);
        final ValueAnimator animator = ValueAnimator.ofArgb(0xFFFF0000, 0xFF00FF00);
        animator.addUpdateListener(new ValueAnimator.AnimatorUpdateListener() {
            @Override
            public void onAnimationUpdate(ValueAnimator animation) {
                int animatedValue = (int) animator.getAnimatedValue();
                btn.setBackgroundColor(animatedValue);
            }
        });
        animator.setStartDelay(1000);
        animator.setDuration(5000).start();
    }
实现效果:经过1秒的延迟后,按钮的背景色在5秒内由红色->绿色,动画是先快后慢。
第3行,调用ValueAnimator$ofArgb方法创建ValueAnimator对象,该方法内部维护了一个ArgbEvaluator估值器,且默认插值器是加速减速插值器。0xFFFF0000为属性值的初始值,0xFF00FF00为属性值的结束值。
第7行,getAnimatedValue方法获取当前时刻的属性值,具体计算方式由ArgbEvaluator颜色估值器的内部实现来确定。
第8行,由于ValueAnimator值计算出当前时刻的属性值,因此需要手动设置按钮的背景色。
ValueAnimator.ofObject(...)与自定义估值器
直接上代码,如下:
    private void startValueAnimatorByObj() {
        final Button btn = (Button) findViewById(R.id.btn);

        TypeEvaluator evaluator = new TypeEvaluator() {
            @Override
            public Object evaluate(float fraction, Object startValue, Object endValue) {
                int color = 0xFFFF0000;
                if (fraction < 0.2f) {
                    color = (int) startValue;
                } else if (fraction >= 0.2f && fraction < 0.8f) {
                    //black
                    color = 0xFFFF0000;
                } else if (fraction >= 0.8f) {
                    color = (int) endValue;
                }
                return color;
            }
        };

        ValueAnimator animator = ValueAnimator.ofObject(evaluator, 0xFF000000, 0xFF00FF00);
        animator.setInterpolator(new LinearInterpolator());
        animator.addUpdateListener(new ValueAnimator.AnimatorUpdateListener() {
            @Override
            public void onAnimationUpdate(ValueAnimator animation) {
                int animatedValue = (int) animation.getAnimatedValue();
                btn.setBackgroundColor(animatedValue);
            }
        });
        animator.setStartDelay(2000);
        animator.setDuration(6000).start();
    }
实现效果:动画在延迟2秒后执行,在6秒的时间内,按钮的背景色在前2秒是黑色,中间6秒是红色,最后2秒是绿色。
第20行,使用ofObject方法创建ValueAnimator对象,相比ofInt,ofArgb方法,需要多传递一个TypeEvaluator类型的参数。从上面描述的实现效果可知,系统没有提供相应的估值器来实现2秒黑色,6秒红色,2秒绿色的效果,因此需要自定义估值器。于是使用ValueAnimator的ofObject方法,配合自定义估值器完成业务需求。0xFF000000(黑色)是属性值的初始值,0xFF00FF00(绿色)是属性值的结束值。
第4行,创建一个TypeEvaluator类型的匿名内部类,用于替换创建TypeEvaluator的子类;
第6行,重写evaluator方法;
第9行,当插值器的值小于0.2(属性值变化的百分比小于0.2)时,估值器(改变后的属性值)的值为startValue,即0xFF000000(黑色)。
第12行,当插值器的值大于0.2,小于0.8时,估值器的值为0xFFFF0000(红色)。
第14行,当插值器的值大于0.8时,估值器的值为endValue,即0xFF00FF00(绿色)。
第21行,设置ValueAnimator的插值器为线性插值器;
第22行,对动画的每一帧进行监听,并在回调方法onAnimationUpdate操作UI;
第25行,获取当前时刻属性值的具体数值(前面设置好了插值器,估值器);
第26行,由于ValueAnimator最终只是获取当前的属性值,因此需要手动调用Button的setBackgroundColor方法,设置按钮的背景颜色。
其他行的代码应该比较好理解,这里不再阐述。
注意:文章前面提到“属性动画可以不作用于具体的对象”,学习了ValueAnimator实现属性动画,发现ValueAnimator确实没有作用于任何对象。只是借助ValueAnimator相关的方法,插值器,估值器,监听每一帧动画,确定了当前时刻的属性值,最后手动更新UI。
四,最后
本篇文章,先后介绍了使用xml,Java代码两种方式实现属性动画,以及动画集合;然后介绍了如何使属性动画,作用于任意的属性;最后介绍了ValueAnimator的使用,包括插值器,估值器的概念及内部实现,ofInt,ofArgb,ofObject方法的使用。