前言
在已经创建好数据库以及数据表的情况下,如果要手动写pojo以及mapper相关文件的话,会比较花费时间,而且没有多大的意义,好在有前辈替我们实现了相关工具,让我们可以简便的生成这些代码,提高开发效率,从而有更多的时间处理主要业务逻辑的实现。那么这款工具是啥呢?就是我们的mybatis-generator插件啦。
如何使用
首先,在pom.xml文件中增加如下代码
<build>
  <finalName>xxx</finalName>
  <plugins>
    <plugin>
      <groupId>org.mybatis.generator</groupId>
      <artifactId>mybatis-generator-maven-plugin</artifactId>
      <version>1.3.2</version>
      <configuration>
        <verbose>true</verbose>
        <overwrite>true</overwrite>
      </configuration>
    </plugin>
  </plugins>
</build>
然后在resources文件夹下增加generatorConfig.xml配置文件(如下所示,注意要更改一些包名)
<?xml version="1.0" encoding="UTF-8"?>
<!DOCTYPE generatorConfiguration
        PUBLIC "-//mybatis.org//DTD MyBatis Generator Configuration 1.0//EN"
        "http://mybatis.org/dtd/mybatis-generator-config_1_0.dtd">

<generatorConfiguration>
    <!--导入属性配置-->
    <properties resource="db.properties"></properties>

    <!--指定特定数据库的jdbc驱动jar包的位置-->
    <classPathEntry location="${db.driverLocation}"/>

    <context id="default" targetRuntime="MyBatis3">

        <!-- optional,旨在创建class时,对注释进行控制 -->
        <commentGenerator>
            <property name="suppressDate" value="true"/>
            <property name="suppressAllComments" value="true"/>
        </commentGenerator>

        <!--jdbc的数据库连接 -->
        <jdbcConnection
                driverClass="${db.driverClassName}"
                connectionURL="${db.url}"
                userId="${db.username}"
                password="${db.password}">
        </jdbcConnection>


        <!-- 非必需,类型处理器,在数据库类型和java类型之间的转换控制-->
        <javaTypeResolver>
            <property name="forceBigDecimals" value="false"/>
        </javaTypeResolver>


        <!-- Model模型生成器,用来生成含有主键key的类,记录类 以及查询Example类
            targetPackage     指定生成的model生成所在的包名
            targetProject     指定在该项目下所在的路径
        -->
        <!--<javaModelGenerator targetPackage="com.zhihu.pojo" targetProject=".\src\main\java">-->
        <javaModelGenerator targetPackage="com.zhihu.pojo" targetProject="./src/main/java">
            <!-- 是否允许子包,即targetPackage.schemaName.tableName -->
            <property name="enableSubPackages" value="false"/>
            <!-- 是否对model添加 构造函数 -->
            <property name="constructorBased" value="true"/>
            <!-- 是否对类CHAR类型的列的数据进行trim操作 -->
            <property name="trimStrings" value="true"/>
            <!-- 建立的Model对象是否 不可改变  即生成的Model对象不会有 setter方法,只有构造方法 -->
            <property name="immutable" value="false"/>
        </javaModelGenerator>

        <!--mapper映射文件生成所在的目录 为每一个数据库的表生成对应的SqlMap文件 -->
        <!--<sqlMapGenerator targetPackage="mappers" targetProject=".\src\main\resources">-->
        <sqlMapGenerator targetPackage="mappers" targetProject="./src/main/resources">
            <property name="enableSubPackages" value="false"/>
        </sqlMapGenerator>

        <!-- 客户端代码,生成易于使用的针对Model对象和XML配置文件 的代码
                type="ANNOTATEDMAPPER",生成Java Model 和基于注解的Mapper对象
                type="MIXEDMAPPER",生成基于注解的Java Model 和相应的Mapper对象
                type="XMLMAPPER",生成SQLMap XML文件和独立的Mapper接口
        -->

        <!-- targetPackage:mapper接口dao生成的位置 -->
        <!--<javaClientGenerator type="XMLMAPPER" targetPackage="com.mmall.dao" targetProject=".\src\main\java">-->
        <javaClientGenerator type="XMLMAPPER" targetPackage="com.zhihu.mapper" targetProject="./src/main/java">
            <!-- enableSubPackages:是否让schema作为包的后缀 -->
            <property name="enableSubPackages" value="false" />
        </javaClientGenerator>


        <table tableName="answer" enableCountByExample="false" enableUpdateByExample="false" enableDeleteByExample="false" enableSelectByExample="false" selectByExampleQueryId="false">
            <columnOverride column="answer_content" jdbcType="VARCHAR" />
        </table>
        <table tableName="answer_comment" enableCountByExample="false" enableUpdateByExample="false" enableDeleteByExample="false" enableSelectByExample="false" selectByExampleQueryId="false">
            <columnOverride column="answer_comment_content" jdbcType="VARCHAR" />
        </table>
        <table tableName="collection" enableCountByExample="false" enableUpdateByExample="false" enableDeleteByExample="false" enableSelectByExample="false" selectByExampleQueryId="false"></table>
        <table tableName="message" enableCountByExample="false" enableUpdateByExample="false" enableDeleteByExample="false" enableSelectByExample="false" selectByExampleQueryId="false"></table>
        <table tableName="question" enableCountByExample="false" enableUpdateByExample="false" enableDeleteByExample="false" enableSelectByExample="false" selectByExampleQueryId="false">
            <columnOverride column="question_content" jdbcType="VARCHAR" />
        </table>
        <table tableName="question_comment" enableCountByExample="false" enableUpdateByExample="false" enableDeleteByExample="false" enableSelectByExample="false" selectByExampleQueryId="false">
            <columnOverride column="question_comment_content" jdbcType="VARCHAR" />
        </table>
        <table tableName="question_topic" enableCountByExample="false" enableUpdateByExample="false" enableDeleteByExample="false" enableSelectByExample="false" selectByExampleQueryId="false"></table>
        <table tableName="topic" enableCountByExample="false" enableUpdateByExample="false" enableDeleteByExample="false" enableSelectByExample="false" selectByExampleQueryId="false">
            <columnOverride column="topic_desc" jdbcType="VARCHAR" />
        </table>
        <table tableName="toutiao_ad_click_record" domainObjectName="User" enableCountByExample="false" enableUpdateByExample="false" enableDeleteByExample="false" enableSelectByExample="false" selectByExampleQueryId="false">
            <columnOverride column="callback_url" jdbcType="VARCHAR" />
        </table>
        <table tableName="user" enableCountByExample="false" enableUpdateByExample="false" enableDeleteByExample="false" enableSelectByExample="false" selectByExampleQueryId="false"></table>


        <!-- geelynote mybatis插件的搭建 -->
    </context>
</generatorConfiguration>这里要注意一点,在generatorConfig.xml文件末尾的一系列table中,对应的分别是数据库中的表名,如果表中有类型为text的字段的话,要在table中嵌套一个columnOverride配置,否则将无法为pojo文件生成类型为text的相应的属性。另外,在db.properties文件中,db.driverLocation的值一定要写对,建议写你电脑上mysql-connector-java.jar的绝对路径,以下是我的相关db.properties配置
db.driverLocation=D:/maven/repository/mysql/mysql-connector-java/5.1.6/mysql-connector-java-5.1.6.jar
db.driverClassName=com.mysql.jdbc.Driver
db.url=jdbc:mysql://localhost:3306/zhihu?characterEncoding=utf-8
db.username=root
db.password=root


db.initialSize = 20
db.maxActive = 50
db.maxIdle = 20
db.minIdle = 10
db.maxWait = 10
db.defaultAutoCommit = true
db.minEvictableIdleTimeMillis = 3600000
以上,就配置好了,接下来就是在idea上进行操作了
终极操作
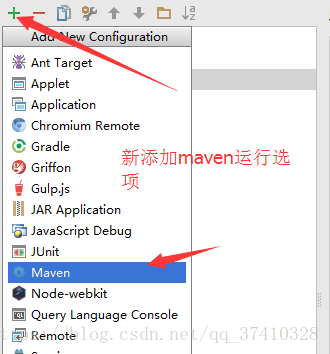
首先在idea上方的工具栏中选择run下拉框中的edit configrations,使用maven运行mybatis-generator

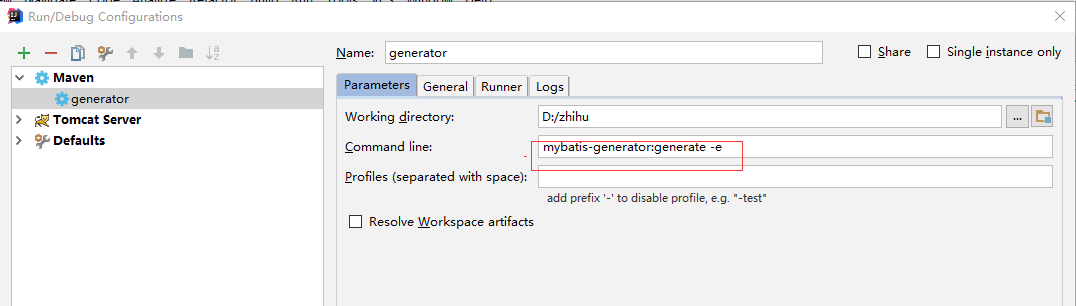
在接下来的配置中,我们在Command line中输入红框中内容,(参数e是为了让该插件给出详细信息,方便我们排错)
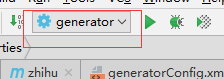
配置完成之后,我们就可以在运行环境框中看到增加了generator
点击旁边的运行按钮,控制台中出现如下信息的话,就说明我们的操作就成功了!
[INFO] ------------------------------------------------------------------------
[INFO] BUILD SUCCESS
[INFO] ------------------------------------------------------------------------
[INFO] Total time: 2.528 s
[INFO] Finished at: 2018-05-10T15:47:37+08:00
[INFO] Final Memory: 12M/155M
[INFO] ------------------------------------------------------------------------如果遇到了Cannot resolve classpath entry: 就说明我们的db.driverLocation可能配置错了(我第一次就遇到了。。。)