其余文章索引:
MPAndroidChart 教程:概述
MPAndroidChart 教程:开始 Getting Started(一)
MPAndroidChart 教程:与图表进行手势交互 Interaction with the Chart(二)
MPAndroidChart 教程:坐标轴,X轴,Y轴,Labels(三)
MPAndroidChart 教程:设置数据,设置颜色(四)
MPAndroidChart 教程:数据格式器 ValueFormatter(五)
MPAndroidChart 教程:图表的具体设置 Specific chart settings(六)
MPAndroidchart 教程:图例 Legend(七)
MPAndroidChart 教程:动态和实时数据 Dynamic & Realtime Data(八)
MPAndroidChart 教程:修改视窗 Modifying the Viewport(九)
MPAndroidChart 教程:动画 Animations(十)
MPAndroidChart 教程:MarkerView(十一)
MPAndroidChart 教程:ChartData类,ChartData子类, DataSet类,DataSet子类(十二)
时间仓促,难免有错误,有的话希望大家在评论中指出,谢谢。
源码:范例代码在线查看或下载
一、什么是MarkerView
首先来看 MarkerView 的效果图:
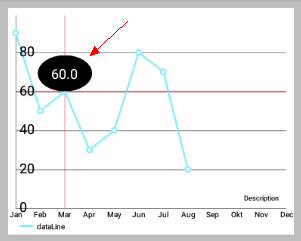
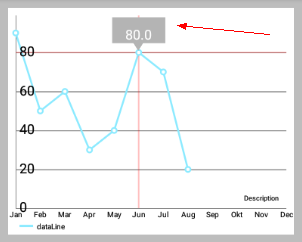
如上图所示,当点击折线图上的点时,会弹出一个View,这就是 Markerview 。
- 上面的左图是一个
TextView布局和一个椭圆黑色的background - 右图是一个
TextView布局和一个bitmap的background
那么这具体是如何实现的呢?
二、MakerView 抽象类
1. 简介
为显示自定义的(弹出的)扩展View并且使得点击的点的值在图表中突出显示,我们可以创建一个类并继承MakerView 抽象类,然后实现该类的构造方法和继承自 MarkerView 类的抽象方法 。
    // extend MarkerView
public class YourCustomMarkerView extends MarkerView { ...MarkerView类继承自RelativeLayout。
2. MarkerView 类源码:
/**
 * View that can be displayed when selecting values in the chart.
 * Extend this class to provide custom layouts for your markers.
 */
public abstract class MarkerView extends RelativeLayout {

    /**
     * Constructor. Sets up the MarkerView with a custom layout resource.
     *
     * @param context
     * @param layoutResource the layout resource to use for the MarkerView
     */
    public MarkerView(Context context, int layoutResource) {
        super(context);
        setupLayoutResource(layoutResource);
    }

    /**
     * Sets the layout resource for a custom MarkerView.
     *
     * @param layoutResource
     */
    private void setupLayoutResource(int layoutResource) {

        View inflated = LayoutInflater.from(getContext())
            .inflate(layoutResource, this);

        inflated.setLayoutParams(
            new LayoutParams(RelativeLayout.LayoutParams.WRAP_CONTENT,
            RelativeLayout.LayoutParams.WRAP_CONTENT));

        inflated.measure(MeasureSpec.makeMeasureSpec(0, MeasureSpec.UNSPECIFIED),
                MeasureSpec.makeMeasureSpec(0, MeasureSpec.UNSPECIFIED));

        // measure(getWidth(), getHeight());
        inflated.layout(0, 0, inflated.getMeasuredWidth(),
            inflated.getMeasuredHeight());
    }

    /**
     * Draws the MarkerView on the given position on the screen
     * with the given Canvas object.
     *
     * @param canvas
     * @param posx
     * @param posy
     */
    public void draw(Canvas canvas, float posx, float posy) {

        // take offsets into consideration
        posx += getXOffset(posx);
        posy += getYOffset(posy);

        // translate to the correct position and draw
        canvas.translate(posx, posy);
        draw(canvas);
        canvas.translate(-posx, -posy);
    }

    /**
     * This method enables a specified custom MarkerView to
     * update it's content everytime the MarkerView is redrawn.
     *
     * @param e         The Entry the MarkerView belongs to. This can
     * also be any subclass of Entry, like BarEntry or CandleEntry,
     * simply cast it at runtime.
     * @param highlight The highlight object contains information
     * about the highlighted value such as it's dataset-index, the
     * selected range or stack-index (only stacked bar entries).
     */
    public abstract void refreshContent(Entry e, Highlight highlight);

    /**
     * Use this to return the desired offset you wish the MarkerView
     * to have on the x-axis. By returning -(getWidth() /
     * 2) you will center the MarkerView horizontally.
     *
     * @param xpos the position on the x-axis in pixels where the marker is drawn
     * @return
     */
    public abstract int getXOffset(float xpos);

    /**
     * Use this to return the desired position offset you wish the MarkerView
     * to have on the y-axis. By returning
     * -getHeight() you will cause the MarkerView to be above the selected value.
     *
     * @param ypos the position on the y-axis in pixels where the marker is drawn
     * @return
     */
    public abstract int getYOffset(float ypos);
}
3. 设置/获取 MarkerView 的方法
setMarkerView(MarkerView mv): 为chart设置一个MarkerView从而显示选中的值。getMarkerView(): 获取chart已经设置了的MarkerView,未设置的话返回null。
三、实现步骤
后面你可以找到一个实现自定义 MarkerView 类的例子。 重要的是,在这个过程中要实现以下从 MarkerView 抽象类继承来的方法:
refreshContent(Entry e, Highlight highlight): 每次MarkerView重绘此方法都会被调用,并为您提供更新它显示的内容的机会(例如,为一个TextView设置文本 ,…)。 它提供了当前突出显示的Entry和相应的Highlight对象以获得更多信息。getXOffset(float xpos): 在这里,应返回要绘制的MarkerView在x轴的偏移位置。 默认情况下,MarkerView的左上边缘处将绘制在entry的位置。 在xpos参数表示绘制MarkerView的默认位置。getYOffset(float ypos): 在这里,应返回要绘制的MarkerView在y轴的偏移位置。 默认情况下,MarkerView的左上边缘处将绘制在entry的位置。 在ypos参数表示绘制MarkerView的默认位置。
实现自定义 MarkerView 类的例子:
public class CustomMarkerView extends MarkerView {

    private TextView tvContent;

    public CustomMarkerView (Context context, int layoutResource) {
        super(context, layoutResource);
        // this markerview only displays a textview
        tvContent = (TextView) findViewById(R.id.tvContent);
    }

    // callbacks everytime the MarkerView is redrawn, can be used to update the
    // content (user-interface)
    @Override
    public void refreshContent(Entry e, Highlight highlight) {
        tvContent.setText("" + e.getVal()); // set the entry-value as the display text
    }

    @Override
    public int getXOffset(float xpos) {
        // this will center the marker-view horizontally
        return -(getWidth() / 2);
    }

    @Override
    public int getYOffset(float ypos) {
        // this will cause the marker-view to be above the selected value
        return -getHeight();
    }
}- 实现自定义的
MarkerView类后,需要创建一个.xml文件来作为MarkerView的布局。 本实例的布局仅是一个有背景图的且内含一个TextView的RelativeLayout,但 你可以创建任何你想要在这里显示的布局。
<?xml version="1.0" encoding="utf-8"?>
<RelativeLayout xmlns:android="http://schemas.android.com/apk/res/android"
    android:layout_width="wrap_content"
    android:layout_height="40dp"
    android:background="@drawable/markerImage" >

    <TextView
        android:id="@+id/tvContent"
        android:layout_width="wrap_content"
        android:layout_height="wrap_content"
        android:layout_centerHorizontal="true"
        android:text=""
        android:textSize="12dp"
        android:textColor="@android:color/white"
        android:ellipsize="end"
        android:singleLine="true"
        android:textAppearance="?android:attr/textAppearanceSmall" />

</RelativeLayout>- 最后,为图表设置你已经创建了的自定义
MarkerView。 创建MarkerView时请确保你创建的.xml文件提供了对应的layout资源。
    CustomMarkerView mv = new CustomMarkerView(Context,
        R.layout.custom_marker_view_layout);

    // set the marker to the chart
    chart.setMarkerView(mv);
四、 随手写的一个样例
1. 动态效果图
2. 主要代码
1) 背景图 bg_marker.xml
<!-- bg_marker.xml -->
<?xml version="1.0" encoding="utf-8"?>
<shape xmlns:android="http://schemas.android.com/apk/res/android"
       android:shape="oval">
    <solid android:color="@android:color/black"/>
</shape>
2) 布局代码 content_marker_view.xml
<!-- content_marker_view.xml -->
<?xml version="1.0" encoding="utf-8"?>
<RelativeLayout xmlns:android="http://schemas.android.com/apk/res/android"
                android:layout_width="72dp"
                android:layout_height="48dp"
                android:background="@drawable/bg_marker"
                android:gravity="center"
                android:orientation="vertical">

    <TextView
        android:id="@+id/tv_content_marker_view"
        android:layout_width="wrap_content"
        android:layout_height="wrap_content"
        android:padding="4dp"
        android:textAppearance="?android:attr/textAppearanceSmall"
        android:textColor="@android:color/white"
        android:textSize="18sp"/>
</RelativeLayout>
3) 自定义的 MyMarkerView.java
public class MyMarkerView extends MarkerView {
    private TextView mContentTv;

    public MyMarkerView(Context context, int layoutResource) {
        super(context, layoutResource);
        mContentTv = (TextView) findViewById(R.id.tv_content_marker_view);
    }

    @Override
    public void refreshContent(Entry e, Highlight highlight) {
        mContentTv.setText("" + e.getVal());
    }

    @Override
    public int getXOffset(float xpos) {
        return -(getWidth() / 2);
    }

    @Override
    public int getYOffset(float ypos) {
        return -getHeight();
    }
}
4) 为图表设置 MarkerView
    // 设置MarkerView
    MarkerView mv = new MyMarkerView(this,R.layout.content_marker_view);
    chart.setMarkerView(mv);
本节完。