版权声明:本文为博主原创文章,未经博主允许不得转载!!! https://blog.csdn.net/qq_19107011/article/details/81252415
一.项目准备
1. vue-cli的安装和初始化web项目
安装vue-cli先要安装nodejs,然后使用下面命令进行安装
npm install --global vue-cli
然后使用下面命令初始化项目
vue init webpack my_project
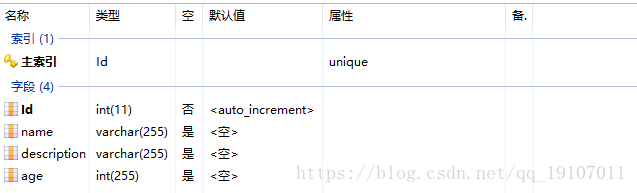
2.准备数据结构
二.server端代码
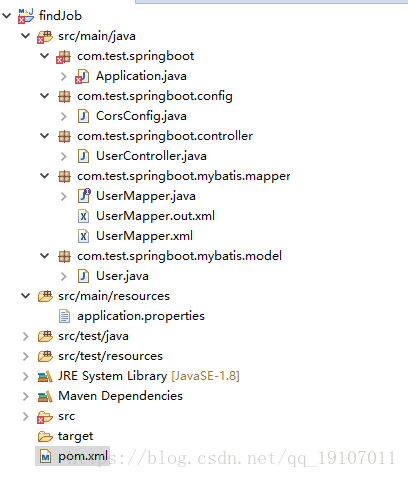
这里是pom文件
主要就是使用了相关依赖,还有热部署模块的测试。
<project xmlns="http://maven.apache.org/POM/4.0.0" xmlns:xsi="http://www.w3.org/2001/XMLSchema-instance" xsi:schemaLocation="http://maven.apache.org/POM/4.0.0 http://maven.apache.org/xsd/maven-4.0.0.xsd">
  <modelVersion>4.0.0</modelVersion>
  <groupId>com.xiejingxun</groupId>
  <artifactId>findJob</artifactId>
  <version>0.0.1-SNAPSHOT</version>
  <name>求职的测试项目</name>
  <description>求职的测试项目</description>
 <parent>
    <groupId>org.springframework.boot</groupId>
    <artifactId>spring-boot-starter-parent</artifactId>
    <version>1.5.6.RELEASE</version>
    <relativePath/>
  </parent>

  <properties>
      <project.build.sourceEncoding>UTF-8</project.build.sourceEncoding>
      <java.version>1.8</java.version>
  </properties>

  <dependencies>
    <!-- SpringBoot相关配置 -->
    <dependency>
        <groupId>org.springframework.boot</groupId>
        <artifactId>spring-boot-starter</artifactId>
    </dependency>
    <dependency>
        <groupId>org.springframework.boot</groupId>
        <artifactId>spring-boot-starter-web</artifactId>
    </dependency>
    <!-- 最重要的是这个POM配置,MyBatis相关操作都在这个包中 -->
    <dependency>
        <groupId>org.mybatis.spring.boot</groupId>
        <artifactId>mybatis-spring-boot-starter</artifactId>
        <version>1.1.1</version>
    </dependency>
    <!-- MySql数据库连接包 -->
    <dependency>
        <groupId>mysql</groupId>
        <artifactId>mysql-connector-java</artifactId>
    </dependency>
            <!-- 热部署模块 -->
        <dependency>
            <groupId>org.springframework.boot</groupId>
            <artifactId>spring-boot-devtools</artifactId>
            <optional>true</optional> <!-- 这个需要为 true 热部署才有效 -->
        </dependency>

  </dependencies>
    <build>
        <plugins>
            <plugin>
                <groupId>org.springframework.boot</groupId>
                <artifactId>spring-boot-maven-plugin</artifactId>
            </plugin>
        </plugins>
    </build>
</project>
二.web端代码
这里是main.js的相关带代码
这里主要就是使用了路由模块和store数据传输模块和引入相关的组件。
主要的组件有:编辑组件、关于组件、主页面组件
import Vue from 'vue'
import App from './App'
import axios from 'axios'
import Vuex from 'vuex'
import store from './vuex/store.js'
import VueRouter from 'vue-router'
import HelloWorld from './components/HelloWorld'
import EditUser from './components/EditUser'
import About from './components/About'

Vue.use(Vuex);
Vue.use(VueRouter);
Vue.config.productionTip = false


/* eslint-disable no-new */
// 可以从其他文件 import 进来


// 2. 定义路由
// 每个路由应该映射一个组件。 其中"component" 可以是
// 通过 Vue.extend() 创建的组件构造器,
// 或者,只是一个组件配置对象。
// 我们晚点再讨论嵌套路由。
const routes = [
  { path: '/', component: HelloWorld },
  { path: '/about', component: About },
  { path: '/edit', component: EditUser }
]

// 3. 创建 router 实例,然后传 `routes` 配置
// 你还可以传别的配置参数, 不过先这么简单着吧。
const router = new VueRouter({
  routes // (缩写) 相当于 routes: routes
})


new Vue({
  el: '#app',
  router,
  store
});
下面是主页的代码
<!DOCTYPE html>
<html>
  <head>
    <link rel="stylesheet" href="https://cdn.bootcss.com/bootstrap/4.0.0/css/bootstrap.min.css" integrity="sha384-Gn5384xqQ1aoWXA+058RXPxPg6fy4IWvTNh0E263XmFcJlSAwiGgFAW/dAiS6JXm" crossorigin="anonymous">
    <meta charset="utf-8">
    <meta name="viewport" content="width=device-width,initial-scale=1.0">
    <title>vue demo</title>
    <style>
        td {text-align:center}
        th {text-align:center}
    </style>
  </head>
  <body>
    <div id="app">
      <p>
        <!-- use router-link component for navigation. -->
        <!-- specify the link by passing the `to` prop. -->
        <!-- <router-link> will be rendered as an `<a>` tag by default -->
        <ul class="nav">
          <li class="nav-item">
            <a class="nav-link active" href="/">主页</a>
          </li>
          <li class="nav-item">
            <a class="nav-link" href="#/about">关于</a>
          </li>
          <li class="nav-item">
            <a class="nav-link disabled" href="http://www.500d.me/resume/7485768314/">简历</a>
          </li>
        </ul>
      </p>
      <!-- route outlet -->
      <!-- component matched by the route will render here -->
      <router-view></router-view>
    </div>
  </body>
</html>
下面举个例子,贴上编辑组件的代码
<template>
<div>
<hr/>
<div style="margin-left:30%" width="50%">
<h3>用户编辑</h3>
用户ID:<span id="userId">{{this.$route.query.id}}</span>
<br/>
旧用户名:{{this.$route.query.name}}
<br/>
新用户名:<input type="text" id="name"/>
<br/>
用户描述:<input type="text" id="info" style="margin-top:3px"/>
<br/>
<button @click="edit()" class="btn btn-primary" style="margin-left:23%;margin-top:10px">修改</button>
</div>
</div>
</template>
<script>
import axios from 'axios'
export default {
name:"EditUser",
methods:{
edit : function(){
var name = document.getElementById("name").value;
var id = document.getElementById("userId").innerHTML;
var info = document.getElementById("info").value;
axios.get('/api/user/edit?name='+name+'&id='+id+'&description='+info).then(function (response) {
alert(response.data);
}).catch(function (error) {
console.log(error);
});
}
}
}
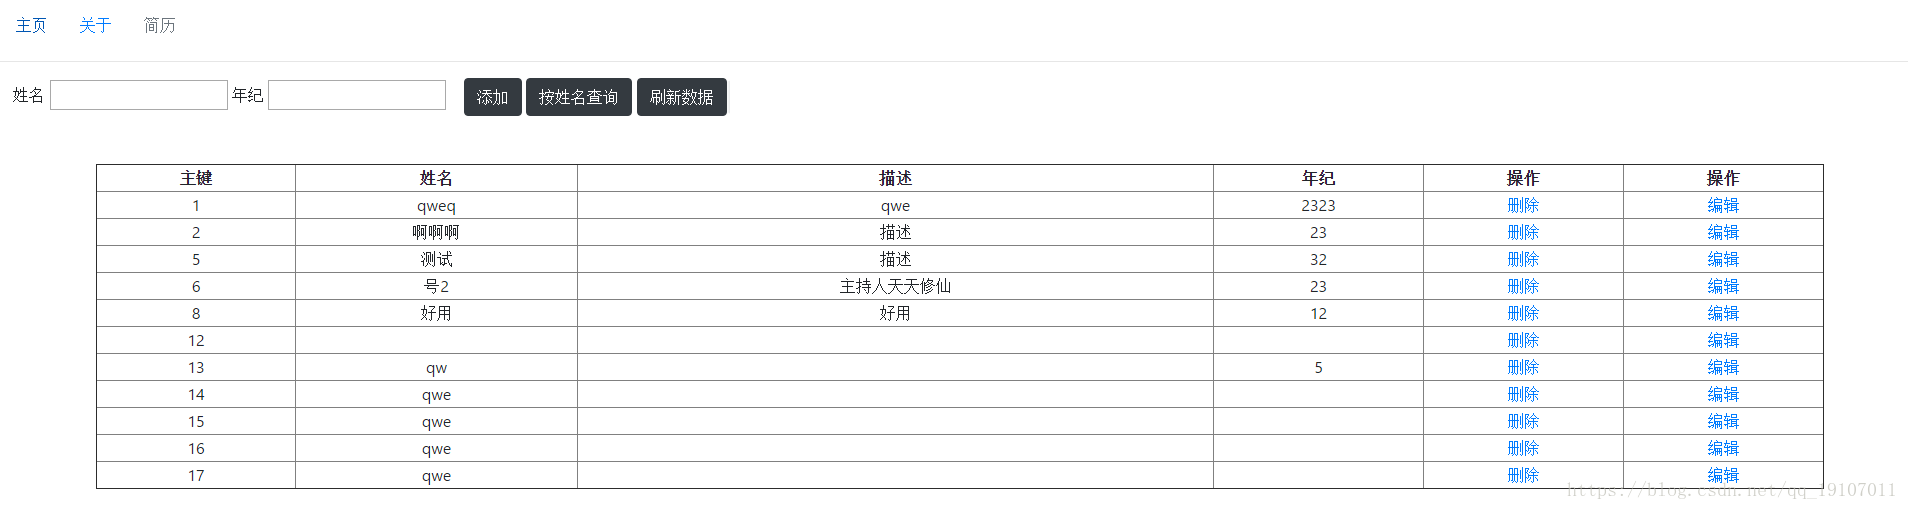
</script>三.效果图