因为网上关于这个springboot+security自定义验证有好多写的有点杂乱,在仿写的过程中总是出现莫名其妙的bug,所以专门写一篇最基础的出来。
本篇还是使用熟悉的springboot+mybatis+thymeleaf来搭最基础的架构,当然不用数据库也是可以的,自己在逻辑实现类新建一个对象测试就好了。
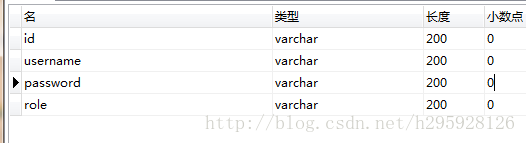
一、新建数据库
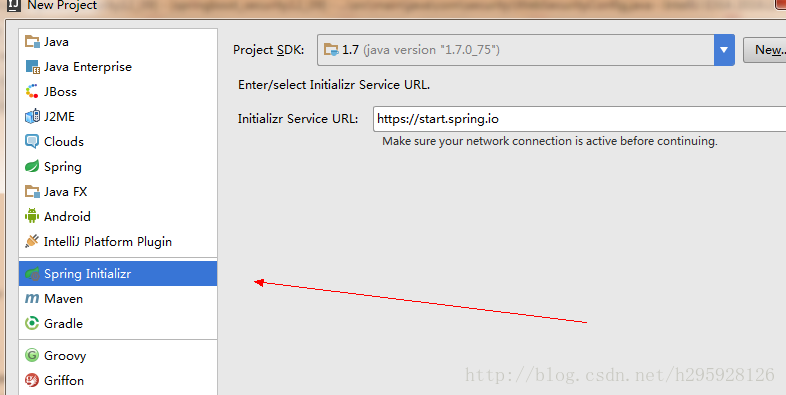
二、打开IDEA新建项目,勾这三个

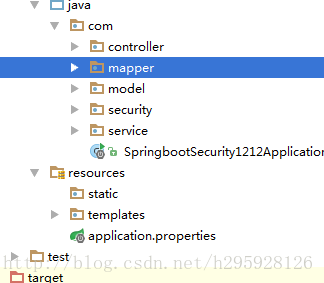
三、项目架构
四、各部分的实现
1、pom.xml下添加mybatis和mysql的依赖,以及对xml路径的支持
<!--mybatis-->
        <dependency>
            <groupId>org.mybatis.spring.boot</groupId>
            <artifactId>mybatis-spring-boot-starter</artifactId>
            <version>1.1.1</version>
        </dependency>
        <!--mysql-->
        <dependency>
            <groupId>mysql</groupId>
            <artifactId>mysql-connector-java</artifactId>
            <version>5.1.21</version>
</dependency><build>
<plugins>
<plugin>
<groupId>org.springframework.boot</groupId>
<artifactId>spring-boot-maven-plugin</artifactId>
</plugin>
</plugins>
<resources>
<resource>
<directory>src/main/java</directory>
<includes>
<include>**/*.xml</include>
</includes>
</resource>
</resources>
</build>2、application.properties文件下添加数据库的信息
spring.datasource.url=jdbc:mysql://localhost:3306/mybatis
spring.datasource.username=root
spring.datasource.password=root
spring.datasource.driver-class-name=com.mysql.jdbc.Driver
mybatis.mapperLocation=classpath*:com/**/*Mapper.xml
3、持久层mapper包下
创建UserMapper接口
package com.mapper;

import com.model.User;
import org.apache.ibatis.annotations.Mapper;

/**
 * Created by Administrator on 2016/12/9.
 */
@Mapper
public interface UserMapper {
    User selectById(String id);
    User selectByUsername(String username);
}
同包下创建UserMapper.xml
<?xml version="1.0" encoding="UTF-8" ?>
<!DOCTYPE mapper PUBLIC "-//mybatis.org//DTD Mapper 3.0//EN" "http://mybatis.org/dtd/mybatis-3-mapper.dtd" >
<mapper namespace="com.mapper.UserMapper" >
  <resultMap id="BaseResultMap" type="com.model.User" >
    <id column="id" property="id" jdbcType="VARCHAR" />
    <result column="username" property="username" jdbcType="VARCHAR" />
    <result column="password" property="password" jdbcType="VARCHAR" />
    <result column="role" property="role" jdbcType="VARCHAR" />
  </resultMap>

  <select id="selectById" resultMap="BaseResultMap" >
    select id, username,password,role
    from user
    where id = #{id, jdbcType=VARCHAR}
  </select>
  <select id="selectByUsername" resultMap="BaseResultMap" >
    select id, username,password,role
    from user
    where username = #{username, jdbcType=VARCHAR}
  </select>

</mapper>
4、实体层model创建实体类User,继承UserDetails
package com.model;

import org.springframework.security.core.GrantedAuthority;
import org.springframework.security.core.authority.SimpleGrantedAuthority;
import org.springframework.security.core.userdetails.UserDetails;

import java.io.Serializable;
import java.util.Arrays;
import java.util.Collection;

/**
 * Created by Administrator on 2016/12/9.
 */
public class User implements Serializable, UserDetails  {
    private String id;
    private String username;
    private String password;
    private String role;

    public User(){}

    public User(String username, String password, String  role){

        this.setUsername(username);
        this.setPassword(password);
        this.setRole(role);

    }
    public String getId() {
        return id;
    }

    public void setId(String id) {
        this.id = id;
    }

    public String getUsername() {
        return username;
    }

    @Override
    public boolean isAccountNonExpired() {
        return true;
    }

    @Override
    public boolean isAccountNonLocked() {
        return true;
    }

    @Override
    public boolean isCredentialsNonExpired() {
        return true;
    }

    @Override
    public boolean isEnabled() {
        return true;
    }

    public void setUsername(String username) {
        this.username = username;
    }

    @Override
    public Collection<? extends GrantedAuthority> getAuthorities() {
        return Arrays.asList(new SimpleGrantedAuthority(getRole()));
    }

    public String getPassword() {
        return password;
    }

    public void setPassword(String password) {
        this.password = password;
    }

    public String getRole() {
        return role;
    }

    public void setRole(String role) {
        this.role = role;
    }
}
5、安全层security包下创建SecurityConfig类,处理登录权限等等。
package com.security;

import com.service.UserService;
import org.springframework.beans.factory.annotation.Autowired;
import org.springframework.context.annotation.Configuration;
import org.springframework.security.config.annotation.authentication.builders.AuthenticationManagerBuilder;
import org.springframework.security.config.annotation.method.configuration.EnableGlobalMethodSecurity;
import org.springframework.security.config.annotation.web.builders.HttpSecurity;
import org.springframework.security.config.annotation.web.configuration.EnableWebSecurity;
import org.springframework.security.config.annotation.web.configuration.WebSecurityConfigurerAdapter;

@Configuration
//@EnableWebSecurity: 禁用Boot的默认Security配置,配合@Configuration启用自定义配置
// (需要扩展WebSecurityConfigurerAdapter)
@EnableWebSecurity
//@EnableGlobalMethodSecurity(prePostEnabled = true): 启用Security注解,
// 例如最常用的@PreAuthorize
@EnableGlobalMethodSecurity(prePostEnabled = true)
public class SecurityConfig extends WebSecurityConfigurerAdapter {

    @Autowired
    private UserService userService;

    @Override
    protected void configure(AuthenticationManagerBuilder auth)
            throws Exception {
        // Configure spring security's authenticationManager with custom
        // user details service
        auth.userDetailsService(this.userService);
    }

    @Override
    //configure(HttpSecurity): Request层面的配置,对应XML Configuration中的<http>元素
    //定义URL路径应该受到保护,哪些不应该
    protected void configure(HttpSecurity http) throws Exception {
        http
                .authorizeRequests()
                // 例如以下代码指定了/和/index不需要任何认证就可以访问,其他的路径都必须通过身份验证。
                .antMatchers("/", "/index").permitAll()
                .anyRequest().authenticated()
                .and()
                //通过formLogin()定义当需要用户登录时候,转到的登录页面。
                .formLogin()
                .loginPage("/login")
                .permitAll()
                .and()
                //注销
                .logout()
                .permitAll();
        //关闭csrf 防止循环定向
        http.csrf().disable();
    }


}
6、业务逻辑层service创建UserService类
package com.service;

import com.mapper.UserMapper;
import com.model.User;
import org.springframework.beans.factory.annotation.Autowired;
import org.springframework.security.core.userdetails.UserDetails;
import org.springframework.security.core.userdetails.UserDetailsService;
import org.springframework.security.core.userdetails.UsernameNotFoundException;
import org.springframework.stereotype.Service;

/**
 * Created by Administrator on 2016/12/13.
 */
@Service
public class UserService implements UserDetailsService {
    @Autowired
    private UserMapper userMapper;
    @Override
    public UserDetails loadUserByUsername(String username) throws UsernameNotFoundException {
        User user = userMapper.selectByUsername(username);

        if( user == null ){
            throw new UsernameNotFoundException(String.format("User with username=%s was not found", username));
        }

        return user;
    }
}
7、网络层(我比较喜欢叫控制层)controller下创建HelloController类
这里映射到resources目录下的templates的html页面。
package com.controller;

import org.springframework.stereotype.Controller;
import org.springframework.web.bind.annotation.RequestMapping;

@Controller
public class HelloController {

    @RequestMapping("/")
    public String index() {
        return "index";
    }

    @RequestMapping("/hello")
    public String hello(){
        return "hello";
    }

    @RequestMapping(value = "/login")
    public String login() {
        return "login";
    }

}
8、在resources目录下的templates创建3个html(默认页,登录页跟登录后才能进入的页面)
hello.xml
<!DOCTYPE html>
<html xmlns="http://www.w3.org/1999/xhtml" xmlns:th="http://www.thymeleaf.org"
      xmlns:sec="http://www.thymeleaf.org/thymeleaf-extras-springsecurity3">
<head>
    <title>Hello World!</title>
</head>
<body>
<h1 th:inline="text">Hello [[${#httpServletRequest.remoteUser}]]!</h1>
<form th:action="@{/logout}" method="post">
    <input type="submit" value="注销"/>
</form>
</body>
</html>
index.html
<!DOCTYPE html>
<html xmlns="http://www.w3.org/1999/xhtml" xmlns:th="http://www.thymeleaf.org"
      xmlns:sec="http://www.thymeleaf.org/thymeleaf-extras-springsecurity3">
<head>
    <title>Hello World!</title>
</head>
<body>
<h1 th:inline="text">Hello [[${#httpServletRequest.remoteUser}]]!</h1>
<form th:action="@{/logout}" method="post">
    <input type="submit" value="注销"/>
</form>
</body>
</html>
login.html
<!DOCTYPE html>
<html xmlns="http://www.w3.org/1999/xhtml" xmlns:th="http://www.thymeleaf.org"
xmlns:sec="http://www.thymeleaf.org/thymeleaf-extras-springsecurity3">
<head>
<title>Hello World!</title>
</head>
<body>
<h1 th:inline="text">Hello [[${#httpServletRequest.remoteUser}]]!</h1>
<form th:action="@{/logout}" method="post">
<input type="submit" value="注销"/>
</form>
</body>
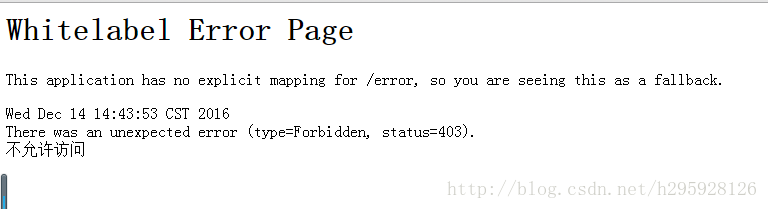
</html>五、做完以上,就能实现最基础的web安全控制了,当然你还可以加url的权限控制,这些网上可搜到很多资料而且不会乱。我这里展示一下。
1、数据库中加入测试数据

这里要注意的是role必须为ROLE_xx形式,不然security识别不出来。
2、在controller类中加入以下控制方法
@RequestMapping(value = "/helloadmin")
    //对应数据库中role为“ROLE_admin”
    @PreAuthorize("hasAnyRole('admin')")
    public String helloAdmin(){
        return "helloadmin";
    }

    @RequestMapping(value = "/hellouser")
    //对应数据库中role为“ROLE_admin”与“ROLE_user”
    @PreAuthorize("hasAnyRole('admin', 'user')")
    public String helloUser(){
        return "hellouser";
    }
3、然后你自己新增俩个测试html(hellouser.html与helloadmin.html),发现以用户名为user登录是进不去helloadmin的。