Twsited异步网络框架
Twisted是一个事件驱动的网络框架,其中包含了诸多功能,例如:网络协议、线程、数据库管理、网络操作、电子邮件等。

事件驱动
简而言之,事件驱动分为二个部分:第一,注册事件;第二,触发事件。
自定义事件驱动框架:
#!/usr/bin/env python
# -*- coding:utf-8 -*-
# event_drive.py
event_list
=
[]
def
run():
for
event
in
event_list:
obj
=
event()
obj.execute()
class
BaseHandler(
object
):
"""
用户必须继承该类,从而规范所有类的方法(类似于接口的功能)
"""
def
execute(
self
):
raise
Exception(
'you must overwrite execute'
)
最牛逼的事件驱动框架
|
程序员使用框架”:
|
1
2
3
4
5
6
7
8
9
10
11
12
13
14
|
#!/usr/bin/env python
# -*- coding:utf-8 -*-
from
source
import
event_drive
class
MyHandler(event_drive.BaseHandler):
def
execute(
self
):
print
'event-drive execute MyHandler'
event_drive.event_list.append(MyHandler)
event_drive.run()
|
Protocols
Protocols描述了如何以异步的方式处理网络中的事件。HTTP、DNS以及IMAP是应用层协议中的例子。Protocols实现了IProtocol接口,它包含如下的方法:
makeConnection 在transport对象和服务器之间建立一条连接 connectionMade 连接建立起来后调用 dataReceived 接收数据时调用 connectionLost 关闭连接时调用Transports
Transports代表网络中两个通信结点之间的连接。Transports负责描述连接的细节,比如连接是面向流式的还是面向数据报的,流控以及可靠性。TCP、UDP和Unix套接字可作为transports的例子。它们被设计为“满足最小功能单元,同时具有最大程度的可复用性”,而且从协议实现中分离出来,这让许多协议可以采用相同类型的传输。Transports实现了ITransports接口,它包含如下的方法:
write                   以非阻塞的方式按顺序依次将数据写到物理连接上
writeSequence           将一个字符串列表写到物理连接上 loseConnection 将所有挂起的数据写入,然后关闭连接 getPeer 取得连接中对端的地址信息 getHost 取得连接中本端的地址信息
将transports从协议中分离出来也使得对这两个层次的测试变得更加简单。可以通过简单地写入一个字符串来模拟传输,用这种方式来检查。
EchoServer
|
1
2
3
4
5
6
7
8
9
10
11
12
13
14
15
16
|
from
twisted.internet
import
protocol
from
twisted.internet
import
reactor
class
Echo(protocol.Protocol):
def
dataReceived(
self
, data):
self
.transport.write(data)
def
main():
factory
=
protocol.ServerFactory()
factory.protocol
=
Echo
reactor.listenTCP(
1234
,factory)
reactor.run()
if
__name__
=
=
'__main__'
:
main()
|
EchoClient
|
1
2
3
4
5
6
7
8
9
10
11
12
13
14
15
16
17
18
19
20
21
22
23
24
25
26
27
28
29
30
31
32
33
34
35
36
37
38
39
40
|
from
twisted.internet
import
reactor, protocol
# a client protocol
class
EchoClient(protocol.Protocol):
"""Once connected, send a message, then print the result."""
def
connectionMade(
self
):
self
.transport.write(
"hello alex!"
)
def
dataReceived(
self
, data):
"As soon as any data is received, write it back."
print
"Server said:"
, data
self
.transport.loseConnection()
def
connectionLost(
self
, reason):
print
"connection lost"
class
EchoFactory(protocol.ClientFactory):
protocol
=
EchoClient
def
clientConnectionFailed(
self
, connector, reason):
print
"Connection failed - goodbye!"
reactor.stop()
def
clientConnectionLost(
self
, connector, reason):
print
"Connection lost - goodbye!"
reactor.stop()
# this connects the protocol to a server running on port 8000
def
main():
f
=
EchoFactory()
reactor.connectTCP(
"localhost"
,
1234
, f)
reactor.run()
# this only runs if the module was *not* imported
if
__name__
=
=
'__main__'
:
main()
|
运行服务器端脚本将启动一个TCP服务器,监听端口1234上的连接。服务器采用的是Echo协议,数据经TCP transport对象写出。运行客户端脚本将对服务器发起一个TCP连接,回显服务器端的回应然后终止连接并停止reactor事件循环。这里的Factory用来对连接的双方生成protocol对象实例。两端的通信是异步的,connectTCP负责注册回调函数到reactor事件循环中,当socket上有数据可读时通知回调处理
一个传送文件的例子
server side
|
1
2
3
4
5
6
7
8
9
10
11
12
13
14
15
16
17
18
19
20
21
22
23
24
25
26
27
28
29
30
31
32
33
34
35
36
37
38
39
40
41
42
43
44
45
46
47
48
49
50
51
52
53
54
55
56
57
58
59
60
61
62
63
64
65
66
67
68
69
70
71
72
73
74
75
76
77
78
79
80
|
#_*_coding:utf-8_*_
# This is the Twisted Fast Poetry Server, version 1.0
import
optparse, os
from
twisted.internet.protocol
import
ServerFactory, Protocol
def
parse_args():
usage
=
"""usage: %prog [options] poetry-file
This is the Fast Poetry Server, Twisted edition.
Run it like this:
python fastpoetry.py <path-to-poetry-file>
If you are in the base directory of the twisted-intro package,
you could run it like this:
python twisted-server-1/fastpoetry.py poetry/ecstasy.txt
to serve up John Donne's Ecstasy, which I know you want to do.
"""
parser
=
optparse.OptionParser(usage)
help
=
"The port to listen on. Default to a random available port."
parser.add_option(
'--port'
,
type
=
'int'
,
help
=
help
)
help
=
"The interface to listen on. Default is localhost."
parser.add_option(
'--iface'
,
help
=
help
, default
=
'localhost'
)
options, args
=
parser.parse_args()
print
(
"--arg:"
,options,args)
if
len
(args) !
=
1
:
parser.error(
'Provide exactly one poetry file.'
)
poetry_file
=
args[
0
]
if
not
os.path.exists(args[
0
]):
parser.error(
'No such file: %s'
%
poetry_file)
return
options, poetry_file
class
PoetryProtocol(Protocol):
def
connectionMade(
self
):
self
.transport.write(
self
.factory.poem)
self
.transport.loseConnection()
class
PoetryFactory(ServerFactory):
protocol
=
PoetryProtocol
def
__init__(
self
, poem):
self
.poem
=
poem
def
main():
options, poetry_file
=
parse_args()
poem
=
open
(poetry_file).read()
factory
=
PoetryFactory(poem)
from
twisted.internet
import
reactor
port
=
reactor.listenTCP(options.port
or
9000
, factory,
interface
=
options.iface)
print
'Serving %s on %s.'
%
(poetry_file, port.getHost())
reactor.run()
if
__name__
=
=
'__main__'
:
main()
|
client side
|
1
2
3
4
5
6
7
8
9
10
11
12
13
14
15
16
17
18
19
20
21
22
23
24
25
26
27
28
29
30
31
32
33
34
35
36
37
38
39
40
41
42
43
44
45
46
47
48
49
50
51
52
53
54
55
56
57
58
59
60
61
62
63
64
65
66
67
68
69
70
71
72
73
74
75
76
77
78
79
80
81
82
83
84
85
86
87
88
89
90
91
92
93
94
95
96
97
98
99
100
101
102
103
|
# This is the Twisted Get Poetry Now! client, version 3.0.
# NOTE: This should not be used as the basis for production code.
import
optparse
from
twisted.internet.protocol
import
Protocol, ClientFactory
def
parse_args():
usage
=
"""usage: %prog [options] [hostname]:port ...
This is the Get Poetry Now! client, Twisted version 3.0
Run it like this:
python get-poetry-1.py port1 port2 port3 ...
"""
parser
=
optparse.OptionParser(usage)
_, addresses
=
parser.parse_args()
if
not
addresses:
print
parser.format_help()
parser.exit()
def
parse_address(addr):
if
':'
not
in
addr:
host
=
'127.0.0.1'
port
=
addr
else
:
host, port
=
addr.split(
':'
,
1
)
if
not
port.isdigit():
parser.error(
'Ports must be integers.'
)
return
host,
int
(port)
return
map
(parse_address, addresses)
class
PoetryProtocol(Protocol):
poem
=
''
def
dataReceived(
self
, data):
self
.poem
+
=
data
def
connectionLost(
self
, reason):
self
.poemReceived(
self
.poem)
def
poemReceived(
self
, poem):
self
.factory.poem_finished(poem)
class
PoetryClientFactory(ClientFactory):
protocol
=
PoetryProtocol
def
__init__(
self
, callback):
self
.callback
=
callback
def
poem_finished(
self
, poem):
self
.callback(poem)
def
get_poetry(host, port, callback):
"""
Download a poem from the given host and port and invoke
callback(poem)
when the poem is complete.
"""
from
twisted.internet
import
reactor
factory
=
PoetryClientFactory(callback)
reactor.connectTCP(host, port, factory)
def
poetry_main():
addresses
=
parse_args()
from
twisted.internet
import
reactor
poems
=
[]
def
got_poem(poem):
poems.append(poem)
if
len
(poems)
=
=
len
(addresses):
reactor.stop()
for
address
in
addresses:
host, port
=
address
get_poetry(host, port, got_poem)
reactor.run()
for
poem
in
poems:
print
poem
if
__name__
=
=
'__main__'
:
poetry_main()
|
Twisted深入
http://krondo.com/an-introduction-to-asynchronous-programming-and-twisted/
http://blog.csdn.net/hanhuili/article/details/9389433
SqlAlchemy ORM
SQLAlchemy是Python编程语言下的一款ORM框架,该框架建立在数据库API之上,使用关系对象映射进行数据库操作,简言之便是:将对象转换成SQL,然后使用数据API执行SQL并获取执行结果
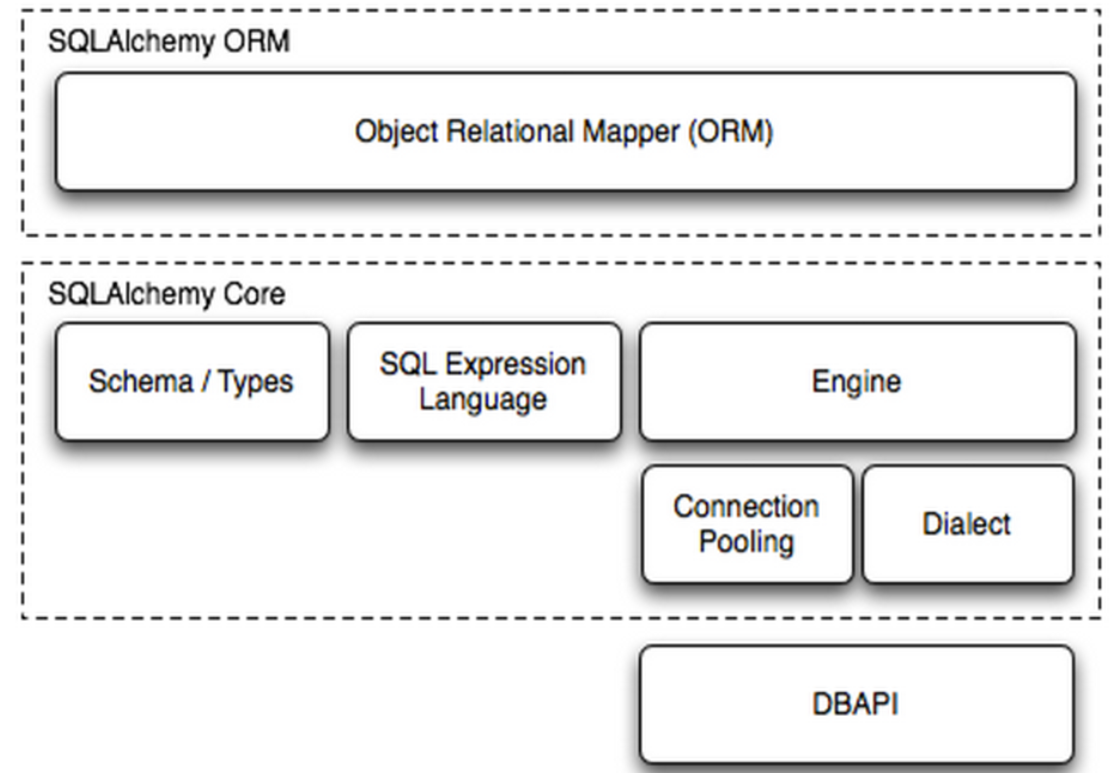
Dialect用于和数据API进行交流,根据配置文件的不同调用不同的数据库API,从而实现对数据库的操作,如:
|
1
2
3
4
5
6
7
8
9
10
11
12
13
|
MySQL
-
Python
mysql
+
mysqldb:
/
/
<user>:<password>@<host>[:<port>]
/
<dbname>
pymysql
mysql
+
pymysql:
/
/
<username>:<password>@<host>
/
<dbname>[?<options>]
MySQL
-
Connector
mysql
+
mysqlconnector:
/
/
<user>:<password>@<host>[:<port>]
/
<dbname>
cx_Oracle
oracle
+
cx_oracle:
/
/
user:
pass
@host:port
/
dbname[?key
=
value&key
=
value...]
更多详见:http:
/
/
docs.sqlalchemy.org
/
en
/
latest
/
dialects
/
index.html
|
步骤一:
使用 Engine/ConnectionPooling/Dialect 进行数据库操作,Engine使用ConnectionPooling连接数据库,然后再通过Dialect执行SQL语句。
|
1
2
3
4
5
6
7
8
9
10
11
12
13
14
15
16
17
18
19
20
21
22
23
|
#!/usr/bin/env python
# -*- coding:utf-8 -*-
from
sqlalchemy
import
create_engine
engine.execute(
"INSERT INTO ts_test (a, b) VALUES ('2', 'v1')"
)
engine.execute(
"INSERT INTO ts_test (a, b) VALUES (%s, %s)"
,
((
555
,
"v1"
),(
666
,
"v1"
),)
)
engine.execute(
"INSERT INTO ts_test (a, b) VALUES (%(id)s, %(name)s)"
,
id
=
999
, name
=
"v1"
)
result
=
engine.execute(
'select * from ts_test'
)
result.fetchall()
|
步骤二:
使用 Schema Type/SQL Expression Language/Engine/ConnectionPooling/Dialect 进行数据库操作。Engine使用Schema Type创建一个特定的结构对象,之后通过SQL Expression Language将该对象转换成SQL语句,然后通过 ConnectionPooling 连接数据库,再然后通过 Dialect 执行SQL,并获取结果。
#!/usr/bin/env python
# -*- coding:utf-8 -*-
from
sqlalchemy
import
create_engine, Table, Column, Integer, String, MetaData, ForeignKey
metadata
=
MetaData()
user
=
Table(
'user'
, metadata,
Column(
'id'
, Integer, primary_key
=
True
),
Column(
'name'
, String(
20
)),
)
color
=
Table(
'color'
, metadata,
Column(
'id'
, Integer, primary_key
=
True
),
Column(
'name'
, String(
20
)),
)
engine
=
create_engine(
"mysql+mysqldb://root@localhost:3306/test"
, max_overflow
=
5
)
metadata.create_all(engine)
|
增删改查
|
1
2
3
4
5
6
7
8
9
10
11
12
13
14
15
16
17
18
19
20
21
22
23
24
25
26
27
28
29
30
31
32
33
34
35
36
37
38
39
40
41
42
|
#!/usr/bin/env python
# -*- coding:utf-8 -*-
from
sqlalchemy
import
create_engine, Table, Column, Integer, String, MetaData, ForeignKey
metadata
=
MetaData()
user
=
Table(
'user'
, metadata,
Column(
'id'
, Integer, primary_key
=
True
),
Column(
'name'
, String(
20
)),
)
color
=
Table(
'color'
, metadata,
Column(
'id'
, Integer, primary_key
=
True
),
Column(
'name'
, String(
20
)),
)
conn
=
engine.connect()
# 创建SQL语句,INSERT INTO "user" (id, name) VALUES (:id, :name)
conn.execute(user.insert(),{
'id'
:
7
,
'name'
:
'seven'
})
conn.close()
# sql = user.insert().values(id=123, name='wu')
# conn.execute(sql)
# conn.close()
# sql = user.delete().where(user.c.id > 1)
# sql = user.update().values(fullname=user.c.name)
# sql = user.update().where(user.c.name == 'jack').values(name='ed')
# sql = select([user, ])
# sql = select([user.c.id, ])
# sql = select([user.c.name, color.c.name]).where(user.c.id==color.c.id)
# sql = select([user.c.name]).order_by(user.c.name)
# sql = select([user]).group_by(user.c.name)
# result = conn.execute(sql)
# print result.fetchall()
# conn.close()
|
一个简单的完整例子
|
1
2
3
4
5
6
7
8
9
10
11
12
13
14
15
16
17
18
19
20
21
22
23
24
25
26
27
28
29
30
31
32
33
|
from
sqlalchemy
import
create_engine
from
sqlalchemy.ext.declarative
import
declarative_base
from
sqlalchemy
import
Column, Integer, String
from
sqlalchemy.orm
import
sessionmaker
Base
=
declarative_base()
#生成一个SqlORM 基类
engine
=
create_engine(
"mysql+mysqldb://root@localhost:3306/test"
,echo
=
False
)
class
Host(Base):
__tablename__
=
'hosts'
id
=
Column(Integer,primary_key
=
True
,autoincrement
=
True
)
hostname
=
Column(String(
64
),unique
=
True
,nullable
=
False
)
ip_addr
=
Column(String(
128
),unique
=
True
,nullable
=
False
)
port
=
Column(Integer,default
=
22
)
Base.metadata.create_all(engine)
#创建所有表结构
if
__name__
=
=
'__main__'
:
SessionCls
=
sessionmaker(bind
=
engine)
#创建与数据库的会话session class ,注意,这里返回给session的是个class,不是实例
session
=
SessionCls()
#h1 = Host(hostname='localhost',ip_addr='127.0.0.1')
#h2 = Host(hostname='ubuntu',ip_addr='192.168.2.243',port=20000)
#h3 = Host(hostname='ubuntu2',ip_addr='192.168.2.244',port=20000)
#session.add(h3)
#session.add_all( [h1,h2])
#h2.hostname = 'ubuntu_test' #只要没提交,此时修改也没问题
#session.rollback()
#session.commit() #提交
res
=
session.query(Host).
filter
(Host.hostname.in_([
'ubuntu2'
,
'localhost'
])).
all
()
print
(res)
|
更多内容详见:
http://www.jianshu.com/p/e6bba189fcbd
http://docs.sqlalchemy.org/en/latest/core/expression_api.html
注:SQLAlchemy无法修改表结构,如果需要可以使用SQLAlchemy开发者开源的另外一个软件Alembic来完成。
步骤三:
使用 ORM/Schema Type/SQL Expression Language/Engine/ConnectionPooling/Dialect 所有组件对数据进行操作。根据类创建对象,对象转换成SQL,执行SQL。
|
1
2
3
4
5
6
7
8
9
10
11
12
13
14
15
16
17
18
19
20
21
22
23
24
25
26
27
28
29
30
31
32
33
34
35
36
37
38
39
40
41
42
43
44
45
46
47
48
49
50
51
52
53
54
55
56
57
58
59
|
#!/usr/bin/env python
# -*- coding:utf-8 -*-
from
sqlalchemy.ext.declarative
import
declarative_base
from
sqlalchemy
import
Column, Integer, String
from
sqlalchemy.orm
import
sessionmaker
from
sqlalchemy
import
create_engine
Base
=
declarative_base()
class
User(Base):
__tablename__
=
'users'
id
=
Column(Integer, primary_key
=
True
)
name
=
Column(String(
50
))
# 寻找Base的所有子类,按照子类的结构在数据库中生成对应的数据表信息
# Base.metadata.create_all(engine)
Session
=
sessionmaker(bind
=
engine)
session
=
Session()
# ########## 增 ##########
# u = User(id=2, name='sb')
# session.add(u)
# session.add_all([
# User(id=3, name='sb'),
# User(id=4, name='sb')
# ])
# session.commit()
# ########## 删除 ##########
# session.query(User).filter(User.id > 2).delete()
# session.commit()
# ########## 修改 ##########
# session.query(User).filter(User.id > 2).update({'cluster_id' : 0})
# session.commit()
# ########## 查 ##########
# ret = session.query(User).filter_by(name='sb').first()
# ret = session.query(User).filter_by(name='sb').all()
# print ret
# ret = session.query(User).filter(User.name.in_(['sb','bb'])).all()
# print ret
# ret = session.query(User.name.label('name_label')).all()
# print ret,type(ret)
# ret = session.query(User).order_by(User.id).all()
# print ret
# ret = session.query(User).order_by(User.id)[1:3]
# print ret
# session.commit()
|
外键关联
A one to many relationship places a foreign key on the child table referencing the parent.relationship() is then specified on the parent, as referencing a collection of items represented by the child
from sqlalchemy import Table, Column, Integer, ForeignKey
from sqlalchemy.orm import relationship
from sqlalchemy.ext.declarative import declarative_base

Base = declarative_base()
|
1
2
3
4
5
6
7
8
9
|
<br>
class
Parent(Base):
__tablename__
=
'parent'
id
=
Column(Integer, primary_key
=
True
)
children
=
relationship(
"Child"
)
class
Child(Base):
__tablename__
=
'child'
id
=
Column(Integer, primary_key
=
True
)
parent_id
=
Column(Integer, ForeignKey(
'parent.id'
))
|
To establish a bidirectional relationship in one-to-many, where the “reverse” side is a many to one, specify an additional relationship() and connect the two using therelationship.back_populates parameter:
|
1
2
3
4
5
6
7
8
9
10
|
class
Parent(Base):
__tablename__
=
'parent'
id
=
Column(Integer, primary_key
=
True
)
children
=
relationship(
"Child"
, back_populates
=
"parent"
)
class
Child(Base):
__tablename__
=
'child'
id
=
Column(Integer, primary_key
=
True
)
parent_id
=
Column(Integer, ForeignKey(
'parent.id'
))
parent
=
relationship(
"Parent"
, back_populates
=
"children"
)
|
Child will get a parent attribute with many-to-one semantics.
Alternatively, the backref option may be used on a single relationship() instead of usingback_populates:
|
1
2
3
4
|
class
Parent(Base):
__tablename__
=
'parent'
id
=
Column(Integer, primary_key
=
True
)
children
=
relationship(
"Child"
, backref
=
"parent"
)
|
附,原生sql join查询
几个Join的区别 http://stackoverflow.com/questions/38549/difference-between-inner-and-outer-joins
- INNER JOIN: Returns all rows when there is at least one match in BOTH tables
- LEFT JOIN: Return all rows from the left table, and the matched rows from the right table
- RIGHT JOIN: Return all rows from the right table, and the matched rows from the left table
|
1
|
select
host.id,hostname,ip_addr,port,host_group.
name
from
host
right
join
host_group
on
host.id = host_group.host_id
|
in SQLAchemy
|
1
|
session.query(Host).
join
(Host.host_groups).filter(HostGroup.
name
==
't1'
).group_by(
"Host"
).
all
()
|
group by 查询
|
1
|
select
name
,
count
(host.id)
as
NumberOfHosts
from
host
right
join
host_group
on
host.id= host_group.host_id
group
by
name
;
|
in SQLAchemy
|
1
2
3
4
5
6
|
from
sqlalchemy import func
session.query(HostGroup, func.
count
(HostGroup.
name
)).group_by(HostGroup.
name
).
all
()
#another example
session.query(func.
count
(
User
.
name
),
User
.
name
).group_by(
User
.
name
).
all
()
SELECT
count
(users.
name
)
AS
count_1, users.
name
AS
users_name
FROM
users
GROUP
BY
users.
name
|