Android studio 2.2版本以后对C/C++的支持可以说很方便了,当然官方推荐使用Cmake完成对C/C++的支持
2.2版本以上的同学新建一个项目就知道了,步骤如下:
File -> New -> New Project,如下图:
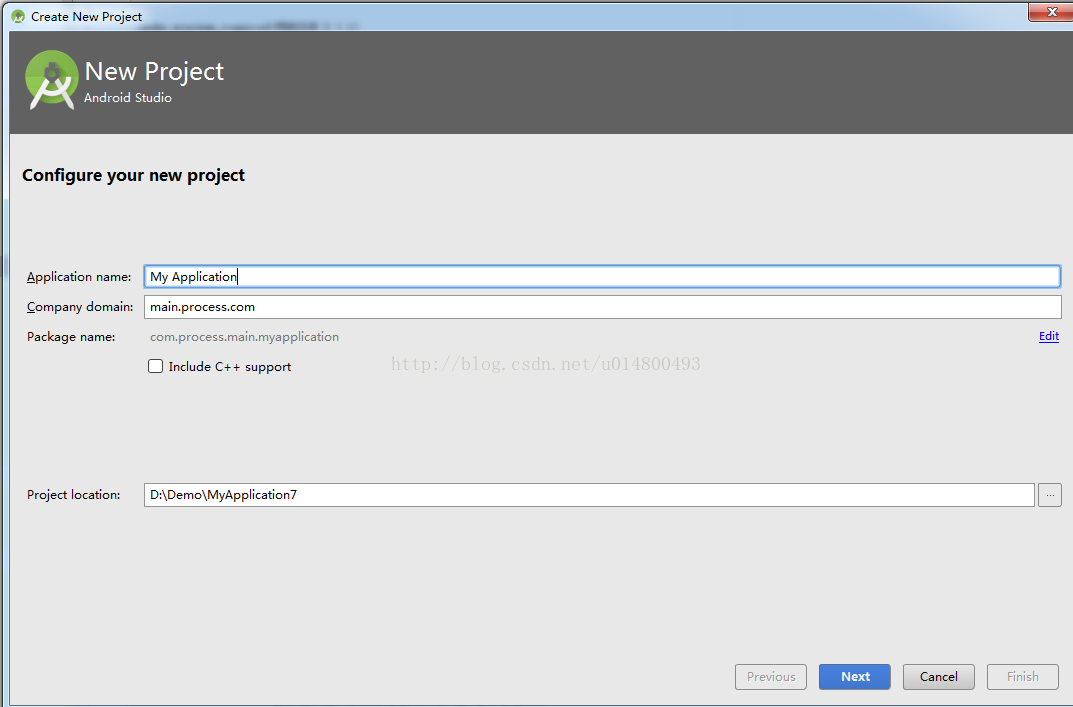
然后勾选Include C++ support,一直next ,最后Finish以后,项目就出现了,和一般的项目略有不同,其实只要多了几个文件,而已:
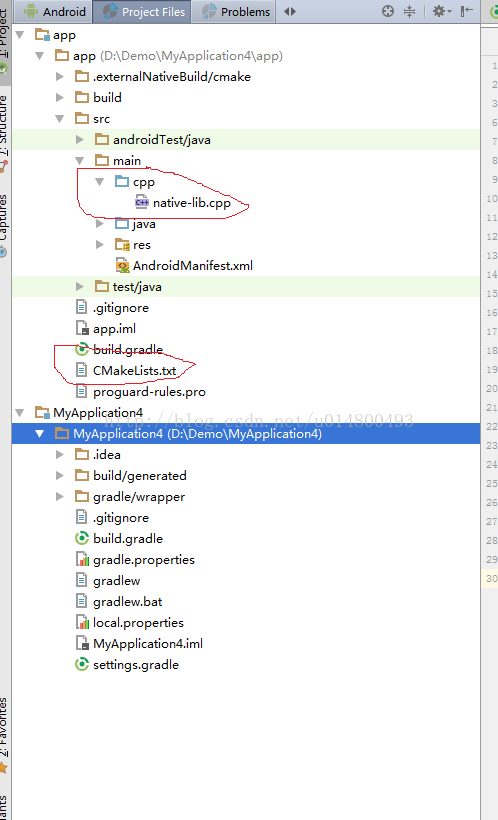
1:目录下多了个CmakeLists.txt文件
2:src目录下多了一个cpp目录,里面有个.cpp文件,C++文件都是以.cpp结尾的。
3:就是build.gradle内容中添加了几行配置
一一解读一下,先来看看CmakeLists.txt 文件里面的内容是什么:
# For more information about using CMake with Android Studio, read the
# documentation: https://d.android.com/studio/projects/add-native-code.html

# Sets the minimum version of CMake required to build the native library.

cmake_minimum_required(VERSION 3.4.1)

# Creates and names a library, sets it as either STATIC
# or SHARED, and provides the relative paths to its source code.
# You can define multiple libraries, and CMake builds them for you.
# Gradle automatically packages shared libraries with your APK.

add_library( # Sets the name of the library.
             native-lib

             # Sets the library as a shared library.
             SHARED

             # Provides a relative path to your source file(s).
             src/main/cpp/native-lib.cpp )
# Searches for a specified prebuilt library and stores the path as a
# variable. Because CMake includes system libraries in the search path by
# default, you only need to specify the name of the public NDK library
# you want to add. CMake verifies that the library exists before
# completing its build.
find_library( # Sets the name of the path variable.
              log-lib
              # Specifies the name of the NDK library that
              # you want CMake to locate.
              log )
# Specifies libraries CMake should link to your target library. You
# can link multiple libraries, such as libraries you define in this
# build script, prebuilt third-party libraries, or system libraries.
target_link_libraries( # Specifies the target library.
                       native-lib
                       # Links the target library to the log library
                       # included in the NDK.
                       ${log-lib} )
这里有设置Cmake版本啊,引用的cpp文件的路径啊等等,如果自己引用的话 其实值需要修改引用的cpp路径即可,
其他的暂时不需要动
看下native_lib.cpp文件内容:
#include <jni.h>
#include <string>

extern "C"
JNIEXPORT jstring JNICALL
Java_com_process_main_myapplication_MainActivity_stringFromJNI(
        JNIEnv* env,
        jobject /* this */) {
    std::string hello = "Hello from C++";
    return env->NewStringUTF(hello.c_str());
}
很简单 其实就是输出Hello from C++这段文字:
再看下build.gradle的配置改变:
apply plugin: 'com.android.application'

android {
    compileSdkVersion 25
    buildToolsVersion "25.0.2"
    defaultConfig {
        applicationId "com.process.main.myapplication"
        minSdkVersion 22
        targetSdkVersion 25
        versionCode 1
        versionName "1.0"
        testInstrumentationRunner "android.support.test.runner.AndroidJUnitRunner"
        externalNativeBuild {
            cmake {
                cppFlags ""
            }
        }
    }
    buildTypes {
        release {
            minifyEnabled false
            proguardFiles getDefaultProguardFile('proguard-android.txt'), 'proguard-rules.pro'
        }
    }
    externalNativeBuild {
        cmake {
            path "CMakeLists.txt"
        }
    }
}

dependencies {
    compile fileTree(dir: 'libs', include: ['*.jar'])
    androidTestCompile('com.android.support.test.espresso:espresso-core:2.2.2', {
        exclude group: 'com.android.support', module: 'support-annotations'
    })
    compile 'com.android.support:appcompat-v7:25.1.1'
    compile 'com.android.support.constraint:constraint-layout:1.0.0-beta4'
    testCompile 'junit:junit:4.12'
}
主要多了两个地方的改变:
1:defaultConfig中添加:
externalNativeBuild {
            cmake {
                cppFlags ""
            }
        }
2:在android{}中添加:
externalNativeBuild {
    cmake {
        path "CMakeLists.txt"
    }
}
其实也就是引用CmakeLists.txt文件。
说到这里,大致知道C++项目的大致结构了。那么原始项目怎么添加C++呢,步骤如下:
1,现在src/main目录下新建cpp目录和java目录同级,然后在cpp目录中新建一个.cpp文件,这里以native-lib.cpp为例子直接copy进去
2,右键项目(选中项目,然后右键)如下:

选择第二个Link C++ Project with Gradle,出现以下界面:

关于Project Path是选择CmakeLists.txt文件的路径,这里先把之前的CmakeLists.txt文件直接copy过来,然后相应的修改即可:

选择CmakeLists文件然后点击OK按钮。修改CmakeLists.txt文件中的cpp文件引用目录即可(add_library {第三行})。
接下来,在java代码中调用C++代码啦,看下MainActivity中的代码:
public class MainActivity extends AppCompatActivity {

    @Override
    protected void onCreate(Bundle savedInstanceState) {
        super.onCreate(savedInstanceState);
        setContentView(R.layout.activity_main);

    // Example of a call to a native method
    TextView tv = (TextView) findViewById(R.id.sample_text);
    tv.setText(stringFromJNI());
    }

    /**
     * A native method that is implemented by the 'native-lib' native library,
     * which is packaged with this application.
     */
    public native String stringFromJNI();

    // Used to load the 'native-lib' library on application startup.
    static {
        System.loadLibrary("native-lib");
    }
}
这里注意System.loadLibrary("native-lib"),加载(native-lib)Library,这里是CmakeLists文件中配置好的Library名字要对应。
然后就是native调用stringFromJNI ()方法啦》
最后编译一下app,Make Project build一下,然后run到手机上就可以运行了。
这里有同学想问那.so文件在哪里找啊 ,如下图:

这里的so文件就可以用到其他项目中啦;
至此一个简单的使用C++项目就完成啦