环境:
jdk1.8;spring boot2.0.2;Maven3.3
摘要说明:
前面我们已经主要讲述如何进行接口开发,接口开发之后如何进行页面渲染?
spring boot默认不支持jsp;主要支持下面渲染模版:
- Thymeleaf
- FreeMarker
- Velocity
- Groovy
- Mustache
本篇文章主要讲述如何配置使用Thymeleaf模版引擎进行页面渲染;
Thymeleaf是一个XML/XHTML/HTML5模板引擎,可用于Web与非Web环境中的应用开发。它是一个开源的Java库,基于Apache License 2.0许可,由Daniel Fernández创建,该作者还是Java加密库Jasypt的作者。
步骤:
1.依赖
引入依赖:
		<!-- 引入thymeleaf渲染模板 -->
		<dependency>
			<groupId>org.springframework.boot</groupId>
			<artifactId>spring-boot-starter-thymeleaf</artifactId>
		</dependency>
这里先阐述下Thymeleaf可以使用的mode如下:
- XML
- Valid XML
- XHTML
- Valid XHTML
- HTML5(默认)
- Legacy HTML5
由于除了Legacy HTML5之外,其他模式都必须是闭合的(标签),也就是说不支持不规范的HTML标签写法;
对于配置了Legacy HTML5模式的情况,Legacy HTML5先转换为规范写法的H5,so官方建议使用H5的代码来写模板;
这里说的使用Legacy HTML5需要另外引入依赖:
<dependency>
      <groupId>net.sourceforge.nekohtml</groupId>
      <artifactId>nekohtml</artifactId>
      <version>1.9.22</version>
</dependency>2.Thymeleaf配置
渲染页面首先需要放置静态页面;
Spring Boot默认提供静态资源目录位置需置于classpath下即放置在src/main/resources/下,目录名需符合如下规则:‘
- /static
- /public
- /resources
- /META-INF/resources
本篇文章使用常用的static;
Thymeleaf配置如下,主要指定前后缀及缓存:
#<!-- 关闭thymeleaf缓存 开发时使用 否则没有实时画面-->
spring.thymeleaf.cache=false
## 检查模板是否存在,然后再呈现
spring.thymeleaf.check-template-location=true
#Content-Type值
spring.thymeleaf.content-type=text/html
#启用MVC Thymeleaf视图分辨率
spring.thymeleaf.enabled=true
# 在构建URL时预先查看名称的前缀
spring.thymeleaf.prefix=classpath:/static/
# 构建URL时附加查看名称的后缀.
spring.thymeleaf.suffix=.html
## 应该从解决方案中排除的视图名称的逗号分隔列表
#spring.thymeleaf.excluded-view-names=
#模板编码默认为html5
#spring.thymeleaf.mode=LEGACYHTML5
# 链中模板解析器的顺序
#spring.thymeleaf.template-resolver-order=o
# 可以解析的视图名称的逗号分隔列表
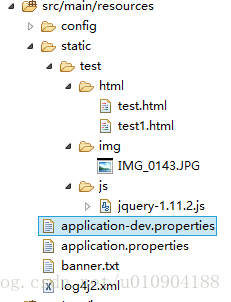
#spring.thymeleaf.view-names=3.页面开发
静态资源开发结构如下:
两种方式访问页面;
一、直接访问页面,如http://127.0.0.1:xxxx/xx/test/html/test.html
<!DOCTYPE html>
<html>
<head>
<meta charset="UTF-8">
<title>Insert title here</title>
<script type="text/javascript" src="../js/jquery-1.11.2.js"></script>
<script>
	$(function() {
		$.ajax({
			async : false,
			type : "post",
			url : "../../swagger-resources/",
			data : null,
			dataType : 'json',
			success : function(data) {
				console.log(data);
			},
			error : function() {
				alert("请求服务超时");
			}
		});
	});
</script>
</head>
<body>
	<image src="../img/IMG_0143.JPG"></image>
</body>
</html>
二、通过controller进行跳转,同时使用Thymeleaf标签,如http://127.0.0.1:xxxx/xx/test1:
这里面注意的是使用@Controller注解而不是@RestController;因为后者默认返回json类型;
import org.springframework.stereotype.Controller;
import org.springframework.ui.ModelMap;
import org.springframework.web.bind.annotation.RequestMapping;

@Controller//注意这里是@Controller而不是@RestController
public class TestThymeleafController {
    @RequestMapping("/test1")
    public String index(ModelMap map) {
        // 加入一个属性,用来在模板中读取
        map.addAttribute("host", "https://blog.csdn.net/u010904188/");
        // return模板文件的名称,对应src\main\resources\static\test\html\test1.html
        return "test/html/test1";
    }
}
静态页面如下:
<!DOCTYPE html>
<html>
<head>
<meta charset="UTF-8">
<title>Insert title here</title>
</head>
<body>
	<h1 th:text="${host}">Hello World</h1>
</body>
</html>4.Thymeleaf常用标签
常用的标签有:
| 关键字 | 功能介绍 | 案例 |
| th:id | 替换id | <input th:id="'xxx' + ${collect.id}"/> |
| th:text | 文本替换 | <p th:text="${collect.description}">description</p> |
| th:utext | 支持html的文本替换 | <p th:utext="${htmlcontent}">conten</p> |
| th:object | 替换对象 | <div th:object="${session.user}"> |
| th:value | 属性赋值 | <input th:value="${user.name}" /> |
| th:with | 变量赋值运算 | <div th:with="isEven=${prodStat.count}%2==0"></div> |
| th:style | 设置样式 | th:style="'display:' + @{(${sitrue} ? 'none' : 'inline-block')} + ''" |
| th:onclick | 点击事件 | th:onclick="'getCollect()'" |
| th:each | 属性赋值 | tr th:each="user,userStat:${users}"> |
| th:if | 判断条件 | <a th:if="${userId == collect.userId}" > |
| th:unless | 和th:if判断相反 | <a th:href="@{/login}" th:unless=${session.user != null}>Login</a> |
| th:href | 链接地址 | <a th:href="@{/login}" th:unless=${session.user != null}>Login</a> /> |
| th:switch | 多路选择 配合th:case 使用 | <div th:switch="${user.role}"> |
| th:case | th:switch的一个分支 | <p th:case="'admin'">User is an administrator</p> |
| th:fragment | 布局标签,定义一个代码片段,方便其它地方引用 | <div th:fragment="alert"> |
| th:include | 布局标签,替换内容到引入的文件 | <head th:include="layout :: htmlhead" th:with="title='xx'"></head> |
| th:replace | 布局标签,替换整个标签到引入的文件 | <div th:replace="fragments/header :: title"></div> |
| th:selected | selected选择框选中 | th:selected="(${xxx.id} == ${configObj.dd})" |
| th:src | 图片类地址引入 | <img class="img-responsive" alt="App Logo" th:src="@{/img/logo.png}" /> |
| th:inline | 定义js脚本可以使用变量 | <script type="text/javascript" th:inline="javascript"> |
| th:action | 表单提交的地址 | <form action="subscribe.html" th:action="@{/subscribe}"> |
| th:attr | 设置标签属性,多个属性可以用逗号分隔 | 比如 th:attr="src=@{/image/aa.jpg},title=#{logo}",此标签不太优雅,一般用的比较少。 |
常用数据类型:
- #dates:日期格式化内置对象,具体方法可以参照java.util.Date;
- #calendars:类似于#dates,但是是java.util.Calendar类的方法;
- #numbers: 数字格式化;
- #strings:字符串格式化,具体方法可以参照java.lang.String,如startsWith、contains等;
- #objects:参照java.lang.Object;
- #bools:判断boolean类型的工具;
- #arrays:数组操作的工具;
- #lists:列表操作的工具,参照java.util.List;
- #sets:Set操作工具,参照java.util.Set;
- #maps:Map操作工具,参照java.util.Map;
- #aggregates:操作数组或集合的工具;
- #messages:操作消息的工具。
更多可参考:https://www.thymeleaf.org/doc/tutorials/2.1/usingthymeleaf.html#standard-expression-syntax